
Owner's Manual
Page 3
... tasted. TABLE OF CONTENTS 1 Introduction to the Flat Panel Displays 6 1.1 Flat Panel Display Shipment Checklist ...6 1.2 Control Options: Get to Know Your Flat Panel Display 7 1.2.1 Control Buttons and More on the Flat Panel Display 7 1.2.2 Operating the Remote Control ...9 1.2.3 Buttons on your purchase of a Pioneer KURO monitor. English TABLE OF CONTENTS Congratulations on the Remote Control ...11 2 Install Your Flat Panel Display ...13 2.1 Use the Optional Table Top Stand...
... tasted. TABLE OF CONTENTS 1 Introduction to the Flat Panel Displays 6 1.1 Flat Panel Display Shipment Checklist ...6 1.2 Control Options: Get to Know Your Flat Panel Display 7 1.2.1 Control Buttons and More on the Flat Panel Display 7 1.2.2 Operating the Remote Control ...9 1.2.3 Buttons on your purchase of a Pioneer KURO monitor. English TABLE OF CONTENTS Congratulations on the Remote Control ...11 2 Install Your Flat Panel Display ...13 2.1 Use the Optional Table Top Stand...
Owner's Manual
Page 4
... With Your Flat Panel Display 50 6.1 Program the Remote Control to Operate Other Equipment 50 6.1.1 Use the Learning Function ...50 6.1.2 Assign a Manufacturing Code to the Remote Control 51 6.1.3 Issue a Library Search for a Manufacturer Code 51 6.1.4 Clear Added Manufacturer Codes from the Remote Control 52 6.1.5 Control a Pioneer Receiver ...52...62 6.4.2 Control a Recorder ...63 6.4.3 Control a Player...63 6.4.4 Add an AV Amp or a BD Player...64 6.5 Specific KURO LINK Commands ...65 6.5.1 Play Source Sound Using an HDMI Command 65 6.5.2 Turn OFF the Power With an HDMI Command 65 6.5.3 ...
... With Your Flat Panel Display 50 6.1 Program the Remote Control to Operate Other Equipment 50 6.1.1 Use the Learning Function ...50 6.1.2 Assign a Manufacturing Code to the Remote Control 51 6.1.3 Issue a Library Search for a Manufacturer Code 51 6.1.4 Clear Added Manufacturer Codes from the Remote Control 52 6.1.5 Control a Pioneer Receiver ...52...62 6.4.2 Control a Recorder ...63 6.4.3 Control a Player...63 6.4.4 Add an AV Amp or a BD Player...64 6.5 Specific KURO LINK Commands ...65 6.5.1 Play Source Sound Using an HDMI Command 65 6.5.2 Turn OFF the Power With an HDMI Command 65 6.5.3 ...
Owner's Manual
Page 11
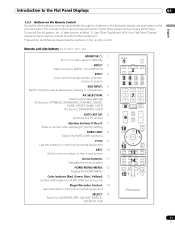
... the PC screen Number buttons 0 thru 9: 7 Enter a number when applying IP Control Setting KURO LINK: 8 Select the KURO LINK functions P/CH: 9 Use the button for control of connected equipment EXIT: 10 Exit the menu to return to the Flat Panel Displays 01 English 1.2.3 Buttons on the Remote Control Except for MONITOR, STB, CBL/SAT, BDP...
... the PC screen Number buttons 0 thru 9: 7 Enter a number when applying IP Control Setting KURO LINK: 8 Select the KURO LINK functions P/CH: 9 Use the button for control of connected equipment EXIT: 10 Exit the menu to return to the Flat Panel Displays 01 English 1.2.3 Buttons on the Remote Control Except for MONITOR, STB, CBL/SAT, BDP...
Owner's Manual
Page 12
01 Introduction to the Flat Panel Displays Remote: Right side buttons (top to bottom, left to right) MONITOR INPUT 1 2 3 16 4 5 6 7 8 SUB PIP 17 18 SPLIT INPUT SWAP SHIFT AV AUTO SCREEN 19 20 SELECTION SETUP FREEZE SIZE 1 2 3 4 5 6 7 8 9 KURO LINK 0 21CH ENTER 22 DISPLAY INFO 23 P/CH MUTING 24 EXIT TOP...buttons (except arrow buttons and the ENTER button) Lights turn off the sound while the video continues to play 25 USER MENU/TOOLS: Display the User Menu 26 ENTER: Execute a command 27 RETURN: Return to the previous menu screen Note: If you set the preset code...
01 Introduction to the Flat Panel Displays Remote: Right side buttons (top to bottom, left to right) MONITOR INPUT 1 2 3 16 4 5 6 7 8 SUB PIP 17 18 SPLIT INPUT SWAP SHIFT AV AUTO SCREEN 19 20 SELECTION SETUP FREEZE SIZE 1 2 3 4 5 6 7 8 9 KURO LINK 0 21CH ENTER 22 DISPLAY INFO 23 P/CH MUTING 24 EXIT TOP...buttons (except arrow buttons and the ENTER button) Lights turn off the sound while the video continues to play 25 USER MENU/TOOLS: Display the User Menu 26 ENTER: Execute a command 27 RETURN: Return to the previous menu screen Note: If you set the preset code...
Owner's Manual
Page 26
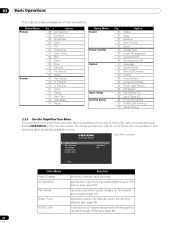
... Setup 1/2 Input Setup 2/2 IP Control Setting KURO LINK Setting Serial Setting 3.2.3 Use the Simplified User Menu For simplified menu selections, the User Menu provides quick access to "3.2.2 Explore the Home Menu". USER MENU FLAT PANEL DISPLAY User Menu screen Input Change AV Selection Film ...Mode Sleep Timer KURO LINK : Standard : Off Exit User Menu Input Change AV Selection Film Mode Sleep Timer KURO LINK Function switches external input sources selects from eight...
... Setup 1/2 Input Setup 2/2 IP Control Setting KURO LINK Setting Serial Setting 3.2.3 Use the Simplified User Menu For simplified menu selections, the User Menu provides quick access to "3.2.2 Explore the Home Menu". USER MENU FLAT PANEL DISPLAY User Menu screen Input Change AV Selection Film ...Mode Sleep Timer KURO LINK : Standard : Off Exit User Menu Input Change AV Selection Film Mode Sleep Timer KURO LINK Function switches external input sources selects from eight...

Owner's Manual
Page 53
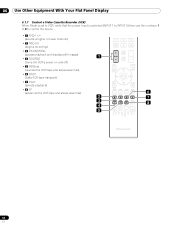
... 8 9 KURO LINK 0 CH ENTER 5 DISPLAY INFO 2 P/CH MUTING EXIT USER MENU TOP MENU GUIDE TOOLS 3 ENTER HOME MENU MENU RETURN 6 ONDEMAND FAVORITE SOURCE 4 DVD/HDD RECEIVER VOL INPUT SELECT BDP EDIT/LEARN MONITOR STB LD VCR CBL DVD SAT DVR 53 En Use Other Equipment With Your Flat Panel Display 06 English ...) • 6 RETURN (restores the immediately previous screen) * Some cable converter manufacturers do not preset CH ENTER. However, the panel only recognizes a single system (cable or satellite) at a time. • 1 Number buttons (press to CBL/SAT, a cable converter uses the...
... 8 9 KURO LINK 0 CH ENTER 5 DISPLAY INFO 2 P/CH MUTING EXIT USER MENU TOP MENU GUIDE TOOLS 3 ENTER HOME MENU MENU RETURN 6 ONDEMAND FAVORITE SOURCE 4 DVD/HDD RECEIVER VOL INPUT SELECT BDP EDIT/LEARN MONITOR STB LD VCR CBL DVD SAT DVR 53 En Use Other Equipment With Your Flat Panel Display 06 English ...) • 6 RETURN (restores the immediately previous screen) * Some cable converter manufacturers do not preset CH ENTER. However, the panel only recognizes a single system (cable or satellite) at a time. • 1 Number buttons (press to CBL/SAT, a cable converter uses the...
Owner's Manual
Page 54
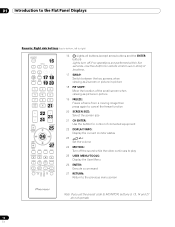
06 Use Other Equipment With Your Flat Panel Display 6.1.7 Control a Video Cassette Recorder (VCR) When...P/CH +/- (selects a higher or lower channel) • 2 RECord (begins recording) • 3 PAUSE/STILL (pauses playback and displays still images) • 4 SOURCE (turns the VCR's power on and off) • 5 REWind (rewinds the VCR tape and... • 7 PLAY (selects playback) • 8 FF (advances the VCR tape and allows searches) 7 8 9 KURO LINK 0 CH ENTER DISPLAY INFO 1 P/CH MUTING EXIT USER MENU TOP MENU GUIDE HOME MENU ENTER TOOLS RETURN MENU 6 2 ONDEMAND FAVORITE 7 ...
06 Use Other Equipment With Your Flat Panel Display 6.1.7 Control a Video Cassette Recorder (VCR) When...P/CH +/- (selects a higher or lower channel) • 2 RECord (begins recording) • 3 PAUSE/STILL (pauses playback and displays still images) • 4 SOURCE (turns the VCR's power on and off) • 5 REWind (rewinds the VCR tape and... • 7 PLAY (selects playback) • 8 FF (advances the VCR tape and allows searches) 7 8 9 KURO LINK 0 CH ENTER DISPLAY INFO 1 P/CH MUTING EXIT USER MENU TOP MENU GUIDE HOME MENU ENTER TOOLS RETURN MENU 6 2 ONDEMAND FAVORITE 7 ...
Owner's Manual
Page 55
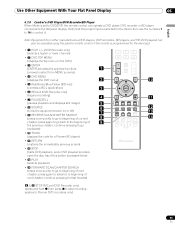
...DVD playback, some DVD players/recorders open the disc tray if this button is programmed for fast forward) 7 8 9 KURO LINK 0 CH ENTER P/CH DISPLAY INFO MUTING EXIT TOP MENU GUIDE HOME MENU MENU USER MENU TOOLS ENTER RETURN ONDEMAND FAVORITE SOURCE DVD/HDD RECEIVER VOL ...8226; 14 FORWARD SCAN/CHAPTER SEARCH (press once quickly to go back to beginning of next chapter; press again to advance to the flat panel display. continue pressing to go to Pioneer DVD recorders only) 55 En continue pressing for the device(s). • 1 P/CH +/- (DVD Recorder only) (selects a higher ...
...DVD playback, some DVD players/recorders open the disc tray if this button is programmed for fast forward) 7 8 9 KURO LINK 0 CH ENTER P/CH DISPLAY INFO MUTING EXIT TOP MENU GUIDE HOME MENU MENU USER MENU TOOLS ENTER RETURN ONDEMAND FAVORITE SOURCE DVD/HDD RECEIVER VOL ...8226; 14 FORWARD SCAN/CHAPTER SEARCH (press once quickly to go back to beginning of next chapter; press again to advance to the flat panel display. continue pressing to go to Pioneer DVD recorders only) 55 En continue pressing for the device(s). • 1 P/CH +/- (DVD Recorder only) (selects a higher ...
Owner's Manual
Page 58
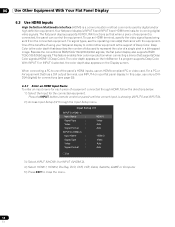
... 5 and INPUT 6). 2 ) Access Input Setup 2/2 through HDMI, follow the directions below. 1 ) Select the Input for incoming digital video signals. The flat panel display supports KURO LINK functions so that when a piece of the panel's HDMI inputs, use an HDMI terminal, specify the video signal types being sent from the connected equipment. Besides the conventional RGB...
... 5 and INPUT 6). 2 ) Access Input Setup 2/2 through HDMI, follow the directions below. 1 ) Select the Input for incoming digital video signals. The flat panel display supports KURO LINK functions so that when a piece of the panel's HDMI inputs, use an HDMI terminal, specify the video signal types being sent from the connected equipment. Besides the conventional RGB...
Owner's Manual
Page 60
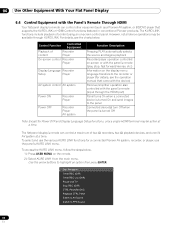
...TV Stop REC (DVR) CTRL Panel(AV-SYS) Playback CTRL Panel Switch to AV Sound Switch to highlight an option then press ENTER. Use the arrow buttons to FPD Sound 60 En The flat panel display's remote can control other equipment such as a Pioneer AV system, or BD/DVD player... that came with the device) Receiver/amplifier operation also controlled with the panel's remote (input through KURO LINK. To select and use the various KURO LINK functions for Power OFF and Display Language ...
...TV Stop REC (DVR) CTRL Panel(AV-SYS) Playback CTRL Panel Switch to AV Sound Switch to highlight an option then press ENTER. Use the arrow buttons to FPD Sound 60 En The flat panel display's remote can control other equipment such as a Pioneer AV system, or BD/DVD player... that came with the device) Receiver/amplifier operation also controlled with the panel's remote (input through KURO LINK. To select and use the various KURO LINK functions for Power OFF and Display Language ...
Owner's Manual
Page 61
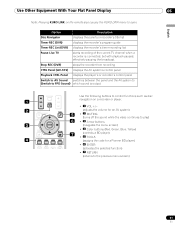
...to FPD Sound) which sound is connected, but with playback paused, effectively pausing the broadcast. Use Other Equipment With Your Flat Panel Display 06 English Note: Pressing KURO LINK on a recorder or player. 1 • 1 VOL +/- 2 (adjusts the volume for an AV system) ...the code for a Pioneer BD player) • 6 ENTER (activates the selected function) • 7 RETURN (returns to open. Option Description Disc Navigator displays the panel's or recorder's title list Timer REC (DVR) displays the recorder's program guide Timer REC List (DVR) displays the recorder's timer...
...to FPD Sound) which sound is connected, but with playback paused, effectively pausing the broadcast. Use Other Equipment With Your Flat Panel Display 06 English Note: Pressing KURO LINK on a recorder or player. 1 • 1 VOL +/- 2 (adjusts the volume for an AV system) ...the code for a Pioneer BD player) • 6 ENTER (activates the selected function) • 7 RETURN (returns to open. Option Description Disc Navigator displays the panel's or recorder's title list Timer REC (DVR) displays the recorder's program guide Timer REC List (DVR) displays the recorder's timer...
Owner's Manual
Page 62
... through the Control Setup menu. 2 ) Select Input Setting from the submenu. 06 Use Other Equipment With Your Flat Panel Display To connect a device for KURO LINK, follow the steps below for installation notes and the supported commands. 6.4.1 Control an AV System When adding ... When connecting to the sections below . 1 ) Access KURO LINK Setting through the HDMI terminal(s). 5 ) Turn Off the flat panel display. 6 ) Pause for a few seconds before turning the panel back on the flat panel display and all equipment is set for KURO LINK. 4 ) Check that the other than that selected...
... through the Control Setup menu. 2 ) Select Input Setting from the submenu. 06 Use Other Equipment With Your Flat Panel Display To connect a device for KURO LINK, follow the steps below for installation notes and the supported commands. 6.4.1 Control an AV System When adding ... When connecting to the sections below . 1 ) Access KURO LINK Setting through the HDMI terminal(s). 5 ) Turn Off the flat panel display. 6 ) Pause for a few seconds before turning the panel back on the flat panel display and all equipment is set for KURO LINK. 4 ) Check that the other than that selected...

Owner's Manual
Page 63
... menu then select the function again. Exit 4 6.4.2 Control a Recorder Press ENTER to start playback or press KURO LINK to return to the menu. Use Other Equipment With Your Flat Panel Display 06 English During playback, use (Play), (Stop), (Pause), (Fast Forward) and (Fast Reverse) on the remote control to...
... menu then select the function again. Exit 4 6.4.2 Control a Recorder Press ENTER to start playback or press KURO LINK to return to the menu. Use Other Equipment With Your Flat Panel Display 06 English During playback, use (Play), (Stop), (Pause), (Fast Forward) and (Fast Reverse) on the remote control to...
Owner's Manual
Page 65
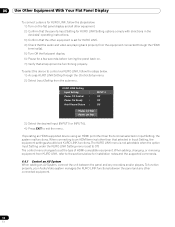
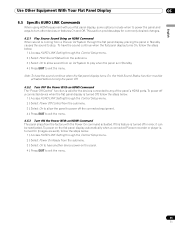
...Ready from the submenu. 3 ) Select On to have another device power-on the flat panel display automatically when a connected Pioneer recorder or player is coming from an AV System to play when the panel is valid for the devices connected to exit the menu. 65 En To power on... sent), follow the steps below . 1 ) Access KURO LINK Setting through the flat panel display, placing the panel in Standby. 4 ) Press EXIT to stop. Note: To have the sound continue when the flat panel display turns On, follow the steps below . 1 ) Access KURO LINK Setting through the Control Setup menu. 2 ) Select...
...Ready from the submenu. 3 ) Select On to have another device power-on the flat panel display automatically when a connected Pioneer recorder or player is coming from an AV System to play when the panel is valid for the devices connected to exit the menu. 65 En To power on... sent), follow the steps below . 1 ) Access KURO LINK Setting through the flat panel display, placing the panel in Standby. 4 ) Press EXIT to stop. Note: To have the sound continue when the flat panel display turns On, follow the steps below . 1 ) Access KURO LINK Setting through the Control Setup menu. 2 ) Select...
Owner's Manual
Page 66
... the steps below. 1 ) Access KURO LINK Setting through INPUT 1. To watch an image coming from the submenu. Each device must be used. 6.7 Use the IR REPEATER OUT Connecting control cables between the flat panel display and other Pioneer equipment allows you to Recognize a Game... Console." If the Power On/Off Test fails, check the connection points and the settings. 6.6 Connect a Game Console or Camcorder Your flat panel display supplies direct connections for this ...
... the steps below. 1 ) Access KURO LINK Setting through INPUT 1. To watch an image coming from the submenu. Each device must be used. 6.7 Use the IR REPEATER OUT Connecting control cables between the flat panel display and other Pioneer equipment allows you to Recognize a Game... Console." If the Power On/Off Test fails, check the connection points and the settings. 6.6 Connect a Game Console or Camcorder Your flat panel display supplies direct connections for this ...
Owner's Manual
Page 68
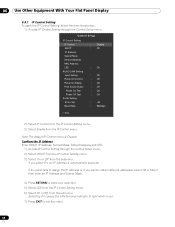
...On, an IP Address is Disable. Control Setup IP Control Setting IP Control DHCP IP Address Subnet Mask Default Gateway MAC Address LED KURO LINK Setting Input Setting Power Off Control Power On Ready Hold Sound Status Power On Test Power Off Test Serial Setting ID No....DHCP, IP Address, Subnet Mask, Default Gateway and LED. 1 ) Access IP Control Setting through the Control Setup menu. 06 Use Other Equipment With Your Flat Panel Display 6.8.1 IP Control Setting To apply the IP Control Setting, follow the directions below. 1 ) Access IP Control Setting through the Control Setup menu. 2 )...
...On, an IP Address is Disable. Control Setup IP Control Setting IP Control DHCP IP Address Subnet Mask Default Gateway MAC Address LED KURO LINK Setting Input Setting Power Off Control Power On Ready Hold Sound Status Power On Test Power Off Test Serial Setting ID No....DHCP, IP Address, Subnet Mask, Default Gateway and LED. 1 ) Access IP Control Setting through the Control Setup menu. 06 Use Other Equipment With Your Flat Panel Display 6.8.1 IP Control Setting To apply the IP Control Setting, follow the directions below. 1 ) Access IP Control Setting through the Control Setup menu. 2 )...
Owner's Manual
Page 71
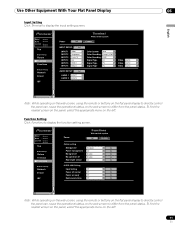
...KURO LINK Setting Input Setting : Off Set Power off control : Off Set Power on ready : Off Set Hold sound status : Off Set Note: While operating on the web screen, using the remote or buttons on the flat panel display to differ from the panel status. Use Other Equipment With Your Flat Panel Display... Input Setting Click Terminal to display the function setting screen. To find the needed screen on the panel, select the appropriate menu on the...
...KURO LINK Setting Input Setting : Off Set Power off control : Off Set Power on ready : Off Set Hold sound status : Off Set Note: While operating on the web screen, using the remote or buttons on the flat panel display to differ from the panel status. Use Other Equipment With Your Flat Panel Display... Input Setting Click Terminal to display the function setting screen. To find the needed screen on the panel, select the appropriate menu on the...
Owner's Manual
Page 73
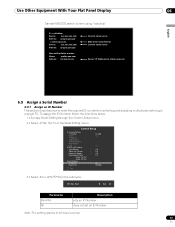
...Setup menu. 2 ) Select ID No. Control Setup IP Control Setting IP Control : DHCP : IP Address Subnet Mask Default Gateway MAC Address LED : KURO LINK Setting Input Setting : Power Off Control : Power On Ready : Hold Sound Status : Power On Test Power Off Test Serial Setting ID No.Set ... On On Off Off Off Off All 9600bps Exit 3 ) Select All or 00H-FFH from the Serial Setting menu. Use Other Equipment With Your Flat Panel Display 06 English Sample MS-DOS search screen using "nslookup" C:\> nslookup Server: xxx.xxx.xxx.com Adress: yyy.yyy.yyy.yyy > mailsv.aaa.com...
...Setup menu. 2 ) Select ID No. Control Setup IP Control Setting IP Control : DHCP : IP Address Subnet Mask Default Gateway MAC Address LED : KURO LINK Setting Input Setting : Power Off Control : Power On Ready : Hold Sound Status : Power On Test Power Off Test Serial Setting ID No.Set ... On On Off Off Off Off All 9600bps Exit 3 ) Select All or 00H-FFH from the Serial Setting menu. Use Other Equipment With Your Flat Panel Display 06 English Sample MS-DOS search screen using "nslookup" C:\> nslookup Server: xxx.xxx.xxx.com Adress: yyy.yyy.yyy.yyy > mailsv.aaa.com...
Owner's Manual
Page 82
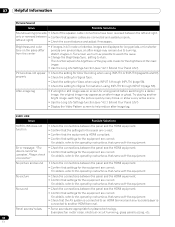
... side masks for the brightness of the main image. • Use the Long Life Settings function (see "4.2.1 Extend Your Panel Life") • Display the Video Pattern screen to the operating instructions that settings for the equipment are correct. Try playing another HDMI terminal. For details...that came with the equipment. only or reversed between the left and right) • Check the sound balance and adjust if necessary. KURO LINK Issue KURO LINK does not function Error message: "The device cannot be operated. For details, refer to avoid this issue. • Change the...
... side masks for the brightness of the main image. • Use the Long Life Settings function (see "4.2.1 Extend Your Panel Life") • Display the Video Pattern screen to the operating instructions that settings for the equipment are correct. Try playing another HDMI terminal. For details...that came with the equipment. only or reversed between the left and right) • Check the sound balance and adjust if necessary. KURO LINK Issue KURO LINK does not function Error message: "The device cannot be operated. For details, refer to avoid this issue. • Change the...
Owner's Manual
Page 83
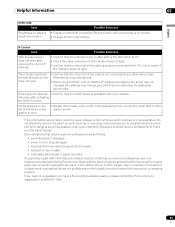
...KURO LINK Issue Brightness on the left of screen are uneven Possible Solutions • Display content that require a service professional are as follows: • panel dropped or damaged • power cord or plug damaged • liquid spilled or an object dropped into the panel... you need more assistance or have a Service/Parts-related question, please contact the Pioneer Service organization at (800) 421-1625. 83 En Upon completion of the cable ...open • Confirm that your flat panel display. Do not attempt to any service or repair work, request that the product is...
...KURO LINK Issue Brightness on the left of screen are uneven Possible Solutions • Display content that require a service professional are as follows: • panel dropped or damaged • power cord or plug damaged • liquid spilled or an object dropped into the panel... you need more assistance or have a Service/Parts-related question, please contact the Pioneer Service organization at (800) 421-1625. 83 En Upon completion of the cable ...open • Confirm that your flat panel display. Do not attempt to any service or repair work, request that the product is...