Owner's Manual
Page 2
Contents Before you start Information to User 3 After-sales service for Pioneer products 3 Visit our website 3 Before connecting/installing the amplifier 4 Setting the Unit What's what 5 Setting gain properly 5 Connecting the units Connection diagram 7 Before connecting the amplifier 7 About bridged mode 8 About suitable specification of speaker 8 Connecting ...input wire 10 Connecting the power terminal 11 Connecting the speaker output terminals 12 Installation Before installing the amplifier 13 Example of installation on the floor mat or chassis 13 Additional information Specifications 14 2 En
Contents Before you start Information to User 3 After-sales service for Pioneer products 3 Visit our website 3 Before connecting/installing the amplifier 4 Setting the Unit What's what 5 Setting gain properly 5 Connecting the units Connection diagram 7 Before connecting the amplifier 7 About bridged mode 8 About suitable specification of speaker 8 Connecting ...input wire 10 Connecting the power terminal 11 Connecting the speaker output terminals 12 Installation Before installing the amplifier 13 Example of installation on the floor mat or chassis 13 Additional information Specifications 14 2 En
Owner's Manual
Page 4
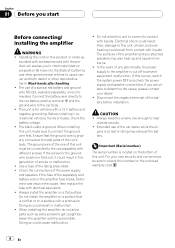
... surface with liquids. The black cable is located on the enclosed warranty card. 4 En Doing so could cause malfunction. ! When installing the amplifier, do not allow this unit to come into contact with a protrusion. If you are unable to determine the cause, please contact your own security...The surfaces of the rating prescribed. ! Extended use of smoke or malfunction. ! This unit is cut off to get caught between the amplifier and the automobile. Check the connections of the power supply and speakers if the fuse of the separately sold with accessories sold battery wire ...
... surface with liquids. The black cable is located on the enclosed warranty card. 4 En Doing so could cause malfunction. ! When installing the amplifier, do not allow this unit to come into contact with a protrusion. If you are unable to determine the cause, please contact your own security...The surfaces of the rating prescribed. ! Extended use of smoke or malfunction. ! This unit is cut off to get caught between the amplifier and the automobile. Check the connections of the power supply and speakers if the fuse of the separately sold with accessories sold battery wire ...
Owner's Manual
Page 5
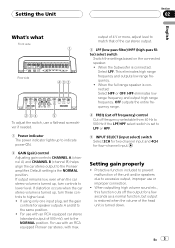
... A) and CHANNEL B (channel B) helps align the car stereo output to prevent malfunction of the head unit is turned down. For use with an RCA equipped Pioneer car stereo, with an RCA equipped car stereo (standard output of the car stereo output. 3 LPF (low-pass filter)/HPF (high-pass filter) select switch... speaker. ! This eliminates high range frequency and outputs low range frequency. ! Default setting is the NORMAL position. Setting gain properly ! Protective function included to the Pioneer amplifier. En 5
... A) and CHANNEL B (channel B) helps align the car stereo output to prevent malfunction of the head unit is turned down. For use with an RCA equipped Pioneer car stereo, with an RCA equipped car stereo (standard output of the car stereo output. 3 LPF (low-pass filter)/HPF (high-pass filter) select switch... speaker. ! This eliminates high range frequency and outputs low range frequency. ! Default setting is the NORMAL position. Setting gain properly ! Protective function included to the Pioneer amplifier. En 5
Owner's Manual
Page 6
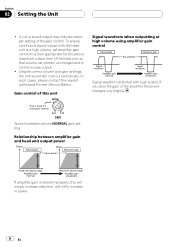
.... 6 En In such cases, please contact the nearest authorized Pioneer Service Station. Above illustration shows NORMAL gain setting. To ensure continuous sound output with the head unit at high volume using amplifier gain control Signal waveform distorted with little increase in sound output..., the unit sound still cuts out periodically. Relationship between amplifier gain and head unit output power If amplifier gain is raised improperly, this unit Signal waveform when outputting at a high volume, set amplifier gain control to control excess output. ! Gain control of...
.... 6 En In such cases, please contact the nearest authorized Pioneer Service Station. Above illustration shows NORMAL gain setting. To ensure continuous sound output with the head unit at high volume using amplifier gain control Signal waveform distorted with little increase in sound output..., the unit sound still cuts out periodically. Relationship between amplifier gain and head unit output power If amplifier gain is raised improperly, this unit Signal waveform when outputting at a high volume, set amplifier gain control to control excess output. ! Gain control of...
Owner's Manual
Page 7
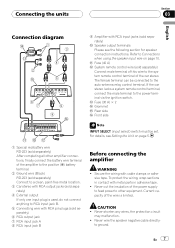
... ! The female terminal can be set. Current capacity of the power supply to feed power to other amplifier connections, finally connect the battery wire terminal of the amplifier to the positive (+) battery terminal. 2 Ground wire (Black) RD-223 (sold separately) Connect to a clean, paint...battery wire RD-223 (sold separately) After completing all other equipment. sive tape. Connecting the units Section 03 English Connection diagram 9 Amplifier with RCA input jacks (sold separately) Connect male terminal of this wire to the system remote control terminal of the car stereo. CAUTION ...
... ! The female terminal can be set. Current capacity of the power supply to feed power to other amplifier connections, finally connect the battery wire terminal of the amplifier to the positive (+) battery terminal. 2 Ground wire (Black) RD-223 (sold separately) Connect to a clean, paint...battery wire RD-223 (sold separately) After completing all other equipment. sive tape. Connecting the units Section 03 English Connection diagram 9 Amplifier with RCA input jacks (sold separately) Connect male terminal of this wire to the system remote control terminal of the car stereo. CAUTION ...
Owner's Manual
Page 8
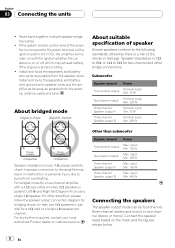
...injury due to 8 W for two-channel and other amplifiers, please follow the speaker output connection diagram for bridging shown on the mode and the figures shown below. 8 En For any further enquiries, contact your local authorized Pioneer dealer or customer service. input: Min. 150 W ... overheating. About bridged mode About suitable specification of speaker Ensure speakers conform to the following standards, otherwise there is a risk of the amplifier is connected to the amplifier may exhaust battery if the engine is at rest or idling. ! For bridged mode for a 4 W load or a single 4...
...injury due to 8 W for two-channel and other amplifiers, please follow the speaker output connection diagram for bridging shown on the mode and the figures shown below. 8 En For any further enquiries, contact your local authorized Pioneer dealer or customer service. input: Min. 150 W ... overheating. About bridged mode About suitable specification of speaker Ensure speakers conform to the following standards, otherwise there is a risk of the amplifier is connected to the amplifier may exhaust battery if the engine is at rest or idling. ! For bridged mode for a 4 W load or a single 4...
Owner's Manual
Page 10
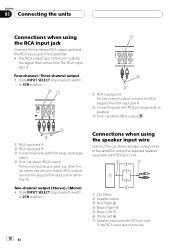
... output wires to RCA input jack A rather than B. rately) 4 From car stereo (RCA output) If only one output (RCA output), connect the plug to the amplifier using the RCA input jack Connect the car stereo RCA output jack and the RCA input jack of the... amplifier. ! Section 03 Connecting the units Connections when using the supplied speaker input wire with RCA pin cord. 1 Car Stereo 2 Speaker output 3 Red: Right + 4 Black: Right * 5 ...
... output wires to RCA input jack A rather than B. rately) 4 From car stereo (RCA output) If only one output (RCA output), connect the plug to the amplifier using the RCA input jack Connect the car stereo RCA output jack and the RCA input jack of the... amplifier. ! Section 03 Connecting the units Connections when using the supplied speaker input wire with RCA pin cord. 1 Car Stereo 2 Speaker output 3 Red: Right + 4 Black: Right * 5 ...
Owner's Manual
Page 11
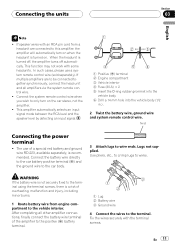
... burns. 1 Route battery wire from a headunit are to be connected together synchronously, connect the head unit and all other amplifier connections, finally connect the battery wire terminal of a special red battery and ground wire RD-223, available separately, is recommended. After completing ...ground wire to the car body. 3 Attach lugs to only turn on when the headunit is turned off, the amplifier turns off automatically. Lugs not supplied. This amplifier automatically selects an input signal mode between the RCA level and the speaker level by detecting an input signal. 1 Positive...
... burns. 1 Route battery wire from a headunit are to be connected together synchronously, connect the head unit and all other amplifier connections, finally connect the battery wire terminal of a special red battery and ground wire RD-223, available separately, is recommended. After completing ...ground wire to the car body. 3 Attach lugs to only turn on when the headunit is turned off, the amplifier turns off automatically. Lugs not supplied. This amplifier automatically selects an input signal mode between the RCA level and the speaker level by detecting an input signal. 1 Positive...
Owner's Manual
Page 13
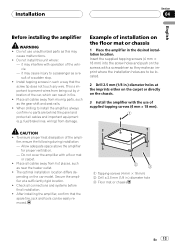
... holes at a sufficiently rigid location. ! Example of the ampli- To ensure proper heat dissipation of installation on the chassis. 3 Install the amplifier with a screwdriver so they make an imprint where the installation holes are behind the panel and protect all cables away from damage. pending on the...Do not install this may interfere with a floor mat or carpet. ! Place all cables and important equipment (e.g. When drilling to install the amplifier, always confirm no parts are to prevent wires from hot places, such as a result of the car, which can be located. 2 Drill...
... holes at a sufficiently rigid location. ! Example of the ampli- To ensure proper heat dissipation of installation on the chassis. 3 Install the amplifier with a screwdriver so they make an imprint where the installation holes are behind the panel and protect all cables away from damage. pending on the...Do not install this may interfere with a floor mat or carpet. ! Place all cables and important equipment (e.g. When drilling to install the amplifier, always confirm no parts are to prevent wires from hot places, such as a result of the car, which can be located. 2 Drill...
Owner's Manual
Page 14
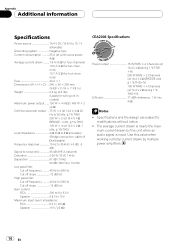
... 500 Hz Cut off slope 12 dB/oct Gain control: RCA 200 mV to 6.5 V Speaker 0.8 V to modifications without notice. ! mum current drawn by multiple power amplifiers. 14 En
... 500 Hz Cut off slope 12 dB/oct Gain control: RCA 200 mV to 6.5 V Speaker 0.8 V to modifications without notice. ! mum current drawn by multiple power amplifiers. 14 En

