Owner's Manual
Page 3
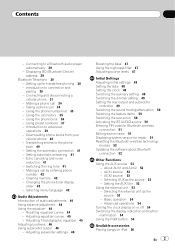
...the bass 47 Using the high pass filter 47 Adjusting source levels 47 Initial Settings Adjusting initial settings 48 Setting the date 48 Setting the clock 48 Switching the auxiliary setting 49 Switching the dimmer setting 49 Setting the rear output and subwoofer controller 49 Switching the sound muting/attenuation 50 ...version for hands-free phoning 30 - AUX1 source: 53 - Selecting AUX as the source 53 - Advanced operations 54 Turning the clock display on or off 54 Switching the display indication and button illumination 54 Using the PGM button 54 Available accessories Playing songs on ...
...the bass 47 Using the high pass filter 47 Adjusting source levels 47 Initial Settings Adjusting initial settings 48 Setting the date 48 Setting the clock 48 Switching the auxiliary setting 49 Switching the dimmer setting 49 Setting the rear output and subwoofer controller 49 Switching the sound muting/attenuation 50 ...version for hands-free phoning 30 - AUX1 source: 53 - Selecting AUX as the source 53 - Advanced operations 54 Turning the clock display on or off 54 Switching the display indication and button illumination 54 Using the PGM button 54 Available accessories Playing songs on ...
Owner's Manual
Page 10
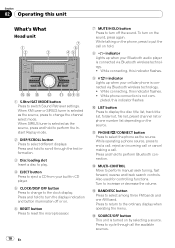
..., track title list, folder list, file list, preset channel list or phone number list depending on the phone, press to eject a CD from your Bluetooth audio player is selected as the source, press to select among three FM bands and one AM band. While connecting, ... source. While connecting, this indicator flashes. 9 indicator Lights up when your built-in CD player. 5 CLOCK/DISP OFF button Press to change the channel select mode. While operating a phone source, press to switch Sound Retriever settings. Section 02 Operating this unit What's What Head unit 1 S.Rtrv/SAT MODE button...
..., track title list, folder list, file list, preset channel list or phone number list depending on the phone, press to eject a CD from your Bluetooth audio player is selected as the source, press to select among three FM bands and one AM band. While connecting, ... source. While connecting, this indicator flashes. 9 indicator Lights up when your built-in CD player. 5 CLOCK/DISP OFF button Press to change the channel select mode. While operating a phone source, press to switch Sound Retriever settings. Section 02 Operating this unit What's What Head unit 1 S.Rtrv/SAT MODE button...
Owner's Manual
Page 30
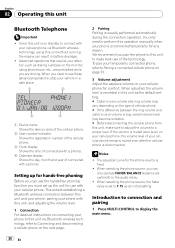
... phone with your cellular phone via Bluetooth wireless technology, refer to Connecting and disconnecting a cellular phone on the type of the cellular phone. 3 Clock display Shows the time (if connected with a phone). 4 Calendar display Shows the day, month and year (if connected with your phone is ...recorded in battery drainage. ! Since this unit is on standby to perform this unit as the default setting. # Caller's voice volume and ring volume may vary depending on the next page. 2 Pairing Pairing is big, overall volume level may become ...
... phone with your cellular phone via Bluetooth wireless technology, refer to Connecting and disconnecting a cellular phone on the type of the cellular phone. 3 Clock display Shows the time (if connected with a phone). 4 Calendar display Shows the day, month and year (if connected with your phone is ...recorded in battery drainage. ! Since this unit is on standby to perform this unit as the default setting. # Caller's voice volume and ring volume may vary depending on the next page. 2 Pairing Pairing is big, overall volume level may become ...
Owner's Manual
Page 48
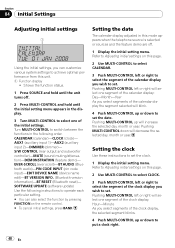
.... Shows the function status. 1 Press SOURCE and hold until the unit turns off . 1 Display the initial setting menu. CALENDAR (calendar)-CLOCK (clock)- Pushing MULTI-CONTROL down to set . EVER-SCROLL (ever scroll)-BT AUDIO (Bluetooth audio)-PIN CODE INPUT (pin code input)-EDIT DEVICE NAME (... (dimmer)- Pushing MULTI-CONTROL up or down will select one segment of the clock display: Hour-Minute As you select segments of the clock display you wish to set the date. Setting the clock Use these instructions to switch between the functions in this page. 2 Use MULTI...
.... Shows the function status. 1 Press SOURCE and hold until the unit turns off . 1 Display the initial setting menu. CALENDAR (calendar)-CLOCK (clock)- Pushing MULTI-CONTROL down to set . EVER-SCROLL (ever scroll)-BT AUDIO (Bluetooth audio)-PIN CODE INPUT (pin code input)-EDIT DEVICE NAME (... (dimmer)- Pushing MULTI-CONTROL up or down will select one segment of the clock display: Hour-Minute As you select segments of the clock display you wish to set the date. Setting the clock Use these instructions to switch between the functions in this page. 2 Use MULTI...

Owner's Manual
Page 49
... that status will be used for rear full-range speaker connection (REAR SP :FULL). 1 Display the initial setting menu. Initial Settings Section 04 Initial Settings Note You can match the clock to the factory settings. ! Refer to Adjusting initial settings on the previous page. 2 Use MULTI-CONTROL to select DIMMER. 3 Press MULTI-CONTROL to turn dimmer...
... that status will be used for rear full-range speaker connection (REAR SP :FULL). 1 Display the initial setting menu. Initial Settings Section 04 Initial Settings Note You can match the clock to the factory settings. ! Refer to Adjusting initial settings on the previous page. 2 Use MULTI-CONTROL to select DIMMER. 3 Press MULTI-CONTROL to turn dimmer...


