Owner's Manual
Page 2
... to use the navigation menu screens 18 - Searching for POIs around the destination 28 - Using "Saved Criteria" 29 Searching for POIs by using the data on external storage devices (USB, SD) 31 Searching for a location by recalling a saved route 34 Deleting an entry in "History" 33 Selecting a location stored in a USB storage device 15 - Please read this manual 8 - Resetting the microprocessor 11 Basic operation Checking part names and functions 13 Inserting/ejecting a disc...
... to use the navigation menu screens 18 - Searching for POIs around the destination 28 - Using "Saved Criteria" 29 Searching for POIs by using the data on external storage devices (USB, SD) 31 Searching for a location by recalling a saved route 34 Deleting an entry in "History" 33 Selecting a location stored in a USB storage device 15 - Please read this manual 8 - Resetting the microprocessor 11 Basic operation Checking part names and functions 13 Inserting/ejecting a disc...
Owner's Manual
Page 6
... - Using subwoofer output 141 - Adjusting source levels 142 - Using the direct traffic announcement function 116 - Displayed Info 126 - Manage Track Logs 127 - Demo Mode 129 - Setting your customized POI 132 - Displaying the "AV Sound" menu 138 - Switching the sound muting/ attenuation 144 - Acquiring/Cataloging iPod music information 145 Displaying Game Information 119 Using the AV input Using the AV1 120 Using the AV2 120 Using the touch panel keys 120 Using the external unit (EXT1, EXT2) Reading the screen 121 Using the touch...
... - Using subwoofer output 141 - Adjusting source levels 142 - Using the direct traffic announcement function 116 - Displayed Info 126 - Manage Track Logs 127 - Demo Mode 129 - Setting your customized POI 132 - Displaying the "AV Sound" menu 138 - Switching the sound muting/ attenuation 144 - Acquiring/Cataloging iPod music information 145 Displaying Game Information 119 Using the AV input Using the AV1 120 Using the AV2 120 Using the touch panel keys 120 Using the external unit (EXT1, EXT2) Reading the screen 121 Using the touch...
Owner's Manual
Page 7
... Commands 149 - Ambient conditions for AV source (other than iPod) 150 - About playing DualDisc 171 - Maintaining the LCD screen 181 - Positioning by GPS 165 - DVD Setup 186 Glossary 187 Specifications 190 En 7 Deleting the password 153 - About DTS sound 171 Detailed information for the iPod 149 - Liquid crystal display (LCD) screen 181 - About DVD-Video and CD 171 - Contents Operating Your Navigation System with Voice To Ensure Safe Driving 147...
... Commands 149 - Ambient conditions for AV source (other than iPod) 150 - About playing DualDisc 171 - Maintaining the LCD screen 181 - Positioning by GPS 165 - DVD Setup 186 Glossary 187 Specifications 190 En 7 Deleting the password 153 - About DTS sound 171 Detailed information for the iPod 149 - Liquid crystal display (LCD) screen 181 - About DVD-Video and CD 171 - Contents Operating Your Navigation System with Voice To Ensure Safe Driving 147...

Owner's Manual
Page 9
... operate the navigation and audio functions by using the touch panel key. 2D and 3D map view modes Various types of screen displays can be stored in the built-in JPEG or BMP format and import an original splash screen to this navigation system. p This function may not work under certain conditions. These imported images can be guaranteed completely. If your original image data is connected to this system with an RCA cable...
... operate the navigation and audio functions by using the touch panel key. 2D and 3D map view modes Various types of screen displays can be stored in the built-in JPEG or BMP format and import an original splash screen to this navigation system. p This function may not work under certain conditions. These imported images can be guaranteed completely. If your original image data is connected to this system with an RCA cable...
Owner's Manual
Page 10
... file usage Supply of the functions on -demand applications. An independent license for such use the latest software for iPod (CDIU230V) (sold separately), you use is prohibited. - For details, please visit http://www.mp3licensing.com. Ver. 1.3.1 ! Ver. 1.1.1 ! Hands-free phoning A cellular phone featuring Bluetooth® technology can control an iPod compatible with this navigation system, refer to operate all of this navigation system with a Pioneer USB interface cable for the iPod. Rear display entertainment Video sources...
... file usage Supply of the functions on -demand applications. An independent license for such use the latest software for iPod (CDIU230V) (sold separately), you use is prohibited. - For details, please visit http://www.mp3licensing.com. Ver. 1.3.1 ! Ver. 1.1.1 ! Hands-free phoning A cellular phone featuring Bluetooth® technology can control an iPod compatible with this navigation system, refer to operate all of this navigation system with a Pioneer USB interface cable for the iPod. Rear display entertainment Video sources...
Owner's Manual
Page 11
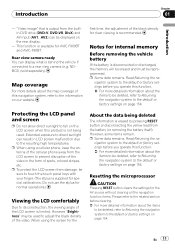
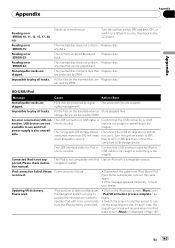
.... Notes for the AV source without clearing all the navigation function items. Please refer to the related section before you operate this navigation system, refer to the default or factory settings on the rear display. - Resetting the microprocessor CAUTION Pressing RESET button clears the settings for internal memory Before removing the vehicle battery If the battery is behind the vehicle if connected to the default or factory settings on page 154. Extended...
.... Notes for the AV source without clearing all the navigation function items. Please refer to the related section before you operate this navigation system, refer to the default or factory settings on the rear display. - Resetting the microprocessor CAUTION Pressing RESET button clears the settings for internal memory Before removing the vehicle battery If the battery is behind the vehicle if connected to the default or factory settings on page 154. Extended...
Owner's Manual
Page 16
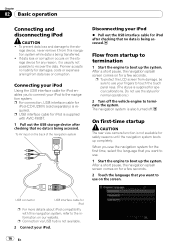
... the data. Connecting your iPod Using the USB interface cable for iPod enables you want to use the stylus for iPod is supplied with this navigation system while data is being transferred. ! The navigation system is not available. 2 Connect your fingers to boot up completely. p USB interface cable for normal operations.) 2 Turn off . After a short pause, the navigation splash screen comes on our website. USB connector USB interface cable for iPod p For more details about iPod compatibility with AVIC-F90BT...
... the data. Connecting your iPod Using the USB interface cable for iPod enables you want to use the stylus for iPod is supplied with this navigation system while data is being transferred. ! The navigation system is not available. 2 Connect your fingers to boot up completely. p USB interface cable for normal operations.) 2 Turn off . After a short pause, the navigation splash screen comes on our website. USB connector USB interface cable for iPod p For more details about iPod compatibility with AVIC-F90BT...
Owner's Manual
Page 19
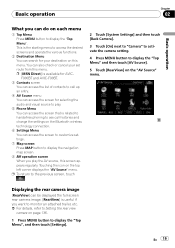
...-screen rear camera image. [RearView] is the starting menu to access the desired screens and operate the various functions. 2 Destination Menu You can also check or cancel your destination on this menu. You can search for selecting the audio and visual source to play. 5 Phone Menu You can access the screen that is related to hands-free phoning to see call histories and change the settings on the Bluetooth wireless technology connection. 6 Settings Menu...
...-screen rear camera image. [RearView] is the starting menu to access the desired screens and operate the various functions. 2 Destination Menu You can also check or cancel your destination on this menu. You can search for selecting the audio and visual source to play. 5 Phone Menu You can access the screen that is related to hands-free phoning to see call histories and change the settings on the Bluetooth wireless technology connection. 6 Settings Menu...
Owner's Manual
Page 54
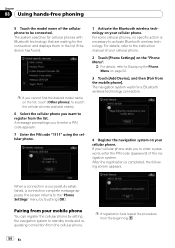
... a password, enter the PIN code (password) of the cellular phone to standby mode and requesting connection from the cellular phone. For some cellular phones, no specific action is completed, the following screen appears. Pairing from your cellular phone. 2 Touch [Phone Settings] on page 52. 3 Touch [Add Device], and then [Pair from the mobile phone]. After the registration is necessary to register from the list. Chapter 08 Using hands-free phoning 5 Touch the model name of the navigation system...
... a password, enter the PIN code (password) of the cellular phone to standby mode and requesting connection from the cellular phone. For some cellular phones, no specific action is completed, the following screen appears. Pairing from your cellular phone. 2 Touch [Phone Settings] on page 52. 3 Touch [Add Device], and then [Pair from the mobile phone]. After the registration is necessary to register from the list. Chapter 08 Using hands-free phoning 5 Touch the model name of the navigation system...
Owner's Manual
Page 63
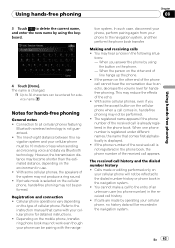
... when sending and receiving voice and data via Bluetooth technology. If calls are made or editing performed only on your cellular phone, no phone number) in the navigation system. ! Using hands-free phoning Chapter 08 Using hands-free phoning 3 Touch to delete the current name, and enter the new name by using the button on the phone. - p Up to an echo, decrease the volume level for detailed instructions. ! However, the...
... when sending and receiving voice and data via Bluetooth technology. If calls are made or editing performed only on your cellular phone, no phone number) in the navigation system. ! Using hands-free phoning Chapter 08 Using hands-free phoning 3 Touch to delete the current name, and enter the new name by using the button on the phone. - p Up to an echo, decrease the volume level for detailed instructions. ! However, the...
Owner's Manual
Page 64
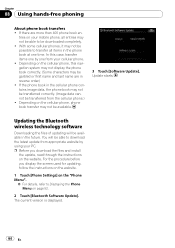
... install the update, read through the instructions on the cellular phone, phone book transfer may not be downloaded completely. ! Chapter 08 Using hands-free phoning About phone book transfers ! In this navigation system may not display the phone book correctly. (Some characters may not be transferred correctly. (Image data cannot be available. 3 Touch [Software Update]. The current version is displayed. 64 En If the phone book in the cellular phone contains image data, the phone...
... install the update, read through the instructions on the cellular phone, phone book transfer may not be downloaded completely. ! Chapter 08 Using hands-free phoning About phone book transfers ! In this navigation system may not display the phone book correctly. (Some characters may not be transferred correctly. (Image data cannot be available. 3 Touch [Software Update]. The current version is displayed. 64 En If the phone book in the cellular phone contains image data, the phone...

Owner's Manual
Page 83
.... Setting the parental lock Some DVD-Video discs let you can set . ! The picture is displayed, touch [Enter]. Playback of the screen ! Selecting "16:09" may be switched. 1 Touch [DVD Setup] on the "Function" menu. = For details, refer to the disc's instructions. You can now set restrictions so that do not have a panscan system, the disc is possible En 83 Setting the aspect ratio There are two kinds of [TV Aspect] changes the settings...
.... Setting the parental lock Some DVD-Video discs let you can set . ! The picture is displayed, touch [Enter]. Playback of the screen ! Selecting "16:09" may be switched. 1 Touch [DVD Setup] on the "Function" menu. = For details, refer to the disc's instructions. You can now set restrictions so that do not have a panscan system, the disc is possible En 83 Setting the aspect ratio There are two kinds of [TV Aspect] changes the settings...
Owner's Manual
Page 124
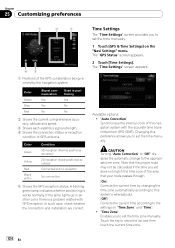
... No Used in another color, there is works normally. The "GPS Status" screen appears. 2 Touch [Time Settings]. If the lamp lights up in positioning Yes No No 2 Shows the current comprehensive accuracy, altitude and speed. 3 Shows each satellite's signal strength. 4 Shows the connection status or reception condition of this navigation system with the accurate time transmitted from GPS (GMT). The "Time Settings" screen appears. CAUTION Turning "Auto Correction" to "Off" disables the automatic change...
... No Used in another color, there is works normally. The "GPS Status" screen appears. 2 Touch [Time Settings]. If the lamp lights up in positioning Yes No No 2 Shows the current comprehensive accuracy, altitude and speed. 3 Shows each satellite's signal strength. 4 Shows the connection status or reception condition of this navigation system with the accurate time transmitted from GPS (GMT). The "Time Settings" screen appears. CAUTION Turning "Auto Correction" to "Off" disables the automatic change...
Owner's Manual
Page 136
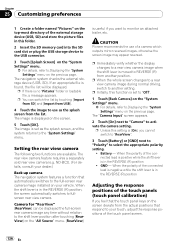
... splash screen, and the system returns to the "System Settings" menu. p Immediately verify whether the display changes to a rear view camera image when the shift lever is [On], you cannot switch to "RearView". 3 Touch [Battery] or [GND] next to "Polarity" to activate the camera setting. Chapter 25 Customizing preferences 1 Create a folder named "Pictures" on the top-most directory of the external storage device (USB, SD) and store the picture files in the REVERSE (R) position Adjusting the...
... splash screen, and the system returns to the "System Settings" menu. p Immediately verify whether the display changes to a rear view camera image when the shift lever is [On], you cannot switch to "RearView". 3 Touch [Battery] or [GND] next to "Polarity" to activate the camera setting. Chapter 25 Customizing preferences 1 Create a folder named "Pictures" on the top-most directory of the external storage device (USB, SD) and store the picture files in the REVERSE (R) position Adjusting the...
Owner's Manual
Page 145
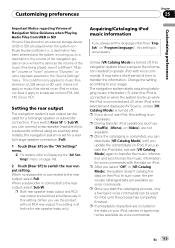
... iPod, names or types may take a short period of time to broadcast content (FM, AM, XM, Sirius, HD). Change the setting according to a destination), the volume of the music files being played, even if a different "Master" volume or "Voice" volume or "Dynamic" volume has been selected in the "Sound Settings" menu. p If you do not use the product without using an auxiliary amp. p Once you always set for a rear full-range speaker connection (Full). 1 Touch [Rear...
... iPod, names or types may take a short period of time to broadcast content (FM, AM, XM, Sirius, HD). Change the setting according to a destination), the volume of the music files being played, even if a different "Master" volume or "Voice" volume or "Dynamic" volume has been selected in the "Sound Settings" menu. p If you do not use the product without using an auxiliary amp. p Once you always set for a rear full-range speaker connection (Full). 1 Touch [Rear...
Owner's Manual
Page 156
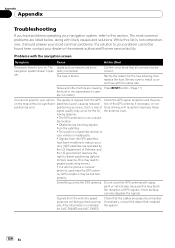
... improves. rectly connected. positioning error. racy. (GPS satellites are operated by the US Department of satellites relative to your navigation system, refer to this may lead to distort positioning data for AVIC-F900BT and AVIC-F90BT.) Check that the cables are causing Press RESET button. (Page 11) the built-in an unsuita- The Leads and connectors are blocking signals from the GPS Check the GPS signal reception and...
... improves. rectly connected. positioning error. racy. (GPS satellites are operated by the US Department of satellites relative to your navigation system, refer to this may lead to distort positioning data for AVIC-F900BT and AVIC-F90BT.) Check that the cables are causing Press RESET button. (Page 11) the built-in an unsuita- The Leads and connectors are blocking signals from the GPS Check the GPS signal reception and...
Owner's Manual
Page 157
... vehicle. Check [Night mode] setting and make sure [Automatic] is misaligned after a U-turn or reversing. The screen is not con- duced. Adjust the volume level. Adjusting the volume of AV source are used. There's no picture. The display is very dim. [Night] is connected properly. (The navigation system works properly without a significant positioning error. possible. speaking The parking brake cord is too bright. display", for AVIC-F900BT and AVIC-F90BT.) The voice from the speakers and then picked...
... vehicle. Check [Night mode] setting and make sure [Automatic] is misaligned after a U-turn or reversing. The screen is not con- duced. Adjust the volume level. Adjusting the volume of AV source are used. There's no picture. The display is very dim. [Night] is connected properly. (The navigation system works properly without a significant positioning error. possible. speaking The parking brake cord is too bright. display", for AVIC-F900BT and AVIC-F90BT.) The voice from the speakers and then picked...
Owner's Manual
Page 163
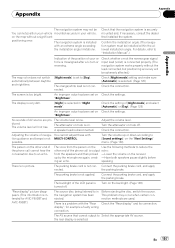
... the files on the iPod basic screen (Music) until "iPod VR activation process complete." any data. The connected USB storage device Disconnect the USB storage device and do able. Please check instruction manual. iPod connection failed. iPod function is restricted because the navigation system is not caught in something or da- Replace disc. secured by DRM. storage device are protected by digital rights management. cable is trying to acquire the information needed to play all tracks. Turn...
... the files on the iPod basic screen (Music) until "iPod VR activation process complete." any data. The connected USB storage device Disconnect the USB storage device and do able. Please check instruction manual. iPod connection failed. iPod function is restricted because the navigation system is not caught in something or da- Replace disc. secured by DRM. storage device are protected by digital rights management. cable is trying to acquire the information needed to play all tracks. Turn...
Installation Manual
Page 2
... When connecting the external video component 17 - Installation notes 21 - When installing the antenna outside the vehicle (on the rear shelf) 24 - When using the screw holes on the side of the navigation unit 22 Installing the GPS antenna 23 - When installing the antenna inside the vehicle (on the body) 25 Installing the microphone 26 - Mounting on the steering column 27 - Installation using a rear display connected to separately sold power amp 14 When connecting a rear view camera...
... When connecting the external video component 17 - Installation notes 21 - When installing the antenna outside the vehicle (on the rear shelf) 24 - When using the screw holes on the side of the navigation unit 22 Installing the GPS antenna 23 - When installing the antenna inside the vehicle (on the body) 25 Installing the microphone 26 - Mounting on the steering column 27 - Installation using a rear display connected to separately sold power amp 14 When connecting a rear view camera...

Installation Manual
Page 6
... on changing [Ant CTRL] mode, refer to "Operation Manual".) ! When replacing the fuse, be sure to black, etc. ! Do not pull the lead, as you may pull it out of the same color to the corresponding colored port, i.e., blue connector to the blue port, black to only use a fuse of your vehicle before beginning installation. Attach the connectors of the connector. ! Connecting speakers with a 12-volt battery and negative grounding. A signal is output through the blue lead...
... on changing [Ant CTRL] mode, refer to "Operation Manual".) ! When replacing the fuse, be sure to black, etc. ! Do not pull the lead, as you may pull it out of the same color to the corresponding colored port, i.e., blue connector to the blue port, black to only use a fuse of your vehicle before beginning installation. Attach the connectors of the connector. ! Connecting speakers with a 12-volt battery and negative grounding. A signal is output through the blue lead...


