Operating Instructions
Page 5
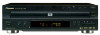
... watching movies or other media with on-screen menus conveniently organized and arranged. Easy setup and adjustment using on-screen menus Press SETUP on the remote control to open the Setup screen and you'll find setting up and adjusting the system easy to do with subtitles available. Below are using the...
... watching movies or other media with on-screen menus conveniently organized and arranged. Easy setup and adjustment using on-screen menus Press SETUP on the remote control to open the Setup screen and you'll find setting up and adjusting the system easy to do with subtitles available. Below are using the...

Operating Instructions
Page 6
...to throughout this player much easier and more enjoyable. When discs have been made, you can be made to titles on the main unit and remote control as they will be beneficial for operating these menus will make using the basic player functions, you are new to DVD, it to as ...titles, and titles are divided into chapters. When all the accessories were included with PBC (Playback Control) also contain menus recorded on page 38 describes how to Proceed in This Manual DVD is first necessary to offer. The player functions available may...
...to throughout this player much easier and more enjoyable. When discs have been made, you can be made to titles on the main unit and remote control as they will be beneficial for operating these menus will make using the basic player functions, you are new to DVD, it to as ...titles, and titles are divided into chapters. When all the accessories were included with PBC (Playback Control) also contain menus recorded on page 38 describes how to Proceed in This Manual DVD is first necessary to offer. The player functions available may...
Operating Instructions
Page 7
Table of contents Before Using 8 Checking Accessories 8 Preparing the Remote Control 8 Names and Functions 9 Front Panel 9 Display Window 10 Rear Panel 11 Remote Control 12 Making Connections 14 Connecting Your DVD Player 14 Audio Connections 15 Video Connections 16 System Control Connections 17 Setting Up the Player 18 Using the Setup Navigator 18 Getting Started Using...
Table of contents Before Using 8 Checking Accessories 8 Preparing the Remote Control 8 Names and Functions 9 Front Panel 9 Display Window 10 Rear Panel 11 Remote Control 12 Making Connections 14 Connecting Your DVD Player 14 Audio Connections 15 Video Connections 16 System Control Connections 17 Setting Up the Player 18 Using the Setup Navigator 18 Getting Started Using...
Operating Instructions
Page 8
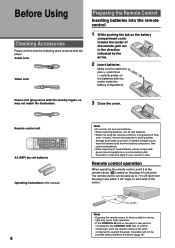
... Notes • Do not mix old and new batteries. • When replacing batteries, use all new batteries. • When not using the remote control for a long period of used up to 7 m (23 feet) from the player and within a 30° angle on the batteries with the...the marks inside the battery compartment. Audio cord Video cord Preparing the Remote Control Inserting batteries into the remote control 1 While pushing the tab on the player's front panel. The remote control can be possible when pointed at the remote sensor (Î) located on the battery compartment cover toward the center...
... Notes • Do not mix old and new batteries. • When replacing batteries, use all new batteries. • When not using the remote control for a long period of used up to 7 m (23 feet) from the player and within a 30° angle on the batteries with the...the marks inside the battery compartment. Audio cord Video cord Preparing the Remote Control Inserting batteries into the remote control 1 While pushing the tab on the player's front panel. The remote control can be possible when pointed at the remote sensor (Î) located on the battery compartment cover toward the center...

Operating Instructions
Page 9
... button Press during playback to pause. Press and hold to perform reverse playback scanning (pages 24). = Display window Displays system information (page 10). ~ Remote sensor Point the remote control toward the remote sensor to operate the player (page 8). ! Press again to close the disc tray (pages 21, 25). 5 DISC SKIP button During playback, press...
... button Press during playback to pause. Press and hold to perform reverse playback scanning (pages 24). = Display window Displays system information (page 10). ~ Remote sensor Point the remote control toward the remote sensor to operate the player (page 8). ! Press again to close the disc tray (pages 21, 25). 5 DISC SKIP button During playback, press...
Operating Instructions
Page 11
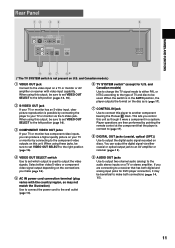
....) 1 VIDEO OUT jack Connect to the video input on this player to another component bearing the Pioneer Î mark. When using this output, be sure to set which output is (page 17). 7 CONTROL IN jack Use to output the video signals. and Canadian models) Use to change the TV signal...sure to set VIDEO OUT SELECT to the left position (page 16). 3 COMPONENT VIDEO OUT jacks If your TV or monitor by pointing the remote control at the component that has both digital and analog input jacks for U.S. Select either coaxial or optical output jack to an AV amplifier or receiver...
....) 1 VIDEO OUT jack Connect to the video input on this player to another component bearing the Pioneer Î mark. When using this output, be sure to set which output is (page 17). 7 CONTROL IN jack Use to output the video signals. and Canadian models) Use to change the TV signal...sure to set VIDEO OUT SELECT to the left position (page 16). 3 COMPONENT VIDEO OUT jacks If your TV or monitor by pointing the remote control at the component that has both digital and analog input jacks for U.S. Select either coaxial or optical output jack to an AV amplifier or receiver...
Operating Instructions
Page 12
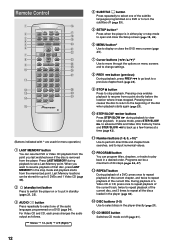
... During playback of a DVD, press once to repeat playback of the current title. When you last watched even if the disc is in a desired order. Remote Control 1 2 3 4 5 6 7 8 9 0 - = ~ ! @ LAST MEMORY CONDITION MEMORY OPEN/ CLOSE 0 AUDIO SUBTITLE ANGLE DISPLAY SETUP MENU 5 TOP MENU RETURN 5 5 ENTER PREV 4 5 STOP 7 PLAY 3 STEP/SLOW REV e E 1 1 2 3 NEXT ¢ PAUSE...
... During playback of a DVD, press once to repeat playback of the current title. When you last watched even if the disc is in a desired order. Remote Control 1 2 3 4 5 6 7 8 9 0 - = ~ ! @ LAST MEMORY CONDITION MEMORY OPEN/ CLOSE 0 AUDIO SUBTITLE ANGLE DISPLAY SETUP MENU 5 TOP MENU RETURN 5 5 ENTER PREV 4 5 STOP 7 PLAY 3 STEP/SLOW REV e E 1 1 2 3 NEXT ¢ PAUSE...
Operating Instructions
Page 17
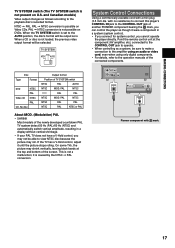
..., refer to the playback disc's recorded format. Point the remote control unit at the top and bottom of the connected components. NTSC = PAL, PAL = NTSC conversion is not possible on DVDs. CONTROL TV SYSTEM PAL NTSC AUTO AC IN CONTROL IN CONTROL OUT Pioneer component with a mini plug (3.5 mm dia. PAL = NTSC... NTSC AUTO Disc Type Format DVD NTSC PAL Video CD NTSC PAL CD, No disc Output format Position of another PIONEER component bearing the Î mark, you can control the player as is not a malfunction; When a CD or disc is set to view NTSC disc because the ...
..., refer to the playback disc's recorded format. Point the remote control unit at the top and bottom of the connected components. NTSC = PAL, PAL = NTSC conversion is not possible on DVDs. CONTROL TV SYSTEM PAL NTSC AUTO AC IN CONTROL IN CONTROL OUT Pioneer component with a mini plug (3.5 mm dia. PAL = NTSC... NTSC AUTO Disc Type Format DVD NTSC PAL Video CD NTSC PAL CD, No disc Output format Position of another PIONEER component bearing the Î mark, you can control the player as is not a malfunction; When a CD or disc is set to view NTSC disc because the ...

Operating Instructions
Page 23
...menu screen • Although individual DVD titles may also be used for some reason it cannot be advanced to or returned to with Playback Control (PBC) display a menu screen when play is possible, using the player and attempt to perform an operation, but for selection. &#...loaded 1 Highlight Clips 2 Chapter List 3 Commercial Header 4 Subtitles 5 Soundtrack 6 Start Main Feature To open or return to directly select an option on the remote control. It is displayed, use the cursor buttons (2/ 3/5/∞) and ENTER on a menu screen. PLAY 3, 0 OPEN/CLOSE*, DISC*, LAST MEMORY. * These...
...menu screen • Although individual DVD titles may also be used for some reason it cannot be advanced to or returned to with Playback Control (PBC) display a menu screen when play is possible, using the player and attempt to perform an operation, but for selection. &#...loaded 1 Highlight Clips 2 Chapter List 3 Commercial Header 4 Subtitles 5 Soundtrack 6 Start Main Feature To open or return to directly select an option on the remote control. It is displayed, use the cursor buttons (2/ 3/5/∞) and ENTER on a menu screen. PLAY 3, 0 OPEN/CLOSE*, DISC*, LAST MEMORY. * These...

Operating Instructions
Page 24
... previous chapter (track). • You can advance more than one chapter (track) forward by pressing and holding NEXT ¢ (remote control only) and releasing when the desired chapter (track) number appears in the display. When the desired location has been reached, press PLAY...Normal playback resumes. • When the "Scan" indicator on the screen changes from flashing to previous chapters (tracks) by pressing and holding PREV 4 (remote control only) and releasing when the desired chapter (track) number appears in the display. 5 5 5 5 5 5 Chapter (Track) Skip Forward/ Skip ...
... previous chapter (track). • You can advance more than one chapter (track) forward by pressing and holding NEXT ¢ (remote control only) and releasing when the desired chapter (track) number appears in the display. When the desired location has been reached, press PLAY...Normal playback resumes. • When the "Scan" indicator on the screen changes from flashing to previous chapters (tracks) by pressing and holding PREV 4 (remote control only) and releasing when the desired chapter (track) number appears in the display. 5 5 5 5 5 5 Chapter (Track) Skip Forward/ Skip ...
Operating Instructions
Page 53
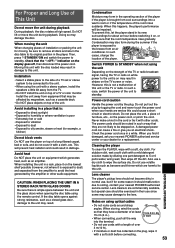
...be sure to the breeze from cool surroundings into the terminal. • Do not use since some reason it damaged, ask your nearest PIONEER authorized service center or your hands are not likely to be connected to the unit. • When using the unit Depending on the strength... table using optical cables • Do not route cords around sharp angles. Avoid installing in a place that the "--OFF--" indication on using the remote control. Never make sure that may result in a while. The power cords should malfunction due to standby. For Proper and Long Use of This Unit...
...be sure to the breeze from cool surroundings into the terminal. • Do not use since some reason it damaged, ask your nearest PIONEER authorized service center or your hands are not likely to be connected to the unit. • When using the unit Depending on the strength... table using optical cables • Do not route cords around sharp angles. Avoid installing in a place that the "--OFF--" indication on using the remote control. Never make sure that may result in a while. The power cords should malfunction due to standby. For Proper and Long Use of This Unit...
Operating Instructions
Page 56
The rear panel control input jack on a VCR or passed through a VCR or an AV selector may cause malfunctioning of this does not correct the problem, please consult your nearest PIONEER service center. 56 Audio is not output or is not a malfunction. The connection plugs are ...the plugs and terminals are connected correctly (page 16). Caution Static electricity or other external influence may prevent recording or cause picture problems. Remote control operation is not possible. The batteries are firmly inserted. Connect the digital output on the player to the digital input on some discs...
The rear panel control input jack on a VCR or passed through a VCR or an AV selector may cause malfunctioning of this does not correct the problem, please consult your nearest PIONEER service center. 56 Audio is not output or is not a malfunction. The connection plugs are ...the plugs and terminals are connected correctly (page 16). Caution Static electricity or other external influence may prevent recording or cause picture problems. Remote control operation is not possible. The batteries are firmly inserted. Connect the digital output on the player to the digital input on some discs...
Operating Instructions
Page 58
... rate. Time number The time number corresponds to , and not the player itself. For example, a signal with a mini plug to another Pioneer component such as a receiver or an amplifier bearing the Î mark, you connect this player via an S-video cable produces clearer picture reproduction...one title with S-video input via a cord with a 96 kHz sampling rate indicates that the player is not possible. To control the player, point the player's remote control at the time selected. A disc which contains a movie may have only one second, the analog signal was sampled 96000 ...
... rate. Time number The time number corresponds to , and not the player itself. For example, a signal with a mini plug to another Pioneer component such as a receiver or an amplifier bearing the Î mark, you connect this player via an S-video cable produces clearer picture reproduction...one title with S-video input via a cord with a 96 kHz sampling rate indicates that the player is not possible. To control the player, point the player's remote control at the time selected. A disc which contains a movie may have only one second, the analog signal was sampled 96000 ...
Operating Instructions
Page 59
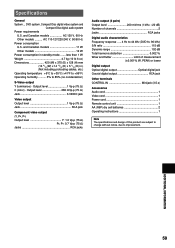
... output Y (luminance) - PEAK) or lower Digital output Optical digital output Optical digital jack Coaxial digital output RCA jack Other terminals CONTROL IN Minijack (3.5 ø) Accessories Audio cord 1 Video cord 1 Power cord 1 Remote control unit 1 AA (R6P) dry cell batteries 2 Operating instructions 1 Note The specifications and design of measurement (±0.001% W. Specifications General System...
... output Y (luminance) - PEAK) or lower Digital output Optical digital output Optical digital jack Coaxial digital output RCA jack Other terminals CONTROL IN Minijack (3.5 ø) Accessories Audio cord 1 Video cord 1 Power cord 1 Remote control unit 1 AA (R6P) dry cell batteries 2 Operating instructions 1 Note The specifications and design of measurement (±0.001% W. Specifications General System...