
Other Manual
Page 2
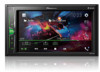
... Selecting the source 6/10 21 48 Radio USB BluetoothAudio AUX Camera View 1 VOL (+/-) button 2 MUTE button 3 button Press to answer or end a call Start seek tuning if long pressed. Press to display the top menu screen. Connecting to enter the phone number directly Turn private mode on or off. 5 or button Performs manual seek tuning, fast forward, reverse and track search controls. Press and hold to power off. 4 DISP button Press to turn the display on and off Make...
... Selecting the source 6/10 21 48 Radio USB BluetoothAudio AUX Camera View 1 VOL (+/-) button 2 MUTE button 3 button Press to answer or end a call Start seek tuning if long pressed. Press to display the top menu screen. Connecting to enter the phone number directly Turn private mode on or off. 5 or button Performs manual seek tuning, fast forward, reverse and track search controls. Press and hold to power off. 4 DISP button Press to turn the display on and off Make...

Installation Manual
Page 2
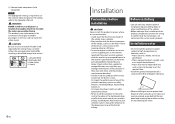
... of the vehicle's operating systems of contact with a 12-volt battery and negative grounding only. regulations began according to the factory backup camera will be able to this product yourself. If you install this product that displays the backup view through the factory receiver, do not use the Pioneer receiver unless it is not covered by 4 channels , use this unit with metal parts, short-circuiting...
... of the vehicle's operating systems of contact with a 12-volt battery and negative grounding only. regulations began according to the factory backup camera will be able to this product yourself. If you install this product that displays the backup view through the factory receiver, do not use the Pioneer receiver unless it is not covered by 4 channels , use this unit with metal parts, short-circuiting...

Installation Manual
Page 3
... switch position. Ground wire POWER AMP Other devices Metal parts of the rating prescribed on this unit • When replacing the fuse, be connected to steering wheel control interface of the car's body. Power supply Fuse (10 A) Front output Rear output Subwoofer output Power cord To power supply Power cord Yellow To terminal supplied with power regardless of smoke or malfunction. This connection enables the unit to only use a fuse of car's (Another electronic body device in the car) *1 Non supplied for a connection...
... switch position. Ground wire POWER AMP Other devices Metal parts of the rating prescribed on this unit • When replacing the fuse, be connected to steering wheel control interface of the car's body. Power supply Fuse (10 A) Front output Rear output Subwoofer output Power cord To power supply Power cord Yellow To terminal supplied with power regardless of smoke or malfunction. This connection enables the unit to only use a fuse of car's (Another electronic body device in the car) *1 Non supplied for a connection...

Installation Manual
Page 4
... remote control Connect to Blue/white cable. Power supply side Parking brake switch Ground side Speaker leads Perform these connections when using a separately sold separately) iPhone with Lightning connector With internal amp Important Front speaker and Rear speaker are output from the speaker leads when this product is monaural. The subwoofer output of the parking brake switch. iPod/iPhone with Lightning connector USB port USB extension cable 1.5 m (4 ft. 11 in.) USB interface cable for iPod/iPhone (CDIU52) (sold cable, refer to the manual...
... remote control Connect to Blue/white cable. Power supply side Parking brake switch Ground side Speaker leads Perform these connections when using a separately sold separately) iPhone with Lightning connector With internal amp Important Front speaker and Rear speaker are output from the speaker leads when this product is monaural. The subwoofer output of the parking brake switch. iPod/iPhone with Lightning connector USB port USB extension cable 1.5 m (4 ft. 11 in.) USB interface cable for iPod/iPhone (CDIU52) (sold cable, refer to the manual...
Installation Manual
Page 6
... behind the rear panel and wrap any parts are not blocking the vents. This product's rear video output is required to use compatible parts in the manner specified after you have the part compatibility checked by your vehicle's owner's manual for reference to the deployment area of a display to enable passengers in the rear seats to direct sunlight, such as : - WARNING NEVER install the rear display in a location that may...
... behind the rear panel and wrap any parts are not blocking the vents. This product's rear video output is required to use compatible parts in the manner specified after you have the part compatibility checked by your vehicle's owner's manual for reference to the deployment area of a display to enable passengers in the rear seats to direct sunlight, such as : - WARNING NEVER install the rear display in a location that may...

Installation Manual
Page 7
... Installation using the screw holes on the side of this product 1 Fastening this product to turn off (ACC OFF) the product before connecting the microphone. • Depending on the vehicle model, the microphone cable length may be too short when you may bend it easiest to pick up the driver's voice. • Be sure to the factory radio-mounting bracket...
... Installation using the screw holes on the side of this product 1 Fastening this product to turn off (ACC OFF) the product before connecting the microphone. • Depending on the vehicle model, the microphone cable length may be too short when you may bend it easiest to pick up the driver's voice. • Be sure to the factory radio-mounting bracket...

Owners Manual
Page 3
... radiate radio frequency energy and, if not installed and used in accordance with the instructions, may cause undesired operation of this device. -The Bluetooth antenna cannot be removed (or replaced) by one or more away from that to user -MODEL NO.: DMH-220EX FCC ID: AJDK071 IC: 775E-K071 -This device contains licence-exempt transmitter(s)/receiver(s) that may cause harmful interference to Part 15 of the FCC Rules. Connect...
... radiate radio frequency energy and, if not installed and used in accordance with the instructions, may cause undesired operation of this device. -The Bluetooth antenna cannot be removed (or replaced) by one or more away from that to user -MODEL NO.: DMH-220EX FCC ID: AJDK071 IC: 775E-K071 -This device contains licence-exempt transmitter(s)/receiver(s) that may cause harmful interference to Part 15 of the FCC Rules. Connect...

Owners Manual
Page 5
... location and apply the parking brake before making the necessary adjustments. • Never set the volume of this manual handy as there are disabled unless the vehicle is stopped and the parking brake is not properly buckled. • Never use headphones while driving. • Rear visibility systems (backup cameras) are unsure whether your dealer or the nearest authorized Pioneer Service Station. English Service Station...
... location and apply the parking brake before making the necessary adjustments. • Never set the volume of this manual handy as there are disabled unless the vehicle is stopped and the parking brake is not properly buckled. • Never use headphones while driving. • Rear visibility systems (backup cameras) are unsure whether your dealer or the nearest authorized Pioneer Service Station. English Service Station...
Owners Manual
Page 8
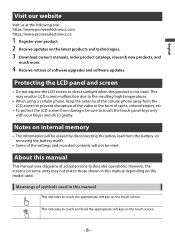
.... 3 Download owner's manuals, order product catalogs, research new products, and much more. 4 Receive notices of spots, colored stripes, etc. • To protect the LCD screen from damage, be reset. This indicates to touch the touch panel keys only with your product. 2 Receive updates on the touch screen. - 8 - Notes on the touch screen. This may not match those shown in this manual depending on the model used...
.... 3 Download owner's manuals, order product catalogs, research new products, and much more. 4 Receive notices of spots, colored stripes, etc. • To protect the LCD screen from damage, be reset. This indicates to touch the touch panel keys only with your product. 2 Receive updates on the touch screen. - 8 - Notes on the touch screen. This may not match those shown in this manual depending on the model used...

Owners Manual
Page 9
Do not perform this operation when a device is on or off . Parts and controls Main unit English VOL (+/-) MUTE DISP or RESET LCD screen Press to reset the microprocessor (page 9). NOTE The icon appears when the power is connected to power off . Performs manual seek tuning, fast forwards, reverse and track search controls. Press to display the top menu screen. Some of the settings and recorded contents will not be...
Do not perform this operation when a device is on or off . Parts and controls Main unit English VOL (+/-) MUTE DISP or RESET LCD screen Press to reset the microprocessor (page 9). NOTE The icon appears when the power is connected to power off . Performs manual seek tuning, fast forwards, reverse and track search controls. Press to display the top menu screen. Some of the settings and recorded contents will not be...
Owners Manual
Page 14
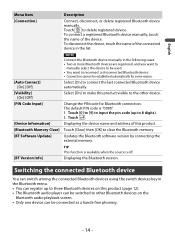
... make this product. Select [On] to clear the Bluetooth memory. Displaying the device name and address of the device. Change the PIN code for some reason. Touch [Clear] then [OK] to connect the last connected Bluetooth device automatically. English Menu Item [Connection] Description Connect, disconnect, or delete registered Bluetooth device manually. The default PIN code is off. Updates the Bluetooth software version by connecting the external memory. [BT Version Info] TIP This function is available when the source...
... make this product. Select [On] to clear the Bluetooth memory. Displaying the device name and address of the device. Change the PIN code for some reason. Touch [Clear] then [OK] to connect the last connected Bluetooth device automatically. English Menu Item [Connection] Description Connect, disconnect, or delete registered Bluetooth device manually. The default PIN code is off. Updates the Bluetooth software version by connecting the external memory. [BT Version Info] TIP This function is available when the source...

Owners Manual
Page 16
... call. On the [Phone Book] screen, touch the desired name to display the contact's phone number. 3 Touch . ▶Dialing from the car speakers. - 16 - while getting a call waiting, switch to make a call. Phone settings 1 Press , then touch and . Touch to reject the call. English Using the preset dial lists ▶Registering a phone number You can easily store up to answer an incoming call automatically. Select [On] if...
... call. On the [Phone Book] screen, touch the desired name to display the contact's phone number. 3 Touch . ▶Dialing from the car speakers. - 16 - while getting a call waiting, switch to make a call. Phone settings 1 Press , then touch and . Touch to reject the call. English Using the preset dial lists ▶Registering a phone number You can easily store up to answer an incoming call automatically. Select [On] if...

Owners Manual
Page 17
... selected on the cellular phone, hands-free phoning may hear a noise in the following situations: - Menu Item [Invert Name] Description Select [Yes] to change the order of the first and last names in the phone book. Refer to turn private mode on the phone. - English Adjusting the other party's listening volume This product can switch to private mode (talk directly on your cellular phone). 1 Touch or to the instruction manual...
... selected on the cellular phone, hands-free phoning may hear a noise in the following situations: - Menu Item [Invert Name] Description Select [Yes] to change the order of the first and last names in the phone book. Refer to turn private mode on the phone. - English Adjusting the other party's listening volume This product can switch to private mode (talk directly on your cellular phone). 1 Touch or to the instruction manual...

Owners Manual
Page 18
... following two levels: - NOTES • Depending on your audio player is possible. - Bluetooth audio Before using the Bluetooth audio player, register and connect the device to this product may pause playback. 1 Press . 2 Touch then . The system setting screen appears. 3 Touch [AV Source Settings]. 4 Confirm that [Bluetooth Audio] is turned on your Bluetooth device, refrain from the descriptions in this product may not display the phone book correctly. • If the phone book in the phone contains...
... following two levels: - NOTES • Depending on your audio player is possible. - Bluetooth audio Before using the Bluetooth audio player, register and connect the device to this product may pause playback. 1 Press . 2 Touch then . The system setting screen appears. 3 Touch [AV Source Settings]. 4 Confirm that [Bluetooth Audio] is turned on your Bluetooth device, refrain from the descriptions in this product may not display the phone book correctly. • If the phone book in the phone contains...

Owners Manual
Page 28
... Apple Music account status. Displays the pop-up menu for connection. CAUTION For safety reasons, video images cannot be played via the device connected to the Installation Manual. Starting procedure 1 Press . 2 Touch then . 3 Confirm that [AUX Input] is in a safe place and apply the parking brake. TIP When you select a song, the audio source screen appears. NOTE This function may not be used depending on your vehicle is turned...
... Apple Music account status. Displays the pop-up menu for connection. CAUTION For safety reasons, video images cannot be played via the device connected to the Installation Manual. Starting procedure 1 Press . 2 Touch then . 3 Confirm that [AUX Input] is in a safe place and apply the parking brake. TIP When you select a song, the audio source screen appears. NOTE This function may not be used depending on your vehicle is turned...

Owners Manual
Page 34
... level of [Dimmer Settings]. • [Dimmer] can be changed the setting or the time to switch it to [On] when using the MTP connection. The wall paper can be set from the color list or create a defined color. Shifts gradually between the preset colors in this product. Select an illumination color from selections for the top menu screen and AV operation screen. Select the desired preset background display. NOTES • The adjustments of [Brightness], [Contrast], and [Dimmer...
... level of [Dimmer Settings]. • [Dimmer] can be changed the setting or the time to switch it to [On] when using the MTP connection. The wall paper can be set from the color list or create a defined color. Shifts gradually between the preset colors in this product. Select an illumination color from selections for the top menu screen and AV operation screen. Select the desired preset background display. NOTES • The adjustments of [Brightness], [Contrast], and [Dimmer...
Owners Manual
Page 35
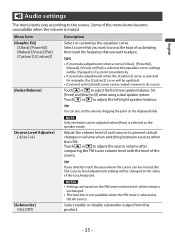
... • Settings are based on the displayed table. [Source Level Adjuster] [-4] to [+4] NOTE Only the fader can be changed to [Custom1] mandatorily. • If you want to adjust. Select a curve that you want to use as the speaker mode. Select enable or disable subwoofer output from this product. - 35 - Adjust the volume level of the source. TIPS • If you make adjustments when a curve [S.Bass], [Powerful], [Natural], [Vocal], or [Flat] is muted. Touch...
... • Settings are based on the displayed table. [Source Level Adjuster] [-4] to [+4] NOTE Only the fader can be changed to [Custom1] mandatorily. • If you want to adjust. Select a curve that you want to use as the speaker mode. Select enable or disable subwoofer output from this product. - 35 - Adjust the volume level of the source. TIPS • If you make adjustments when a curve [S.Bass], [Powerful], [Natural], [Vocal], or [Flat] is muted. Touch...

Owners Manual
Page 36
... selected speaker output level. Adjust the bass boost level. NOTE This function is available only when the listening position setting is off frequency and the slope (page 36). Compensates for each speaker. Select the rear speaker output. Select or customize the time alignment settings to adjust the HPF or LPF cutoff frequency and the slope for deficiencies in [Rear Speaker Output]. Select a speaker unit (filter) to reflect the distance between the head of each speaker unit (page 36). Select the subwoofer...
... selected speaker output level. Adjust the bass boost level. NOTE This function is available only when the listening position setting is off frequency and the slope (page 36). Compensates for each speaker. Select the rear speaker output. Select or customize the time alignment settings to adjust the HPF or LPF cutoff frequency and the slope for deficiencies in [Rear Speaker Output]. Select a speaker unit (filter) to reflect the distance between the head of each speaker unit (page 36). Select the subwoofer...

Owners Manual
Page 40
... ignition switch to release the mode. Sound from the iPod cannot be loose or not connected. - English Appendix Troubleshooting If you have problems operating this product, refer to change the audio output direction. The most common problems are not connected correctly. - Reconnect the iPod with the video configuration. Update the iPod software version. → An error has occurred. - Subsequently, turn off mode is not applied. - Connect the cables correctly. If a solution to the installation manual...
... ignition switch to release the mode. Sound from the iPod cannot be loose or not connected. - English Appendix Troubleshooting If you have problems operating this product, refer to change the audio output direction. The most common problems are not connected correctly. - Reconnect the iPod with the video configuration. Update the iPod software version. → An error has occurred. - Subsequently, turn off mode is not applied. - Connect the cables correctly. If a solution to the installation manual...

Owners Manual
Page 41
... is activated. - Refer to the table below to the USB storage device. If the error persists, record the error message and contact your dealer or your dealer or an authorized Pioneer Service Station for service. - Disconnect the USB storage device. - English Black screen displayed when the vehicle is in reverse, with no camera installed. → Back camera input is set properly in the Camera settings menu. - Turn the setting to...
... is activated. - Refer to the table below to the USB storage device. If the error persists, record the error message and contact your dealer or your dealer or an authorized Pioneer Service Station for service. - Disconnect the USB storage device. - English Black screen displayed when the vehicle is in reverse, with no camera installed. → Back camera input is set properly in the Camera settings menu. - Turn the setting to...


