Owner's Manual
Page 2
... outside antenna or cable system is connected to the product, be blocked or covered. DJM-600 KEEP THESE NUMBERS FOR FUTURE USE. RETAIN INSTRUCTIONS - If an outside antenna system, ...convenience receptacles, and the point where they may touch dangerous voltage points or short-out parts that could result in the vicinity of the product should follow the manufacturer's instructions, ...surfaces may result in a stable location. GROUNDING OR POLARIZATION ÷ If this Pioneer product. Do not defeat the safety purpose of the grounding type plug. Unauthorized substitutions may cause ...
... outside antenna or cable system is connected to the product, be blocked or covered. DJM-600 KEEP THESE NUMBERS FOR FUTURE USE. RETAIN INSTRUCTIONS - If an outside antenna system, ...convenience receptacles, and the point where they may touch dangerous voltage points or short-out parts that could result in the vicinity of the product should follow the manufacturer's instructions, ...surfaces may result in a stable location. GROUNDING OR POLARIZATION ÷ If this Pioneer product. Do not defeat the safety purpose of the grounding type plug. Unauthorized substitutions may cause ...
Owner's Manual
Page 3
NO USERSERVICEABLE PARTS INSIDE. These limits are designed to provide reasonable protection against this manufacturer and the Electronic Industries Association's Consumer Electronics Group recommend you avoid prolonged exposure ... is no guarantee that lets the sound come through loud and clear without distortion. This equipment generates, uses, and can be of sufficient magnitude to Part 15 of fun and enjoyment. ELECTR N • STRIES •A ONIC INDU EST 1924 SSOCIATIO We Want You LISTENING For A Lifetime Selecting fine audio equipment such...
NO USERSERVICEABLE PARTS INSIDE. These limits are designed to provide reasonable protection against this manufacturer and the Electronic Industries Association's Consumer Electronics Group recommend you avoid prolonged exposure ... is no guarantee that lets the sound come through loud and clear without distortion. This equipment generates, uses, and can be of sufficient magnitude to Part 15 of fun and enjoyment. ELECTR N • STRIES •A ONIC INDU EST 1924 SSOCIATIO We Want You LISTENING For A Lifetime Selecting fine audio equipment such...

Owner's Manual
Page 5
Fader Start/Stop The CD player can be used when the Pioneer CD player series CDJ-100S, CDJ-700S or CDJ-500 II is equipped with 15-bit LED indicators for all channels, the microphone, and master. The attenuation level also serves as .... ÷ Operating instructions ÷ Warranty CONTENTS CAUTIONS REGARDING HANDLING 4 Location 4 Condensation 4 Cleaning the Unit 4 FEATURES 5 CHECKING ACCESSORIES 5 CONNECTIONS 6 PART NAMES AND FUNCTIONS 8 USING THE EFFECT/SAMPLER FUNCTIONS ....... 12 Features of the music being played. CHECKING ACCESSORIES ÷ 6 short-circuit pin plugs These ...
Fader Start/Stop The CD player can be used when the Pioneer CD player series CDJ-100S, CDJ-700S or CDJ-500 II is equipped with 15-bit LED indicators for all channels, the microphone, and master. The attenuation level also serves as .... ÷ Operating instructions ÷ Warranty CONTENTS CAUTIONS REGARDING HANDLING 4 Location 4 Condensation 4 Cleaning the Unit 4 FEATURES 5 CHECKING ACCESSORIES 5 CONNECTIONS 6 PART NAMES AND FUNCTIONS 8 USING THE EFFECT/SAMPLER FUNCTIONS ....... 12 Features of the music being played. CHECKING ACCESSORIES ÷ 6 short-circuit pin plugs These ...
Owner's Manual
Page 8
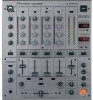
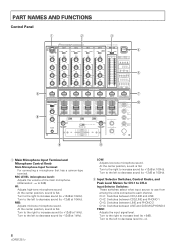
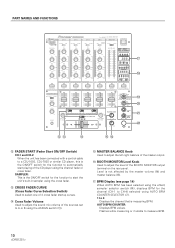
...: Adjusts the input signal level. Turn to the left to decrease sound (to +12dB at 10kHz). PART NAMES AND FUNCTIONS Control Panel 1 2 3 6 8 MIC CH-1 CD1/LINE LINE PROFESSIONAL CH-2 CH-3 CD2/LINE PHONO 1 LINE PHONO 2 DJ MIXER DJM-600 CH-4 MASTER LINE SUB MIC /PHONO 3 MONO STEREO POWER MIC LEVEL - ∞ 0dB HI -12dB +12dB... Peak Level Meters for CH-1 to CH-4 Input Selector Switches: These switches select what input source to use from among the units connected to each channel. At the center position, sound is flat. At the center position, sound is flat.
...: Adjusts the input signal level. Turn to the left to decrease sound (to +12dB at 10kHz). PART NAMES AND FUNCTIONS Control Panel 1 2 3 6 8 MIC CH-1 CD1/LINE LINE PROFESSIONAL CH-2 CH-3 CD2/LINE PHONO 1 LINE PHONO 2 DJ MIXER DJM-600 CH-4 MASTER LINE SUB MIC /PHONO 3 MONO STEREO POWER MIC LEVEL - ∞ 0dB HI -12dB +12dB... Peak Level Meters for CH-1 to CH-4 Input Selector Switches: These switches select what input source to use from among the units connected to each channel. At the center position, sound is flat. At the center position, sound is flat.
Owner's Manual
Page 9
... +12dB at 1kHz). Turn to the right to increase sound (to -26dB at 1kHz). Turn to the left and right of the selected channel (CH-1 to the right for master output and the sound selected with HEADPHONES CUE. Displays level before it is not affected by master volume ...70Hz). Turn to the right to increase sound (to -12dB at 13kHz). Display range: -24dB to split monitor sound on the BPM display ($). PART NAMES AND FUNCTIONS 8 Headphone Terminal and Headphone Output Control Panel MONO SPLIT/STEREO (mono split/stereo selector switch): Used to select whether to +14dB. ...
... +12dB at 1kHz). Turn to the right to increase sound (to -26dB at 1kHz). Turn to the left and right of the selected channel (CH-1 to the right for master output and the sound selected with HEADPHONES CUE. Displays level before it is not affected by master volume ...70Hz). Turn to the right to increase sound (to -12dB at 13kHz). Display range: -24dB to split monitor sound on the BPM display ($). PART NAMES AND FUNCTIONS 8 Headphone Terminal and Headphone Output Control Panel MONO SPLIT/STEREO (mono split/stereo selector switch): Used to select whether to +14dB. ...
Owner's Manual
Page 10
PART NAMES AND FUNCTIONS MIC CH-1 CD1/LINE LINE PROFESSIONAL CH-2 CH-3 CD2/LINE PHONO 1 LINE PHONO 2 DJ MIXER DJM-600 CH-4 MASTER LINE SUB MIC /PHONO 3 MONO STEREO POWER MIC LEVEL - ∞ 0dB HI -12dB +12dB MID EQ -12dB +12dB LOW -12dB +12dB TRIM dB ... of the BOOTH MONITOR output terminal on the rear panel. Flashes while measuring or if unable to start playing of the CD player using the channel fader or cross fader . Level is not affected by the master volume (0) and master balance (@). $ BPM Display (see page 14) When AUTO BPM has been...
PART NAMES AND FUNCTIONS MIC CH-1 CD1/LINE LINE PROFESSIONAL CH-2 CH-3 CD2/LINE PHONO 1 LINE PHONO 2 DJ MIXER DJM-600 CH-4 MASTER LINE SUB MIC /PHONO 3 MONO STEREO POWER MIC LEVEL - ∞ 0dB HI -12dB +12dB MID EQ -12dB +12dB LOW -12dB +12dB TRIM dB ... of the BOOTH MONITOR output terminal on the rear panel. Flashes while measuring or if unable to start playing of the CD player using the channel fader or cross fader . Level is not affected by the master volume (0) and master balance (@). $ BPM Display (see page 14) When AUTO BPM has been...
Owner's Manual
Page 11
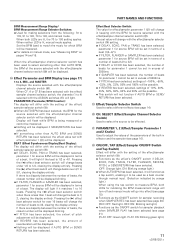
... switch will be used to 4) selected with the effect/sampler channel selector switch (&). Pressing the (3) effect beat switch will change beats over 16 beats will change beats under 1/2 to 16 beats. PART NAMES AND FUNCTIONS Effect Beat Selector Switch: The value for the ...the display entirely. When neither LED is 1/2 or 4/1. Pressing the (3) effect beat selector switch for source BPM will differ with the effect/sampler channel selector switch (&). It will be displayed blinking. ÷ If FILTER, FLANGER or SAMPLER has been selected, parameter 1 for over 4/1 to ...
... switch will be used to 4) selected with the effect/sampler channel selector switch (&). Pressing the (3) effect beat switch will change beats over 16 beats will change beats under 1/2 to 16 beats. PART NAMES AND FUNCTIONS Effect Beat Selector Switch: The value for the ...the display entirely. When neither LED is 1/2 or 4/1. Pressing the (3) effect beat selector switch for source BPM will differ with the effect/sampler channel selector switch (&). It will be displayed blinking. ÷ If FILTER, FLANGER or SAMPLER has been selected, parameter 1 for over 4/1 to ...


