Pioneer DJM-600 REFURBISHED Support and Manuals
Get Help and Manuals for this Pioneer item
View All Support Options Below
Free Pioneer DJM-600 REFURBISHED manuals!
Problems with Pioneer DJM-600 REFURBISHED?
Ask a Question
Free Pioneer DJM-600 REFURBISHED manuals!
Problems with Pioneer DJM-600 REFURBISHED?
Ask a Question
Popular Pioneer DJM-600 REFURBISHED Manual Pages
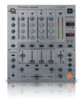
Owner's Manual - Page 1

DJ MIXER
DJM-600
Operating Instructions
1
Owner's Manual - Page 2
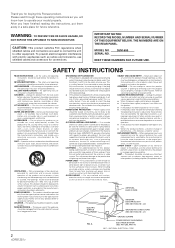
...POWER LINES - DJM-600
KEEP THESE NUMBERS FOR FUTURE USE. RETAIN INSTRUCTIONS - ACCESSORIES -
Never push objects of antenna-discharge unit, connection to cords at plugs, convenience receptacles, and the point where they exit from the wall outlet and disconnect the antenna or cable system.
REPLACEMENT PARTS - SAFETY CHECK - A
GROUND CLAMPS
POWER SERVICE GROUNDING...
Owner's Manual - Page 3
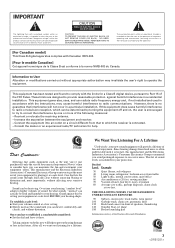
... installation. IMPORTANT
The lightning flash with arrowhead symbol, within an equilateral triangle, is intended to alert the user to the presence of uninsulated "dangerous voltage" within an equilateral triangle is intended to alert the user to the presence of important operating and maintenance (servicing) instructions in the literature accompanying the appliance.
[For Canadian model...
Owner's Manual - Page 6
...
CH - 2
CH - 1
PLAYER CONTROL
220-230 110-120V -240V
VOLTAGE SELECTOR
MASTER
R OUT2
R
2 COLD 3 HOT
L R L R
L
L
1 GND
REC OUT
R L R L R
LR
L
SEND (MONO)
RETURN (MONO)
CH - 4 SUBMIC
DJM-600
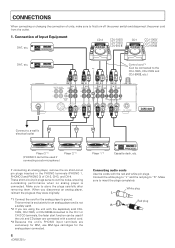
Connect to a wall's electrical outlet
Player 3 *3
(PHONO 3 cannot be connected to cut fine noise, ensuring outstanding performance when no analog player is not a safety earth...
Owner's Manual - Page 7
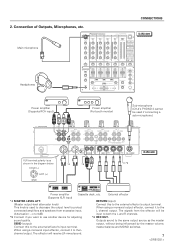
..., etc.
When using a monaural input effector, connect it to the same output source as
RL
shown in the diagram below.
*4
*6
*5
COLD (-)
23
1
HOT (+)
GND
DJM-600
Power amplifier (Supports XLR input)
Cassette deck, etc. CONNECTIONS
2. External effector
*4 MASTER LEVEL ATT. (Master output-level attenuator knob) This knob is as the master output, without...
Owner's Manual - Page 8
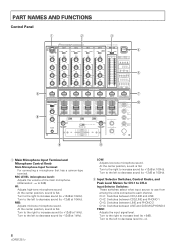
... PHONO 2 CH-4: Switches between LINE and SUB MIC/PHONO 3 TRIM: Adjusts the input signal level. PART NAMES AND FUNCTIONS
Control Panel
1
2
3
6 8
MIC
CH-1
CD1/LINE
LINE
PROFESSIONAL
CH-2
CH-3
CD2/LINE
PHONO 1
LINE
PHONO 2
DJ MIXER DJM-600
CH-4
MASTER
LINE
SUB MIC /PHONO 3
MONO
STEREO
POWER
MIC LEVEL
- ∞
0dB
HI
-12dB...
Owner's Manual - Page 10
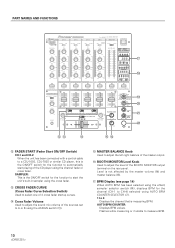
...fader.
~ CROSS FADER CURVE (Cross Fader Curve Selection Switch) Used to select one of the sources set to A or B using AUTO BPM COUNTER SELECTOR (7). 1 to 4: Displays the channel that is ... cross fader . Level is measuring BPM. PART NAMES AND FUNCTIONS
MIC
CH-1
CD1/LINE
LINE
PROFESSIONAL
CH-2
CH-3
CD2/LINE
PHONO 1
LINE
PHONO 2
DJ MIXER DJM-600
CH-4
MASTER
LINE
SUB MIC /PHONO ...
Owner's Manual - Page 14
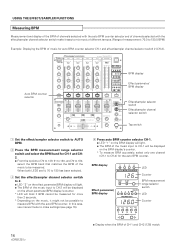
...Effect/sampler selector switch Effect/sampler channel selector switch
Tap switch
1 Set the effect/sampler selector switch to AUTO BPM.
2 Press the ...LINE
PROFESSIONAL
CH-2
CH-3
CD2/LINE
PHONO 1
LINE
PHONO 2
DJ MIXER DJM-600
CH-4
MASTER
LINE
SUB MIC /PHONO 3
MONO
STEREO
POWER
MIC LEVEL
-...BEAT SAMPLER
MIC
CF.
In this case, use manual mode to make it might not be possible to ...
Owner's Manual - Page 16
...-1
CD1/LINE
LINE
PROFESSIONAL
CH-2
CH-3
CD2/LINE
PHONO 1
LINE
PHONO 2
DJ MIXER DJM-600
CH-4
MASTER
LINE
SUB MIC /PHONO 3
MONO
STEREO
POWER
MIC LEVEL
- ∞
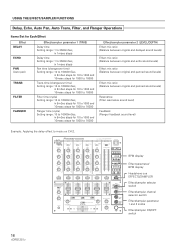
0dB...Effect/sampler parameter 1 (TIME)
Delay time Setting range: 1 to 3500mSec,
in 1msec steps
Delay time Setting range: 1 to 3500mSec,
in 1msec steps
Pan time (changeover time) Setting range: 10 to 16000mSec,
in 5mSec steps...
Owner's Manual - Page 17

...than 2 seconds. Setting to Balance Original and Delayed Sound Levels ÷ The balance between original and delayed sound levels is set using the beat display as a guide.
Precautions: ÷...value can be set similarly. Turning this case, use manual mode to make settings (see page 15).
3 Set the parameter value. 1 Set the effect/sampler selector switch to DELAY.
2 Set the effect/sampler...
Owner's Manual - Page 18
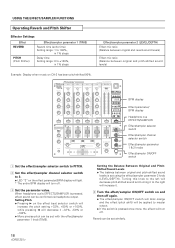
...sampler ON/OFF switch will blink orange and the effect (pitch shift) will be set similarly.
18 B
1
MASTER
CH. Setting Pitch ÷ Pressing 3 on the effect parameter/BPM display will light. *... the switch is set using the effect/sampler parameter 2 knob (LEVEL/DEPTH). MIC
CH-1
CD1/LINE
LINE
PROFESSIONAL
CH-2
CH-3
CD2/LINE
PHONO 1
LINE
PHONO 2
DJ MIXER DJM-600
CH-4
MASTER
LINE...
Owner's Manual - Page 20
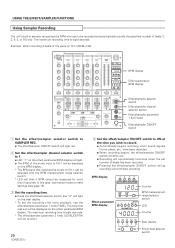
...be displayed on the effect parameter/BPM display. In this case, use manual mode to make settings (see page 15).
3 Set the recording time. ÷ Press the effect beat selector switch and "8"... * The BPM band that was set the recording time more than 2 seconds. MIC
CH-1
CD1/LINE
LINE
PROFESSIONAL
CH-2
CH-3
CD2/LINE
PHONO 1
LINE
PHONO 2
DJ MIXER DJM-600
CH-4
MASTER
LINE
SUB MIC /PHONO...
Owner's Manual - Page 21
.../SAMPLER FUNCTIONS
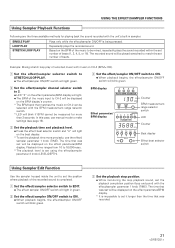
Using Sampler Playback Functions
Following are the three available methods for more than the time that was set the playback time more precisely, use manual mode to make settings (see page 15).
3 Set the playback time and playback level. ÷ Press the effect beat selector switch and "8" will light on the BPM...
Owner's Manual - Page 22

... the cue point when the fader is returned to this unit
CDJ-100S CDJ-700S CDJ-500 II
22 B
1
MASTER
CH. A CDJ-100S
Control cables DJM-600
B CDJ-100S
Channel fader volume
Cross fader volume
Cross Fader Start Play and Back Cue Play
When "A" is at the same time. Channel fader volume...
Owner's Manual - Page 24

.... Measured BPM values are often mistaken for trouble and malfunctions.
If you think there is off and then on the back has been set BPM manually. Sometimes the trouble may cause the unit to the correct cross...the following items, contact your dealer or nearest PIONEER service center. External effector's sound distorted.
÷ The input level from another component. Can't measure BPM...
Pioneer DJM-600 REFURBISHED Reviews
We have not received any reviews for Pioneer yet.