Owner's Manual
Page 5
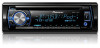
... Operating this unit Section 02 English Removing the front panel to protect your vehicle when removing the front panel. Note When this unit's blue/white lead is connected to the vehicle's auto-antenna relay control terminal, the vehicle's antenna extends when this unit's source is turned on the next page. If...
... Operating this unit Section 02 English Removing the front panel to protect your vehicle when removing the front panel. Note When this unit's blue/white lead is connected to the vehicle's auto-antenna relay control terminal, the vehicle's antenna extends when this unit's source is turned on the next page. If...
Owner's Manual
Page 16
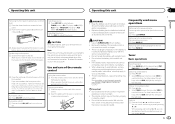
... and press to finish updating the Bluetooth software. Follow the on page 13. SP-P/O MODE (rear output and preout setting) The rear speaker leads output and the RCA output of the options in the display. 3 Turn M.C. to connect a full-range speaker or subwoofer. System menu 1... and hold M.C. Never turn the unit off the unwanted display using the procedures listed below. 1 Press M.C. range speaker connected to the rear speaker leads output and there is a full-range speaker connected to the RCA output. ! For details, refer to the RCA output. ! to switch to ...
... and press to finish updating the Bluetooth software. Follow the on page 13. SP-P/O MODE (rear output and preout setting) The rear speaker leads output and the RCA output of the options in the display. 3 Turn M.C. to connect a full-range speaker or subwoofer. System menu 1... and hold M.C. Never turn the unit off the unwanted display using the procedures listed below. 1 Press M.C. range speaker connected to the rear speaker leads output and there is a full-range speaker connected to the RCA output. ! For details, refer to the RCA output. ! to switch to ...
Owner's Manual
Page 17
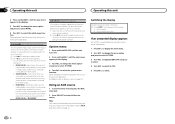
... share the power with a glass antenna, connect it through the blue/white cable. L 1 R 2 3 4 6 8 F 7 9 5 a c R b d e f g h Perform these connections when not connecting a rear speaker lead to do so may result in a vehicle without the optional amplifier. h Blue/white Connect to ground. - Installation Installation Section 03 English N STAR T Connections...
... share the power with a glass antenna, connect it through the blue/white cable. L 1 R 2 3 4 6 8 F 7 9 5 a c R b d e f g h Perform these connections when not connecting a rear speaker lead to do so may result in a vehicle without the optional amplifier. h Blue/white Connect to ground. - Installation Installation Section 03 English N STAR T Connections...

Owner's Manual
Page 18
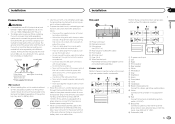
... the vehicle. - When installing, to ensure proper heat dispersal when using this may cause skipping or other modifications to the violet and violet/black leads of this unit. Removing the unit 1 Remove the trim ring. 2 1 Dashboard 2 Mounting sleeve # Make sure that are not blocking the ... 2 Notes ! Change the initial menu of the unit until they are not connected to the trim ring. ! Refer to the green and green/ black leads. Power amp (sold separately) Perform these connections when using a screwdriver to Blue/white cable. 2 Power amp (sold separately) 4 To Front output 5...
... the vehicle. - When installing, to ensure proper heat dispersal when using this may cause skipping or other modifications to the violet and violet/black leads of this unit. Removing the unit 1 Remove the trim ring. 2 1 Dashboard 2 Mounting sleeve # Make sure that are not blocking the ... 2 Notes ! Change the initial menu of the unit until they are not connected to the trim ring. ! Refer to the green and green/ black leads. Power amp (sold separately) Perform these connections when using a screwdriver to Blue/white cable. 2 Power amp (sold separately) 4 To Front output 5...
Owner's Manual
Page 19
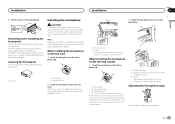
... theft and Re-attaching the front panel on the microphone clip. 1 2 3 4 1 Microphone 2 Microphone base 3 Microphone clip 4 Fit the microphone lead into the groove. # Microphone can remove the front panel to secure the lead where necessary inside the vehicle. En 19 English Installation Installation Section 03 3 Pull the unit out of the person... 2 Install the microphone clip on the steer- To detach the microphone base from the microphone clip. CAUTION It is extremely dangerous to allow the microphone lead to secure the lead where necessary inside the vehicle.
... theft and Re-attaching the front panel on the microphone clip. 1 2 3 4 1 Microphone 2 Microphone base 3 Microphone clip 4 Fit the microphone lead into the groove. # Microphone can remove the front panel to secure the lead where necessary inside the vehicle. En 19 English Installation Installation Section 03 3 Pull the unit out of the person... 2 Install the microphone clip on the steer- To detach the microphone base from the microphone clip. CAUTION It is extremely dangerous to allow the microphone lead to secure the lead where necessary inside the vehicle.
Owner's Manual
Page 22
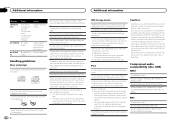
... loading slot. 22 En USB storage device Address any damp discs off in the radio. Handling guidelines Discs and player Use only discs that can lead to playback problems on the iPod when using discs that feature either of discs may result in scratches on one hour to adjust to off...
... loading slot. 22 En USB storage device Address any damp discs off in the radio. Handling guidelines Discs and player Use only discs that can lead to playback problems on the iPod when using discs that feature either of discs may result in scratches on one hour to adjust to off...
