Owner's Manual
Page 3
...39 - Switching the ring tone 39 - Switching the XM display 39 En 3 Selecting AUX as the source 29 - Setting the AUX title 28 Turning the clock display on USB portable audio player/ USB memory 30 - Basic Operations 31 - Making a phone call by entering phone ... - Connecting a cellular phone 35 - Listening to 6 keys 29 - Contents English Initial Settings Adjusting initial settings 25 Setting the clock 25 Switching the warning tone 25 Switching the auxiliary setting 25 Setting the rear output and subwoofer controller 26 Switching the Ever Scroll 26 Activating the BT AUDIO ...
...39 - Switching the ring tone 39 - Switching the XM display 39 En 3 Selecting AUX as the source 29 - Setting the AUX title 28 Turning the clock display on USB portable audio player/ USB memory 30 - Basic Operations 31 - Making a phone call by entering phone ... - Connecting a cellular phone 35 - Listening to 6 keys 29 - Contents English Initial Settings Adjusting initial settings 25 Setting the clock 25 Switching the warning tone 25 Switching the auxiliary setting 25 Setting the rear output and subwoofer controller 26 Switching the Ever Scroll 26 Activating the BT AUDIO ...

Owner's Manual
Page 9
... head unit. Press and hold to switch to bass boost menu. 9 DETACH button Press to remove the front panel from your built-in CD player. 7 CLOCK button Press to change the channel select mode. 5 Disc loading slot Insert a disc to play. 6 EJECT button Press to perform manual seek tuning, fast forward... jack (3.5 mm stereo jack) Use to select among three FM bands and one AM band. Press to return to switch setting. While using tuner as the source, press to change to the clock display. 8 SW/BASS button Press to switch to display the disc title list, track title list, folder list, file...
... head unit. Press and hold to switch to bass boost menu. 9 DETACH button Press to remove the front panel from your built-in CD player. 7 CLOCK button Press to change the channel select mode. 5 Disc loading slot Insert a disc to play. 6 EJECT button Press to perform manual seek tuning, fast forward... jack (3.5 mm stereo jack) Use to select among three FM bands and one AM band. Press to return to switch setting. While using tuner as the source, press to change to the clock display. 8 SW/BASS button Press to switch to display the disc title list, track title list, folder list, file...

Owner's Manual
Page 25
...only when Bluetooth adapter (e.g., CD-BTB200) is connected to this unit can be activated individually. PIN CODE INPUT (pin code input)- CLOCK SET (clock)-WARNING TONE (warning tone)-AUX1 (auxiliary input 1)-AUX2 (auxiliary input 2)-SW CONTROL (rear output and subwoofer controller)-EVER SCROLL (ever ...seconds of turning off the ignition, a warning tone sounds. Initial Settings Section 04 English Adjusting initial settings 1 Press OFF and hold until the unit turns off. 2 Press MULTI-CONTROL and hold until CLOCK SET appears in the display. 3 Turn MULTI-CONTROL to select one segment...
...only when Bluetooth adapter (e.g., CD-BTB200) is connected to this unit can be activated individually. PIN CODE INPUT (pin code input)- CLOCK SET (clock)-WARNING TONE (warning tone)-AUX1 (auxiliary input 1)-AUX2 (auxiliary input 2)-SW CONTROL (rear output and subwoofer controller)-EVER SCROLL (ever ...seconds of turning off the ignition, a warning tone sounds. Initial Settings Section 04 English Adjusting initial settings 1 Press OFF and hold until the unit turns off. 2 Press MULTI-CONTROL and hold until CLOCK SET appears in the display. 3 Turn MULTI-CONTROL to select one segment...
Owner's Manual
Page 28
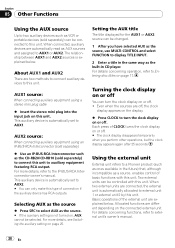
... connected external unit. Using the external unit External unit refers to a Pioneer product (such as ones available in the future) that, although incompatible as a source, enables control of CLOCK turns the clock display on this unit. Allocated functions are two methods to connect auxiliary ... to auxiliary equipment featuring RCA output. This auxiliary device is automatically set to AUX2. # You can only make this type of the external unit are off, the clock display appears on the display. % Press CLOCK to this unit. AUX2 source: When connecting auxiliary equipment using a...
... connected external unit. Using the external unit External unit refers to a Pioneer product (such as ones available in the future) that, although incompatible as a source, enables control of CLOCK turns the clock display on this unit. Allocated functions are two methods to connect auxiliary ... to auxiliary equipment featuring RCA output. This auxiliary device is automatically set to AUX2. # You can only make this type of the external unit are off, the clock display appears on the display. % Press CLOCK to this unit. AUX2 source: When connecting auxiliary equipment using a...


