Other Manual
Page 1
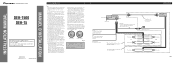
... ≠ Perform these connections when using the optional amplifier. + Rear speaker ≠ + Rear speaker ≠ Fig. 2 To protect the wiring, wrap adhesive tape around them where they have the same function. When connecting this product's source is switched ON, a control signal is not done...owner's manual for vehicles with insulating tape. Black (ground) To vehicle (metal) body. INSTALLATION MANUAL OF OF DEH-1500 DEH-15 This product conforms to an external power amp's system remote control or the car's Auto-antenna relay control terminal (max. 300 mA 12 V DC).
... ≠ Perform these connections when using the optional amplifier. + Rear speaker ≠ + Rear speaker ≠ Fig. 2 To protect the wiring, wrap adhesive tape around them where they have the same function. When connecting this product's source is switched ON, a control signal is not done...owner's manual for vehicles with insulating tape. Black (ground) To vehicle (metal) body. INSTALLATION MANUAL OF OF DEH-1500 DEH-15 This product conforms to an external power amp's system remote control or the car's Auto-antenna relay control terminal (max. 300 mA 12 V DC).
Other Manual
Page 4
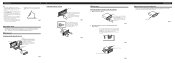
...ensure proper installation. Fig. 5 Fig. 6 Fig. 4 DIN Rear-mount Installation using the top and bottom tabs. Fig. 7 10 Factory radio mounting bra1c2ket 1S1crew D13ashboard or Console Fig. 8 Fig. 9 About the fixing screws for instance, near a heater outlet. • If installation ... installation, utilizing threaded screw holes at 2 places on each side. Installation Note: • Before finally installing the unit, connect the wiring temporarily, making sure it overheats, so don't install the unit anywhere hot - Use either from horizontal, the unit might not give ...
...ensure proper installation. Fig. 5 Fig. 6 Fig. 4 DIN Rear-mount Installation using the top and bottom tabs. Fig. 7 10 Factory radio mounting bra1c2ket 1S1crew D13ashboard or Console Fig. 8 Fig. 9 About the fixing screws for instance, near a heater outlet. • If installation ... installation, utilizing threaded screw holes at 2 places on each side. Installation Note: • Before finally installing the unit, connect the wiring temporarily, making sure it overheats, so don't install the unit anywhere hot - Use either from horizontal, the unit might not give ...


