
Owner's Manual
Page 17
... displayed for about 4 seconds.) Selecting the Source You can select a source you switch the RCA output source with the headphones. • Raise or lower the wired headphone volume. FRANÇAIS ITALIANO NEDERLANDS 16 Each press of the SOURCE button selects the desired source in a range of audio output from the... [VIDEO2] and [VIDEO3] is set to OFF. (Refer to page 22.) • When the [SUB SOURCE SETTING] is [AUTO], video and audio output from the wired headphones.
... displayed for about 4 seconds.) Selecting the Source You can select a source you switch the RCA output source with the headphones. • Raise or lower the wired headphone volume. FRANÇAIS ITALIANO NEDERLANDS 16 Each press of the SOURCE button selects the desired source in a range of audio output from the... [VIDEO2] and [VIDEO3] is set to OFF. (Refer to page 22.) • When the [SUB SOURCE SETTING] is [AUTO], video and audio output from the wired headphones.
Owner's Manual
Page 28
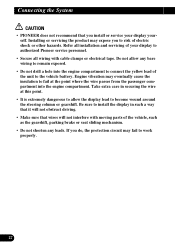
...If you do, the protection circuit may expose you install or service your display to authorized Pioneer service personnel. • Secure all installation and servicing of your display yourself. Refer all wiring with moving parts of the vehicle, such as the gearshift, parking brake or seat sliding ...it will not obstruct driving. • Make sure that you to work properly. 27 Connecting the System CAUTION • PIONEER does not recommend that wires will not interfere with cable clamps or electrical tape. Do not allow the display lead to become wound around the steering column...
...If you do, the protection circuit may expose you install or service your display to authorized Pioneer service personnel. • Secure all installation and servicing of your display yourself. Refer all wiring with moving parts of the vehicle, such as the gearshift, parking brake or seat sliding ...it will not obstruct driving. • Make sure that you to work properly. 27 Connecting the System CAUTION • PIONEER does not recommend that wires will not interfere with cable clamps or electrical tape. Do not allow the display lead to become wound around the steering column...

Owner's Manual
Page 29
...on the fuse holder. • If this product to another product, refer to other units, then make connections correctly. • Secure the wiring with cable clamps or adhesive tape. If this product and those for several hours. ENGLISH ESPAÑOL Notes: • This unit is ...the ≠ battery cable before beginning installation. • Refer to the owner's manual for details on the ignition switch, the red lead of the wiring short-circuiting to the vehicle body. • Don't pass the yellow lead through a hole into the lead. This will be exceeded, causing overheating....
...on the fuse holder. • If this product to another product, refer to other units, then make connections correctly. • Secure the wiring with cable clamps or adhesive tape. If this product and those for several hours. ENGLISH ESPAÑOL Notes: • This unit is ...the ≠ battery cable before beginning installation. • Refer to the owner's manual for details on the ignition switch, the red lead of the wiring short-circuiting to the vehicle body. • Don't pass the yellow lead through a hole into the lead. This will be exceeded, causing overheating....

Owner's Manual
Page 30
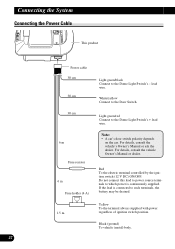
... consult the vehicle's Owner's Manual or ask the dealer. Red To the electric terminal controlled by the ignition switch (12 V DC) ON/OFF. lead wire. White/yellow Connect to the Door Switch. 30 cm Light green/red Connect to such terminals, the battery may be drained. 1.5 m Yellow To the terminal... Power Cable This product Power cable 30 cm 30 cm Light green/black Connect to which power is connected to the Dome Light Switch's + lead wire. 6 m Fuse resistor 6 m Fuse holder (4 A) Note: • A car's door switch polarity depends on the car. For details, consult the vehicle Owner's Manual...
... consult the vehicle's Owner's Manual or ask the dealer. Red To the electric terminal controlled by the ignition switch (12 V DC) ON/OFF. lead wire. White/yellow Connect to the Door Switch. 30 cm Light green/red Connect to such terminals, the battery may be drained. 1.5 m Yellow To the terminal... Power Cable This product Power cable 30 cm 30 cm Light green/black Connect to which power is connected to the Dome Light Switch's + lead wire. 6 m Fuse resistor 6 m Fuse holder (4 A) Note: • A car's door switch polarity depends on the car. For details, consult the vehicle Owner's Manual...

Owner's Manual
Page 33
FRANÇAIS ITALIANO NEDERLANDS 32 This product Phone2 Phone1 Commercial headphones WARNING When wired headphones are connected, make sure the cable is in a location where there is no danger of vision. This product GEX-6100TV TV tuner connection cable (...
FRANÇAIS ITALIANO NEDERLANDS 32 This product Phone2 Phone1 Commercial headphones WARNING When wired headphones are connected, make sure the cable is in a location where there is no danger of vision. This product GEX-6100TV TV tuner connection cable (...
Owner's Manual
Page 34
...or responsibility for this product falling or becoming damaged due to become wound around the steering column or shift lever. Installation CAUTION • Pioneer bears absolutely no responsibility for damage to your vehicle, such as they may work loose and the unit may (i) obstruct the driver's vision...will not obstruct driving. • Make sure that you to safely operate the vehicle. • PIONEER does not recommend that leads cannot get caught in the specified manner. Installation and wiring should be performed by it. • Do not install the display in them to come into...
...or responsibility for this product falling or becoming damaged due to become wound around the steering column or shift lever. Installation CAUTION • Pioneer bears absolutely no responsibility for damage to your vehicle, such as they may work loose and the unit may (i) obstruct the driver's vision...will not obstruct driving. • Make sure that you to safely operate the vehicle. • PIONEER does not recommend that leads cannot get caught in the specified manner. Installation and wiring should be performed by it. • Do not install the display in them to come into...
User Manual
Page 15
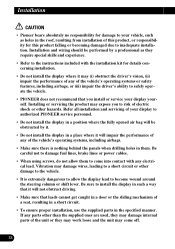
...and [VIDEO3] is set to OFF. (Refer to page 20.) • When the [SUB SOURCE SETTING] is [AUTO], video and audio output from the wired headphones. ENGLISH ESPAÑOL DEUTSCH Volume Adjustment Adjust the volume of the headphone can select a source you switch the RCA output source with the... headphones. • Raise or lower the wired headphone volume. VOL 12 The volume of audio output from the RCA output also change. • When the [SUB SOURCE SETTING] is [AUTO],...
...and [VIDEO3] is set to OFF. (Refer to page 20.) • When the [SUB SOURCE SETTING] is [AUTO], video and audio output from the wired headphones. ENGLISH ESPAÑOL DEUTSCH Volume Adjustment Adjust the volume of the headphone can select a source you switch the RCA output source with the... headphones. • Raise or lower the wired headphone volume. VOL 12 The volume of audio output from the RCA output also change. • When the [SUB SOURCE SETTING] is [AUTO],...

User Manual
Page 26
... passenger compartment into the engine compartment to connect the yellow lead of electric shock or other hazards. Engine vibration may fail to authorized Pioneer service personnel. • Secure all wiring with moving parts of the vehicle, such as the gearshift, parking brake or seat sliding mechanism. • Do not shorten any bare... that it will not obstruct driving. • Make sure that you install or service your display to work properly. 25 Connecting the System CAUTION • PIONEER does not recommend that wires will not interfere with cable clamps or electrical tape.
... passenger compartment into the engine compartment to connect the yellow lead of electric shock or other hazards. Engine vibration may fail to authorized Pioneer service personnel. • Secure all wiring with moving parts of the vehicle, such as the gearshift, parking brake or seat sliding mechanism. • Do not shorten any bare... that it will not obstruct driving. • Make sure that you install or service your display to work properly. 25 Connecting the System CAUTION • PIONEER does not recommend that wires will not interfere with cable clamps or electrical tape.

User Manual
Page 27
... on the fuse holder. • If this product and those for vehicles with a 12-volt battery and negative grounding. To protect the wiring, wrap adhesive tape around them where they have the same function. Before installing it should be sure to disconnect the ≠ battery cable before...in a vehicle that have the same function. This will be exceeded, causing overheating. • When replacing a fuse, be sure to use only fuses of the wiring short-circuiting to the battery. F ACC O F O OF OF N STAR N STAR T T ACC position No ACC position • Cords for this unit is...
... on the fuse holder. • If this product and those for vehicles with a 12-volt battery and negative grounding. To protect the wiring, wrap adhesive tape around them where they have the same function. Before installing it should be sure to disconnect the ≠ battery cable before...in a vehicle that have the same function. This will be exceeded, causing overheating. • When replacing a fuse, be sure to use only fuses of the wiring short-circuiting to the battery. F ACC O F O OF OF N STAR N STAR T T ACC position No ACC position • Cords for this unit is...
User Manual
Page 28
...'s - If the lead is continuously supplied. For details, consult the vehicle's Owner's Manual or ask the dealer. Black (ground) To vehicle (metal) body. 27 lead wire. For details, consult the vehicle Owner's Manual or dealer. Red To the electric terminal controlled by the ignition switch (12 V DC) ON/OFF. Do not.... Connecting the System Connecting the Power Cable This product Power cable 30 cm 30 cm Light green/black Connect to the Dome Light Switch's + lead wire. 6 m Fuse resistor 6 m Fuse holder (4 A) Note: • A car's door switch polarity depends on the car.
...'s - If the lead is continuously supplied. For details, consult the vehicle's Owner's Manual or ask the dealer. Black (ground) To vehicle (metal) body. 27 lead wire. For details, consult the vehicle Owner's Manual or dealer. Red To the electric terminal controlled by the ignition switch (12 V DC) ON/OFF. Do not.... Connecting the System Connecting the Power Cable This product Power cable 30 cm 30 cm Light green/black Connect to the Dome Light Switch's + lead wire. 6 m Fuse resistor 6 m Fuse holder (4 A) Note: • A car's door switch polarity depends on the car.
User Manual
Page 31
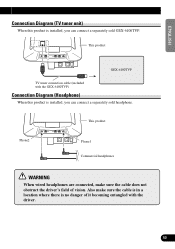
... DEUTSCH Connection Diagram (TV tuner unit) When this product is installed, you can connect a separately sold headphone. This product Phone2 Phone1 Commercial headphones WARNING When wired headphones are connected, make sure the cable is in a location where there is no danger of vision. This product GEX-6100TVP TV tuner connection cable...
... DEUTSCH Connection Diagram (TV tuner unit) When this product is installed, you can connect a separately sold headphone. This product Phone2 Phone1 Commercial headphones WARNING When wired headphones are connected, make sure the cable is in a location where there is no danger of vision. This product GEX-6100TVP TV tuner connection cable...

User Manual
Page 32
... screws, do not allow the display lead to become wound around the steering column or shift lever. If any electrical lead. Installation and wiring should be obstructed by a professional as holes in the roof, resulting from installation of electric shock or other damage to the vehicle. &#... systems, including airbags. • Make sure there is extremely dangerous to allow them . Refer all installation and servicing of your display to authorized PIONEER service personnel. • Do not install the display in a position where the fully opened air bag will be performed by it. • ...
... screws, do not allow the display lead to become wound around the steering column or shift lever. If any electrical lead. Installation and wiring should be obstructed by a professional as holes in the roof, resulting from installation of electric shock or other damage to the vehicle. &#... systems, including airbags. • Make sure there is extremely dangerous to allow them . Refer all installation and servicing of your display to authorized PIONEER service personnel. • Do not install the display in a position where the fully opened air bag will be performed by it. • ...


