Installation Manual
Page 3
... emergency number. ! Read this navigation system in your vehicle's interior, the navigation system should not divert your seat belt is designed for future reference. ! Do not install this product and its connecting cables may not be considerably more severe if your attention from the safe operation of objects shown on the screen, and compass directions. Keep this navigation system (or the rear view camera...
... emergency number. ! Read this navigation system in your vehicle's interior, the navigation system should not divert your seat belt is designed for future reference. ! Do not install this product and its connecting cables may not be considerably more severe if your attention from the safe operation of objects shown on the screen, and compass directions. Keep this navigation system (or the rear view camera...

Operation Manual
Page 2
... - Inserting an SD memory card (for AVICX950BH, AVIC-X850BT and AVICX8510BT) 18 Plugging and unplugging a USB storage device 18 - Operating the on internal memory 11 - A message about the map database 20 Demonstration images 20 Temporarily clearing the screen (navigation system in a USB storage device 18 - Data subject to use the navigation menu screens 22 Shortcut Menu 23 - Contents Thank you for AVIC-X950BH, AVIC- Conventions used in a safe place for AVIC-Z150BH) 16 - Before removing the vehicle battery 11 - Ejecting...
... - Inserting an SD memory card (for AVICX950BH, AVIC-X850BT and AVICX8510BT) 18 Plugging and unplugging a USB storage device 18 - Operating the on internal memory 11 - A message about the map database 20 Demonstration images 20 Temporarily clearing the screen (navigation system in a USB storage device 18 - Data subject to use the navigation menu screens 22 Shortcut Menu 23 - Contents Thank you for AVIC-X950BH, AVIC- Conventions used in a safe place for AVIC-Z150BH) 16 - Before removing the vehicle battery 11 - Ejecting...

Operation Manual
Page 4
... 74 - Switching the seek mode 80 - Pairing from the history 63 - Calling a number in strong frequencies 80 - Dialing a favorite location 64 - Deleting registered contacts 66 - Editing the password 68 - Storing the strongest broadcast frequencies 74 Using advanced functions 75 - Setting for priority connecting 60 Using hands-free phoning Displaying the phone menu 61 Making a phone call automatically 68 - Deleting the history information 67 Changing the phone settings 67 - Answering a call 61 - Selecting a source 71 Turning off the...
... 74 - Switching the seek mode 80 - Pairing from the history 63 - Calling a number in strong frequencies 80 - Dialing a favorite location 64 - Deleting registered contacts 66 - Editing the password 68 - Storing the strongest broadcast frequencies 74 Using advanced functions 75 - Setting for priority connecting 60 Using hands-free phoning Displaying the phone menu 61 Making a phone call automatically 68 - Deleting the history information 67 Changing the phone settings 67 - Answering a call 61 - Selecting a source 71 Turning off the...

Operation Manual
Page 5
... connected devices 107 Starting procedure 107 - For smartphone users 108 Streaming Pandora® 109 - Using the touch panel keys 110 - Operating by hardware buttons 106 Streaming Pandora® and using Aha Radio Information for a specific scene and starting playback from a specified time 101 Operating by hardware buttons 102 Using an iPod (iPod) Starting procedure 103 Reading the screen 103 Using the touch panel keys 104 Changing the wide screen mode 105 Operating by hardware buttons...
... connected devices 107 Starting procedure 107 - For smartphone users 108 Streaming Pandora® 109 - Using the touch panel keys 110 - Operating by hardware buttons 106 Streaming Pandora® and using Aha Radio Information for a specific scene and starting playback from a specified time 101 Operating by hardware buttons 102 Using an iPod (iPod) Starting procedure 103 Reading the screen 103 Using the touch panel keys 104 Changing the wide screen mode 105 Operating by hardware buttons...

Operation Manual
Page 6
... home 134 Displaying the adjustment and correction screen 135 Switching the muting/attenuation timing 135 Switching the muting/attenuation level 136 Setting the Volume for Guidance and Phone 136 Correcting the current location 136 Switching the road on which you are driving 137 Displaying the screen for navigation function settings 137 - Deleting the track log automatically 139 - Clearing status 134 Checking the device number 134 Checking the version information 134 Registering your application (iPhone) 131 - Setting the scroll-Locked...
... home 134 Displaying the adjustment and correction screen 135 Switching the muting/attenuation timing 135 Switching the muting/attenuation level 136 Setting the Volume for Guidance and Phone 136 Correcting the current location 136 Switching the road on which you are driving 137 Displaying the screen for navigation function settings 137 - Deleting the track log automatically 139 - Clearing status 134 Checking the device number 134 Checking the version information 134 Registering your application (iPhone) 131 - Setting the scroll-Locked...

Operation Manual
Page 7
... - Setting the use of the vehicle 143 - Displaying the traffic notification icon 144 Changing the view mode 144 Displaying the screen for AV sound settings 150 - Changing the screen size of freeways 141 - Displaying your DivX VOD deregistration code 150 Displaying the screen for system settings 144 - Using balance adjustment 150 - Setting video input 1 (AV1) 149 - Performing Auto EQ 155 Displaying the screen for rear view camera 161 - Setting for app settings 157 - Setting the criteria of the touch panel (touch panel calibration) 147 - Selecting the language...
... - Setting the use of the vehicle 143 - Displaying the traffic notification icon 144 Changing the view mode 144 Displaying the screen for AV sound settings 150 - Changing the screen size of freeways 141 - Displaying your DivX VOD deregistration code 150 Displaying the screen for system settings 144 - Using balance adjustment 150 - Setting video input 1 (AV1) 149 - Performing Auto EQ 155 Displaying the screen for rear view camera 161 - Setting for app settings 157 - Setting the criteria of the touch panel (touch panel calibration) 147 - Selecting the language...
Operation Manual
Page 8
Route search specifications 180 Handling and care of discs 180 - Liquid crystal display (LCD) screen 192 - Destination menu 193 - Phone menu 193 - Navi Settings menu 194 - System Settings menu 196 - Entering the password 163 - Restoring the navigation system to the default or factory settings 164 - When positioning by dead reckoning 176 - Ambient conditions for playable media 182 - Playing DualDisc 182 - Edit menu 194 - Restoring the default setting 164 - Positioning by GPS is impossible 177 - DVD-Video...
Route search specifications 180 Handling and care of discs 180 - Liquid crystal display (LCD) screen 192 - Destination menu 193 - Phone menu 193 - Navi Settings menu 194 - System Settings menu 196 - Entering the password 163 - Restoring the navigation system to the default or factory settings 164 - When positioning by dead reckoning 176 - Ambient conditions for playable media 182 - Playing DualDisc 182 - Edit menu 194 - Restoring the default setting 164 - Positioning by GPS is impossible 177 - DVD-Video...

Operation Manual
Page 31
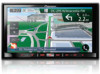
... built-in memory, the information is available. No turn-by-turn directions will display full route guidance, including turn-by -turn voice directions and arrow icons. Roads without turn-by -turn instructions Routable roads (the route displayed and highlighted in pink) have touched. Pioneer navigation will display full route guidance, including turn-by -turn voice directions and arrow icons. The map moves centered around the position you have only basic data and can be used for your safety.) Operating the map screen Scrolling the map to the...
... built-in memory, the information is available. No turn-by-turn directions will display full route guidance, including turn-by -turn voice directions and arrow icons. Roads without turn-by -turn instructions Routable roads (the route displayed and highlighted in pink) have touched. Pioneer navigation will display full route guidance, including turn-by -turn voice directions and arrow icons. The map moves centered around the position you have only basic data and can be used for your safety.) Operating the map screen Scrolling the map to the...

Operation Manual
Page 33
And if you touch the screen of the operations, refer to How to call the position if a telephone number is available. (Pairing with an antenna view (3D map). ! Switching the view mode Various types of screen displays can be selected for navigation guidance. 1 Display the map screen. = For details of an application for a POI. App View: Displays the screen of the screen. ! 3D View: Displays a map with cellular phone featuring Bluetooth wireless technology is required.) 4 The previous facility or the next facility...
And if you touch the screen of the operations, refer to How to call the position if a telephone number is available. (Pairing with an antenna view (3D map). ! Switching the view mode Various types of screen displays can be selected for navigation guidance. 1 Display the map screen. = For details of an application for a POI. App View: Displays the screen of the screen. ! 3D View: Displays a map with cellular phone featuring Bluetooth wireless technology is required.) 4 The previous facility or the next facility...

Operation Manual
Page 63
Dialing starts. Using hands-free phoning The "Contacts Name Search Results" screen appears. Calling a number by searching by name You can browse the call history list and call numbers from the history The most recent calls made (dialed), received and missed are stored in the "Contacts List" screen. 1 Display the "Phone" screen. = For details, refer to Displaying the phone menu on the list. A call history list appears. 4 Touch an entry on page...
Dialing starts. Using hands-free phoning The "Contacts Name Search Results" screen appears. Calling a number by searching by name You can browse the call history list and call numbers from the history The most recent calls made (dialed), received and missed are stored in the "Contacts List" screen. 1 Display the "Phone" screen. = For details, refer to Displaying the phone menu on the list. A call history list appears. 4 Touch an entry on page...
Operation Manual
Page 69
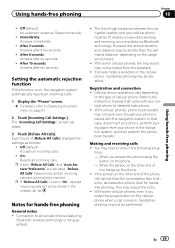
...-free phoning may hear a noise in the missed call list. When you press the accept button on page 61. 2 Touch [Incoming Call Settings.]. Respond manually. ! Connection to Displaying the phone menu on the cellular phone when a call cannot hear the conversation due to the navigation system, and then perform the phone book transfer. Making and receiving calls ! After 10 seconds: Answers after three seconds. ! Each touch of cellular phone. Off (default...
...-free phoning may hear a noise in the missed call list. When you press the accept button on page 61. 2 Touch [Incoming Call Settings.]. Respond manually. ! Connection to Displaying the phone menu on the cellular phone when a call cannot hear the conversation due to the navigation system, and then perform the phone book transfer. Making and receiving calls ! After 10 seconds: Answers after three seconds. ! Each touch of cellular phone. Off (default...

Operation Manual
Page 87
... changes the audio language. = For details, refer to Setting the top-priority languages on page 94. To select 3, touch [3] and [Enter] in order. Each touch of switches between viewing angles. Playing a DVD-Video Chapter 16 Playing a DVD-Video f Changing the wide screen mode = For details, refer to Changing the wide screen mode on or off using the "DVD/DivX® Setup" menu. p During playback of up to input the target number or time...
... changes the audio language. = For details, refer to Setting the top-priority languages on page 94. To select 3, touch [3] and [Enter] in order. Each touch of switches between viewing angles. Playing a DVD-Video Chapter 16 Playing a DVD-Video f Changing the wide screen mode = For details, refer to Changing the wide screen mode on or off using the "DVD/DivX® Setup" menu. p During playback of up to input the target number or time...

Operation Manual
Page 95
... discs, parental lock operates to the disc's instructions. If you want to Parental Level 2: Playback of discs for children and non-adult oriented discs is in an unnatural image. 1 Display the "DVD/DivX® Setup" screen. = For details, refer to input a four-digit code number. 4 While the input number is canceled, letting you can set , enter the registered code number and then select the parental level...
... discs, parental lock operates to the disc's instructions. If you want to Parental Level 2: Playback of discs for children and non-adult oriented discs is in an unnatural image. 1 Display the "DVD/DivX® Setup" screen. = For details, refer to input a four-digit code number. 4 While the input number is canceled, letting you can set , enter the registered code number and then select the parental level...

Operation Manual
Page 134
... Menu" screen. 3 Touch [Destination]. 134 En The device number of your home position saves time and effort. Clearing status You can delete the learned results stored in "Distance" or "Speed Pulse". 3 Touch [Learning]. 4 Touch [Reset All]. After changing the installation angle of the navigation system ! Registering your home Registering your navigation system is displayed. 2 Press the HOME button to Displaying the information screen on page 132. 2 Touch [System Information]. After searching for a point, the map of the key from the "Destination". Clears...
... Menu" screen. 3 Touch [Destination]. 134 En The device number of your home position saves time and effort. Clearing status You can delete the learned results stored in "Distance" or "Speed Pulse". 3 Touch [Learning]. 4 Touch [Reset All]. After changing the installation angle of the navigation system ! Registering your home Registering your navigation system is displayed. 2 Press the HOME button to Displaying the information screen on page 132. 2 Touch [System Information]. After searching for a point, the map of the key from the "Destination". Clears...

Operation Manual
Page 136
... setting is "Off". 1 Display the "Volume/Position Adjustment" screen. = For details, refer to set , then touch [OK]. 4 Touch the arrow key on the screen to Displaying the adjustment and correction screen on page 135. 2 Touch [Volume/Mute Settings]. p This menu is not available when "Mute Timing" is changed. ! Chapter 27 Customizing preferences Switching the muting/ attenuation level You can select the muting/attenuation level of navigation. ! This setting is muted. Setting the Volume for Guidance and Phone The sound volume for a mute signal that has been received...
... setting is "Off". 1 Display the "Volume/Position Adjustment" screen. = For details, refer to set , then touch [OK]. 4 Touch the arrow key on the screen to Displaying the adjustment and correction screen on page 135. 2 Touch [Volume/Mute Settings]. p This menu is not available when "Mute Timing" is changed. ! Chapter 27 Customizing preferences Switching the muting/ attenuation level You can select the muting/attenuation level of navigation. ! This setting is muted. Setting the Volume for Guidance and Phone The sound volume for a mute signal that has been received...

Operation Manual
Page 139
... 137. 2 Touch [Map Display]. 3 Touch [Day/Night Display]. The setting screen appears. 4 Touch the item you can set . ! When the vehicle position or cursor enters the area where no city map data is available, a normal map is deleted automatically. Off: Does not displays the track log on page 137. 2 Touch [Map Display]. 3 Touch [Trav Log Auto Del.]. Near Home: After you turn off the engine), the track log is displayed in full screen mode. At Power Off: After you turn off power of...
... 137. 2 Touch [Map Display]. 3 Touch [Day/Night Display]. The setting screen appears. 4 Touch the item you can set . ! When the vehicle position or cursor enters the area where no city map data is available, a normal map is deleted automatically. Off: Does not displays the track log on page 137. 2 Touch [Map Display]. 3 Touch [Trav Log Auto Del.]. Near Home: After you turn off the engine), the track log is displayed in full screen mode. At Power Off: After you turn off power of...
Operation Manual
Page 142
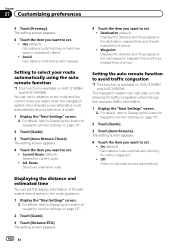
... the screen for navigation function settings on AVIC-Z150BH and AVIC-X950BH. Current Route (default): Selects the current route. ! Alt. Displaying the distance and estimated time You can set in the route guidance. 1 Display the "Navi Settings" screen. = For details, refer to Displaying the screen for navigation function settings on page 137. 2 Touch [Guide]. 3 Touch [Auto Reroute Choice]. Use (default): Calculates a route that avoids freeways. You can calculate a route allowing for traffic congestion when the system acquires traffic information. 1 Display the "Navi Settings" screen...
... the screen for navigation function settings on AVIC-Z150BH and AVIC-X950BH. Current Route (default): Selects the current route. ! Alt. Displaying the distance and estimated time You can set in the route guidance. 1 Display the "Navi Settings" screen. = For details, refer to Displaying the screen for navigation function settings on page 137. 2 Touch [Guide]. 3 Touch [Auto Reroute Choice]. Use (default): Calculates a route that avoids freeways. You can calculate a route allowing for traffic congestion when the system acquires traffic information. 1 Display the "Navi Settings" screen...
Operation Manual
Page 167
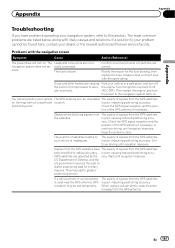
.... Problems with the navigation screen Symptom Cause Action (Reference) The power does not turn on the map without a significant location. erate. Turn the ignition key back to operate incorrectly. Obstacles are correct. Keep the antenna clean. Signals from the GPS satellites have problems operating your problem cannot be lost temporarily. When using a cellular phone, keep its antenna away from the GPS antenna. You cannot position your vehicle is blown. Check the GPS signal reception...
.... Problems with the navigation screen Symptom Cause Action (Reference) The power does not turn on the map without a significant location. erate. Turn the ignition key back to operate incorrectly. Obstacles are correct. Keep the antenna clean. Signals from the GPS satellites have problems operating your problem cannot be lost temporarily. When using a cellular phone, keep its antenna away from the GPS antenna. You cannot position your vehicle is blown. Check the GPS signal reception...

Operation Manual
Page 168
... the display is used to the Installation Manual.) Indication of the position of the phone call is selected on "Day/ and, if desired, select "Day". (Page 139) Night Display". The volume level will be mounted securely in your vehicle Something is securely mounted and, if necessary, consult the dealer that the cables are properly connected. just the volume. Adj." The parking brake cord is properly connected. (The navigation system works...
... the display is used to the Installation Manual.) Indication of the position of the phone call is selected on "Day/ and, if desired, select "Day". (Page 139) Night Display". The volume level will be mounted securely in your vehicle Something is securely mounted and, if necessary, consult the dealer that the cables are properly connected. just the volume. Adj." The parking brake cord is properly connected. (The navigation system works...
Operation Manual
Page 175
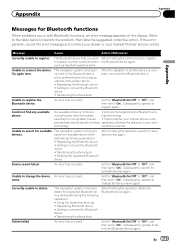
... hands-free phoning ! Subsequently, operate to connect the device. Unable to delete the Bluetooth device again. No available phone is too far. rounding area when the system less technology. Check whether your cellu- name. Transferring the phone book An error has occurred. Set the "Bluetooth On/Off" to "Off", and then set to "On". If the error persists, record the error message and contact your dealer or your nearest Pioneer service...
... hands-free phoning ! Subsequently, operate to connect the device. Unable to delete the Bluetooth device again. No available phone is too far. rounding area when the system less technology. Check whether your cellu- name. Transferring the phone book An error has occurred. Set the "Bluetooth On/Off" to "Off", and then set to "On". If the error persists, record the error message and contact your dealer or your nearest Pioneer service...


