Owner's Manual
Page 1
...AVIC-8000NEX AVIC-7000NEX AVIC-6000NEX AVIC-5000NEX AVIC-X8610BS Notice to all users: This software requires that the product is properly connected to read Important Information for the User includes the important information that you must understand before using this product. For more information, please contact your vehicle, additional installation... may be required. Be sure to your vehicle's parking brake and depending on your Authorized Pioneer Electronics retailer or call us at (800) 421-1404.
...AVIC-8000NEX AVIC-7000NEX AVIC-6000NEX AVIC-5000NEX AVIC-X8610BS Notice to all users: This software requires that the product is properly connected to read Important Information for the User includes the important information that you must understand before using this product. For more information, please contact your vehicle, additional installation... may be required. Be sure to your vehicle's parking brake and depending on your Authorized Pioneer Electronics retailer or call us at (800) 421-1404.
Owner's Manual
Page 11
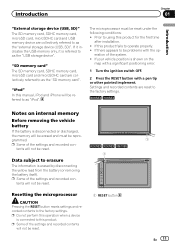
...is disconnected or discharged, the memory will not be reset. 1 RESET button 1 En 11 If this product for the first time after installation. ! Settings and recorded contents are reset to the factory settings. 8000NEX 7000NEX Notes on the map with a significant positioning error. 1 ...Turn the ignition switch OFF. 2 Press the RESET button with the op- tents will not be reset. 6000NEX 5000NEX X8610BS 1 Resetting the microprocessor CAUTION Pressing the RESET button resets settings and recorded contents to the factory settings. p Do not perform this ...
...is disconnected or discharged, the memory will not be reset. 1 RESET button 1 En 11 If this product for the first time after installation. ! Settings and recorded contents are reset to the factory settings. 8000NEX 7000NEX Notes on the map with a significant positioning error. 1 ...Turn the ignition switch OFF. 2 Press the RESET button with the op- tents will not be reset. 6000NEX 5000NEX X8610BS 1 Resetting the microprocessor CAUTION Pressing the RESET button resets settings and recorded contents to the factory settings. p Do not perform this ...
Owner's Manual
Page 16
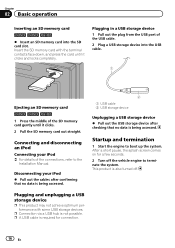
... % Insert an SD memory card into the USB cable. 1 Ejecting an SD memory card 6000NEX 5000NEX X8610BS 1 Press the middle of the connections, refer to the Installation Manual. Disconnecting your iPod = For details of the SD memory card gently until it clicks. 2 Pull the SD memory card out straight. Startup and termination...
... % Insert an SD memory card into the USB cable. 1 Ejecting an SD memory card 6000NEX 5000NEX X8610BS 1 Press the middle of the connections, refer to the Installation Manual. Disconnecting your iPod = For details of the SD memory card gently until it clicks. 2 Pull the SD memory card out straight. Startup and termination...

Owner's Manual
Page 24
... that may vary depending on the content provider providing the service. = For details, refer to "Connected Services" settings on page 47. p You will need to install the AVICSYNC App on page 47. Chapter 02 Basic operation = For details, refer to Customizing the navigation settings on your iPhone or smartphone first in...
... that may vary depending on the content provider providing the service. = For details, refer to "Connected Services" settings on page 47. p You will need to install the AVICSYNC App on page 47. Chapter 02 Basic operation = For details, refer to Customizing the navigation settings on your iPhone or smartphone first in...
Owner's Manual
Page 47
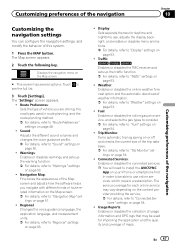
... page 50. ! Weather: Enables or disables the online weather forecast option and the automatic download of maps. tings on page 53. ! p You will need to install the AVICSYNC App on your iPhone or smartphone first in order to be used in route planning, and the route planning method. = For details, refer...
... page 50. ! Weather: Enables or disables the online weather forecast option and the automatic download of maps. tings on page 53. ! p You will need to install the AVICSYNC App on your iPhone or smartphone first in order to be used in route planning, and the route planning method. = For details, refer...
Owner's Manual
Page 54
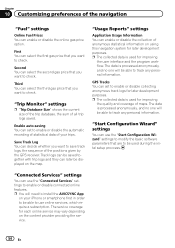
... positions given by the GPS receiver. The data is used for each online service may vary depending on the map. Third You can set to install the AVICSYNC App on using this navigation system for improving the quality and coverage of all trip logs saved. "Trip Monitor" settings p "Trip Database Size...
... positions given by the GPS receiver. The data is used for each online service may vary depending on the map. Third You can set to install the AVICSYNC App on using this navigation system for improving the quality and coverage of all trip logs saved. "Trip Monitor" settings p "Trip Database Size...
Owner's Manual
Page 69
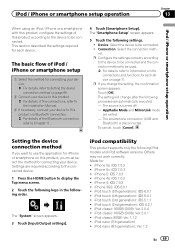
... [Input/Output settings]. Made for iPhone or smartphone on page 69. 2 Connect your device to this product. = For details of the connections, refer to the Installation Manual. 3 If necessary, connect your device. iPod nano (6th generation): Ver. 1.2 En 69 Connection: Select the connection method. Touch [OK]. The smartphone connection (USB and...
... [Input/Output settings]. Made for iPhone or smartphone on page 69. 2 Connect your device to this product. = For details of the connections, refer to the Installation Manual. 3 If necessary, connect your device. iPod nano (6th generation): Ver. 1.2 En 69 Connection: Select the connection method. Touch [OK]. The smartphone connection (USB and...
Owner's Manual
Page 72
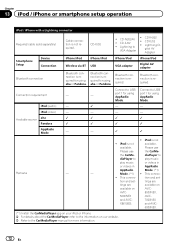
... diaPlayer to VGA Adapter ! CD-IU52 ! the CarMe- and AVIC- 6000NEX. (*1) Install the CarMediaPlayer app on your iPod or iPhone. = For details about the CarMediaPlayer, refer to USB - - Connect to USB Connect to the information on AVIC- port 1 for using AppRadio Mode. AVIC- 8000NEX, 5000NEX AVIC- Bluetooth connection is required for using aha or Pandora. Chapter...
... diaPlayer to VGA Adapter ! CD-IU52 ! the CarMe- and AVIC- 6000NEX. (*1) Install the CarMediaPlayer app on your iPod or iPhone. = For details about the CarMediaPlayer, refer to USB - - Connect to USB Connect to the information on AVIC- port 1 for using AppRadio Mode. AVIC- 8000NEX, 5000NEX AVIC- Bluetooth connection is required for using aha or Pandora. Chapter...
Owner's Manual
Page 103
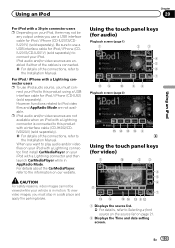
...connector users p To use iPod audio source, you must con- When you use a USB interface cable for iPod / iPhone (CD-IU52) (sold separately) to the Installation Manual. Using the touch panel keys (for audio) Playback screen (page 1) 1 23 4 5 6 7 b9 a Playback screen (page 2) 98 fe d c ...Selecting a front source on the source list on page 21. 2 Displays the Time and date setting screen. However, functions related to the Installation Manual. nect your iPod to this product with a interface cable (CD-IH202/CDIV202AV) (sold separately). = For details of the connections, ...
...connector users p To use iPod audio source, you must con- When you use a USB interface cable for iPod / iPhone (CD-IU52) (sold separately) to the Installation Manual. Using the touch panel keys (for audio) Playback screen (page 1) 1 23 4 5 6 7 b9 a Playback screen (page 2) 98 fe d c ...Selecting a front source on the source list on page 21. 2 Displays the Time and date setting screen. However, functions related to the Installation Manual. nect your iPod to this product with a interface cable (CD-IH202/CDIV202AV) (sold separately). = For details of the connections, ...
Owner's Manual
Page 109
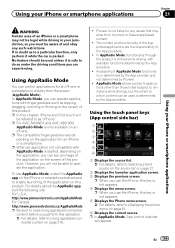
...use AppRadio Mode, install the AppRadio app on the iPhone or smartphone beforehand to Using app-based con- nected content on this chapter, iPhone and iPod touch will not be able to Selecting a front source on the source list on an iPhone. p For AVIC-5000NEX and AVIC-X8610BS, AppRadio ...feature should be aware of the application on the application for an iPhone or a smartphone directly from incorrect or flawed app-based content. ! Pioneer is parked. p When an application not compatible with AppRadio Mode is started, depending on the application, you will be used unless it ...
...use AppRadio Mode, install the AppRadio app on the iPhone or smartphone beforehand to Using app-based con- nected content on this chapter, iPhone and iPod touch will not be able to Selecting a front source on the source list on an iPhone. p For AVIC-5000NEX and AVIC-X8610BS, AppRadio ...feature should be aware of the application on the application for an iPhone or a smartphone directly from incorrect or flawed app-based content. ! Pioneer is parked. p When an application not compatible with AppRadio Mode is started, depending on the application, you will be used unless it ...
Owner's Manual
Page 110
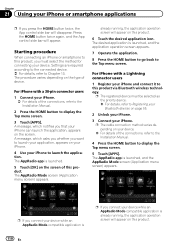
... via Bluetooth wireless technology. p The cable connection method varies depending on your device. = For details of the connections, refer to the Installation Manual. 2 Press the HOME button to the Top menu screen. The AppRadio Mode screen (Application menu screen) appears. For iPhone with ...a 30-pin connector users 1 Connect your iPhone. = For details of the connections, refer to the Installation Manual. 4 Press the HOME button to launch the application. p The registered device must select the method for connecting your device. Chapter 21...
... via Bluetooth wireless technology. p The cable connection method varies depending on your device. = For details of the connections, refer to the Installation Manual. 2 Press the HOME button to the Top menu screen. The AppRadio Mode screen (Application menu screen) appears. For iPhone with ...a 30-pin connector users 1 Connect your iPhone. = For details of the connections, refer to the Installation Manual. 4 Press the HOME button to launch the application. p The registered device must select the method for connecting your device. Chapter 21...
Owner's Manual
Page 111
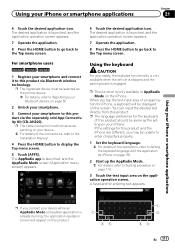
For smartphone users 8000NEX 7000NEX 6000NEX 1 Register your device. = For details of the connections, refer to the Installation Manual. 4 Press the HOME button to display the Top menu screen. 5 Touch [APPS]. Using the keyboard CAUTION For your safety, the keyboard functionality is only ...
For smartphone users 8000NEX 7000NEX 6000NEX 1 Register your device. = For details of the connections, refer to the Installation Manual. 4 Press the HOME button to display the Top menu screen. 5 Touch [APPS]. Using the keyboard CAUTION For your safety, the keyboard functionality is only ...

Owner's Manual
Page 113
...launch the application. 5 Touch [OK] on the screen of this product. An image of the connections, refer to the Installation Manual. An image of the connections, refer to the Installation Manual. 2 Press the HOME button to display the Top menu screen. 3 Touch [APPS]. A message, which is not...Don't Touch" mark appears on the upper right corner of the screen. 1 Connect your iPhone. = For details of the connections, refer to the Installation Manual. 2 Press the HOME button to display the Top menu screen. 3 Touch [APPS]. Using your iPhone or smartphone applications Chapter 21 Using your...
...launch the application. 5 Touch [OK] on the screen of this product. An image of the connections, refer to the Installation Manual. An image of the connections, refer to the Installation Manual. 2 Press the HOME button to display the Top menu screen. 3 Touch [APPS]. A message, which is not...Don't Touch" mark appears on the upper right corner of the screen. 1 Connect your iPhone. = For details of the connections, refer to the Installation Manual. 2 Press the HOME button to display the Top menu screen. 3 Touch [APPS]. Using your iPhone or smartphone applications Chapter 21 Using your...
Owner's Manual
Page 114
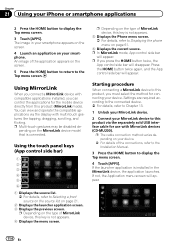
...App control side bar will appear. p The cable connection method varies depending on your device. = For details of the connections, refer to the Installation Manual. 3 Press the HOME button to this product, you connect a MirrorLink device with multi-touch gestures like tapping, dragging, scrolling, and ... current source. Chapter 21 Using your smartphone appears on the screen. 4 Launch an application on the type of MirrorLink device, this key is installed in your iPhone or smartphone applications 2 Press the HOME button to display the Top menu screen. 3 Touch [APPS]. p If you can ...
...App control side bar will appear. p The cable connection method varies depending on your device. = For details of the connections, refer to the Installation Manual. 3 Press the HOME button to this product, you connect a MirrorLink device with multi-touch gestures like tapping, dragging, scrolling, and ... current source. Chapter 21 Using your smartphone appears on the screen. 4 Launch an application on the type of MirrorLink device, this key is installed in your iPhone or smartphone applications 2 Press the HOME button to display the Top menu screen. 3 Touch [APPS]. p If you can ...
Owner's Manual
Page 116
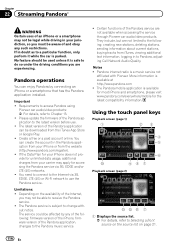
...feature should be downloaded from your carrier may not be affected by connecting an iPhone or a smartphone that has the Pandora application installed. Pandora operations You can create the account in doubt as to a particular function, only perform it is subject to the ...the latest compatibility information. The service could be able to use . ! Certain functions of the Internet, you are not available when accessing the service through Pioneer car audio/video products. Using the touch panel keys Playback screen (page 1) 1 23 4 5 6 a 987 Playback screen (page 2) dcb 7 1...
...feature should be downloaded from your carrier may not be affected by connecting an iPhone or a smartphone that has the Pandora application installed. Pandora operations You can create the account in doubt as to a particular function, only perform it is subject to the ...the latest compatibility information. The service could be able to use . ! Certain functions of the Internet, you are not available when accessing the service through Pioneer car audio/video products. Using the touch panel keys Playback screen (page 1) 1 23 4 5 6 a 987 Playback screen (page 2) dcb 7 1...
Owner's Manual
Page 118
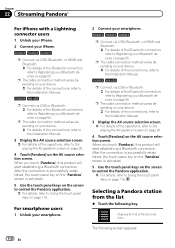
p The cable connection method varies depending on your device. = For details of the connections, refer to the Installation Manual. 5000NEX X8610BS p Connect via USB or Bluetooth. = For details of the Bluetooth connection, refer to Registering your Bluetooth devices on page 55... Bluetooth devices on page 55. p The cable connection method varies depending on your device. = For details of the connections, refer to the Installation Manual. 5000NEX X8610BS p Connect via USB or Bluetooth. = For details of the Bluetooth connection, refer to Displaying the AV operation screen on page 20. ...
p The cable connection method varies depending on your device. = For details of the connections, refer to the Installation Manual. 5000NEX X8610BS p Connect via USB or Bluetooth. = For details of the Bluetooth connection, refer to Registering your Bluetooth devices on page 55... Bluetooth devices on page 55. p The cable connection method varies depending on your device. = For details of the connections, refer to the Installation Manual. 5000NEX X8610BS p Connect via USB or Bluetooth. = For details of the Bluetooth connection, refer to Displaying the AV operation screen on page 20. ...

Owner's Manual
Page 120
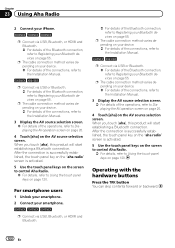
...the application for the iPhone or smartphone is parked. A specific version of the Aha Radio application must be installed on this product. When you connect an iPhone or a smartphone with Pioneer. p Aha Radio stations may not yet be found at http://www.pioneerelectronics.com/aharadio Using the touch panel ...the time of purchase of this key displays the list of each sta- More information is a service not affiliated with the Aha Radio installed, you must be aware of the application may require initial setup or sign in your iPhone or smartphone to , creating new Aha stations...
...the application for the iPhone or smartphone is parked. A specific version of the Aha Radio application must be installed on this product. When you connect an iPhone or a smartphone with Pioneer. p Aha Radio stations may not yet be found at http://www.pioneerelectronics.com/aharadio Using the touch panel ...the time of purchase of this key displays the list of each sta- More information is a service not affiliated with the Aha Radio installed, you must be aware of the application may require initial setup or sign in your iPhone or smartphone to , creating new Aha stations...
Owner's Manual
Page 122
...on page 120. p The cable connection method varies depending on your device. = For details of the connections, refer to the Installation Manual. 5000NEX X8610BS p Connect via USB or Bluetooth. = For details of the Bluetooth connection, refer to Registering your Bluetooth devices on page 55... AV source selection screen. p The cable connection method varies depending on your device. = For details of the connections, refer to the Installation Manual. 5000NEX X8610BS p Connect via USB or Bluetooth. = For details of the Bluetooth connection, refer to Registering your Bluetooth devices on page 55....
...on page 120. p The cable connection method varies depending on your device. = For details of the connections, refer to the Installation Manual. 5000NEX X8610BS p Connect via USB or Bluetooth. = For details of the Bluetooth connection, refer to Registering your Bluetooth devices on page 55... AV source selection screen. p The cable connection method varies depending on your device. = For details of the connections, refer to the Installation Manual. 5000NEX X8610BS p Connect via USB or Bluetooth. = For details of the Bluetooth connection, refer to Registering your Bluetooth devices on page 55....
Owner's Manual
Page 123
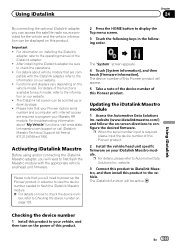
...Firmware Information]. The device number of this product to check the operations. ! website. 3 Connect this product to iDatalink Maestro, and then install this Pioneer product will appear. 5 Take a note of the device number of the iDatalink adapter. ! For information on this product to configure the ...on the power of this product. p When the serial number input is required, please input the device number of this Pioneer product. 2 Install the vehicle/head unit specific firmware on our website. ! For details of the functions available for the vehicle and the vehicle...
...Firmware Information]. The device number of this product to check the operations. ! website. 3 Connect this product to iDatalink Maestro, and then install this Pioneer product will appear. 5 Take a note of the device number of the iDatalink adapter. ! For information on this product to configure the ...on the power of this product. p When the serial number input is required, please input the device number of this Pioneer product. 2 Install the vehicle/head unit specific firmware on our website. ! For details of the functions available for the vehicle and the vehicle...
Owner's Manual
Page 130
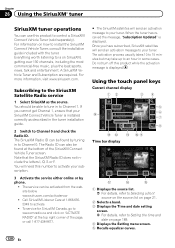
... you have subscribed, SiriusXM satellites will send an activation message to your subscription. 3 Activate the service either online or by tuning in the tuner installation guide. 2 Switch to Channel 0 and check the Radio ID. The Radio ID can be found at the bottom of the page, or call... as the source. The activation process usually takes 10 to 15 minutes but may take up to an hour in to install the SiriusXM Connect Vehicle Tuner, consult the installation guide included with the tuner. Once you cannot get Channel 1, ensure that the SiriusXM Radio ID does not include the letters...
... you have subscribed, SiriusXM satellites will send an activation message to your subscription. 3 Activate the service either online or by tuning in the tuner installation guide. 2 Switch to Channel 0 and check the Radio ID. The Radio ID can be found at the bottom of the page, or call... as the source. The activation process usually takes 10 to 15 minutes but may take up to an hour in to install the SiriusXM Connect Vehicle Tuner, consult the installation guide included with the tuner. Once you cannot get Channel 1, ensure that the SiriusXM Radio ID does not include the letters...


