Owner's Manual
Page 1
Operation Manual DVD AV RECEIVER AVH-P5000DVD English
Operation Manual DVD AV RECEIVER AVH-P5000DVD English
Owner's Manual
Page 2
... reading the instructions, keep this Pioneer product. About the SAT RADIO READY mark 12 To protect the LCD screen 12 For viewing LCD comfortably 13 - Optional remote control... When using a rear view camera 7 To avoid battery exhaustion 7 Before You Start Information to REAR MONITOR OUTPUT 7 - Changing the wide screen size 13 - Basic Operations 21 - Introduction of advanced operations 20... in DVD player 21 - About WMA 11 - DVD video disc region numbers 9 About this unit What's What 15 - Selecting a source 16 - Opening and closing the LCD panel 18 Radio 19 - DVD video ...
... reading the instructions, keep this Pioneer product. About the SAT RADIO READY mark 12 To protect the LCD screen 12 For viewing LCD comfortably 13 - Optional remote control... When using a rear view camera 7 To avoid battery exhaustion 7 Before You Start Information to REAR MONITOR OUTPUT 7 - Changing the wide screen size 13 - Basic Operations 21 - Introduction of advanced operations 20... in DVD player 21 - About WMA 11 - DVD video disc region numbers 9 About this unit What's What 15 - Selecting a source 16 - Opening and closing the LCD panel 18 Radio 19 - DVD video ...
Owner's Manual
Page 3
...- Using subwoofer output 36 - Boosting the bass 36 - Introduction of audio adjustments 34 - Switching the assist subtitle on USB portable audio player/ USB memory 32 - Setting the angle icon display 39 - Displaying your iPod 31 - Setting the rear output and subwoofer controller 41 ... song/video 30 - Return to the specified scene 26 - Browsing for Bluetooth wireless connection 42 - Adjusting source levels 37 Setting up the DVD player 37 - Setting the DivX subtitle file 40 - Switching the auxiliary setting 41 - Setting the security indicator 43 Other Functions 44 En 3 ...
...- Using subwoofer output 36 - Boosting the bass 36 - Introduction of audio adjustments 34 - Switching the assist subtitle on USB portable audio player/ USB memory 32 - Setting the angle icon display 39 - Displaying your iPod 31 - Setting the rear output and subwoofer controller 41 ... song/video 30 - Return to the specified scene 26 - Browsing for Bluetooth wireless connection 42 - Adjusting source levels 37 Setting up the DVD player 37 - Setting the DivX subtitle file 40 - Switching the auxiliary setting 41 - Setting the security indicator 43 Other Functions 44 En 3 ...
Owner's Manual
Page 4
Changing the wide screen mode 44 - Adjusting the LCD panel slide position 46 - Adjusting the response positions of advanced operations 63 - Switching the XM display 54 SIRIUS Satellite Radio tuner 54 - Selecting ...by entering phone number 67 - Making a call history 66 - Storing and recalling broadcast stations 55 - Setting the automatic open function 46 - Disconnecting a Bluetooth audio player 60 - Connecting to a registered cellular phone 64 - Switching the XM channel select mode 52 - Using Instant Replay function 58 Bluetooth Audio 59 - Echo canceling ...
Changing the wide screen mode 44 - Adjusting the LCD panel slide position 46 - Adjusting the response positions of advanced operations 63 - Switching the XM display 54 SIRIUS Satellite Radio tuner 54 - Selecting ...by entering phone number 67 - Making a call history 66 - Storing and recalling broadcast stations 55 - Setting the automatic open function 46 - Disconnecting a Bluetooth audio player 60 - Connecting to a registered cellular phone 64 - Switching the XM channel select mode 52 - Using Instant Replay function 58 Bluetooth Audio 59 - Echo canceling ...
Owner's Manual
Page 5
... messages 86 Understanding auto TA and EQ error messages 88 Handling guideline of advanced operations 69 - USB audio player/USB memory compatibility 91 - Using CD TEXT functions 69 DVD Player 70 - Pausing disc playback 70 - Using the down-mix function 76 - Adjusting the speaker output levels... - Using the position selector 74 - USB audio player/USB memory 91 - Storing and recalling broadcast stations 72 - Compressed audio compatibility 92 DivX video files 93 - Liquid crystal display (LCD) screen 94 - Pausing CD playback 69 - DivX compatibility 93 About handling the iPod 93 - Keeping ...
... messages 86 Understanding auto TA and EQ error messages 88 Handling guideline of advanced operations 69 - USB audio player/USB memory compatibility 91 - Using CD TEXT functions 69 DVD Player 70 - Pausing disc playback 70 - Using the down-mix function 76 - Adjusting the speaker output levels... - Using the position selector 74 - USB audio player/USB memory 91 - Storing and recalling broadcast stations 72 - Compressed audio compatibility 92 DivX video files 93 - Liquid crystal display (LCD) screen 94 - Pausing CD playback 69 - DivX compatibility 93 About handling the iPod 93 - Keeping ...
Owner's Manual
Page 6
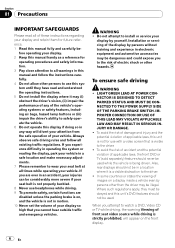
...driving rules and follow the instructions carefully. 4 Do not allow other persons to use this system until they must be obeyed and this unit's DVD features should never be considerably more severe if your seat belt is not properly buckled. 8 Never use with a video screen that you to the... to all warnings in a safe location and make necessary adjustments. 7 Please remember to wear your seat belt at all of applicable laws, the front DVD or TV (sold separately) feature should not be - If you are disabled unless the parking brake is on a display inside a vehicle even by yourself...
...driving rules and follow the instructions carefully. 4 Do not allow other persons to use this system until they must be obeyed and this unit's DVD features should never be considerably more severe if your seat belt is not properly buckled. 8 Never use with a video screen that you to the... to all warnings in a safe location and make necessary adjustments. 7 Please remember to wear your seat belt at all of applicable laws, the front DVD or TV (sold separately) feature should not be - If you are disabled unless the parking brake is on a display inside a vehicle even by yourself...

Owner's Manual
Page 7
... feature an ACC position. When using a display connected to REAR MONITOR OUTPUT This unit's REAR MONITOR OUTPUT is returned to keep an eye on trailers, or while ...backing up , and whether the images are used while the vehicle is in a safe place and apply the parking brake. OTHER USE MAY RESULT IN INJURY OR DAMAGE. To avoid battery exhaustion Be sure to watch the DVD...to use with vehicles that senses when the parking brake is supplied to watch a DVD, Video CD or TV on trailers, or backing into a tight parking spot....
... feature an ACC position. When using a display connected to REAR MONITOR OUTPUT This unit's REAR MONITOR OUTPUT is returned to keep an eye on trailers, or while ...backing up , and whether the images are used while the vehicle is in a safe place and apply the parking brake. OTHER USE MAY RESULT IN INJURY OR DAMAGE. To avoid battery exhaustion Be sure to watch the DVD...to use with vehicles that senses when the parking brake is supplied to watch a DVD, Video CD or TV on trailers, or backing into a tight parking spot....

Owner's Manual
Page 8
... product contains mercury. For disposal or recycling information, please contact your local authorities or the Electronics Industries Alliance: www.eiae.org The backlighting lamp of LCD in this unit. CAUTION: THE USE OF OPTICAL INSTRUMENTS WITH THIS PRODUCT WILL INCREASE EYE HAZARD. Always keep the volume low enough so that you...
... product contains mercury. For disposal or recycling information, please contact your local authorities or the Electronics Industries Alliance: www.eiae.org The backlighting lamp of LCD in this unit. CAUTION: THE USE OF OPTICAL INSTRUMENTS WITH THIS PRODUCT WILL INCREASE EYE HAZARD. Always keep the volume low enough so that you...

Owner's Manual
Page 9
Before You Start Section 02 Playable discs DVD, Video CD and CD discs that display the logos shown below can be played back on this player. Before You Start Video CD CD Notes ! The region number of the player can only play back discs bearing the marks shown above. After-...recommend that you familiarize yourself with the functions and their operation by reading through the manual before you begin using this unit for Pioneer products Please contact the dealer or distributor from this manual. is especially important that have been designed for repair without advance contact....
Before You Start Section 02 Playable discs DVD, Video CD and CD discs that display the logos shown below can be played back on this player. Before You Start Video CD CD Notes ! The region number of the player can only play back discs bearing the marks shown above. After-...recommend that you familiarize yourself with the functions and their operation by reading through the manual before you begin using this unit for Pioneer products Please contact the dealer or distributor from this manual. is especially important that have been designed for repair without advance contact....

Owner's Manual
Page 10
...Video Recording format. (Refer to DVD-R/DVD-RW discs on page 91. CUSTOMER SATISFACTION DEPARTMENT 300 Allstate Parkway Markham, Ontario L3R 0P2 1-877-283-5901 905-479-4411 For warranty information please see the Limited Warranty sheet included with a Pioneer multichannel processor, you refer to ...this information in the industry. DVD-R/RW compatibility It is possible to play back Video CDs featuring PBC (playback control). WMA, MP3 and...
...Video Recording format. (Refer to DVD-R/DVD-RW discs on page 91. CUSTOMER SATISFACTION DEPARTMENT 300 Allstate Parkway Markham, Ontario L3R 0P2 1-877-283-5901 905-479-4411 For warranty information please see the Limited Warranty sheet included with a Pioneer multichannel processor, you refer to ...this information in the industry. DVD-R/RW compatibility It is possible to play back Video CDs featuring PBC (playback control). WMA, MP3 and...

Owner's Manual
Page 11
... Symbol are trademarks of certain U.S. USB MSC (Mass Storage Class) compliant portable audio player and memory - WMA, MP3, AAC and WAV file playback For details about your USB portable audio player/USB memory. This unit supports only the following . - iPod photo (software version ... Inquire at the manufacturer about the compatibility, refer to encode WMA files. Patent #: 5,451,942 & other countries. Portable audio player compatibility ! iPod® compatibility This unit can control and listen to the following iPods. Supported iPod software versions are trademarks or...
... Symbol are trademarks of certain U.S. USB MSC (Mass Storage Class) compliant portable audio player and memory - WMA, MP3, AAC and WAV file playback For details about your USB portable audio player/USB memory. This unit supports only the following . - iPod photo (software version ... Inquire at the manufacturer about the compatibility, refer to encode WMA files. Patent #: 5,451,942 & other countries. Portable audio player compatibility ! iPod® compatibility This unit can control and listen to the following iPods. Supported iPod software versions are trademarks or...

Owner's Manual
Page 12
... to coast. Official DivX® Certified product Plays all related marks are used . To protect the LCD screen ! Extended exposure to direct sunlight can result in LCD screen malfunction due to -recei- tered in any commercial (i.e. For satellite radio tuner operation, please refer..., please visit http://www.mp3licensing.com. and other electronic content distribution systems, such as DVD video, individual DivX video files are called "Titles". An independent license for Pioneer (i.e., XM tuner and Sirius satellite tuner which are trademarks of DivX, Inc. Satellite radio...
... to coast. Official DivX® Certified product Plays all related marks are used . To protect the LCD screen ! Extended exposure to direct sunlight can result in LCD screen malfunction due to -recei- tered in any commercial (i.e. For satellite radio tuner operation, please refer..., please visit http://www.mp3licensing.com. and other electronic content distribution systems, such as DVD video, individual DivX video files are called "Titles". An independent license for Pioneer (i.e., XM tuner and Sirius satellite tuner which are trademarks of DivX, Inc. Satellite radio...
Owner's Manual
Page 13
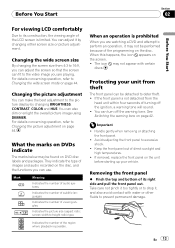
... refer to Changing the picture adjustment on the unit before starting up your unit from the head unit within four seconds of the LCD screen is not detached from theft The front panel can make the best adjustment to the picture display by changing either screen size or... tone will sound. ! Indicates the picture size (aspect ratio: screen width-to excessive shock. ! Indicates the number of images and audio recorded on DVD disc labels and packages. Handle gently when removing or attaching the front panel. ! Changing the wide screen size By changing the screen size from 4:3 to...
... refer to Changing the picture adjustment on the unit before starting up your unit from the head unit within four seconds of the LCD screen is not detached from theft The front panel can make the best adjustment to the picture display by changing either screen size or... tone will sound. ! Indicates the picture size (aspect ratio: screen width-to excessive shock. ! Indicates the number of images and audio recorded on DVD disc labels and packages. Handle gently when removing or attaching the front panel. ! Changing the wide screen size By changing the screen size from 4:3 to...

Owner's Manual
Page 14
The microprocessor must be drained. 14 En Prior to using this unit should be damaged if you select the source OFF. pear on the previous page. To cancel the feature demo, press and hold VOLUME/MUTE again. Important The red lead (ACC) of the front panel until it is turned off operations. When strange or incorrect messages ap- Refer to Removing the front panel on the display 1 Turn the ignition switch OFF. 2 Remove the front panel. RESET button Note After completing connections or when you want to erase all memorized settings or return the unit to its initial settings without ...
The microprocessor must be drained. 14 En Prior to using this unit should be damaged if you select the source OFF. pear on the previous page. To cancel the feature demo, press and hold VOLUME/MUTE again. Important The red lead (ACC) of the front panel until it is turned off operations. When strange or incorrect messages ap- Refer to Removing the front panel on the display 1 Turn the ignition switch OFF. 2 Remove the front panel. RESET button Note After completing connections or when you want to erase all memorized settings or return the unit to its initial settings without ...

Owner's Manual
Page 15
... unit Section 03 Operating this unit. 8 AUX1 input jack (3.5 mm stereo/video jack) Use to connect an auxiliary device. Press and hold to turn the LCD panel horizontal temporarily from upright position. 7 EJECT (h) button Press to eject a disc from this unit What's What Head unit 1 VOLUME/MUTE button Rotate it to...
... unit Section 03 Operating this unit. 8 AUX1 input jack (3.5 mm stereo/video jack) Use to connect an auxiliary device. Press and hold to turn the LCD panel horizontal temporarily from upright position. 7 EJECT (h) button Press to eject a disc from this unit What's What Head unit 1 VOLUME/MUTE button Rotate it to...
Owner's Manual
Page 16
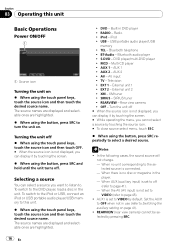
... disc in use (refer to OFF when not in the unit. Bluetooth telephone ! Bluetooth audio player ! Multi-CD player ! AUX 2 ! Television ! SIRIUS - Rear view camera ! When no disc or magazine in DVD player ! Built-in the player. - S-DVD - DVD player/multi-DVD player ! MCD - AUX 1 ! AUX 2 - AV - TV - XM tuner ! Notes ... to . iPod ! To switch to the iPod or USB, connect an iPod or USB portable audio player/USB memory to page 41). - USB portable audio player/USB memory ! OFF - Turning the unit off (refer to this unit Basic Operations Power ON/OFF ...
... disc in use (refer to OFF when not in the unit. Bluetooth telephone ! Bluetooth audio player ! Multi-CD player ! AUX 2 ! Television ! SIRIUS - Rear view camera ! When no disc or magazine in DVD player ! Built-in the player. - S-DVD - DVD player/multi-DVD player ! MCD - AUX 1 ! AUX 2 - AV - TV - XM tuner ! Notes ... to . iPod ! To switch to the iPod or USB, connect an iPod or USB portable audio player/USB memory to page 41). - USB portable audio player/USB memory ! OFF - Turning the unit off (refer to this unit Basic Operations Power ON/OFF ...
Owner's Manual
Page 17
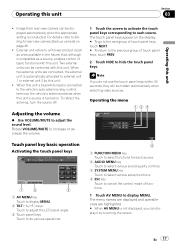
...keys corresponding to Setting for each source. Image from rear view camera can be displayed automatically when the appropriate setting is automatically allocated to a Pioneer product (such as ones available in the future) that, although incompatible as a source, enables control of basic functions with this unit. !...key basic operation Activating the touch panel keys 1 AV MENU key Touch to display MENU. 2 TILT ( / ) keys Touch to adjust the LCD panel angle. 3 Touch panel keys Touch to do not use the touch panel keys within 30 seconds, they will be hidden automatically when selecting...
...keys corresponding to Setting for each source. Image from rear view camera can be displayed automatically when the appropriate setting is automatically allocated to a Pioneer product (such as ones available in the future) that, although incompatible as a source, enables control of basic functions with this unit. !...key basic operation Activating the touch panel keys 1 AV MENU key Touch to display MENU. 2 TILT ( / ) keys Touch to adjust the LCD panel angle. 3 Touch panel keys Touch to do not use the touch panel keys within 30 seconds, they will be hidden automatically when selecting...

Owner's Manual
Page 18
... the operation of the air conditioner, the panel can turn off . If the LCD panel has stopped halfway, leaving it to move the LCD panel a little forward. ! When adjusting the LCD panel angle, be opened , the LCD panel will be memorized and automatically returned to an easily viewable angle. CAUTION Keep...'s hands and fingers. % Press OPEN/CLOSE to open function. (Refer to page 13.) ! In this case, press OPEN/CLOSE to open the LCD panel. # To close /open the LCD panel. ! Do not close the LCD panel with the turning of the ignition switch on or off the automatic close the...
... the operation of the air conditioner, the panel can turn off . If the LCD panel has stopped halfway, leaving it to move the LCD panel a little forward. ! When adjusting the LCD panel angle, be opened , the LCD panel will be memorized and automatically returned to an easily viewable angle. CAUTION Keep...'s hands and fingers. % Press OPEN/CLOSE to open function. (Refer to page 13.) ! In this case, press OPEN/CLOSE to open the LCD panel. # To close /open the LCD panel. ! Do not close the LCD panel with the turning of the ignition switch on or off the automatic close the...
Owner's Manual
Page 19
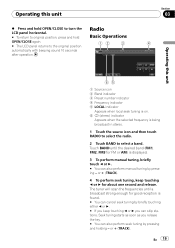
... - En 19 Radio Basic Operations Section 03 Operating this unit % Press and hold OPEN/CLOSE to turn the LCD panel horizontal. # To return to original position, press and hold OPEN/CLOSE again. # The LCD panel returns to select a band. The tuner will scan the frequencies until the desired band (FM1, FM2, FM3...
... - En 19 Radio Basic Operations Section 03 Operating this unit % Press and hold OPEN/CLOSE to turn the LCD panel horizontal. # To return to original position, press and hold OPEN/CLOSE again. # The LCD panel returns to select a band. The tuner will scan the frequencies until the desired band (FM1, FM2, FM3...

Owner's Manual
Page 20
The next time you can be stored under preset tuning keys P1 to P6 and once stored there you touch the same preset tuning key the radio station frequency is recalled from this case, turn BSM on. Tuning in strong signals Local seek tuning lets you tune in only those frequencies with the touch of a key. ! BSM begins to display the function names. Touch LOCAL repeatedly until the beep sounds. The selected radio station frequency has been stored in the display. There are highlighted. 2 Touch ESC to return to the frequency display. # To return to the previous display, touch...
The next time you can be stored under preset tuning keys P1 to P6 and once stored there you touch the same preset tuning key the radio station frequency is recalled from this case, turn BSM on. Tuning in strong signals Local seek tuning lets you tune in only those frequencies with the touch of a key. ! BSM begins to display the function names. Touch LOCAL repeatedly until the beep sounds. The selected radio station frequency has been stored in the display. There are highlighted. 2 Touch ESC to return to the frequency display. # To return to the previous display, touch...
