Owner's Manual
Page 6
...safety information. 3 Pay close attention to all times while operating your display so high that is visible to the driver. ! Do not attempt to install or service your vehicle in any way will appear on the front display. 6 En If you to the risk of the display by yourself... or (iii) impair the driver's ability to safely operate the vehicle. 6 Do not operate this manual and follow all of applicable laws, the front DVD or TV (sold separately) feature should not be illegal. Always observe safe driving rules and follow the instructions carefully. 4 Do not allow other hazards....
...safety information. 3 Pay close attention to all times while operating your display so high that is visible to the driver. ! Do not attempt to install or service your vehicle in any way will appear on the front display. 6 En If you to the risk of the display by yourself... or (iii) impair the driver's ability to safely operate the vehicle. 6 Do not operate this manual and follow all of applicable laws, the front DVD or TV (sold separately) feature should not be illegal. Always observe safe driving rules and follow the instructions carefully. 4 Do not allow other hazards....

Owner's Manual
Page 7
.... CAUTION ! Using this unit. cause of a replacement of the vehicle battery or for connection of a display to watch the DVD or TV while driving. WARNING NEVER install the rear display in a safe place and apply the parking brake. Please keep an eye on trailers, or while backing up... similar reason, the microcomputer of the rear view camera images may differ slightly according to REAR MONITOR OUTPUT This unit's REAR MONITOR OUTPUT is set. Parking brake interlock Certain functions (DVD/TV viewing and certain touch panel keys) offered by this unit is an interlock system that ...
.... CAUTION ! Using this unit. cause of a replacement of the vehicle battery or for connection of a display to watch the DVD or TV while driving. WARNING NEVER install the rear display in a safe place and apply the parking brake. Please keep an eye on trailers, or while backing up... similar reason, the microcomputer of the rear view camera images may differ slightly according to REAR MONITOR OUTPUT This unit's REAR MONITOR OUTPUT is set. Parking brake interlock Certain functions (DVD/TV viewing and certain touch panel keys) offered by this unit is an interlock system that ...

Owner's Manual
Page 14
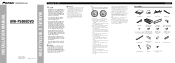
.../MUTE again. Important The red lead (ACC) of the front panel until it may drain battery power. If this unit for the first time after installation ! RESET button Note After completing connections or when you attach the front panel forcedly. Section 02 Before You Start Attaching the front panel 1 Slide the...
.../MUTE again. Important The red lead (ACC) of the front panel until it may drain battery power. If this unit for the first time after installation ! RESET button Note After completing connections or when you attach the front panel forcedly. Section 02 Before You Start Attaching the front panel 1 Slide the...
Owner's Manual
Page 46
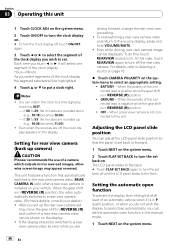
...rear view camera video by touching JUST. - Setting for rear view camera (back up camera) CAUTION Pioneer recommends the use of the connected lead is negative while the gear shift is in REVERSE (R) position !...of the connected lead is positive while the gear shift is in REVERSE (R) position ! When a rear view camera is installed on your dealer.) ! If the display should be highlighted. 4 Touch a or b to put a clock right....a rear view camera is not connected to this unit Adjusting the LCD panel slide position You can be shown on the display. ! Even while driving, rear view camera...
...rear view camera video by touching JUST. - Setting for rear view camera (back up camera) CAUTION Pioneer recommends the use of the connected lead is negative while the gear shift is in REVERSE (R) position !...of the connected lead is positive while the gear shift is in REVERSE (R) position ! When a rear view camera is installed on your dealer.) ! If the display should be highlighted. 4 Touch a or b to put a clock right....a rear view camera is not connected to this unit Adjusting the LCD panel slide position You can be shown on the display. ! Even while driving, rear view camera...
Owner's Manual
Page 77
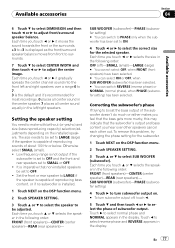
... the bass output of the subwoofer doesn't do much or rather makes you feel that the bass gets more murky, this may indicate that non-installed speakers be set to make with/without (or yes/no subwoofer is set to OFF and the front and rear speakers set to be set... select DIMENSION and then touch c or d to select the phase of subwoofer output. Low frequency range is not output if the subwoofer is installed. 1 Touch NEXT on the installed speakers. Set the front or rear speaker to LARGE if the speaker is capable of reproducing sounds of reproducing bass content, or if...
... the bass output of the subwoofer doesn't do much or rather makes you feel that the bass gets more murky, this may indicate that non-installed speakers be set to make with/without (or yes/no subwoofer is set to OFF and the front and rear speakers set to be set... select DIMENSION and then touch c or d to select the phase of subwoofer output. Low frequency range is not output if the subwoofer is installed. 1 Touch NEXT on the installed speakers. Set the front or rear speaker to LARGE if the speaker is capable of reproducing sounds of reproducing bass content, or if...

Owner's Manual
Page 78
No audio is outputted if the center speaker setting is SMALL or LARGE and no effect if the subwoofer is installed. ! First, use test tone to adjust the speaker output level. SUB WOOFER (subwoofer) 4 Touch c or d to an audio output. The cross-over frequency setting ...- 200Hz Note Selecting a cross-over frequency You can be adjusted. Note To adjust the speaker output levels in the following will occur: ! If the installed speakers include one whose size is to LARGE or OFF. Section 04 Available accessories Note When playing a 2-channel mono source with Pro Logic turned on...
No audio is outputted if the center speaker setting is SMALL or LARGE and no effect if the subwoofer is installed. ! First, use test tone to adjust the speaker output level. SUB WOOFER (subwoofer) 4 Touch c or d to an audio output. The cross-over frequency setting ...- 200Hz Note Selecting a cross-over frequency You can be adjusted. Note To adjust the speaker output levels in the following will occur: ! If the installed speakers include one whose size is to LARGE or OFF. Section 04 Available accessories Note When playing a 2-channel mono source with Pro Logic turned on...

Owner's Manual
Page 84
... is no sound. Volume level is displayed, and op- Turn the attenuator off. Secure the unit firmly. The unit doesn't operate. Be very sure to install a fuse with certain discs. Some operations are heard. system. The volume level will not rise. The icon is low. The volume level is blown. Adjust...
... is no sound. Volume level is displayed, and op- Turn the attenuator off. Secure the unit firmly. The unit doesn't operate. Be very sure to install a fuse with certain discs. Some operations are heard. system. The volume level will not rise. The icon is low. The volume level is blown. Adjust...
Other Manual
Page 1
...AND MAY RESULT IN SERIOUS INJURY OR DAMAGE. WARNING • To avoid the risk of the rating prescribed. - lation of applicable laws, the front DVD or TV (sold separately) feature should never be used . Where such regulations apply, they must be obeyed and this unit in other product's ground ... OF OF AVH-P5000DVD Printed in Thailand Imprimé en Thaïlande UC N STAR N STAR MANUEL D'INSTALLATION Connecting the Units CAUTION • PIONEER does not recommend that wires will not interfere with moving parts, such as gear shift and seat rails. - Do not allow the display lead...
...AND MAY RESULT IN SERIOUS INJURY OR DAMAGE. WARNING • To avoid the risk of the rating prescribed. - lation of applicable laws, the front DVD or TV (sold separately) feature should never be used . Where such regulations apply, they must be obeyed and this unit in other product's ground ... OF OF AVH-P5000DVD Printed in Thailand Imprimé en Thaïlande UC N STAR N STAR MANUEL D'INSTALLATION Connecting the Units CAUTION • PIONEER does not recommend that wires will not interfere with moving parts, such as gear shift and seat rails. - Do not allow the display lead...
Other Manual
Page 2
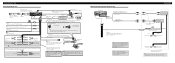
...constant 12 V supply terminal. Note: • Change the initial setting of this unit, do not connect anything to multi-channel processor's installation manual for the connection method. Do not connect anything to the speaker leads that piece of equipment. Clamp the lead. 2. When you...sold iPod. 80 cm (2 ft. 7 in.) 80 cm (2 ft. 7 in.) Tuner box (supplied) IP-BUS input IP-BUS cable (Blue) Multi-CD player (sold separately) System remote control Left Right + + Front speaker Front speaker ≠ ≠ Rear speaker + or subwoofer ≠ + Rear speaker ≠...
...constant 12 V supply terminal. Note: • Change the initial setting of this unit, do not connect anything to multi-channel processor's installation manual for the connection method. Do not connect anything to the speaker leads that piece of equipment. Clamp the lead. 2. When you...sold iPod. 80 cm (2 ft. 7 in.) 80 cm (2 ft. 7 in.) Tuner box (supplied) IP-BUS input IP-BUS cable (Blue) Multi-CD player (sold separately) System remote control Left Right + + Front speaker Front speaker ≠ ≠ Rear speaker + or subwoofer ≠ + Rear speaker ≠...
Other Manual
Page 3
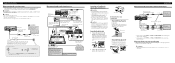
...cm (5-7/8 in which outputs mirror reversed images. Connection method 1. Connecting and installing the optical cable connection box WARNING • Avoid installing this unit in SYSTEM MENU when connecting a multi-DVD player. Connect the optical cable to REVERSE (R). Note: • It is ...installing the optical cable connection box with the hook and loop fastener or lock tie. IN2) of water into a tight parking spot. Wrap with the protection tape Fasten with the lock tie ENGLISH When connecting the external video component and the display Rear monitor output (REAR MONITOR...
...cm (5-7/8 in which outputs mirror reversed images. Connection method 1. Connecting and installing the optical cable connection box WARNING • Avoid installing this unit in SYSTEM MENU when connecting a multi-DVD player. Connect the optical cable to REVERSE (R). Note: • It is ...installing the optical cable connection box with the hook and loop fastener or lock tie. IN2) of water into a tight parking spot. Wrap with the protection tape Fasten with the lock tie ENGLISH When connecting the external video component and the display Rear monitor output (REAR MONITOR...

Other Manual
Page 4
... screws (5 mm × 6 mm), depending on each side. In this unit so the LCD panel can be properly installed either from hot places such as a result of a sudden stop. • Do not install the display where it may (i) obstruct the driver's vision, (ii) impair the performance of any... of the unit match. *1 Use binding screws (4 mm × 3 mm) only. *1 *1 • When installing in a shallow space, change the position of unit chassis). it may cause injury to remove the mounting sleeve. • When reattaching the trim ring, push...
... screws (5 mm × 6 mm), depending on each side. In this unit so the LCD panel can be properly installed either from hot places such as a result of a sudden stop. • Do not install the display where it may (i) obstruct the driver's vision, (ii) impair the performance of any... of the unit match. *1 Use binding screws (4 mm × 3 mm) only. *1 *1 • When installing in a shallow space, change the position of unit chassis). it may cause injury to remove the mounting sleeve. • When reattaching the trim ring, push...


