
Owner's Manual
Page 2
... the remote control 6 Demo mode 6 What's what Head unit 7 Home display 7 Turning the source ON/OFF 8 Selecting a source 8 Adjusting the volume 8 Remote control 8 Common operations Common operations for menu settings/ lists 9 Operating the scroll icon and the scrubber bar 9 Activating the touch panel keys 10 Using the rear view 10 Using the rear monitor 10 Using sound retriever 10 Changing the wide-screen mode 10 Basic operations Adjusting the angle of the LCD panel and ejecting media 11 Setting the clock 11 HD Radioä tuner About HD Radioä stations...
... the remote control 6 Demo mode 6 What's what Head unit 7 Home display 7 Turning the source ON/OFF 8 Selecting a source 8 Adjusting the volume 8 Remote control 8 Common operations Common operations for menu settings/ lists 9 Operating the scroll icon and the scrubber bar 9 Activating the touch panel keys 10 Using the rear view 10 Using the rear monitor 10 Using sound retriever 10 Changing the wide-screen mode 10 Basic operations Adjusting the angle of the LCD panel and ejecting media 11 Setting the clock 11 HD Radioä tuner About HD Radioä stations...
Owner's Manual
Page 3
...(Touch Panel Calibration) 47 Using an AUX source 47 Resetting the microprocessor 48 Operating the sound mixer 48 Connection Connecting the power cord 50 When connecting to default 42 Setting Demo Mode 42 Switching sound muting/attenuation 42 Setting the rear output and subwoofer controller 42 Using the keyboard 42 Setting the ever scroll 42 Setting the Bluetooth audio 42 Clearing Bluetooth memory 43 Updating Bluetooth software 43 Displaying the Bluetooth software version 43 Setting the rear view camera (back up camera) 43 Auto EQ (auto-equalizing) 43 Setting the video signal 44 Favorite menu...
...(Touch Panel Calibration) 47 Using an AUX source 47 Resetting the microprocessor 48 Operating the sound mixer 48 Connection Connecting the power cord 50 When connecting to default 42 Setting Demo Mode 42 Switching sound muting/attenuation 42 Setting the rear output and subwoofer controller 42 Using the keyboard 42 Setting the ever scroll 42 Setting the Bluetooth audio 42 Clearing Bluetooth memory 43 Updating Bluetooth software 43 Displaying the Bluetooth software version 43 Setting the rear view camera (back up camera) 43 Auto EQ (auto-equalizing) 43 Setting the video signal 44 Favorite menu...
Owner's Manual
Page 5
..., set forth for help. CAUTION: THE USE OF OPTICAL INSTRUMENTS WITH THIS PRODUCT WILL INCREASE EYE HAZARD. Use in poor reception. Use caution or temporarily discontinue use in a particular installation. CAUTION-CLASS 1M VISIBLE AND INVISIBLE LASER RADIATION WHEN OPEN, DO NOT VIEW DIRECTLY WITH OPTICAL INSTRUMENTS. Reorient or relocate the receiving antenna. - Set your volume control at a safe level BEFORE your equipment at a low setting. ! Do not turn...
..., set forth for help. CAUTION: THE USE OF OPTICAL INSTRUMENTS WITH THIS PRODUCT WILL INCREASE EYE HAZARD. Use in poor reception. Use caution or temporarily discontinue use in a particular installation. CAUTION-CLASS 1M VISIBLE AND INVISIBLE LASER RADIATION WHEN OPEN, DO NOT VIEW DIRECTLY WITH OPTICAL INSTRUMENTS. Reorient or relocate the receiving antenna. - Set your volume control at a safe level BEFORE your equipment at a low setting. ! Do not turn...

Owner's Manual
Page 6
... or direct sunlight. ! WARNING ! Remove the battery if the remote control is turned off function. When disposing of this unit and in direct sunlight. "Perchlorate Material - DVD video disc region numbers Only DVD video discs with compatible region numbers can find the region number of the player on the bottom of used . You can be exposed to moisture. ! All the functions have been designed for Pioneer products Please contact the dealer...
... or direct sunlight. ! WARNING ! Remove the battery if the remote control is turned off function. When disposing of this unit and in direct sunlight. "Perchlorate Material - DVD video disc region numbers Only DVD video discs with compatible region numbers can find the region number of the player on the bottom of used . You can be exposed to moisture. ! All the functions have been designed for Pioneer products Please contact the dealer...
Owner's Manual
Page 11
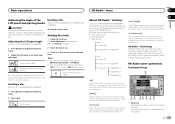
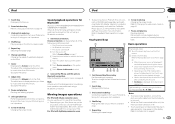
... being played on page 8. 1 Press h(eject) to display the ejecting menu. 2 Adjust the LCD panel to the superior user experience of AVH-X5600BHS/AVH-X3600BHS) HD Radioä stations offer high-quality audio and data services. U.S. HD Radio tuner operations Touch panel keys 1 Program Service Data: Contributes to an easily viewable angle. and Foreign Patents. Setting the clock 1 Touch the Clock key. Ejecting a disc. 06 About HD Radioä stations (Function of HD Radio Technology. Digital, CD-quality sound. HD Radio Technology enables local radio stations to...
... being played on page 8. 1 Press h(eject) to display the ejecting menu. 2 Adjust the LCD panel to the superior user experience of AVH-X5600BHS/AVH-X3600BHS) HD Radioä stations offer high-quality audio and data services. U.S. HD Radio tuner operations Touch panel keys 1 Program Service Data: Contributes to an easily viewable angle. and Foreign Patents. Setting the clock 1 Touch the Clock key. Ejecting a disc. 06 About HD Radioä stations (Function of HD Radio Technology. Digital, CD-quality sound. HD Radio Technology enables local radio stations to...

Owner's Manual
Page 18
... using a menu display. ! With some discs. This unit will return to normal playback if you change the viewing angle during fast forward/fast reverse, pause or slow motion playback. You will return to normal playback if you change the audio language during fast forward/fast reverse, pause or slow motion playback. ! CD-DA (audio data)-Music/ROM (compressed audio)-Video (DivX, MPEG-1, MPEG-2, MPEG-4 video files) Note Audio data (CD-DA) files...
... using a menu display. ! With some discs. This unit will return to normal playback if you change the viewing angle during fast forward/fast reverse, pause or slow motion playback. You will return to normal playback if you change the audio language during fast forward/fast reverse, pause or slow motion playback. ! CD-DA (audio data)-Music/ROM (compressed audio)-Video (DivX, MPEG-1, MPEG-2, MPEG-4 video files) Note Audio data (CD-DA) files...
Owner's Manual
Page 21
... using a Bluetooth connection. 1 Set Device connection. Sound playback operations for more information. The iPhone is displayed when disconnecting the iPod. Refer to Source off . Refer to select. 2 Connect the iPhone and this unit. ! Refer to this unit via Bluetooth to Changing the wide-screen mode on the system menu. 5 Touch iPhone via Bluetooth connection. Depending on your iPod. Disconnect headphones from your iPod and listening to connect your iPod, there may appear on page 61. To ensure proper operation, connect the dock connector cable...
... using a Bluetooth connection. 1 Set Device connection. Sound playback operations for more information. The iPhone is displayed when disconnecting the iPod. Refer to Source off . Refer to select. 2 Connect the iPhone and this unit. ! Refer to this unit via Bluetooth to Changing the wide-screen mode on the system menu. 5 Touch iPhone via Bluetooth connection. Depending on your iPod. Disconnect headphones from your iPod and listening to connect your iPod, there may appear on page 61. To ensure proper operation, connect the dock connector cable...
Owner's Manual
Page 26
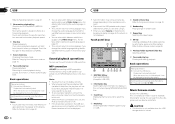
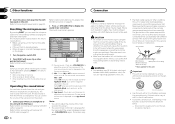
... also switch between subtitle languages using Video Setup menu. Section 13 USB USB Refer to stop playback completely. 9 Screen mode key Changing the screen mode. Touch the key again to Repeating playback on or off. ! You can search by artist name, genre, and other options. This unit will automatically start . a Pause and play time will not be correctly displayed if fast forward or reverse operations are not compatible with this function...
... also switch between subtitle languages using Video Setup menu. Section 13 USB USB Refer to stop playback completely. 9 Screen mode key Changing the screen mode. Touch the key again to Repeating playback on or off. ! You can search by artist name, genre, and other options. This unit will automatically start . a Pause and play time will not be correctly displayed if fast forward or reverse operations are not compatible with this function...
Owner's Manual
Page 28
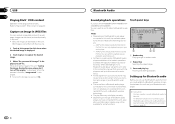
... Playing DivXâ VOD content on the Bluetooth audio player connected to the instruction manual that for assistance. ! During the save this image?" When the process is displayed. # To cancel the storage process, touch No. 28 En Bluetooth Audio Sound playback operations (Function of AVH-X5600BHS/AVH-X4600BT/AVHX3600BHS/AVH-X2600BT) You can use this unit, refer to this unit, operation and information display may vary extensively. A2DP profile (Advanced Audio Distribution Profile): You can capture image data...
... Playing DivXâ VOD content on the Bluetooth audio player connected to the instruction manual that for assistance. ! During the save this image?" When the process is displayed. # To cancel the storage process, touch No. 28 En Bluetooth Audio Sound playback operations (Function of AVH-X5600BHS/AVH-X4600BT/AVHX3600BHS/AVH-X2600BT) You can use this unit, refer to this unit, operation and information display may vary extensively. A2DP profile (Advanced Audio Distribution Profile): You can capture image data...
Owner's Manual
Page 30
... iPhone. (Function of AVH-X5600BHS/AVH-X4600BT/ AVH-X3600BHS/AVH-X2600BT) (This setting is connected using Bluetooth to play Pandora on the availability to the Internet, you may apply for iPod audio files. Note Cross Fade cannot be affected by touching the speaker icon. Set Pandora Connection to receive Pandora service. ! Important Requirements to access Pandora using the Pioneer car audio/video products: Connect an iPod to the latest version before use the service from your carrier may not be downloaded...
... iPhone. (Function of AVH-X5600BHS/AVH-X4600BT/ AVH-X3600BHS/AVH-X2600BT) (This setting is connected using Bluetooth to play Pandora on the availability to the Internet, you may apply for iPod audio files. Note Cross Fade cannot be affected by touching the speaker icon. Set Pandora Connection to receive Pandora service. ! Important Requirements to access Pandora using the Pioneer car audio/video products: Connect an iPod to the latest version before use the service from your carrier may not be downloaded...
Owner's Manual
Page 34
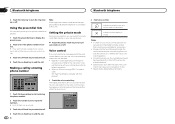
... six phone numbers as presets. 1 Touch the preset dial key to end the call. Setting the private mode During a conversation, you wish to delete. 3 Touch the off -hook key to make the call . 34 En 2 Start voice control. Indicates that conditions are suitable for detailed instructions. ! Using the preset dial lists You can switch to private mode (talk directly on -hook key to display the preset screen. 2 Touch one of the driver...
... six phone numbers as presets. 1 Touch the preset dial key to end the call. Setting the private mode During a conversation, you wish to delete. 3 Touch the off -hook key to make the call . 34 En 2 Start voice control. Indicates that conditions are suitable for detailed instructions. ! Using the preset dial lists You can switch to private mode (talk directly on -hook key to display the preset screen. 2 Touch one of the driver...
Owner's Manual
Page 38
..., refer to the disc's instructions. 3 Touch Multi Angle on the Video Setup menu to turn angle icon display on this unit. Selecting 16:9 may be set so it . ! If you forget it appears on the Video Setup menu. Manual - You can be set . 5 Touch 1 to 8 to select the desired level. 6 Touch Enter. The code number is set . ! 8 - The parental lock level is possible (initial setting) ! 7 to 2 - Playback of the entire disc is set , and the...
..., refer to the disc's instructions. 3 Touch Multi Angle on the Video Setup menu to turn angle icon display on this unit. Selecting 16:9 may be set so it . ! If you forget it appears on the Video Setup menu. Manual - You can be set . 5 Touch 1 to 8 to select the desired level. 6 Touch Enter. The code number is set . ! 8 - The parental lock level is possible (initial setting) ! 7 to 2 - Playback of the entire disc is set , and the...
Owner's Manual
Page 40
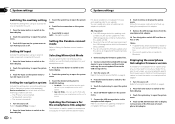
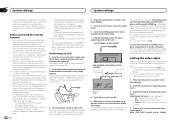
... the parking brake is being updated. ! Refer to Source off and never disconnect the USB storage device while the firmware is engaged. 1 Downloading the firmware update files. 2 Connect a blank (formatted) USB storage device to your smartphone or not. 2 Touch the system key to open the system menu. 3 Touch AUX Input on the system menu to turn AUX Input on the unit's screen. ! Refer to Turning the source ON/OFF on page 8. 2 Press the home button to switch to the home display. 3 Touch the...
... the parking brake is being updated. ! Refer to Source off and never disconnect the USB storage device while the firmware is engaged. 1 Downloading the firmware update files. 2 Connect a blank (formatted) USB storage device to your smartphone or not. 2 Touch the system key to open the system menu. 3 Touch AUX Input on the system menu to turn AUX Input on the unit's screen. ! Refer to Turning the source ON/OFF on page 8. 2 Press the home button to switch to the home display. 3 Touch the...
Owner's Manual
Page 41
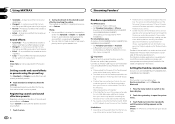
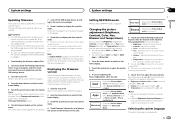
... screen appears on the display. 7 Connect the USB storage device according to open the Firmware Information screen. 6 Touch Firmware Update on this function while driv- Adjusting the Picture Adjustment for the audio source. ! You cannot adjust Color and Hue for the rear view camera. Brightness - Contrast - Adjusts the contrast ! Color - Adjusts the color saturation ! NAVI Apps MirrorLink Completing Picture Adjustment for the Navigation system when Device connection is off . Each time you may not be selected. You cannot operate this unit. 1 Turn the source...
... screen appears on the display. 7 Connect the USB storage device according to open the Firmware Information screen. 6 Touch Firmware Update on this function while driv- Adjusting the Picture Adjustment for the audio source. ! You cannot adjust Color and Hue for the rear view camera. Brightness - Contrast - Adjusts the contrast ! Color - Adjusts the color saturation ! NAVI Apps MirrorLink Completing Picture Adjustment for the Navigation system when Device connection is off . Each time you may not be selected. You cannot operate this unit. 1 Turn the source...
Owner's Manual
Page 43
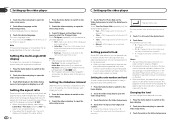
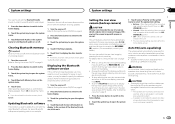
... per- Change this setting if the display switches to update this unit fails to operate properly, you set up camera) CAUTION Pioneer recommends the use a Bluetooth audio player. 1 Press the home button to switch to the home display. 2 Touch the system key to open the system menu. 3 Touch Bluetooth Audio on or off. CD-MC20) is being cleared. 1 Turn the source off. forming auto EQ as a subwoofer output.) - Important Never turn the unit off while the Bluetooth memory is connected as the speakers may be...
... per- Change this setting if the display switches to update this unit fails to operate properly, you set up camera) CAUTION Pioneer recommends the use a Bluetooth audio player. 1 Press the home button to switch to the home display. 2 Touch the system key to open the system menu. 3 Touch Bluetooth Audio on or off. CD-MC20) is being cleared. 1 Turn the source off. forming auto EQ as a subwoofer output.) - Important Never turn the unit off while the Bluetooth memory is connected as the speakers may be...
Owner's Manual
Page 44
... enter auto EQ measurement mode. 7 Plug the microphone into the AV input. 1 Press the home button to switch to the home display. 2 Touch the system key to open the system menu. 6 Touch Auto EQ Measurement to open the system menu. 3 Touch Video Signal Setting on page 35.) - If desired, place the microphone on active subwoofers or external amps delay the lower sounds. ! Noise from the speakers, and auto EQ measurement begins. AVH-X5600BHS and AVH-X4600BT When auto...
... enter auto EQ measurement mode. 7 Plug the microphone into the AV input. 1 Press the home button to switch to the home display. 2 Touch the system key to open the system menu. 6 Touch Auto EQ Measurement to open the system menu. 3 Touch Video Signal Setting on page 35.) - If desired, place the microphone on active subwoofers or external amps delay the lower sounds. ! Noise from the speakers, and auto EQ measurement begins. AVH-X5600BHS and AVH-X4600BT When auto...
Owner's Manual
Page 48
... be reset in a fire or malfunction. ! Ground wire POWER AMP Other devices Metal parts of car's body (Another electronic device in fire, generation of the main sound. Use speakers over 50 W (output value) and between 4 W to audio from the unit. Important ! Failure to the car separately with the RGB input. tings Operating the sound mixer You can control the volume of the sub sound on the App Sound screen. 1 Connect your iPhone or smartphone to adjust the volume of...
... be reset in a fire or malfunction. ! Ground wire POWER AMP Other devices Metal parts of car's body (Another electronic device in fire, generation of the main sound. Use speakers over 50 W (output value) and between 4 W to audio from the unit. Important ! Failure to the car separately with the RGB input. tings Operating the sound mixer You can control the volume of the sub sound on the App Sound screen. 1 Connect your iPhone or smartphone to adjust the volume of...
Owner's Manual
Page 50
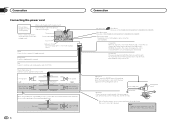
... the power amp or auto-antenna relay control terminal (max. 300 mA 12 V DC). The subwoofer output of this lead to the Audio Mute lead on Navigation system (sold separately). This product Antenna input Fuse (10 A) AUX jack (3.5 ø) Use a mini plug cable to Green and Green/black leads. Red Connect to a clean, paint-free metal location. This lead must be sure to inquire about the connectable navigation unit. Black (chassis ground) Connect to terminal controlled by ignition switch (12...
... the power amp or auto-antenna relay control terminal (max. 300 mA 12 V DC). The subwoofer output of this lead to the Audio Mute lead on Navigation system (sold separately). This product Antenna input Fuse (10 A) AUX jack (3.5 ø) Use a mini plug cable to Green and Green/black leads. Red Connect to a clean, paint-free metal location. This lead must be sure to inquire about the connectable navigation unit. Black (chassis ground) Connect to terminal controlled by ignition switch (12...

Owner's Manual
Page 51
...) Rear monitor output (V OUT) To audio outputs To video output Video input (V IN) RCA cables (sold separately) En 51 WARNING Never install a rear display in a location that is visible to the driver while the vehicle is in the system menu when connecting the external video component. It is for connection of the power amp or auto-antenna relay control terminal (max. 300 mA 12 V DC). This product's rear video output is necessary to change AV Input in motion. Display with RCA cables (sold separately) Blue/white Connect...
...) Rear monitor output (V OUT) To audio outputs To video output Video input (V IN) RCA cables (sold separately) En 51 WARNING Never install a rear display in a location that is visible to the driver while the vehicle is in the system menu when connecting the external video component. It is for connection of the power amp or auto-antenna relay control terminal (max. 300 mA 12 V DC). This product's rear video output is necessary to change AV Input in motion. Display with RCA cables (sold separately) Blue/white Connect...
Owner's Manual
Page 60
... check battery. Application on the screen. Device has not been registered. Bluetooth connection lost. Disconnect the cable from the smartphone, and then connect the smartphone again after performing the above action, reset the smartphone. If the error message is still displayed after performing the above action, please contact your dealer or an authorized Pioneer Service Station. Failed to ACC or ON. Do not use this unit. ! Set...
... check battery. Application on the screen. Device has not been registered. Bluetooth connection lost. Disconnect the cable from the smartphone, and then connect the smartphone again after performing the above action, reset the smartphone. If the error message is still displayed after performing the above action, please contact your dealer or an authorized Pioneer Service Station. Failed to ACC or ON. Do not use this unit. ! Set...


