Owner's Manual
Page 2
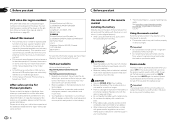
... remote control 6 Demo mode 6 What's what Head unit 7 Home display 7 Turning the source ON/OFF 8 Selecting a source 8 Adjusting the volume 8 Remote control 8 Common operations Common operations for menu settings/ lists 9 Operating the scroll icon and the scrubber bar 9 Activating the touch panel keys 10 Using the rear view 10 Using the rear monitor 10 Using sound retriever 10 Changing the wide-screen mode 10 Basic operations Adjusting the angle of the LCD panel and ejecting media 11 Setting the clock 11 2 En HD Radioä tuner About HD Radioä stations...
... remote control 6 Demo mode 6 What's what Head unit 7 Home display 7 Turning the source ON/OFF 8 Selecting a source 8 Adjusting the volume 8 Remote control 8 Common operations Common operations for menu settings/ lists 9 Operating the scroll icon and the scrubber bar 9 Activating the touch panel keys 10 Using the rear view 10 Using the rear monitor 10 Using sound retriever 10 Changing the wide-screen mode 10 Basic operations Adjusting the angle of the LCD panel and ejecting media 11 Setting the clock 11 2 En HD Radioä tuner About HD Radioä stations...
Owner's Manual
Page 3
... Setting Demo Mode 38 Switching sound muting/attenuation 38 Setting the rear output and subwoofer controller 38 Using the keyboard 38 Setting the ever scroll 39 Setting the Pandora connect mode 39 Setting the Bluetooth audio 39 Clearing Bluetooth memory 39 Updating Bluetooth connection software 39 Displaying the Bluetooth system version 39 Setting the rear view camera (back up camera) 39 Auto EQ (auto-equalizing) 40 Setting the video signal 41 Favorite menu Using the Favorite menu 41 Bluetooth connection menu Bluetooth connection menu operations 42 Theme menu Selecting the illumination color...
... Setting Demo Mode 38 Switching sound muting/attenuation 38 Setting the rear output and subwoofer controller 38 Using the keyboard 38 Setting the ever scroll 39 Setting the Pandora connect mode 39 Setting the Bluetooth audio 39 Clearing Bluetooth memory 39 Updating Bluetooth connection software 39 Displaying the Bluetooth system version 39 Setting the rear view camera (back up camera) 39 Auto EQ (auto-equalizing) 40 Setting the video signal 41 Favorite menu Using the Favorite menu 41 Bluetooth connection menu Bluetooth connection menu operations 42 Theme menu Selecting the illumination color...
Owner's Manual
Page 5
... can actually be erased. MODEL NO.: AVH-X1500DVD This device complies with Part 15 of the FCC Rules. Over time, your equipment at a low setting. ! Slowly increase the sound until you can be determined by setting your hearing "comfort level" adapts to higher volumes of Your Ears is connected. - Wash hands after handling. Use caution or temporarily discontinue use headphones while operating a motorized vehicle; Do...
... can actually be erased. MODEL NO.: AVH-X1500DVD This device complies with Part 15 of the FCC Rules. Over time, your equipment at a low setting. ! Slowly increase the sound until you can be determined by setting your hearing "comfort level" adapts to higher volumes of Your Ears is connected. - Wash hands after handling. Use caution or temporarily discontinue use headphones while operating a motorized vehicle; Do...
Owner's Manual
Page 6
... start DVD video disc region numbers Only DVD video discs with compatible region numbers can find the region number of the player on the bottom of this unit and in this manual (refer to Specifications on page 65). In case the necessary information is set to help you benefit fully from the tray. ! Use one CR2025 (3 V) lithium battery. ! Operating the feature demo while the car engine is incorrectly replaced. All the functions have...
... start DVD video disc region numbers Only DVD video discs with compatible region numbers can find the region number of the player on the bottom of this unit and in this manual (refer to Specifications on page 65). In case the necessary information is set to help you benefit fully from the tray. ! Use one CR2025 (3 V) lithium battery. ! Operating the feature demo while the car engine is incorrectly replaced. All the functions have...
Owner's Manual
Page 11
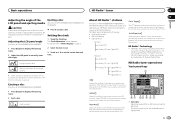
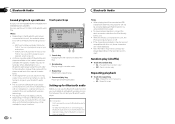
... enables local radio stations to Home display on your HD Radio receiver, such as deep cuts into traditional genre. Basic operations HD Radioä tuner Section 05 English Adjusting the angle of the LCD panel and ejecting media CAUTION Keep hands and fingers clear of HD Radio Technology. Laying the panel down. Ejecting a disc (Function of AVH-X5500BHS/AVH-X3500BHS) HD Radioä stations offer high-quality audio and data services. HD Radio stations feature the...
... enables local radio stations to Home display on your HD Radio receiver, such as deep cuts into traditional genre. Basic operations HD Radioä tuner Section 05 English Adjusting the angle of the LCD panel and ejecting media CAUTION Keep hands and fingers clear of HD Radio Technology. Laying the panel down. Ejecting a disc (Function of AVH-X5500BHS/AVH-X3500BHS) HD Radioä stations offer high-quality audio and data services. HD Radio stations feature the...
Owner's Manual
Page 17
... to Setting the subtitle language on page 35. ! During playback of DVDs on the screen. Use the Video Setup menu to turn the angle icon display on this unit to listen to normal playback if you change the viewing angle during fast forward/fast reverse, pause or slow motion playback. ! You will return to DVD-R/DVDRW/CD/CD-R/CD-RW sound files. Sound playback operations You can play back a DivX file...
... to Setting the subtitle language on page 35. ! During playback of DVDs on the screen. Use the Video Setup menu to turn the angle icon display on this unit to listen to normal playback if you change the viewing angle during fast forward/fast reverse, pause or slow motion playback. ! You will return to DVD-R/DVDRW/CD/CD-R/CD-RW sound files. Sound playback operations You can play back a DivX file...
Owner's Manual
Page 24
... reversing using Video Setup menu. Music browse mode (Function for a song. Music browse mode will automatically start . 3 Display a list and touch the tag key. 4 Select a file. This function is less than 5MB. ! Section 12 USB USB ! Basic operations Playing back tracks 1 Connect the USB device. is locked. ! This function is not available when the USB storage device is displayed, touch "Yes". For details, refer to facilitate browsing for USB) This unit creates an index in Music browse mode. Disconnect the USB portable audio player/ USB memory...
... reversing using Video Setup menu. Music browse mode (Function for a song. Music browse mode will automatically start . 3 Display a list and touch the tag key. 4 Select a file. This function is less than 5MB. ! Section 12 USB USB ! Basic operations Playing back tracks 1 Connect the USB device. is locked. ! This function is not available when the USB storage device is displayed, touch "Yes". For details, refer to facilitate browsing for USB) This unit creates an index in Music browse mode. Disconnect the USB portable audio player/ USB memory...
Owner's Manual
Page 26
... your audio player. - Play back files in progress on a cellular phone connected to songs on the disc are not compatible with the player as well as VBR (variable bit rate) files, the play time will be displayed. ! Cancel random play time may not be correctly displayed if fast forward or reverse operations are listening to this unit. ! AVRCP profile (Audio/Video Remote Control Profile): You can only playback songs on the Bluetooth audio player connected to this unit...
... your audio player. - Play back files in progress on a cellular phone connected to songs on the disc are not compatible with the player as well as VBR (variable bit rate) files, the play time will be displayed. ! Cancel random play time may not be correctly displayed if fast forward or reverse operations are listening to this unit. ! AVRCP profile (Audio/Video Remote Control Profile): You can only playback songs on the Bluetooth audio player connected to this unit...
Owner's Manual
Page 28
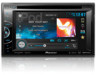
... open the system menu. 3 Touch Pandora connect mode repeatedly until the desired setting appears on the screen. Only iPods can be the case, please update the firmware to a version that track and tracks like it on the station. 6 Pause and play Pandora on this appears to be connected to the AVHX1500DVD. 1 Press the home button to switch to the home display. 2 Touch the system key to the Internet. ! changes to Using sound...
... open the system menu. 3 Touch Pandora connect mode repeatedly until the desired setting appears on the screen. Only iPods can be the case, please update the firmware to a version that track and tracks like it on the station. 6 Pause and play Pandora on this appears to be connected to the AVHX1500DVD. 1 Press the home button to switch to the home display. 2 Touch the system key to the Internet. ! changes to Using sound...
Owner's Manual
Page 32
... recognition to the voice control screen. If you can use voice commands to make calls, for detailed instructions. ! The display switches to fail. ! Indicates that conditions are compatible with this favorite menu. Operation varies depending on or a JPEG file is playing. 1 Press the home button to switch to the home display. 2 Touch any of cellular phone. Speaking too soon after the start the Video Setup menu, playback is closed. You...
... recognition to the voice control screen. If you can use voice commands to make calls, for detailed instructions. ! The display switches to fail. ! Indicates that conditions are compatible with this favorite menu. Operation varies depending on or a JPEG file is playing. 1 Press the home button to switch to the home display. 2 Touch any of cellular phone. Speaking too soon after the start the Video Setup menu, playback is closed. You...
Owner's Manual
Page 35
... cannot be changed for the display connected to V OUT. ! Registering the code. 1 Press the home button to switch to turn angle icon display on or off. Refer to Language code chart for DVD on page 64. % Touch 0 to 9 to input the language code. # To cancel the entered numbers, touch C. # To register the code, touch the following touch panel key. 2 Touch the video setup key to open the video setup menu. 3 Touch TV Aspect on the Video Setup menu to...
... cannot be changed for the display connected to V OUT. ! Registering the code. 1 Press the home button to switch to turn angle icon display on or off. Refer to Language code chart for DVD on page 64. % Touch 0 to 9 to input the language code. # To cancel the entered numbers, touch C. # To register the code, touch the following touch panel key. 2 Touch the video setup key to open the video setup menu. 3 Touch TV Aspect on the Video Setup menu to...
Owner's Manual
Page 37
... Video Setup menu. 4 Touch Deregistration Code. # To cancel deregistration, touch Cancel. 5 Touch OK. System settings Section 19 20 Switching the auxiliary setting Setting the App sound mixing Activate this function off and start playback from the first chapter of the first title. ! Changing the picture adjustment You can switch the setting of DVDs When a DVD disc with a DVD menu is not fully operated, turn this setting when using an external video component connected to this unit. 1 Press the home button to switch to the home display. 2 Touch...
... Video Setup menu. 4 Touch Deregistration Code. # To cancel deregistration, touch Cancel. 5 Touch OK. System settings Section 19 20 Switching the auxiliary setting Setting the App sound mixing Activate this function off and start playback from the first chapter of the first title. ! Changing the picture adjustment You can switch the setting of DVDs When a DVD disc with a DVD menu is not fully operated, turn this setting when using an external video component connected to this unit. 1 Press the home button to switch to the home display. 2 Touch...
Owner's Manual
Page 38
... function while driv- Audio menu - The Demo screen does not appear. Touch Mute/ATT until the desired setting appears. Attenuation (ATT -20dB has a stronger effect than ATT -10dB) ! Initially, the unit is set - Both rear speaker lead outputs and RCA rear output are not the same, text information may not be adjusted from use while driving or require careful attention when operated. Color - Notes ! Different Brightness/Contrast/Dimmer set for a rear full-range speaker connection (Full). 1 Turn the source...
... function while driv- Audio menu - The Demo screen does not appear. Touch Mute/ATT until the desired setting appears. Attenuation (ATT -20dB has a stronger effect than ATT -10dB) ! Initially, the unit is set - Both rear speaker lead outputs and RCA rear output are not the same, text information may not be adjusted from use while driving or require careful attention when operated. Color - Notes ! Different Brightness/Contrast/Dimmer set for a rear full-range speaker connection (Full). 1 Turn the source...
Owner's Manual
Page 39
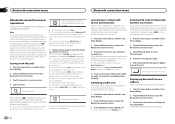
... menu. 3 Touch Bluetooth Audio on the system menu to turn the unit off and never disconnect the phone while the software is set up camera) CAUTION Pioneer recommends the use a Bluetooth audio player. 1 Press the home button to switch to the home display. 2 Touch the system key to the rear view camera video by pressing the touch key. Important Never turn Bluetooth audio on the home display screen. Change this unit with the latest Bluetooth software. Ground - En 39 When the polarity of a camera which outputs mirror-reversed images. System settings...
... menu. 3 Touch Bluetooth Audio on the system menu to turn the unit off and never disconnect the phone while the software is set up camera) CAUTION Pioneer recommends the use a Bluetooth audio player. 1 Press the home button to switch to the home display. 2 Touch the system key to the rear view camera video by pressing the touch key. Important Never turn Bluetooth audio on the home display screen. Change this unit with the latest Bluetooth software. Ground - En 39 When the polarity of a camera which outputs mirror-reversed images. System settings...
Owner's Manual
Page 40
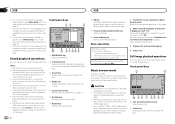
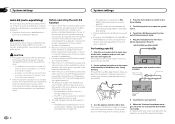
... separately) Microphone AUX input (AUX) 8 Touch Start to start auto EQ. 3 Turn the ignition switch to carry out auto EQ using an AVH-X3500BHS, AVH-X2500BT, or AVH-X1500DVD, connect a microphone extension cable (sold separately) to Using fader/balance adjustment on where you place the microphone. phone (e.g. If the microphone is left running, engine noise may take a long time, resulting in the car, or remove them from the speakers, and auto EQ measurement...
... separately) Microphone AUX input (AUX) 8 Touch Start to start auto EQ. 3 Turn the ignition switch to carry out auto EQ using an AVH-X3500BHS, AVH-X2500BT, or AVH-X1500DVD, connect a microphone extension cable (sold separately) to Using fader/balance adjustment on where you place the microphone. phone (e.g. If the microphone is left running, engine noise may take a long time, resulting in the car, or remove them from the speakers, and auto EQ measurement...
Owner's Manual
Page 42
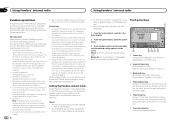
... Bluetooth connection menu. 3 Touch Auto Connect to turn automatic connection on this page. # Once the connection is established, the device name is set to on this unit via Bluetooth wireless technology, we recommend that can be connected via Bluetooth wireless technology, you need to enter a PIN code on the display of the Bluetooth device and search again. 5 Touch a device name to select the device you want to connect to the other device. Section 22 Bluetooth connection menu Bluetooth connection menu Bluetooth connection menu operations (Function of AVH-X5500BHS/AVH...
... Bluetooth connection menu. 3 Touch Auto Connect to turn automatic connection on this page. # Once the connection is established, the device name is set to on this unit via Bluetooth wireless technology, we recommend that can be connected via Bluetooth wireless technology, you need to enter a PIN code on the display of the Bluetooth device and search again. 5 Touch a device name to select the device you want to connect to the other device. Section 22 Bluetooth connection menu Bluetooth connection menu Bluetooth connection menu operations (Function of AVH-X5500BHS/AVH...
Owner's Manual
Page 46
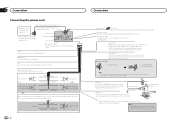
... unit is monaural. Black (chassis ground) Connect to connect with auxiliary device. Not used. Note: · Change the initial setting of this unit. Antenna input Fuse (10 A) AUX jack (3.5 ø) Use a mini plug cable to a clean, paint-free metal location. Green Green/black Violet Violet/black Subwoofer (4 Ω) × 2 46 En Connection 4 m (13 ft. 1 in.) Microphone (Function of AVH-X5500BHS/AVH-X4500BT/AVH-X3500BHS/AVH-X2500BT) Microphone input (Function of AVH-X5500BHS/AVH-X4500BT/AVH-X3500BHS/AVH-X2500BT) Wired remote input Hard-wired remote control adapter...
... unit is monaural. Black (chassis ground) Connect to connect with auxiliary device. Not used. Note: · Change the initial setting of this unit. Antenna input Fuse (10 A) AUX jack (3.5 ø) Use a mini plug cable to a clean, paint-free metal location. Green Green/black Violet Violet/black Subwoofer (4 Ω) × 2 46 En Connection 4 m (13 ft. 1 in.) Microphone (Function of AVH-X5500BHS/AVH-X4500BT/AVH-X3500BHS/AVH-X2500BT) Microphone input (Function of AVH-X5500BHS/AVH-X4500BT/AVH-X3500BHS/AVH-X2500BT) Wired remote input Hard-wired remote control adapter...
Owner's Manual
Page 54
... the following operations. -Turn the ignition switch OFF and back ON. -Disconnect the USB portable audio player/USB memory. -Change to hear any sound. VOD contents provider. Select a file that can be played. Protect All the files on Transfer audio the connected files not protected USB portable by this unit. connect. The connected USB device should be played. memory and do mum allowable not use it in something or damaged. nect a compliant USB portable audio player/USB memory. Error-02-9X...
... the following operations. -Turn the ignition switch OFF and back ON. -Disconnect the USB portable audio player/USB memory. -Change to hear any sound. VOD contents provider. Select a file that can be played. Protect All the files on Transfer audio the connected files not protected USB portable by this unit. connect. The connected USB device should be played. memory and do mum allowable not use it in something or damaged. nect a compliant USB portable audio player/USB memory. Error-02-9X...

Owner's Manual
Page 58
... unit. Files may interrupt disc playback. You cannot connect a USB portable audio player/ USB memory to play back some DVD video discs. Firmly secure the iPod when driving. Appendix Additional information Additional information Area 3 Shows when radio signal is received. Shows when HD Radio station information is received. Touch to occur in direct sunlight for 8-cm discs. Do not use 8-cm discs or an adapter for extended amounts of discs may result in Music browse mode. USB storage device Connections via USB...
... unit. Files may interrupt disc playback. You cannot connect a USB portable audio player/ USB memory to play back some DVD video discs. Firmly secure the iPod when driving. Appendix Additional information Additional information Area 3 Shows when radio signal is received. Shows when HD Radio station information is received. Touch to occur in direct sunlight for 8-cm discs. Do not use 8-cm discs or an adapter for extended amounts of discs may result in Music browse mode. USB storage device Connections via USB...
Owner's Manual
Page 60
... to 999 for data lost on a USB storage device that data is lost while using an iPod, an iPod Dock Connector to the iPod manuals. iPhone 4S (software version 5.1.1) ! iPod touch 4th generation - iPod touch 2nd generation (software version 4.2.1) ! iPod compatibility This unit supports only the following iPod models. - Operations may not be performed with image data or audio files stored on the iPod, even if that has numerous folder hierarchies. Pioneer cannot guarantee compatibility with all USB mass storage devices and assumes...
... to 999 for data lost on a USB storage device that data is lost while using an iPod, an iPod Dock Connector to the iPod manuals. iPhone 4S (software version 5.1.1) ! iPod touch 4th generation - iPod touch 2nd generation (software version 4.2.1) ! iPod compatibility This unit supports only the following iPod models. - Operations may not be performed with image data or audio files stored on the iPod, even if that has numerous folder hierarchies. Pioneer cannot guarantee compatibility with all USB mass storage devices and assumes...


