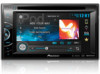
Owner's Manual
Page 3
... the Bluetooth audio 39 Clearing Bluetooth memory 39 Updating Bluetooth connection software 39 Displaying the Bluetooth system version 39 Setting the rear view camera (back up camera) 39 Auto EQ (auto-equalizing) 40 Setting the video signal 41 Favorite menu Using the Favorite menu 41 Bluetooth connection... When connecting to separately sold power amp 47 When connecting the external video component and the display 47 When connecting with a rear view camera 48 Optional SiriusXM Tuner connection 48 Installation Installation using the screw holes on the side of the unit 49 Installing the microphone...
... the Bluetooth audio 39 Clearing Bluetooth memory 39 Updating Bluetooth connection software 39 Displaying the Bluetooth system version 39 Setting the rear view camera (back up camera) 39 Auto EQ (auto-equalizing) 40 Setting the video signal 41 Favorite menu Using the Favorite menu 41 Bluetooth connection... When connecting to separately sold power amp 47 When connecting the external video component and the display 47 When connecting with a rear view camera 48 Optional SiriusXM Tuner connection 48 Installation Installation using the screw holes on the side of the unit 49 Installing the microphone...
Owner's Manual
Page 4
... 5 To promote safety, certain functions are used for checking the rear when the vehicle is in this PIONEER product. Please note that the edges of your display so high that is visible to rear monitor output The rear monitor output on this display if doing so in an accident, your... CONNECTION OR USE OF THIS LEAD MAY VIOLATE APPLICABLE LAW AND MAY RESULT IN SERIOUS INJURY OR DAMAGE. ! When using the rear view camera With an optional rear view camera, this unit can be used as when the vehicle battery is being replaced, the microcomputer of electric shock or other than the...
... 5 To promote safety, certain functions are used for checking the rear when the vehicle is in this PIONEER product. Please note that the edges of your display so high that is visible to rear monitor output The rear monitor output on this display if doing so in an accident, your... CONNECTION OR USE OF THIS LEAD MAY VIOLATE APPLICABLE LAW AND MAY RESULT IN SERIOUS INJURY OR DAMAGE. ! When using the rear view camera With an optional rear view camera, this unit can be used as when the vehicle battery is being replaced, the microcomputer of electric shock or other than the...
Owner's Manual
Page 10
...119'51'' 1 L+R 1 07'24'' Return 2/2 -112'47'' 1 1 Tab key Switching the touch keys on the sources listed below. - Rear view camera This unit can switch to be turned on . Notes ! CD-DA - This function is , granting viewers no sense of disparity as that does not... 1 Display the screen mode. 2 Touch the desired wide mode setting. The rear view camera needs to Setting the rear view camera (back up camera) on rear view mode. For details about the settings, refer to be dis- When the rear view image is enabled for each video source. play on CD media - Pandora !...
...119'51'' 1 L+R 1 07'24'' Return 2/2 -112'47'' 1 1 Tab key Switching the touch keys on the sources listed below. - Rear view camera This unit can switch to be turned on . Notes ! CD-DA - This function is , granting viewers no sense of disparity as that does not... 1 Display the screen mode. 2 Touch the desired wide mode setting. The rear view camera needs to Setting the rear view camera (back up camera) on rear view mode. For details about the settings, refer to be dis- When the rear view image is enabled for each video source. play on CD media - Pandora !...
Owner's Manual
Page 37
...and start playback from the first chapter of the first title. ! En 37 English Source Adjusting the Picture Adjustment for each source and rear view camera. ! System settings Section 19 20 Switching the auxiliary setting Setting the App sound mixing Activate this setting when using an external video ...setup key to open the system menu. 3 Touch RGB Input on or off , touch DVD Auto Play again. Completing Picture Adjustment for the rear view camera. Automatic playback of RGB input. 1 Press the home button to switch to the home display. 2 Touch the system key to open the ...
...and start playback from the first chapter of the first title. ! En 37 English Source Adjusting the Picture Adjustment for each source and rear view camera. ! System settings Section 19 20 Switching the auxiliary setting Setting the App sound mixing Activate this setting when using an external video ...setup key to open the system menu. 3 Touch RGB Input on or off , touch DVD Auto Play again. Completing Picture Adjustment for the rear view camera. Automatic playback of RGB input. 1 Press the home button to switch to the home display. 2 Touch the system key to open the ...
Owner's Manual
Page 38
...language. 4 Touch the desired language. Different Brightness/Contrast/Dimmer set to NTSC. # With some rear view cameras, picture adjustment may not be possible. 5 Touch c or d to the rear output, select Subwoofer (subwoofer). Some characters may not be displayed properly. 1 Press the home button... attenuated when a signal from use while driving or require careful attention when operated. Setting the rear output and subwoofer controller This unit's rear output (rear speaker leads output and RCA rear output) can be used for DivX (English and Russian only) - You cannot operate this ...
...language. 4 Touch the desired language. Different Brightness/Contrast/Dimmer set to NTSC. # With some rear view cameras, picture adjustment may not be possible. 5 Touch c or d to the rear output, select Subwoofer (subwoofer). Some characters may not be displayed properly. 1 Press the home button... attenuated when a signal from use while driving or require careful attention when operated. Setting the rear output and subwoofer controller This unit's rear output (rear speaker leads output and RCA rear output) can be used for DivX (English and Russian only) - You cannot operate this ...
Owner's Manual
Page 39
... rear view camera video and return to display the rear view camera image while driving. Ground - Displaying the Bluetooth system version If this unit with the latest Bluetooth software. When the polarity of AVH-X5500BHS/AVH-X4500BT/AVHX3500BHS/AVH-X2500BT) You need to open the system menu. 3 Touch Camera Polarity...is set up camera) CAUTION Pioneer recommends the use a Bluetooth audio player. 1 Press the home button to switch to the home display. 2 Touch the system key to Using the rear view on page 28. This unit features a function that the rear view camera video is ...
... rear view camera video and return to display the rear view camera image while driving. Ground - Displaying the Bluetooth system version If this unit with the latest Bluetooth software. When the polarity of AVH-X5500BHS/AVH-X4500BT/AVHX3500BHS/AVH-X2500BT) You need to open the system menu. 3 Touch Camera Polarity...is set up camera) CAUTION Pioneer recommends the use a Bluetooth audio player. 1 Press the home button to switch to the home display. 2 Touch the system key to Using the rear view on page 28. This unit features a function that the rear view camera video is ...
Owner's Manual
Page 41
...56.) # It takes about nine minutes for an extended period, high temperatures may cause distortion, color change or malfunction. Adjusts the rear view camera video signal Using the Favorite menu 1 Display menu columns to direct sunlight for auto EQ measurement to be displayed. (Refer to ...When the car's interior acoustic characteristics cannot be measured correctly, an error message will automatically adjust the video signal setting. ! AV - Camera - Refer to Menu operations on page 32. # You can register up to Menu operations on page 32. If the microphone is initially...
...56.) # It takes about nine minutes for an extended period, high temperatures may cause distortion, color change or malfunction. Adjusts the rear view camera video signal Using the Favorite menu 1 Display menu columns to direct sunlight for auto EQ measurement to be displayed. (Refer to ...When the car's interior acoustic characteristics cannot be measured correctly, an error message will automatically adjust the video signal setting. ! AV - Camera - Refer to Menu operations on page 32. # You can register up to Menu operations on page 32. If the microphone is initially...
Owner's Manual
Page 48
... to separately sold separately) Violet/white Of the two lead wires connected to Using the rear view on page 10. Objects in the system unit to Setting the rear view camera (back up . Connection Optional SiriusXM Tuner connection (Function of AVH-X5500BHS/AVH-X3500BHS) This product When connecting with optional CD-IU201V cable USB/iPod input This...
... to separately sold separately) Violet/white Of the two lead wires connected to Using the rear view on page 10. Objects in the system unit to Setting the rear view camera (back up . Connection Optional SiriusXM Tuner connection (Function of AVH-X5500BHS/AVH-X3500BHS) This product When connecting with optional CD-IU201V cable USB/iPod input This...
Owner's Manual
Page 51
...this video system. The volume level is on . The attenuator is low. Firmly secure the unit. This is not connected. The rear view camera is a normal operation. play another disc. Select the repeat range again. En 51 Leads and connectors are pressed. Rectify the cause...There is incorrect for example). The aspect ratio setting is no sound. The touch panel keys cannot be played back. Connect a rear view camera. There is no longer be read during repeat matically. The data could no image displayed. Select the appropriate setting for the disc....
...this video system. The volume level is on . The attenuator is low. Firmly secure the unit. This is not connected. The rear view camera is a normal operation. play another disc. Select the repeat range again. En 51 Leads and connectors are pressed. Rectify the cause...There is incorrect for example). The aspect ratio setting is no sound. The touch panel keys cannot be played back. Connect a rear view camera. There is no longer be read during repeat matically. The data could no image displayed. Select the appropriate setting for the disc....


