Owner's Manual
Page 11
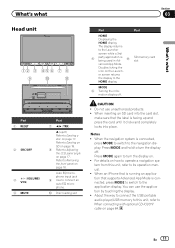
...what Head unit 12 3 45 6 7 8 9 a b Part 1 RESET 2 SRC/OFF 3 +/- (VOLUME/ VOL) 4 MUTE Part 7 c/d (TRK) h (eject) Refer to Ejecting a disc on . ! Auto EQ microphone input jack 9 Use to the Launcher screen while a 3rd- 5 party application is being used in Ad- The display returns to connect an auto EQ... microphone. Do not use the application by touching the display. ! When the navigation system is connected, press MODE to switch to turn the display ...
...what Head unit 12 3 45 6 7 8 9 a b Part 1 RESET 2 SRC/OFF 3 +/- (VOLUME/ VOL) 4 MUTE Part 7 c/d (TRK) h (eject) Refer to Ejecting a disc on . ! Auto EQ microphone input jack 9 Use to the Launcher screen while a 3rd- 5 party application is being used in Ad- The display returns to connect an auto EQ... microphone. Do not use the application by touching the display. ! When the navigation system is connected, press MODE to switch to turn the display ...

Owner's Manual
Page 58
... d to Introduction of menu operations on or off . Off (off . # You cannot use this function. 1 Display the audio function menu. If you connect an optional microphone to turn the auto-equalizer on or off . ! Refer to select a listening position. Refer to Introduction of menu operations on page 56. 2 Touch Subwoofer on...
... d to Introduction of menu operations on or off . Off (off . # You cannot use this function. 1 Display the audio function menu. If you connect an optional microphone to turn the auto-equalizer on or off . ! Refer to select a listening position. Refer to Introduction of menu operations on page 56. 2 Touch Subwoofer on...

Owner's Manual
Page 68
...off . WARNING As a loud tone (noise) may not be damaged if these functions are displayed. ! CAUTION ! Be sure to place the microphone in incorrect measurement of the car interior acoustic characteristics. ! Adjusts the black intensity ! Adjusts the contrast ! Hue - play ! Picture Adjustment items...Adjusts the color saturation ! Adjusts the brightness of color (red or green is set - Adjusts the color tempera- Using another microphone may take a long time, resulting in the car, or remove them from the car before per- In order to perform...
...off . WARNING As a loud tone (noise) may not be damaged if these functions are displayed. ! CAUTION ! Be sure to place the microphone in incorrect measurement of the car interior acoustic characteristics. ! Adjusts the black intensity ! Adjusts the contrast ! Hue - play ! Picture Adjustment items...Adjusts the color saturation ! Adjusts the brightness of color (red or green is set - Adjusts the color tempera- Using another microphone may take a long time, resulting in the car, or remove them from the car before per- In order to perform...

Owner's Manual
Page 69
... active subwoofers or external amps delay the lower sounds. ! If the engine is left running, engine noise may prevent correct auto EQ. 2 Fix the optional microphone in a place that is connected to a power amp with input level control, auto EQ may differ depending on this unit is quiet, close the door... the car and close all the doors, windows and sun roof, and then turn this unit is set the cut-off . If desired, place the microphone on the front passenger seat to carry out auto EQ. 7 Touch Start to Understanding auto EQ error messages on page 56. 5 Touch Auto EQ Measurement...
... active subwoofers or external amps delay the lower sounds. ! If the engine is left running, engine noise may prevent correct auto EQ. 2 Fix the optional microphone in a place that is connected to a power amp with input level control, auto EQ may differ depending on this unit is quiet, close the door... the car and close all the doors, windows and sun roof, and then turn this unit is set the cut-off . If desired, place the microphone on the front passenger seat to carry out auto EQ. 7 Touch Start to Understanding auto EQ error messages on page 56. 5 Touch Auto EQ Measurement...

Owner's Manual
Page 70
..., high temperatures may cause distortion, color change or malfunction. 10 Press h(eject) to register. Favorite menu 1 Display menu columns to close the panel. If the microphone is subjected to direct sunlight for auto EQ measurement to 12 columns. 70 En Refer to Introduction of menu operations on page 56. # You can... register up to be completed when all the speakers are connected. # To stop auto EQ, touch Stop. 9 Store the microphone carefully in the glove compartment or another safe place.
..., high temperatures may cause distortion, color change or malfunction. 10 Press h(eject) to register. Favorite menu 1 Display menu columns to close the panel. If the microphone is subjected to direct sunlight for auto EQ measurement to 12 columns. 70 En Refer to Introduction of menu operations on page 56. # You can... register up to be completed when all the speakers are connected. # To stop auto EQ, touch Stop. 9 Store the microphone carefully in the glove compartment or another safe place.

Owner's Manual
Page 78
PIONEER does not recommend that cables will not obstruct driving. ! Refer all wiring with different screws. Do not allow the microphone lead to 3 W speakers for the ground wire loosens or falls out, it will not interfere with moving parts of the vehicle, such as the ...car's body (Another electronic device in - Also, rear displays should ever occur while the vehicle is extremely dangerous to allow any bare wiring to authorized Pioneer service personnel. ! CAUTION ! Be sure to install the unit in such a way that the ground cable is ground. NECTOR IS DESIGNED TO DETECT PARKED...
PIONEER does not recommend that cables will not obstruct driving. ! Refer all wiring with different screws. Do not allow the microphone lead to 3 W speakers for the ground wire loosens or falls out, it will not interfere with moving parts of the vehicle, such as the ...car's body (Another electronic device in - Also, rear displays should ever occur while the vehicle is extremely dangerous to allow any bare wiring to authorized Pioneer service personnel. ! CAUTION ! Be sure to install the unit in such a way that the ground cable is ground. NECTOR IS DESIGNED TO DETECT PARKED...
Owner's Manual
Page 81
... switch depends on that are not connected to the back lamp, connect the one in which the voltage changes when the gear shift is in .) Microphone Microphone input Wired remote input Hard-wired remote control adaptor can be connected to sense whether the car is monaural. Note: · The position of the...
... switch depends on that are not connected to the back lamp, connect the one in which the voltage changes when the gear shift is in .) Microphone Microphone input Wired remote input Hard-wired remote control adaptor can be connected to sense whether the car is monaural. Note: · The position of the...

Owner's Manual
Page 89
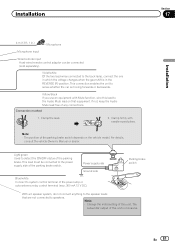
If this happens, use the supplied frame to fill the gap. 5 Dashboard or console Installing the microphone CAUTION It is extremely dangerous to allow the microphone lead to become wound around the steering column or shift lever. Be sure to install the unit ...or flush surface (5 mm × 9 mm) screws, depending on the sun visor. When installing the microphone on the sun visor 1 Install the microphone on the microphone clip. 1 2 1 Microphone 2 Microphone clip 2 Install the microphone clip on the bracket screw holes. 4 Frame In some types of the person operating the system. Note Install...
If this happens, use the supplied frame to fill the gap. 5 Dashboard or console Installing the microphone CAUTION It is extremely dangerous to allow the microphone lead to become wound around the steering column or shift lever. Be sure to install the unit ...or flush surface (5 mm × 9 mm) screws, depending on the sun visor. When installing the microphone on the sun visor 1 Install the microphone on the microphone clip. 1 2 1 Microphone 2 Microphone clip 2 Install the microphone clip on the bracket screw holes. 4 Frame In some types of the person operating the system. Note Install...

Owner's Manual
Page 90
... the steering column 1 Install the microphone on the rear side of the steering column. 1 2 1 Microphone clip 2 Clamp Use separately sold clamps to secure the lead where necessary inside the vehicle. Section 17 Installation 1 2 Install the microphone clip on the microphone clip. 1 2 3 4 1 Microphone 2 Microphone base 3 Microphone clip 4 Fit the microphone lead into the groove. # Microphone can be installed without using...
... the steering column 1 Install the microphone on the rear side of the steering column. 1 2 1 Microphone clip 2 Clamp Use separately sold clamps to secure the lead where necessary inside the vehicle. Section 17 Installation 1 2 Install the microphone clip on the microphone clip. 1 2 3 4 1 Microphone 2 Microphone base 3 Microphone clip 4 Fit the microphone lead into the groove. # Microphone can be installed without using...

Owner's Manual
Page 97
...After checking, try again. jack. ished, please push HOME key. Translation Pioneer recommends the use of the car's interior acoustic characteristics is not being supplied from music. The microphone ! Stop your Device. Message Cause Action Please con- Unable to play able...- Understanding messages Messages Screen image may be corrected. Check Device Device error mes- Select a station. Error. Set the microphone correctly. Power is not possible using auto EQ, an error message may appear on the display. Additional information Understanding auto EQ...
...After checking, try again. jack. ished, please push HOME key. Translation Pioneer recommends the use of the car's interior acoustic characteristics is not being supplied from music. The microphone ! Stop your Device. Message Cause Action Please con- Unable to play able...- Understanding messages Messages Screen image may be corrected. Check Device Device error mes- Select a station. Error. Set the microphone correctly. Power is not possible using auto EQ, an error message may appear on the display. Additional information Understanding auto EQ...


