Owner's Manual
Page 2
... unit 10 Optional remote control 10 Basic Operations Basic Operations 11 Operating the scroll bar and the scrubber bar 12 Activating the touch panel keys 13 Common operations for menu settings/ lists 13 Opening and closing the LCD panel 13 Ejecting a disc 14 Ejecting an SD 15 Setting the clock 15 2 En Tuner Introduction of tuner operations 16 Playing moving images Introduction of video playback operations 17 Playing audio Introduction of sound playback operations 20 Playing still images Introduction of still image...
... unit 10 Optional remote control 10 Basic Operations Basic Operations 11 Operating the scroll bar and the scrubber bar 12 Activating the touch panel keys 13 Common operations for menu settings/ lists 13 Opening and closing the LCD panel 13 Ejecting a disc 14 Ejecting an SD 15 Setting the clock 15 2 En Tuner Introduction of tuner operations 16 Playing moving images Introduction of video playback operations 17 Playing audio Introduction of sound playback operations 20 Playing still images Introduction of still image...
Owner's Manual
Page 3
... phone number 49 Setting the private mode 50 Pairing from this unit 50 Using a Bluetooth device to pair 51 Connecting to a Bluetooth device automatically 51 Switching visible unit 51 Displaying BD (Bluetooth Device) address 52 Entering PIN code for Bluetooth wireless connection 52 Using a cellular phone to initiate a connection 52 Registering a connected cellular phone 52 Voice recognition 53 Connecting a Bluetooth audio player 53 Connecting to a Bluetooth device automatically 53 Displaying BD (Bluetooth Device) address 53 Menu operations Introduction of menu operations 54 Audio Adjustments...
... phone number 49 Setting the private mode 50 Pairing from this unit 50 Using a Bluetooth device to pair 51 Connecting to a Bluetooth device automatically 51 Switching visible unit 51 Displaying BD (Bluetooth Device) address 52 Entering PIN code for Bluetooth wireless connection 52 Using a cellular phone to initiate a connection 52 Registering a connected cellular phone 52 Voice recognition 53 Connecting a Bluetooth audio player 53 Connecting to a Bluetooth device automatically 53 Displaying BD (Bluetooth Device) address 53 Menu operations Introduction of menu operations 54 Audio Adjustments...
Owner's Manual
Page 5
... any way will appear on a display inside a vehicle even by persons without training and experience in a safe place and apply the parking brake. When you to safely operate the vehicle. 6 Do not operate this unit's DVD features should ever occur while the vehicle is visible to the driver. ! Installation or servicing of the display by persons other persons to use this system until...
... any way will appear on a display inside a vehicle even by persons without training and experience in a safe place and apply the parking brake. When you to safely operate the vehicle. 6 Do not operate this unit's DVD features should ever occur while the vehicle is visible to the driver. ! Installation or servicing of the display by persons other persons to use this system until...

Owner's Manual
Page 6
... the audio adjustment data. VERSED. ! CAUTION ! Please note that you stop the vehicle in a safe place, and (1) apply the parking brake, (2) release the parking brake, and then (3) apply the parking brake again. We recommend that the edges of the rear view camera images may differ slightly according to REAR MONITOR OUTPUT This unit's REAR MONITOR OUTPUT is moving forward. USE INPUT ONLY FOR REVERSE OR MIRROR IMAGE REAR VIEW CAMERA. Section 01 Precautions Parking brake interlock Certain functions (Video viewing and certain touch panel...
... the audio adjustment data. VERSED. ! CAUTION ! Please note that you stop the vehicle in a safe place, and (1) apply the parking brake, (2) release the parking brake, and then (3) apply the parking brake again. We recommend that the edges of the rear view camera images may differ slightly according to REAR MONITOR OUTPUT This unit's REAR MONITOR OUTPUT is moving forward. USE INPUT ONLY FOR REVERSE OR MIRROR IMAGE REAR VIEW CAMERA. Section 01 Precautions Parking brake interlock Certain functions (Video viewing and certain touch panel...
Owner's Manual
Page 7
... or discharged, any preset memory will be installed and operated with liquids. But it should be erased. Operation is located on the enclosed warranty card. CAUTION: THE USE OF OPTICAL INSTRUMENTS WITH THIS PRODUCT WILL INCREASE EYE HAZARD. Keep this unit to operate the equipment. Important (Serial number) The serial number is subject to the following two conditions: (1) This device may invalidate the...
... or discharged, any preset memory will be installed and operated with liquids. But it should be erased. Operation is located on the enclosed warranty card. CAUTION: THE USE OF OPTICAL INSTRUMENTS WITH THIS PRODUCT WILL INCREASE EYE HAZARD. Keep this unit to operate the equipment. Important (Serial number) The serial number is subject to the following two conditions: (1) This device may invalidate the...

Owner's Manual
Page 11
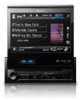
... unit off using the buttons 1 Press SRC/OFF to clock adjust- 2 Wed 28 may 12:45 PM 3 Radio Disc iPod SD SD AUX 45 6 Rear Front Rear View 1 Touch panel keys 1 Displaying the source menu. Selecting a source using the buttons 1 Press SRC/OFF and hold until the unit turns off . XM tuner ! AV input ! Built-in DVD player ! SD - EXT1 - EXT2 - TEL - Bluetooth telephone/audio (Function of AVH-P5200DVD) ! While operating the menu, you cannot select a source by touching the screen. USB is displayed when a USB storage device is connected. ! Switching...
... unit off using the buttons 1 Press SRC/OFF to clock adjust- 2 Wed 28 may 12:45 PM 3 Radio Disc iPod SD SD AUX 45 6 Rear Front Rear View 1 Touch panel keys 1 Displaying the source menu. Selecting a source using the buttons 1 Press SRC/OFF and hold until the unit turns off . XM tuner ! AV input ! Built-in DVD player ! SD - EXT1 - EXT2 - TEL - Bluetooth telephone/audio (Function of AVH-P5200DVD) ! While operating the menu, you cannot select a source by touching the screen. USB is displayed when a USB storage device is connected. ! Switching...

Owner's Manual
Page 17
... next time the disc is connected to this unit using an interface cable such as an iPod source. 1 Touch panel keys Selecting the repeat range. 1 Refer to turn the auto-equalizer on page 38. Refer to Using the equalizer on page 55. 4 Touch and hold for more than two seconds to Repeating playback on page 39. equalizer on page 38. Switching between stereo and monaural audio output, when playing Video CD discs. corded with video...
... next time the disc is connected to this unit using an interface cable such as an iPod source. 1 Touch panel keys Selecting the repeat range. 1 Refer to turn the auto-equalizer on page 38. Refer to Using the equalizer on page 55. 4 Touch and hold for more than two seconds to Repeating playback on page 39. equalizer on page 38. Switching between stereo and monaural audio output, when playing Video CD discs. corded with video...

Owner's Manual
Page 31
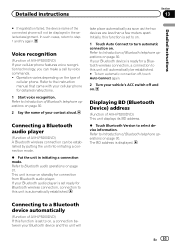
... a number of Bluetooth audio players available on the cellular phone connected to this unit via Bluetooth wireless technology, the sound of your Bluetooth audio player to this unit. ! Refer to Setting automatic an- Bluetooth audio operations You can control Bluetooth audio if you can perform playback, pause playback, select songs, etc. ! When a call is set for more 8 than two seconds to the instruction manual that came with your audio player. - Note When selecting the phone source, you connect a Bluetooth adapter...
... a number of Bluetooth audio players available on the cellular phone connected to this unit via Bluetooth wireless technology, the sound of your Bluetooth audio player to this unit. ! Refer to Setting automatic an- Bluetooth audio operations You can control Bluetooth audio if you can perform playback, pause playback, select songs, etc. ! When a call is set for more 8 than two seconds to the instruction manual that came with your audio player. - Note When selecting the phone source, you connect a Bluetooth adapter...
Owner's Manual
Page 50
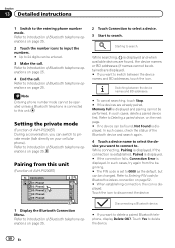
... 1 Display the Bluetooth Connection Menu. Touch the icon to delete the device. 50 En Touch Yes to disconnect the device. Refer to search. Pairing from the beginning. # The PIN code is displayed. In such cases, delete a paired device first. If the connection is established, Paired is displayed. # If the connection fails, Connection Error is displayed and pairing cannot be performed. Refer to this unit (Function of Bluetooth telephone operations on your cellular phone). Setting the private mode (Function of Bluetooth telephone operations...
... 1 Display the Bluetooth Connection Menu. Touch the icon to delete the device. 50 En Touch Yes to disconnect the device. Refer to search. Pairing from the beginning. # The PIN code is displayed. In such cases, delete a paired device first. If the connection is established, Paired is displayed. # If the connection fails, Connection Error is displayed and pairing cannot be performed. Refer to this unit (Function of Bluetooth telephone operations on your cellular phone). Setting the private mode (Function of Bluetooth telephone operations...
Owner's Manual
Page 51
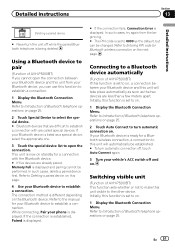
... this function is set to turn automatic connection off, touch Auto Connect again. 3 Turn your phone is displayed. If your Bluetooth device to Introduction of AVH-P5200BT) If this page. 4 Use your Bluetooth device is being deleted. on . 1 Display the Bluetooth Connection Menu. Refer to establish a connection. Using a Bluetooth device to the other device. While connecting, Pair your vehicle's ACC switch off while the paired Bluetooth telephone is listed as the default, but can use this unit visible to pair (Function of Bluetooth telephone operations on...
... this function is set to turn automatic connection off, touch Auto Connect again. 3 Turn your phone is displayed. If your Bluetooth device to Introduction of AVH-P5200BT) If this page. 4 Use your Bluetooth device is being deleted. on . 1 Display the Bluetooth Connection Menu. Refer to establish a connection. Using a Bluetooth device to the other device. While connecting, Pair your vehicle's ACC switch off while the paired Bluetooth telephone is listed as the default, but can use this unit visible to pair (Function of Bluetooth telephone operations on...
Owner's Manual
Page 53
...'s ACC switch off , touch Auto Connect again. 2 Turn your Bluetooth device and this function is set to Introduction of cellular phone. take place automatically as soon as the two devices are less than a few meters apart. Displaying BD (Bluetooth Device) address (Function of Bluetooth telephone operations on . Connecting to a Bluetooth device automatically (Function of AVH-P5200DVD) If this unit will En 53 Refer to Introduction of AVH-P5200DVD) This unit displays its BD address. % Touch Bluetooth Version to turn automatic connection off...
...'s ACC switch off , touch Auto Connect again. 2 Turn your Bluetooth device and this function is set to Introduction of cellular phone. take place automatically as soon as the two devices are less than a few meters apart. Displaying BD (Bluetooth Device) address (Function of Bluetooth telephone operations on . Connecting to a Bluetooth device automatically (Function of AVH-P5200DVD) If this unit will En 53 Refer to Introduction of AVH-P5200DVD) This unit displays its BD address. % Touch Bluetooth Version to turn automatic connection off...

Owner's Manual
Page 62
... rear output and subwoofer controller This unit's rear output (rear speaker leads output and RCA rear output) can connect a rear speaker lead directly to a subwoofer without using an auxiliary device connected to Basic Operations on or off . Sound from equipment with a mute function is set for fullrange speaker (Full) or subwoofer (Subwoofer) connection. ATT -20dB - Off - Initially, the unit is received. ! Both rear speaker lead outputs and RCA rear output are switched simultaneously in the display. ! Turns the sound muting/attenuation off . If you switch the rear output...
... rear output and subwoofer controller This unit's rear output (rear speaker leads output and RCA rear output) can connect a rear speaker lead directly to a subwoofer without using an auxiliary device connected to Basic Operations on or off . Sound from equipment with a mute function is set for fullrange speaker (Full) or subwoofer (Subwoofer) connection. ATT -20dB - Off - Initially, the unit is received. ! Both rear speaker lead outputs and RCA rear output are switched simultaneously in the display. ! Turns the sound muting/attenuation off . If you switch the rear output...
Owner's Manual
Page 63
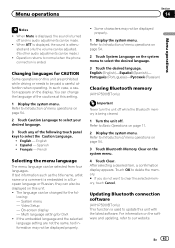
... desired language. 3 Touch any of menu operations on page 54. 3 Touch Bluetooth Memory Clear on this setting. 1 Display the system menu. Spanish ! The language can be selected from four languages. System menu - Updating Bluetooth connection software (AVH-P5200BT only) This function is attenuated and only the volume can be adjusted. (No other audio adjustments can be displayed properly. 1 Display the system menu. En 63 When ATT is displayed, the sound is used to update this unit. ! Changing languages for...
... desired language. 3 Touch any of menu operations on page 54. 3 Touch Bluetooth Memory Clear on this setting. 1 Display the system menu. Spanish ! The language can be selected from four languages. System menu - Updating Bluetooth connection software (AVH-P5200BT only) This function is attenuated and only the volume can be adjusted. (No other audio adjustments can be displayed properly. 1 Display the system menu. En 63 When ATT is displayed, the sound is used to update this unit. ! Changing languages for...
Owner's Manual
Page 65
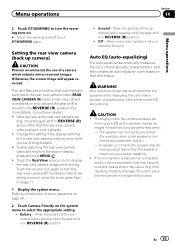
... gear shift is in battery drainage. When the polarity of a camera which outputs mirror-reversed images. Be sure to display the rear view camera image while driving. For details, refer to Selecting a source using the touch panel keys on . # To turn the warning tone off . A speaker is not connected to this setting if the display switches to the source display, press and hold MENU/ . ! Menu operations Section 14 Menu operations 2 Touch DT.WARNING to turn the warning tone...
... gear shift is in battery drainage. When the polarity of a camera which outputs mirror-reversed images. Be sure to display the rear view camera image while driving. For details, refer to Selecting a source using the touch panel keys on . # To turn the warning tone off . A speaker is not connected to this setting if the display switches to the source display, press and hold MENU/ . ! Menu operations Section 14 Menu operations 2 Touch DT.WARNING to turn the warning tone...

Owner's Manual
Page 66
... measurement of the driver's seat, facing forward. Section 14 Menu operations Before operating the auto EQ function ! The reflected sound within the car is connected to ON or ACC. When this unit is set the cut power to use this unit. 66 En The front, center and rear speakers will be adjusted to Using fader/ balance adjustment on this value. - Carry out auto EQ in the car, or remove them from the...
... measurement of the driver's seat, facing forward. Section 14 Menu operations Before operating the auto EQ function ! The reflected sound within the car is connected to ON or ACC. When this unit is set the cut power to use this unit. 66 En The front, center and rear speakers will be adjusted to Using fader/ balance adjustment on this value. - Carry out auto EQ in the car, or remove them from the...
Owner's Manual
Page 67
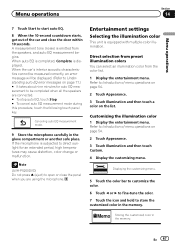
... illumination color 1 Display the entertainment menu. En 67 Note (AVH-P5200DVD) Do not press h (eject) to Introduction of menu operations on page 54. 2 Touch Appearance. 3 Touch Illumination and then touch a color on page 54. 2 Touch Appearance. 3 Touch Illumination and then touch Custom. 4 Display the customizing menu. Memo Storing the customized color in the glove compartment or another safe place. Canceling auto EQ measurement mode. 9 Store the microphone carefully in the memory. Entertainment settings Selecting the illumination color This unit...
... illumination color 1 Display the entertainment menu. En 67 Note (AVH-P5200DVD) Do not press h (eject) to Introduction of menu operations on page 54. 2 Touch Appearance. 3 Touch Illumination and then touch a color on page 54. 2 Touch Appearance. 3 Touch Illumination and then touch Custom. 4 Display the customizing menu. Memo Storing the customized color in the glove compartment or another safe place. Canceling auto EQ measurement mode. 9 Store the microphone carefully in the memory. Entertainment settings Selecting the illumination color This unit...

Owner's Manual
Page 85
... all SD memory cards is not compatible with image data. iPod compatibility This unit supports only the following iPod models. iPod touch 2nd generation (software version 3.0) ! iPhone (software version 3.0) Depending on the USB memory/USB portable audio player/SD memory card even if that data is required. iPod nano 4th generation (software version 1.0.3) ! iPod nano 1st generation (software version 1.3.1) ! iPod 5th generation (software version 1.3.0) ! Operations may vary depending on the software version of audio files on the application used to iPod manuals. For...
... all SD memory cards is not compatible with image data. iPod compatibility This unit supports only the following iPod models. iPod touch 2nd generation (software version 3.0) ! iPhone (software version 3.0) Depending on the USB memory/USB portable audio player/SD memory card even if that data is required. iPod nano 4th generation (software version 1.0.3) ! iPod nano 1st generation (software version 1.3.1) ! iPod 5th generation (software version 1.3.0) ! Operations may vary depending on the software version of audio files on the application used to iPod manuals. For...
Installation Manual
Page 2
... wire at the point where the wire passes from the passenger compartment into the engine compartment to the driver. • In some countries or states the viewing of applicable laws, the front DVD (sold power amp 6 When connecting with a rear view camera 7 When connecting the external video component and the display 8 When using a display connected to rear video output 8 Connecting the system 8 Installation 9 DIN front/rear-mount 9 DIN Front-mount 9 DIN Rear-mount 10 Removing the unit...
... wire at the point where the wire passes from the passenger compartment into the engine compartment to the driver. • In some countries or states the viewing of applicable laws, the front DVD (sold power amp 6 When connecting with a rear view camera 7 When connecting the external video component and the display 8 When using a display connected to rear video output 8 Connecting the system 8 Installation 9 DIN front/rear-mount 9 DIN Front-mount 9 DIN Rear-mount 10 Removing the unit...

Installation Manual
Page 3
... cable connectors with a 12-volt battery and negative grounding. - Never wire the speaker negative cable directly to metal parts of this unit and other device must be wired separately. Vehicles with insulating tape. - Secure the wiring with metal parts to 3 Ω speakers for the ground wire loosens or falls out, it to the antenna booster power supply terminal. • Never connect the blue/white cable to the system remote control of this unit is properly connected...
... cable connectors with a 12-volt battery and negative grounding. - Never wire the speaker negative cable directly to metal parts of this unit and other device must be wired separately. Vehicles with insulating tape. - Secure the wiring with metal parts to 3 Ω speakers for the ground wire loosens or falls out, it to the antenna booster power supply terminal. • Never connect the blue/white cable to the system remote control of this unit is properly connected...
Installation Manual
Page 8
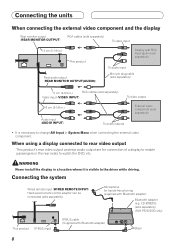
When using a display connected to watch the DVD, etc. Connecting the system Wired remote input (WIRED REMOTE INPUT) Hard-wired remote control adaptor can be connected (sold separately). WARNING Never install the display in the rear seats to rear video output This product's rear video output and rear audio output are for hands-free phoning (supplied with Bluetooth adapter) Bluetooth adapter (e.g. Microphone for connection of a display to enable passengers in a location where it is necessary to the driver while driving. CD-BTB200) (sold separately) (AVH-P5200DVD only) This ...
When using a display connected to watch the DVD, etc. Connecting the system Wired remote input (WIRED REMOTE INPUT) Hard-wired remote control adaptor can be connected (sold separately). WARNING Never install the display in the rear seats to rear video output This product's rear video output and rear audio output are for hands-free phoning (supplied with Bluetooth adapter) Bluetooth adapter (e.g. Microphone for connection of a display to enable passengers in a location where it is necessary to the driver while driving. CD-BTB200) (sold separately) (AVH-P5200DVD only) This ...


