
Owner's Manual
Page 6
...apply the parking brake again. We recommend that the edges of the rear view camera images may differ slightly according to avoid draining the battery power. ! WARNING ! USE INPUT ONLY FOR REVERSE OR MIRROR IMAGE REAR VIEW CAMERA. Please note that you transcribe the audio adjustment data. WARNING Do...keep an eye on trailers, or when backing into a tight parking spot. The rear view camera function is for entertainment purposes. ! Section 01 Precautions Parking brake interlock Certain functions (Video viewing and certain touch panel keys) offered by this unit could be dangerous and/or ...
...apply the parking brake again. We recommend that the edges of the rear view camera images may differ slightly according to avoid draining the battery power. ! WARNING ! USE INPUT ONLY FOR REVERSE OR MIRROR IMAGE REAR VIEW CAMERA. Please note that you transcribe the audio adjustment data. WARNING Do...keep an eye on trailers, or when backing into a tight parking spot. The rear view camera function is for entertainment purposes. ! Section 01 Precautions Parking brake interlock Certain functions (Video viewing and certain touch panel keys) offered by this unit could be dangerous and/or ...
Owner's Manual
Page 11
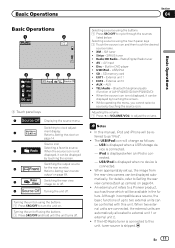
...Press SRC/OFF to as those which will change as a source, the basic functions of AVH-P4200DVD/AVH-P3200DVD) ! USB/iPod - USB/iPod ! En 11 Switching the output source 4 Rear Front for the rear monitor. Turning the unit off . AV - External unit 2 ! AUX ! iPod is... Pioneer product, such as "iPod". ! Radio/HD Radio - If the HD Radio tuner is not displayed, it can be available in DVD player ! XM - Bluetooth telephone/audio (Function of up , the image from the rear view camera can be displayed automatically. Refer to Setting the rear view camera (back up camera)...
...Press SRC/OFF to as those which will change as a source, the basic functions of AVH-P4200DVD/AVH-P3200DVD) ! USB/iPod - USB/iPod ! En 11 Switching the output source 4 Rear Front for the rear monitor. Turning the unit off . AV - External unit 2 ! AUX ! iPod is... Pioneer product, such as "iPod". ! Radio/HD Radio - If the HD Radio tuner is not displayed, it can be available in DVD player ! XM - Bluetooth telephone/audio (Function of up , the image from the rear view camera can be displayed automatically. Refer to Setting the rear view camera (back up camera)...
Owner's Manual
Page 64
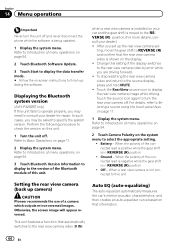
...select the appropriate setting. ! Off - When a rear view camera is not connected to this unit Setting the rear view camera (back up the rear view camera set up camera) CAUTION Pioneer recommends the use of menu operations on page 54. 2 Touch Camera Polarity on page 11. 2 Display the system menu... (R) position ! Otherwise, the screen image will appear reversed. Displaying the Bluetooth system version (AVH-P3200BT only) If this setting if the display switches to the rear view camera video (V IN) Auto EQ (auto-equalizing) The auto-equalizer automatically measures the car's interior...
...select the appropriate setting. ! Off - When a rear view camera is not connected to this unit Setting the rear view camera (back up the rear view camera set up camera) CAUTION Pioneer recommends the use of menu operations on page 54. 2 Touch Camera Polarity on page 11. 2 Display the system menu... (R) position ! Otherwise, the screen image will appear reversed. Displaying the Bluetooth system version (AVH-P3200BT only) If this setting if the display switches to the rear view camera video (V IN) Auto EQ (auto-equalizing) The auto-equalizer automatically measures the car's interior...

Owner's Manual
Page 69
... are adjusting the Picture Adjustment, select the unit. Emphasizes the dark portions of the dis- The source for each source and rear view camera. ! Other Functions Section 15 Other Functions Changing the picture adjustment You can adjust the Brightness (brightness), Contrast (contrast), Color ...), Black Level (black level) and RGB Dot ADJ (RGB dot clock adjustment) for AUX input Off- NAVI Rear View Adjusting the Picture Adjustment for the rear view camera. Adjusting the Picture Adjustment for the Navigation unit. Contrast - Adjusts the contrast ! Hue - Adjusts the tone ...
... are adjusting the Picture Adjustment, select the unit. Emphasizes the dark portions of the dis- The source for each source and rear view camera. ! Other Functions Section 15 Other Functions Changing the picture adjustment You can adjust the Brightness (brightness), Contrast (contrast), Color ...), Black Level (black level) and RGB Dot ADJ (RGB dot clock adjustment) for AUX input Off- NAVI Rear View Adjusting the Picture Adjustment for the rear view camera. Adjusting the Picture Adjustment for the Navigation unit. Contrast - Adjusts the contrast ! Hue - Adjusts the tone ...

Owner's Manual
Page 73
...being played does not feature subtitles. Additional Information Appendix Additional Information Symptom Cause Action (Reference page) Nothing is incorrect. The rear view Connect a rear played. is not The loaded disc Replace the disc possible. code number. The DVD being performed with one featuring gion ... the source display setting. celed. (Page 59) You have forgot- You can - camera is not possible. ing repeat play another track/file. played and playback is not view camera. switch between guage using the items indicated disc menu. in the disc menu. The ...
...being played does not feature subtitles. Additional Information Appendix Additional Information Symptom Cause Action (Reference page) Nothing is incorrect. The rear view Connect a rear played. is not The loaded disc Replace the disc possible. code number. The DVD being performed with one featuring gion ... the source display setting. celed. (Page 59) You have forgot- You can - camera is not possible. ing repeat play another track/file. played and playback is not view camera. switch between guage using the items indicated disc menu. in the disc menu. The ...
Installation Manual
Page 2
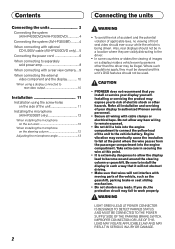
... should not be used. Installing or servicing the product may expose you install or service your display to authorized Pioneer service personnel. • Secure all installation and servicing of your display yourself. Refer all wiring with cable clamps... units 2 Connecting the system (AVH-P4200DVD/AVH-P3200DVD 4 Connecting the system (AVH-P3200BT) ......... 4 When connecting with optional CD-IU200V cable (AVH-P4200DVD only) ... 5 Connecting the power cord 6 When connecting to separately sold power amp 8 When connecting with a rear view camera.... 9 When connecting the external ...
... should not be used. Installing or servicing the product may expose you install or service your display to authorized Pioneer service personnel. • Secure all installation and servicing of your display yourself. Refer all wiring with cable clamps... units 2 Connecting the system (AVH-P4200DVD/AVH-P3200DVD 4 Connecting the system (AVH-P3200BT) ......... 4 When connecting with optional CD-IU200V cable (AVH-P4200DVD only) ... 5 Connecting the power cord 6 When connecting to separately sold power amp 8 When connecting with a rear view camera.... 9 When connecting the external ...
Installation Manual
Page 9
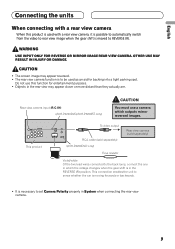
... moved to REVERSE (R). English Connecting the units When connecting with a rear view camera, it is possible to automatically switch from the video to rear view image when the gear shift is necessary to set Camera Polarity properly in System when connecting the rear view camera. 9 Rear view camera input (R.C IN) (AVH-P4200DVD/AVH-P3200BT only) CAUTION You must use this product is used as an...
... moved to REVERSE (R). English Connecting the units When connecting with a rear view camera, it is possible to automatically switch from the video to rear view image when the gear shift is necessary to set Camera Polarity properly in System when connecting the rear view camera. 9 Rear view camera input (R.C IN) (AVH-P4200DVD/AVH-P3200BT only) CAUTION You must use this product is used as an...


