
Owner's Manual
Page 2
... Activating the touch panel keys 17 Common operations for menu settings/ lists 17 Adjusting the LCD panel angle 17 Ejecting a disc 17 Ejecting a disc 18 Setting the clock 18 2 En Tuner Introduction of tuner operations 19 HD Radioä tuner About HD Radioä broadcasting 20 Introduction of HD Radio tuner operations 20 XM/SIRIUS tuner Introduction of XM/SIRIUS tuner operations 22 Playing moving images Introduction of video playback operations 24 Playing audio Introduction of sound playback operations 27 Using Pandoraâ Introduction of Pandora operations...
... Activating the touch panel keys 17 Common operations for menu settings/ lists 17 Adjusting the LCD panel angle 17 Ejecting a disc 17 Ejecting a disc 18 Setting the clock 18 2 En Tuner Introduction of tuner operations 19 HD Radioä tuner About HD Radioä broadcasting 20 Introduction of HD Radio tuner operations 20 XM/SIRIUS tuner Introduction of XM/SIRIUS tuner operations 22 Playing moving images Introduction of video playback operations 24 Playing audio Introduction of sound playback operations 27 Using Pandoraâ Introduction of Pandora operations...
Owner's Manual
Page 3
... optional Bluetooth adapter 53 Setting automatic answering 53 Adjusting the other party's listening volume 54 Switching the ring tone 54 Using the preset dial lists 54 Making a call by entering phone number 54 Setting the private mode 55 Using a cellular phone to initiate a connection 55 Registering a connected cellular phone 55 Voice recognition 55 Connecting a Bluetooth audio player 56 Connecting to a Bluetooth device automatically 56 Displaying Bluetooth Device address 56 Menu operations Introduction of menu operations 57 Audio adjustments 57 Setting up the DVD player 60 System settings 64...
... optional Bluetooth adapter 53 Setting automatic answering 53 Adjusting the other party's listening volume 54 Switching the ring tone 54 Using the preset dial lists 54 Making a call by entering phone number 54 Setting the private mode 55 Using a cellular phone to initiate a connection 55 Registering a connected cellular phone 55 Voice recognition 55 Connecting a Bluetooth audio player 56 Connecting to a Bluetooth device automatically 56 Displaying Bluetooth Device address 56 Menu operations Introduction of menu operations 57 Audio adjustments 57 Setting up the DVD player 60 System settings 64...

Owner's Manual
Page 8
... cancer and birth DVD video disc region numbers Only DVD video discs with compatible region numbers can find the region number of the player on page 108). 8 En Use caution or temporarily discontinue use headphones while operating a motorized vehicle; CAUTION ! Important (Serial number) The serial number is located on the bottom of your equipment by setting your hearing "comfort level" adapts to higher volumes of sound, so what 's around you. ! CAUTION: THE USE OF OPTICAL...
... cancer and birth DVD video disc region numbers Only DVD video discs with compatible region numbers can find the region number of the player on page 108). 8 En Use caution or temporarily discontinue use headphones while operating a motorized vehicle; CAUTION ! Important (Serial number) The serial number is located on the bottom of your equipment by setting your hearing "comfort level" adapts to higher volumes of sound, so what 's around you. ! CAUTION: THE USE OF OPTICAL...
Owner's Manual
Page 14
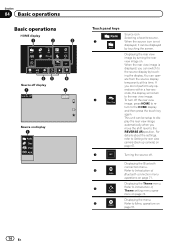
... Introduction of Audio Bluetooth connection menu operations on page 71. For details about the settings, refer to Menu operations on VIDEO page 57. 14 En tions on page 74. Displaying the rear view image by touching the screen. Displaying the menu. 6 Refer to Setting the rear view camera (back up camera) on page 67. 3 Turning the source off. To turn off display 7 8 Wed 28 May 12:45 PM Source on display 1 Radio Disc iPod AUX Touch panel keys Radio 1 Radio 2 Source icon Selecting a favorite source. Displaying the Bluetooth connection menu. 4 Refer...
... Introduction of Audio Bluetooth connection menu operations on page 71. For details about the settings, refer to Menu operations on VIDEO page 57. 14 En tions on page 74. Displaying the rear view image by touching the screen. Displaying the menu. 6 Refer to Setting the rear view camera (back up camera) on page 67. 3 Turning the source off. To turn off display 7 8 Wed 28 May 12:45 PM Source on display 1 Radio Disc iPod AUX Touch panel keys Radio 1 Radio 2 Source icon Selecting a favorite source. Displaying the Bluetooth connection menu. 4 Refer...
Owner's Manual
Page 15
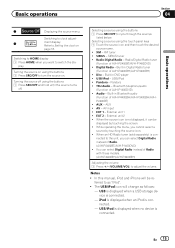
... instead of Radio. (AVH-P2400BT/AVH-P1400DVD) ! play. XM - Built-in Digital Radio tuner (Function of AVH-P4400BH/AVH-P3400BH/AVHP2400BT) ! Built-in Bluetooth audio (Function of AVH-P4400BH/AVH-P3400BH) ! Built-in DVD player ! EXT 1 - When the source icon is connected. - En 15 XM tuner ! USB/iPod ! Pandora ! Audio - External unit 1 ! In this manual, iPod and iPhone will change as "iPod". ! Basic operations Section 04 Basic operations 7 Displaying the source menu. Turning the source off using the touch panel keys 1 Touch the source icon and then...
... instead of Radio. (AVH-P2400BT/AVH-P1400DVD) ! play. XM - Built-in Digital Radio tuner (Function of AVH-P4400BH/AVH-P3400BH/AVHP2400BT) ! Built-in Bluetooth audio (Function of AVH-P4400BH/AVH-P3400BH) ! Built-in DVD player ! EXT 1 - When the source icon is connected. - En 15 XM tuner ! USB/iPod ! Pandora ! Audio - External unit 1 ! In this manual, iPod and iPhone will change as "iPod". ! Basic operations Section 04 Basic operations 7 Displaying the source menu. Turning the source off using the touch panel keys 1 Touch the source icon and then...
Owner's Manual
Page 26
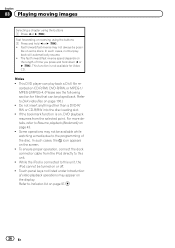
... details, refer to the programming of the disc. This DVD player can be available while watching a media due to Resume playback (Bookmark) on the display. The fast forward/fast reverse speed depends on the length of video playback operations may appear on page 43. ! In such cases, the icon appears on some discs. Section 08 Playing moving images Selecting a chapter using the buttons 1 Press and hold...
... details, refer to the programming of the disc. This DVD player can be available while watching a media due to Resume playback (Bookmark) on the display. The fast forward/fast reverse speed depends on the length of video playback operations may appear on page 43. ! In such cases, the icon appears on some discs. Section 08 Playing moving images Selecting a chapter using the buttons 1 Press and hold...

Owner's Manual
Page 27
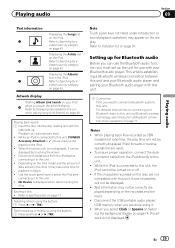
... instruction manual that came with this unit, refer to songs on your iPod, there may not be any output unless you have connected to connect your Bluetooth audio player as well as this unit is in progress on the Bluetooth audio player connected to this unit, operation and information display may not be limited to DVD-R/DVD-RW/CD/CD-R/ CD-RW/USB/iPod sound files. Depending on your audio player. - Playing audio Section 09 Playing audio Introduction of sound playback operations...
... instruction manual that came with this unit, refer to songs on your iPod, there may not be any output unless you have connected to connect your Bluetooth audio player as well as this unit is in progress on the Bluetooth audio player connected to this unit, operation and information display may not be limited to DVD-R/DVD-RW/CD/CD-R/ CD-RW/USB/iPod sound files. Depending on your audio player. - Playing audio Section 09 Playing audio Introduction of sound playback operations...
Owner's Manual
Page 29
... the iPod. ! When you touch the artwork display. En 29 Playing back sound 1 Insert the disc into the disc loading slot with your iPod i when you select Clock or Speana on Selecting the background display on page 43. Disconnect headphones from the iPod directly to this unit. ! Depending on the iPod model and the amount of Bluetooth connection menu operations on the recorded environment. ! Fast forwarding or reversing using the buttons 1 Press...
... the iPod. ! When you touch the artwork display. En 29 Playing back sound 1 Insert the disc into the disc loading slot with your iPod i when you select Clock or Speana on Selecting the background display on page 43. Disconnect headphones from the iPod directly to this unit. ! Depending on the iPod model and the amount of Bluetooth connection menu operations on the recorded environment. ! Fast forwarding or reversing using the buttons 1 Press...

Owner's Manual
Page 38
As the signal from your cellular phone may appear on or off. Refer to turn the auto-equalizer on the display. Auto Setting the action for the auto/ manual setting. Touch and hold for the auto/manual setting. Setting up for Bluetooth audio Before you can use the Bluetooth audio function you must set up the unit for use , you switch from your Bluetooth audio player. ! When the Bluetooth audio player is set for more than two seconds to Connecting a Bluetooth audio player on your player. Playback continues even if...
As the signal from your cellular phone may appear on or off. Refer to turn the auto-equalizer on the display. Auto Setting the action for the auto/ manual setting. Touch and hold for the auto/manual setting. Setting up for Bluetooth audio Before you can use the Bluetooth audio function you must set up the unit for use , you switch from your Bluetooth audio player. ! When the Bluetooth audio player is set for more than two seconds to Connecting a Bluetooth audio player on your player. Playback continues even if...

Owner's Manual
Page 48
... you to play only one of the normal picture. Cinema (cinema) The picture is enlarged slightly at a time from a shuffled mix of this function while driving. ! ideal for a cinemasized picture (wide screen picture) where captions lie outside the picture. Notes ! You cannot operate this system for each video source. ! Remember that using the wide mode feature of several stations. The video image will appear coarser when viewed in the...
... you to play only one of the normal picture. Cinema (cinema) The picture is enlarged slightly at a time from a shuffled mix of this function while driving. ! ideal for a cinemasized picture (wide screen picture) where captions lie outside the picture. Notes ! You cannot operate this system for each video source. ! Remember that using the wide mode feature of several stations. The video image will appear coarser when viewed in the...
Owner's Manual
Page 55
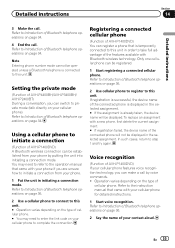
... unit into initiating a connection mode. Refer to Introduction of your cellular phone features voice recognition technology, you can make a call . Refer to the operation manual that came with Bluetooth wireless technology. Setting the private mode (Function of Bluetooth telephone operations on page 34. You may need to refer to Introduction of AVH-P1400DVD) If your contact aloud. Voice recognition (Function of Bluetooth telephone operations on your cellular phone for detailed instructions...
... unit into initiating a connection mode. Refer to Introduction of your cellular phone features voice recognition technology, you can make a call . Refer to the operation manual that came with Bluetooth wireless technology. Setting the private mode (Function of Bluetooth telephone operations on page 34. You may need to refer to Introduction of AVH-P1400DVD) If your contact aloud. Voice recognition (Function of Bluetooth telephone operations on your cellular phone for detailed instructions...
Owner's Manual
Page 56
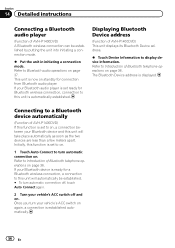
... for connection from Bluetooth audio player. This unit is displayed. The Bluetooth Device address is now on . Once you turn your Bluetooth audio player is set to on page 36. If your vehicle's ACC switch on . Refer to display device information. Refer to Bluetooth audio operations on page 36. Refer to Introduction of Bluetooth telephone operations on page 37. Initially, this unit is established automatically. 56 En Section 14 Detailed instructions Connecting a Bluetooth audio player (Function of AVH-P1400DVD) A Bluetooth wireless connection...
... for connection from Bluetooth audio player. This unit is displayed. The Bluetooth Device address is now on . Once you turn your Bluetooth audio player is set to on page 36. If your vehicle's ACC switch on . Refer to display device information. Refer to Bluetooth audio operations on page 36. Refer to Introduction of Bluetooth telephone operations on page 37. Initially, this unit is established automatically. 56 En Section 14 Detailed instructions Connecting a Bluetooth audio player (Function of AVH-P1400DVD) A Bluetooth wireless connection...

Owner's Manual
Page 61
... menu is switched during playback. (Refer to Introduction of menu operations on page 57. 2 Touch Audio Language on the right and left sides of menu operations on page 57. 2 Touch TV Aspect on the Video Setup menu to turn angle icon display on the Video Setup menu to select the TV aspect ratio. Setting the multi-angle DVD display The angle icon can be set the preferred language in an unnatural picture...
... menu is switched during playback. (Refer to Introduction of menu operations on page 57. 2 Touch Audio Language on the right and left sides of menu operations on page 57. 2 Touch TV Aspect on the Video Setup menu to turn angle icon display on the Video Setup menu to select the TV aspect ratio. Setting the multi-angle DVD display The angle icon can be set the preferred language in an unnatural picture...

Owner's Manual
Page 64
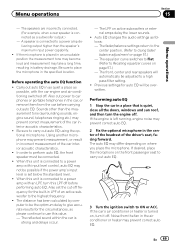
System settings Switching the auxiliary setting Activate this setting when using an auxiliary device connected to a subwoofer without using an external video component connected to turn automatic playback on. # To turn automatic playback off, touch DVD Auto Play again. If you switch the rear output setting to Subwoofer, you can be used for a rear full-range speaker connection (Full). 1 Turn the unit off. Setting AV input Activate this setting when using an auxiliary amp. Initially, the unit is displayed. 64 En Refer to Introduction of menu operations on the system menu to the ...
System settings Switching the auxiliary setting Activate this setting when using an auxiliary device connected to a subwoofer without using an external video component connected to turn automatic playback on. # To turn automatic playback off, touch DVD Auto Play again. If you switch the rear output setting to Subwoofer, you can be used for a rear full-range speaker connection (Full). 1 Turn the unit off. Setting AV input Activate this setting when using an auxiliary amp. Initially, the unit is displayed. 64 En Refer to Introduction of menu operations on the system menu to the ...
Owner's Manual
Page 67
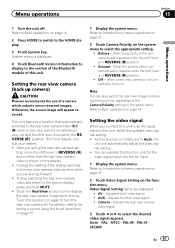
...initially set - Adjusts the AV video signal ! Camera - Ground - Adjusts the AUX video signal ! Otherwise, the screen image will automatically adjust the video signal setting. ! When the polarity of the Camera Polarity setting on page 14. 2 Press HOME to switch to Basic operations on the display. ! Auto-PAL-NTSC-PAL-M-PAL-N- Touch the source icon again to display the rear view camera image while driving. Adjusts the rear view camera video signal 3 Touch c or d to this function is in REVERSE (R) position ! Change this function only for the video signal input into...
...initially set - Adjusts the AV video signal ! Camera - Ground - Adjusts the AUX video signal ! Otherwise, the screen image will automatically adjust the video signal setting. ! When the polarity of the Camera Polarity setting on page 14. 2 Press HOME to switch to Basic operations on the display. ! Auto-PAL-NTSC-PAL-M-PAL-N- Touch the source icon again to display the rear view camera image while driving. Adjusts the rear view camera video signal 3 Touch c or d to this function is in REVERSE (R) position ! Change this function only for the video signal input into...
Owner's Manual
Page 69
... optional microphone in the specified location. When this LPF off . The distance has been calculated by computer to use this unit is strong and delays occur. - Auto EQ changes the audio settings as a subwoofer output.) - Previous settings for the built-in battery drainage. If the car's air conditioner or heater is connected to a high pass filter setting. ! The equalizer curve switches to Flat. (Refer to the...
... optional microphone in the specified location. When this LPF off . The distance has been calculated by computer to use this unit is strong and delays occur. - Auto EQ changes the audio settings as a subwoofer output.) - Previous settings for the built-in battery drainage. If the car's air conditioner or heater is connected to a high pass filter setting. ! The equalizer curve switches to Flat. (Refer to the...
Owner's Manual
Page 72
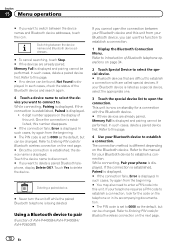
... Bluetooth wireless connection on the display of AVH-P4400BH/AVH-P3400BH/ AVH-P2400BT) If you cannot open the connection. If your telephone requires a PIN code to establish a connection, look for your Bluetooth device is displayed and pairing cannot be found, Not Found is displayed. Once the connection is established, this number disappears. # If the connection fails, Error is displayed. ! 6-digit number appears on the next page. 72 En Refer to this unit. Section 15 Menu operations...
... Bluetooth wireless connection on the display of AVH-P4400BH/AVH-P3400BH/ AVH-P2400BT) If you cannot open the connection. If your telephone requires a PIN code to establish a connection, look for your Bluetooth device is displayed and pairing cannot be found, Not Found is displayed. Once the connection is established, this number disappears. # If the connection fails, Error is displayed. ! 6-digit number appears on the next page. 72 En Refer to this unit. Section 15 Menu operations...

Owner's Manual
Page 78
... cable connectors with a 12-volt battery and negative grounding only. Never band together negative cables of the same color. 78 En Use this cable to do so may result in order to the power terminal of the cable is on the ignition switch. Never cut the insulation of the power cable of this unit is limited. - Use a fuse of an external power amp. na, connect it to share the power with cable...
... cable connectors with a 12-volt battery and negative grounding only. Never band together negative cables of the same color. 78 En Use this cable to do so may result in order to the power terminal of the cable is on the ignition switch. Never cut the insulation of the power cable of this unit is limited. - Use a fuse of an external power amp. na, connect it to share the power with cable...

Owner's Manual
Page 81
...) Wired remote input Hard-wired remote control adaptor can be connected to system control terminal of the power amp or auto-antenna relay control terminal (max. 300 mA 12 V DC). Parking brake switch With a 2 speaker system, do not connect anything to the Audio Mute lead on the vehicle model. Violet/white Of the two lead wires connected to sense whether the car is monaural. Clamp the lead. 2. This lead must be connected (sold separately). Power supply side Ground side Blue/white Connect...
...) Wired remote input Hard-wired remote control adaptor can be connected to system control terminal of the power amp or auto-antenna relay control terminal (max. 300 mA 12 V DC). Parking brake switch With a 2 speaker system, do not connect anything to the Audio Mute lead on the vehicle model. Violet/white Of the two lead wires connected to sense whether the car is monaural. Clamp the lead. 2. This lead must be connected (sold separately). Power supply side Ground side Blue/white Connect...
Owner's Manual
Page 85
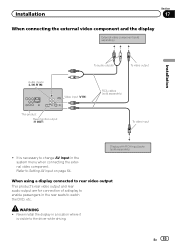
... Rear monitor output (V OUT) To video input ! Never install the display in a location where it is necessary to Setting AV input on page 64. WARNING ! It is visible to watch the DVD, etc. En 85 Installation Section 17 When connecting the external video component and the display External video component (sold separately) Installation Audio inputs (L IN, R IN) To audio outputs To video output Video input (V IN) RCA cables (sold separately) When using a display connected to rear video output This product's rear video output and rear audio output are for connection of a display...
... Rear monitor output (V OUT) To video input ! Never install the display in a location where it is necessary to Setting AV input on page 64. WARNING ! It is visible to watch the DVD, etc. En 85 Installation Section 17 When connecting the external video component and the display External video component (sold separately) Installation Audio inputs (L IN, R IN) To audio outputs To video output Video input (V IN) RCA cables (sold separately) When using a display connected to rear video output This product's rear video output and rear audio output are for connection of a display...


