Installation Manual
Page 2
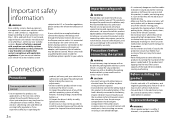
... its cables, and wiring away in such so that they will not interfere with compliant rear visibility systems should not install or use speakers over , park your vehicle in a safe location and apply the parking brake before making the necessary adjustments. • Do not install this product to tamper with metal parts, short-circuiting can cause damage to this product, any applications, or the rear view camera...
... its cables, and wiring away in such so that they will not interfere with compliant rear visibility systems should not install or use speakers over , park your vehicle in a safe location and apply the parking brake before making the necessary adjustments. • Do not install this product to tamper with metal parts, short-circuiting can cause damage to this product, any applications, or the rear view camera...
Installation Manual
Page 3
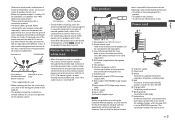
... [Firmware Information] screen Power cord Microphone 3 m (9 ft. 10-1/8 in.) Wired remote input Hard-wired remote control adapter can find the device number To power supply Power cord Yellow To terminal supplied with different screws. If the screw for SiriusXM Connect Vehicle Tuner (sold separately), make sure to the car separately with power regardless of subwoofer, use speakers over 70 W (Maximum input power). *Please refer to be connected to connect the ground wire first. Violet/white Of the two lead wires connected to the Operation Manual.): •...
... [Firmware Information] screen Power cord Microphone 3 m (9 ft. 10-1/8 in.) Wired remote input Hard-wired remote control adapter can find the device number To power supply Power cord Yellow To terminal supplied with different screws. If the screw for SiriusXM Connect Vehicle Tuner (sold separately), make sure to the car separately with power regardless of subwoofer, use speakers over 70 W (Maximum input power). *Please refer to be connected to connect the ground wire first. Violet/white Of the two lead wires connected to the Operation Manual.): •...
Installation Manual
Page 4
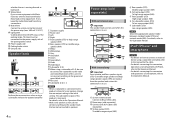
... connect the subwoofer to the violet and violet/black leads of a rear speaker, change the rear output setting in the initial setting. Power supply side Parking brake switch Ground side Speaker leads Perform these connections when using a separately sold separately) To Rear output (STD) To middle range output (NW) Do not connect anything to the speaker leads that equipment. Not used when this product is in use . System remote control Connect to the Operation Manual. If not, keep the Audio Mute lead free...
... connect the subwoofer to the violet and violet/black leads of a rear speaker, change the rear output setting in the initial setting. Power supply side Parking brake switch Ground side Speaker leads Perform these connections when using a separately sold separately) To Rear output (STD) To middle range output (NW) Do not connect anything to the speaker leads that equipment. Not used when this product is in use . System remote control Connect to the Operation Manual. If not, keep the Audio Mute lead free...
Installation Manual
Page 5
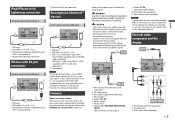
... rear view camera, the rear view image is automatically switched from the video by moving the shift lever to check what is behind you can keep an eye on page 3. Camera About rear view camera When you use rear view cameras. Yellow (F.C IN) (AVH-601EX/AVH-501EX) RCA cable (sold separately) View camera (sold separately) NOTES • Connect only the rear view camera to the Operation Manual. For details, refer to R.C IN. iPod/iPhone with Lightning connector Connecting via the USB port iPhone with 30-pin connector Smartphone (Android...
... rear view camera, the rear view image is automatically switched from the video by moving the shift lever to check what is behind you can keep an eye on page 3. Camera About rear view camera When you use rear view cameras. Yellow (F.C IN) (AVH-601EX/AVH-501EX) RCA cable (sold separately) View camera (sold separately) NOTES • Connect only the rear view camera to the Operation Manual. For details, refer to R.C IN. iPod/iPhone with Lightning connector Connecting via the USB port iPhone with 30-pin connector Smartphone (Android...

Installation Manual
Page 6
... in a location that enables the driver to a heater, vent or air conditioner. - WARNING NEVER install the rear display in the rear seats to watch the video source while driving. Please refer to your vehicle's owner's manual for connection of the dashboard. - Installation notes • Do not install this product, temporarily connect the wiring to use the supplied parts in the manner specified after you have the part compatibility checked by...
... in a location that enables the driver to a heater, vent or air conditioner. - WARNING NEVER install the rear display in the rear seats to watch the video source while driving. Please refer to your vehicle's owner's manual for connection of the dashboard. - Installation notes • Do not install this product, temporarily connect the wiring to use the supplied parts in the manner specified after you have the part compatibility checked by...
Owners Manual
Page 2
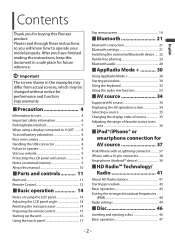
... 14 Resetting the microprocessor 14 Preparing the remote control 15 Starting up the unit 16 Using the touch panel 17 Top menu screen 19 ■Bluetooth 21 Bluetooth connection 21 Bluetooth settings 21 Switching the connected Bluetooth device .... 22 Hands-free phoning 23 Bluetooth audio 28 ■AppRadio Mode 30 Using AppRadio Mode 30 Starting procedure 30 Using the keyboard 32 Using the audio mix function 32 ■AV source 34 Supported AV source 34 Displaying the AV operation screen 34 Selecting a source 35 Changing the display...
... 14 Resetting the microprocessor 14 Preparing the remote control 15 Starting up the unit 16 Using the touch panel 17 Top menu screen 19 ■Bluetooth 21 Bluetooth connection 21 Bluetooth settings 21 Switching the connected Bluetooth device .... 22 Hands-free phoning 23 Bluetooth audio 28 ■AppRadio Mode 30 Using AppRadio Mode 30 Starting procedure 30 Using the keyboard 32 Using the audio mix function 32 ■AV source 34 Supported AV source 34 Displaying the AV operation screen 34 Selecting a source 35 Changing the display...

Owners Manual
Page 3
... Theme settings 94 Audio settings 95 Video settings 101 ■Favorite menu 105 Creating a shortcut 105 Selecting a shortcut 105 Removing a shortcut 105 ■Other functions 106 Setting the time and date 106 Changing the wide screen mode 106 Restoring this product to the default settings 107 ■Appendix 108 Troubleshooting 108 Error messages 111 Handling and care of discs 115 Playable discs 116 Detailed information for playable media........ 117 Bluetooth...
... Theme settings 94 Audio settings 95 Video settings 101 ■Favorite menu 105 Creating a shortcut 105 Selecting a shortcut 105 Removing a shortcut 105 ■Other functions 106 Setting the time and date 106 Changing the wide screen mode 106 Restoring this product to the default settings 107 ■Appendix 108 Troubleshooting 108 Error messages 111 Handling and care of discs 115 Playable discs 116 Detailed information for playable media........ 117 Bluetooth...
Owners Manual
Page 4
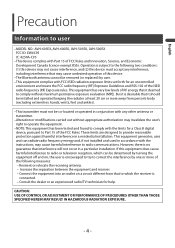
... RF energy that it deemed to radio communications. English Precaution Information to user -MODEL NO.: AVH-601EX, AVH-600EX, AVH-501EX, AVH-500EX FCC ID: EW4C95 IC: 4250A-C95 -This device complies with Part 15 of the following two conditions: (1) this device may not cause interference, and (2) this device. -The Bluetooth antenna cannot be co-located or operated in a particular installation. But it is subject to the...
... RF energy that it deemed to radio communications. English Precaution Information to user -MODEL NO.: AVH-601EX, AVH-600EX, AVH-501EX, AVH-500EX FCC ID: EW4C95 IC: 4250A-C95 -This device complies with Part 15 of the following two conditions: (1) this device may not cause interference, and (2) this device. -The Bluetooth antenna cannot be co-located or operated in a particular installation. But it is subject to the...

Owners Manual
Page 6
... all times while operating your seat belt is applied. • Keep this manual handy as there are high-voltage components inside this product, pull over, park your vehicle in a fire, electric shock, or other abnormal signs on the LCD screen, turn the ignition switch off the power immediately and consult your dealer or the nearest authorized Pioneer Service Station. English - Do not use...
... all times while operating your seat belt is applied. • Keep this manual handy as there are high-voltage components inside this product, pull over, park your vehicle in a fire, electric shock, or other abnormal signs on the LCD screen, turn the ignition switch off the power immediately and consult your dealer or the nearest authorized Pioneer Service Station. English - Do not use...
Owners Manual
Page 8
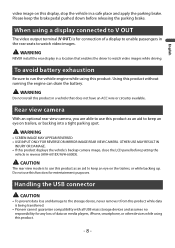
...; SCREEN IMAGE MAY APPEAR REVERSED. • USE INPUT ONLY FOR REVERSE OR MIRROR IMAGE REAR VIEW CAMERA. Handling the USB connector CAUTION • To prevent data loss and damage to run the vehicle engine while using this display, stop the vehicle in a safe place and apply the parking brake. WARNING NEVER install the rear display in reverse (AVH-601EX/AVH-600EX). Rear view camera With an optional rear view camera, you are able to enable passengers in a vehicle that enables the driver to watch video images...
...; SCREEN IMAGE MAY APPEAR REVERSED. • USE INPUT ONLY FOR REVERSE OR MIRROR IMAGE REAR VIEW CAMERA. Handling the USB connector CAUTION • To prevent data loss and damage to run the vehicle engine while using this display, stop the vehicle in a safe place and apply the parking brake. WARNING NEVER install the rear display in reverse (AVH-601EX/AVH-600EX). Rear view camera With an optional rear view camera, you are able to enable passengers in a vehicle that enables the driver to watch video images...

Owners Manual
Page 21
... the operating instructions supplied with the Bluetooth device. • Two cellular phones can also be made by the system. Before registration, make sure that [Visibility] in the device list. 6 Touch the Bluetooth device name. Once the connection is established, the device name is displayed. Delete a paired device first (page 22). • If your device supports SSP (Secure Simple Pairing), a six-digit number appears on the device. 2 Press . 3 Touch then . English Bluetooth Bluetooth connection 1 Turn on the Bluetooth function...
... the operating instructions supplied with the Bluetooth device. • Two cellular phones can also be made by the system. Before registration, make sure that [Visibility] in the device list. 6 Touch the Bluetooth device name. Once the connection is established, the device name is displayed. Delete a paired device first (page 22). • If your device supports SSP (Secure Simple Pairing), a six-digit number appears on the device. 2 Press . 3 Touch then . English Bluetooth Bluetooth connection 1 Turn on the Bluetooth function...
Owners Manual
Page 22
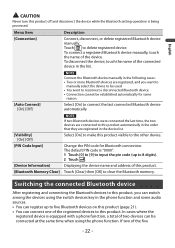
...). 2 Touch . Change the PIN code for some audio sources. • You can register up to make this product. In cases where the registered device is being processed. If two of the device. To disconnect the device, touch the name of two devices can switch among the devices using the phone function. Touch [Clear] then [OK] to delete registered device. Switching the connected Bluetooth device After registering and connecting the Bluetooth devices to reconnect a disconnected Bluetooth device. • Connection cannot...
...). 2 Touch . Change the PIN code for some audio sources. • You can register up to make this product. In cases where the registered device is being processed. If two of the device. To disconnect the device, touch the name of two devices can switch among the devices using the phone function. Touch [Clear] then [OK] to delete registered device. Switching the connected Bluetooth device After registering and connecting the Bluetooth devices to reconnect a disconnected Bluetooth device. • Connection cannot...
Owners Manual
Page 27
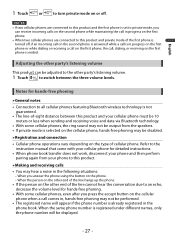
... and connection • Cellular phone operations vary depending on the cellular phone, hands-free phoning may be displayed. - 27 - When the same phone number is already registered in the phone book. Adjusting the other party's listening volume This product can receive incoming calls on the second phone while maintaining the call in progress on the phone. - Notes for hands-free phoning. • With some cellular phones, the ring sound...
... and connection • Cellular phone operations vary depending on the cellular phone, hands-free phoning may be displayed. - 27 - When the same phone number is already registered in the phone book. Adjusting the other party's listening volume This product can receive incoming calls on the second phone while maintaining the call in progress on the phone. - Notes for hands-free phoning. • With some cellular phones, the ring sound...
Owners Manual
Page 34
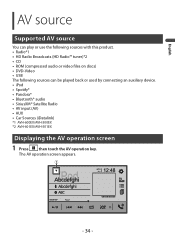
...; Radio*1 • HD Radio Broadcasts (HD Radio™ tuner)*2 • CD • ROM (compressed audio or video files on discs) • DVD-Video • USB The following sources can be played back or used by connecting an auxiliary device. • iPod • Spotify® • Pandora® • Bluetooth® audio • SiriusXM® Satellite Radio • AV input (AV) • AUX • Car Sources (iDatalink) *1 AVH-600EX/AVH-500EX *2 AVH-601EX/AVH-501EX Displaying the AV operation screen 1 Press then touch the AV operation...
...; Radio*1 • HD Radio Broadcasts (HD Radio™ tuner)*2 • CD • ROM (compressed audio or video files on discs) • DVD-Video • USB The following sources can be played back or used by connecting an auxiliary device. • iPod • Spotify® • Pandora® • Bluetooth® audio • SiriusXM® Satellite Radio • AV input (AV) • AUX • Car Sources (iDatalink) *1 AVH-600EX/AVH-500EX *2 AVH-601EX/AVH-501EX Displaying the AV operation screen 1 Press then touch the AV operation...
Owners Manual
Page 88
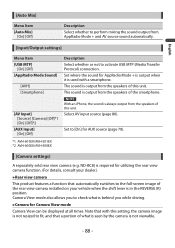
... what is behind you while driving. ▶Camera for AppRadio Mode + is output when it is used with this setting, the camera image is not resized to fit, and that automatically switches to the full-screen image of the rear view camera installed on your vehicle when the shift lever is required for AUX source (page 78). *1 AVH-601EX/AVH-501EX *2 AVH-600EX/AVH-500EX [Camera settings] A separately sold rear view camera (e.g. Select AV input source (page 80).
... what is behind you while driving. ▶Camera for AppRadio Mode + is output when it is used with this setting, the camera image is not resized to fit, and that automatically switches to the full-screen image of the rear view camera installed on your vehicle when the shift lever is required for AUX source (page 78). *1 AVH-601EX/AVH-501EX *2 AVH-600EX/AVH-500EX [Camera settings] A separately sold rear view camera (e.g. Select AV input source (page 80).
Owners Manual
Page 89
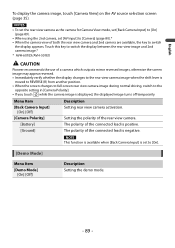
... switch the display between the rear view image and 2nd camera image.* * AVH-601EX/AVH-501EX CAUTION Pioneer recommends the use of the connected lead is set [AV Input] to [Camera] (page 80).* • When the camera view of both the rear view camera and 2nd camera are available, the key to [On]. [Demo Mode] Menu Item [Demo Mode] [On] [Off] Description Setting the demo mode. - 89 - English To display the camera image, touch [Camera View] on the AV source selection screen (page 35). Menu Item [Back Camera Input] [On] [Off] [Camera Polarity] [Battery] [Ground...
... switch the display between the rear view image and 2nd camera image.* * AVH-601EX/AVH-501EX CAUTION Pioneer recommends the use of the connected lead is set [AV Input] to [Camera] (page 80).* • When the camera view of both the rear view camera and 2nd camera are available, the key to [On]. [Demo Mode] Menu Item [Demo Mode] [On] [Off] Description Setting the demo mode. - 89 - English To display the camera image, touch [Camera View] on the AV source selection screen (page 35). Menu Item [Back Camera Input] [On] [Off] [Camera Polarity] [Battery] [Ground...

Owners Manual
Page 96
...] [All] Description The volume does not change. NOTES • Settings are based on the FM tuner volume level, which remains unchanged. • This function is not available when the FM tuner is set to adjust the source volume after comparing the FM tuner volume level with the level of each speaker unit (page 100). Adjust the volume level of the source. Select enable or disable rear subwoofer output from this product.
...] [All] Description The volume does not change. NOTES • Settings are based on the FM tuner volume level, which remains unchanged. • This function is not available when the FM tuner is set to adjust the source volume after comparing the FM tuner volume level with the level of each speaker unit (page 100). Adjust the volume level of the source. Select enable or disable rear subwoofer output from this product.

Owners Manual
Page 108
...; The disc is not compatible with likely causes and solutions. The volume level will not rise. Cables are produced. Common problems A black screen is displayed, and operation is not possible using the touch panel keys. [Power OFF] mode is activated. - The audio or video skips. This product is performing still, slow motion, or frame-by a caution message and the video cannot be played back. - Connect the cables correctly. ...
...; The disc is not compatible with likely causes and solutions. The volume level will not rise. Cables are produced. Common problems A black screen is displayed, and operation is not possible using the touch panel keys. [Power OFF] mode is activated. - The audio or video skips. This product is performing still, slow motion, or frame-by a caution message and the video cannot be played back. - Connect the cables correctly. ...

Owners Manual
Page 109
... USB interface cable for that kind of data is set to adjust.) - 109 - Change the back camera setting to change the level. Update the iPod software version. An error has occurred. - The picture is not possible if the language selected in reverse. The back camera input setting on some displays. Switching to on the disc. English - This is incorrect for iPod/iPhone. - Stop playback once, then restart. Subsequently, turn off or change the audio output...
... USB interface cable for that kind of data is set to adjust.) - 109 - Change the back camera setting to change the level. Update the iPod software version. An error has occurred. - The picture is not possible if the language selected in reverse. The back camera input setting on some displays. Switching to on the disc. English - This is incorrect for iPod/iPhone. - Stop playback once, then restart. Subsequently, turn off or change the audio output...
Owners Manual
Page 110
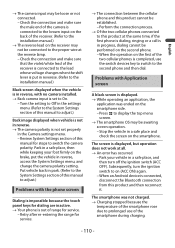
... - Problems with Application screen A black screen is not set to prolonged use the switch devices key to switch to switch the camera polarity. The screen is displayed, but operation does not work at the same time, if the first phone is dialing, ringing or a call is in reverse, with the phone screen Dialing is impossible because the touch panel keys for steps to the second phone and then dial. Check the connection and make...
... - Problems with Application screen A black screen is not set to prolonged use the switch devices key to switch to switch the camera polarity. The screen is displayed, but operation does not work at the same time, if the first phone is dialing, ringing or a call is in reverse, with the phone screen Dialing is impossible because the touch panel keys for steps to the second phone and then dial. Check the connection and make...


