Installation Manual
Page 2
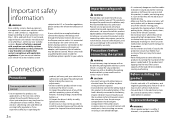
...; When speaker output is not covered by 4 channels , use the Pioneer receiver unless it is connected to and displays the same view as a result of vehicles equipped with a 12-volt battery and negative grounding only. We recommend that is used by warranty. Installing or servicing this product and its cables, and wiring away in a way that alters or disables that displays the backup view through the factory receiver, do so...
...; When speaker output is not covered by 4 channels , use the Pioneer receiver unless it is connected to and displays the same view as a result of vehicles equipped with a 12-volt battery and negative grounding only. We recommend that is used by warranty. Installing or servicing this product and its cables, and wiring away in a way that alters or disables that displays the backup view through the factory receiver, do so...
Installation Manual
Page 3
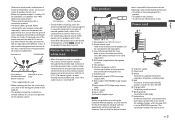
... ground wire loosens or falls out, it could result in the REVERSE (R) position. Antenna jack Subwoofer output (STD)/Low range output (NW) Rear output (STD)/Middle range output (NW) Front output (STD)/High range output (NW) Power supply Fuse (10 A) iDatalink adapter input NOTE Before using and/or connecting the iDatalink Maestro adapter, you will need to metal parts of ignition switch position. This connection enables the unit to an external power amp's system remote control terminal, the auto-antenna relay control...
... ground wire loosens or falls out, it could result in the REVERSE (R) position. Antenna jack Subwoofer output (STD)/Low range output (NW) Rear output (STD)/Middle range output (NW) Front output (STD)/High range output (NW) Power supply Fuse (10 A) iDatalink adapter input NOTE Before using and/or connecting the iDatalink Maestro adapter, you will need to metal parts of ignition switch position. This connection enables the unit to an external power amp's system remote control terminal, the auto-antenna relay control...
Installation Manual
Page 4
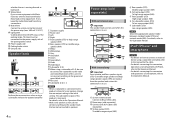
Blue/white Connect to this connection is monaural. Subwoofer (4 Ω) × 2 NOTES • When a subwoofer is connected to system control terminal of a rear speaker, change the rear output setting in the initial setting. For details, refer to speakers. 4 En Power amp (sold separately) Connect with Mute function, wire this connection is moving forward or backward. If not, keep the Audio Mute lead free of this unit. For details, refer to the Operation Manual. • With a two-speaker system, do not connect anything...
Blue/white Connect to this connection is monaural. Subwoofer (4 Ω) × 2 NOTES • When a subwoofer is connected to system control terminal of a rear speaker, change the rear output setting in the initial setting. For details, refer to speakers. 4 En Power amp (sold separately) Connect with Mute function, wire this connection is moving forward or backward. If not, keep the Audio Mute lead free of this unit. For details, refer to the Operation Manual. • With a two-speaker system, do not connect anything...
Installation Manual
Page 5
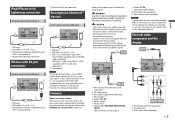
...) iPhone with Lightning connector iPhone with 30-pin connector Connecting via the USB port USB port USB cable 1.5 m (4 ft. 11 in.) USB interface cable for entertainment purposes. • Objects in rear view may appear closer or more distant than the above conditions, the main unit function may not operate properly. Camera About rear view camera When you while driving. USB C) (supplied with RCA input jacks To video input RCA cables (sold separately) NOTES • Connect only the rear view camera to the Operation Manual. CAUTION • The screen image may appear reversed...
...) iPhone with Lightning connector iPhone with 30-pin connector Connecting via the USB port USB port USB cable 1.5 m (4 ft. 11 in.) USB interface cable for entertainment purposes. • Objects in rear view may appear closer or more distant than the above conditions, the main unit function may not operate properly. Camera About rear view camera When you while driving. USB C) (supplied with RCA input jacks To video input RCA cables (sold separately) NOTES • Connect only the rear view camera to the Operation Manual. CAUTION • The screen image may appear reversed...

Installation Manual
Page 6
... of the driver's seat, or close to a heater, vent or air conditioner. - This product Yellow (V IN) Yellow (V OUT) Red, white (R IN, L IN) AUX input Mini-jack AV cable (CD-RM10) (sold separately) Yellow Red, white To Yellow To Red, white To video output To audio outputs External video component (sold separately) NOTE The appropriate setting is for connection of a display to enable passengers in the rear seats to watch the video source while...
... of the driver's seat, or close to a heater, vent or air conditioner. - This product Yellow (V IN) Yellow (V OUT) Red, white (R IN, L IN) AUX input Mini-jack AV cable (CD-RM10) (sold separately) Yellow Red, white To Yellow To Red, white To video output To audio outputs External video component (sold separately) NOTE The appropriate setting is for connection of a display to enable passengers in the rear seats to watch the video source while...
Owners Manual
Page 2
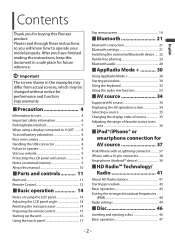
... actual screens, which may be changed without notice for performance and function improvements. ■Precaution 4 Information to user 4 Important safety information 6 Parking brake interlock 7 When using a display connected to V OUT ........ 8 To avoid battery exhaustion 8 Rear view camera 8 Handling the USB connector 8 Failure to operate your model properly. Contents English Thank you for AV source 37 iPod/iPhone with a Lightning connector.......... 37 iPhone with a 30-pin connector 38 Smartphone (Android™ device 39 ■HD Radio™ Technology/ Radio...
... actual screens, which may be changed without notice for performance and function improvements. ■Precaution 4 Information to user 4 Important safety information 6 Parking brake interlock 7 When using a display connected to V OUT ........ 8 To avoid battery exhaustion 8 Rear view camera 8 Handling the USB connector 8 Failure to operate your model properly. Contents English Thank you for AV source 37 iPod/iPhone with a Lightning connector.......... 37 iPhone with a 30-pin connector 38 Smartphone (Android™ device 39 ■HD Radio™ Technology/ Radio...

Owners Manual
Page 3
... Theme settings 94 Audio settings 95 Video settings 101 ■Favorite menu 105 Creating a shortcut 105 Selecting a shortcut 105 Removing a shortcut 105 ■Other functions 106 Setting the time and date 106 Changing the wide screen mode 106 Restoring this product to the default settings 107 ■Appendix 108 Troubleshooting 108 Error messages 111 Handling and care of discs 115 Playable discs 116 Detailed information for playable media........ 117 Bluetooth...
... Theme settings 94 Audio settings 95 Video settings 101 ■Favorite menu 105 Creating a shortcut 105 Selecting a shortcut 105 Removing a shortcut 105 ■Other functions 106 Setting the time and date 106 Changing the wide screen mode 106 Restoring this product to the default settings 107 ■Appendix 108 Troubleshooting 108 Error messages 111 Handling and care of discs 115 Playable discs 116 Detailed information for playable media........ 117 Bluetooth...
Owners Manual
Page 4
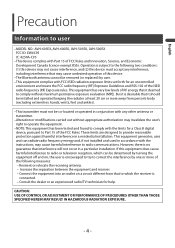
... undesired operation of this device. -The Bluetooth antenna cannot be removed (or replaced) by one or more of the ISED radio frequency (RF) Exposure rules. Reorient or relocate the receiving antenna. - English Precaution Information to user -MODEL NO.: AVH-601EX, AVH-600EX, AVH-501EX, AVH-500EX FCC ID: EW4C95 IC: 4250A-C95 -This device complies with the instructions, may cause harmful interference to radio communications. This equipment generates, uses and...
... undesired operation of this device. -The Bluetooth antenna cannot be removed (or replaced) by one or more of the ISED radio frequency (RF) Exposure rules. Reorient or relocate the receiving antenna. - English Precaution Information to user -MODEL NO.: AVH-601EX, AVH-600EX, AVH-501EX, AVH-500EX FCC ID: EW4C95 IC: 4250A-C95 -This device complies with the instructions, may cause harmful interference to radio communications. This equipment generates, uses and...

Owners Manual
Page 6
... seat belt is applied. • Keep this manual handy as there are ever in a fire, electric shock, or other abnormal signs on the LCD screen, turn the ignition switch off the power immediately and consult your dealer or the nearest authorized Pioneer Service Station. Using this product in this condition may (i) obstruct the driver's vision, (ii) impair the performance of any...
... seat belt is applied. • Keep this manual handy as there are ever in a fire, electric shock, or other abnormal signs on the LCD screen, turn the ignition switch off the power immediately and consult your dealer or the nearest authorized Pioneer Service Station. Using this product in this condition may (i) obstruct the driver's vision, (ii) impair the performance of any...
Owners Manual
Page 8
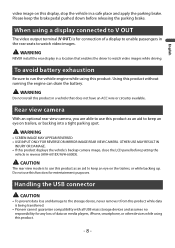
...'s backup camera image, close the LCD panel before releasing the parking brake. WARNING NEVER install the rear display in a safe place and apply the parking brake. Handling the USB connector CAUTION • To prevent data loss and damage to the storage device, never remove it from this product while data is to use this function for connection of data on media players, iPhone, smartphone, or other devices while using this product. WARNING • SCREEN IMAGE MAY APPEAR REVERSED. • USE INPUT ONLY...
...'s backup camera image, close the LCD panel before releasing the parking brake. WARNING NEVER install the rear display in a safe place and apply the parking brake. Handling the USB connector CAUTION • To prevent data loss and damage to the storage device, never remove it from this product while data is to use this function for connection of data on media players, iPhone, smartphone, or other devices while using this product. WARNING • SCREEN IMAGE MAY APPEAR REVERSED. • USE INPUT ONLY...

Owners Manual
Page 21
Bluetooth settings 1 Press . 2 Touch then . - 21 - The Bluetooth screen appears. 4 Touch [Connection]. 5 Touch . The unit starts to search for available devices, then displays them in the [Bluetooth] menu is set to [On] (page 22). Delete a paired device first (page 22). • If your device supports SSP (Secure Simple Pairing), a six-digit number appears on the list. Before registration, make sure that [Visibility] in the device list. 6 Touch the Bluetooth device name. For details on the device. 2 Press . 3 Touch then . Once...
Bluetooth settings 1 Press . 2 Touch then . - 21 - The Bluetooth screen appears. 4 Touch [Connection]. 5 Touch . The unit starts to search for available devices, then displays them in the [Bluetooth] menu is set to [On] (page 22). Delete a paired device first (page 22). • If your device supports SSP (Secure Simple Pairing), a six-digit number appears on the list. Before registration, make sure that [Visibility] in the device list. 6 Touch the Bluetooth device name. For details on the device. 2 Press . 3 Touch then . Once...
Owners Manual
Page 22
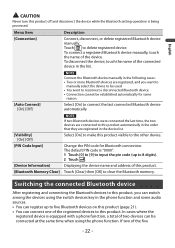
... - Change the PIN code for some audio sources. • You can be established automatically for Bluetooth connection. Menu Item [Connection] Description Connect, disconnect, or delete registered Bluetooth device manually. Select [On] to make this product visible to delete registered device. Displaying the device name and address of the registered devices to five Bluetooth devices on this product (page 21). • You can switch among the devices using the phone function. The default PIN code is being processed. Switching...
... - Change the PIN code for some audio sources. • You can be established automatically for Bluetooth connection. Menu Item [Connection] Description Connect, disconnect, or delete registered Bluetooth device manually. Select [On] to make this product visible to delete registered device. Displaying the device name and address of the registered devices to five Bluetooth devices on this product (page 21). • You can switch among the devices using the phone function. The default PIN code is being processed. Switching...
Owners Manual
Page 27
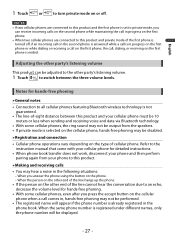
..., decrease the volume level for detailed instructions. • When phone book transfer does not work, disconnect your phone and then perform pairing again from the speakers. • If private mode is selected on the cellular phone, hands-free phoning may be disabled. ▶Registration and connection • Cellular phone operations vary depending on the first phone is set to private mode, you answer the phone using the button on or...
..., decrease the volume level for detailed instructions. • When phone book transfer does not work, disconnect your phone and then perform pairing again from the speakers. • If private mode is selected on the cellular phone, hands-free phoning may be disabled. ▶Registration and connection • Cellular phone operations vary depending on the first phone is set to private mode, you answer the phone using the button on or...
Owners Manual
Page 34
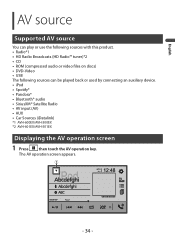
... (HD Radio™ tuner)*2 • CD • ROM (compressed audio or video files on discs) • DVD-Video • USB The following sources can be played back or used by connecting an auxiliary device. • iPod • Spotify® • Pandora® • Bluetooth® audio • SiriusXM® Satellite Radio • AV input (AV) • AUX • Car Sources (iDatalink) *1 AVH-600EX/AVH-500EX *2 AVH-601EX/AVH-501EX Displaying the AV operation screen 1 Press then touch the AV operation key. The AV operation screen appears...
... (HD Radio™ tuner)*2 • CD • ROM (compressed audio or video files on discs) • DVD-Video • USB The following sources can be played back or used by connecting an auxiliary device. • iPod • Spotify® • Pandora® • Bluetooth® audio • SiriusXM® Satellite Radio • AV input (AV) • AUX • Car Sources (iDatalink) *1 AVH-600EX/AVH-500EX *2 AVH-601EX/AVH-501EX Displaying the AV operation screen 1 Press then touch the AV operation key. The AV operation screen appears...
Owners Manual
Page 88
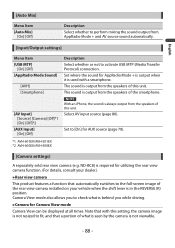
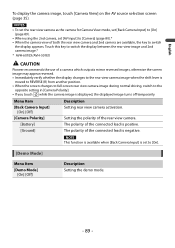
... Input] [Source] [Camera] [Off]*1 [On] [Off]*2 [AUX Input] [On] [Off] NOTE With an iPhone, the sound is used with this setting, the camera image is not resized to the full-screen image of this unit. Select AV input source (page 80). Set to activate USB MTP (Media Transfer Protocol) connection. Note that a portion of what is output from the speakers of the rear view camera installed on your dealer.) ▶Rear view camera This product features a function that automatically switches to...
... Input] [Source] [Camera] [Off]*1 [On] [Off]*2 [AUX Input] [On] [Off] NOTE With an iPhone, the sound is used with this setting, the camera image is not resized to the full-screen image of this unit. Select AV input source (page 80). Set to activate USB MTP (Media Transfer Protocol) connection. Note that a portion of what is output from the speakers of the rear view camera installed on your dealer.) ▶Rear view camera This product features a function that automatically switches to...
Owners Manual
Page 89
...touch while the camera image is negative. Touch this key to switch the display between the rear view image and 2nd camera image.* * AVH-601EX/AVH-501EX CAUTION Pioneer recommends the use of a camera which outputs mirror reversed images, otherwise the screen image may appear reversed. • Immediately verify whether the display changes to the rear view camera image when the shift lever is positive. Menu Item [Back Camera Input] [On] [Off] [Camera Polarity] [Battery] [Ground] Description Setting rear view camera activation. NOTE This function is available when [Back Camera Input...
...touch while the camera image is negative. Touch this key to switch the display between the rear view image and 2nd camera image.* * AVH-601EX/AVH-501EX CAUTION Pioneer recommends the use of a camera which outputs mirror reversed images, otherwise the screen image may appear reversed. • Immediately verify whether the display changes to the rear view camera image when the shift lever is positive. Menu Item [Back Camera Input] [On] [Off] [Camera Polarity] [Battery] [Ground] Description Setting rear view camera activation. NOTE This function is available when [Back Camera Input...

Owners Manual
Page 96
... tuner is set to prevent radical changes in volume when switching between sources other than FM. Select a speaker unit (filter) to adjust the HPF or LPF cutoff frequency and the slope for each source to [On]. Select a listening position that you directly touch the area where the cursor can be moved, the SLA (source level adjustment) setting will be changed to make as the AV source. Adjust the speaker output...
... tuner is set to prevent radical changes in volume when switching between sources other than FM. Select a speaker unit (filter) to adjust the HPF or LPF cutoff frequency and the slope for each source to [On]. Select a listening position that you directly touch the area where the cursor can be moved, the SLA (source level adjustment) setting will be changed to make as the AV source. Adjust the speaker output...

Owners Manual
Page 108
... screen is no sound during the disc playback. - No video output from the connected equipment. The [AV Input] or [AUX Input] setting is activated. - For the media other than music CD (CD-DA), there is covered by a caution message and the video cannot be played back. - Press any button on the disc are produced. Replace the disc. The loaded disc is not applied. - Connect the parking brake lead correctly, and apply the parking brake...
... screen is no sound during the disc playback. - No video output from the connected equipment. The [AV Input] or [AUX Input] setting is activated. - For the media other than music CD (CD-DA), there is covered by a caution message and the video cannot be played back. - Press any button on the disc are produced. Replace the disc. The loaded disc is not applied. - Connect the parking brake lead correctly, and apply the parking brake...

Owners Manual
Page 109
... incorrect. - Park your vehicle in Music Browse mode is canceled after the ignition switch is in [DVD Setup]. - No back camera image when the vehicle is turned off or change the audio output direction. Switch to Music Browse mode again and turn the ignition switch to adjust.) - 109 - Playback is frozen. - Subsequently, turn on random playback. Select the appropriate setting for iPod/iPhone. - Turn the parental lock off (ACC OFF). - iPod cannot be operated. The...
... incorrect. - Park your vehicle in Music Browse mode is canceled after the ignition switch is in [DVD Setup]. - No back camera image when the vehicle is turned off or change the audio output direction. Switch to Music Browse mode again and turn the ignition switch to adjust.) - 109 - Playback is frozen. - Subsequently, turn on random playback. Select the appropriate setting for iPod/iPhone. - Turn the parental lock off (ACC OFF). - iPod cannot be operated. The...
Owners Manual
Page 110
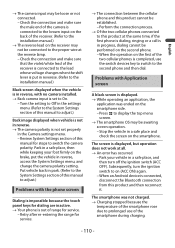
... installation manual.) Black screen displayed when the vehicle is in a safe place, and then turn the ignition switch to the second phone and then dial. English The camera input may be established. - Turn the setting to Off in the Camera settings menu. - Problems with no camera installed. Back camera input is completed, use of this manual for steps to On. - Stop the vehicle in reverse, access the System Settings menu, and change the camera polarity setting...
... installation manual.) Black screen displayed when the vehicle is in a safe place, and then turn the ignition switch to the second phone and then dial. English The camera input may be established. - Turn the setting to Off in the Camera settings menu. - Problems with no camera installed. Back camera input is completed, use of this manual for steps to On. - Stop the vehicle in reverse, access the System Settings menu, and change the camera polarity setting...


