
Owners Manual
Page 2
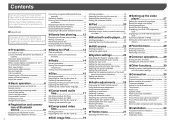
...Setting the time and date 29 Changing the wide screen mode 29 ■Other functions 30 Resetting various settings/Restoring this Pioneer product. ist screen 21 ■Bluetooth audio player.....21 Starting procedure 22 Selecting files from the playl- Please read through ... devices 10 iPod compatibility 13 Information on internal memory 6 About this manual 7 ■Basic operation 8 Checking part names and functions 8 Remote control 8 Inserting/ejecting/connecting media 8 On first-time startup 8 How to the default settings 30 ■ Connection 30 Precautions 30 Precautions...
...Setting the time and date 29 Changing the wide screen mode 29 ■Other functions 30 Resetting various settings/Restoring this Pioneer product. ist screen 21 ■Bluetooth audio player.....21 Starting procedure 22 Selecting files from the playl- Please read through ... devices 10 iPod compatibility 13 Information on internal memory 6 About this manual 7 ■Basic operation 8 Checking part names and functions 8 Remote control 8 Inserting/ejecting/connecting media 8 On first-time startup 8 How to the default settings 30 ■ Connection 30 Precautions 30 Precautions...
Owners Manual
Page 8
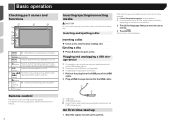
...61477; Insert a disc into the disc-loading slot. Inserting and ejecting a disc After a short pause, the splash screen comes on page 8 9 LCD screen Remote control The remote control CD-R33 is sold separately. Basic operation Checking part names and functions 7 1 8 9 2 3 4 5 6 1 RESET button Resetting the...1 2 1 USB cable 2 USB storage device Check that you want to eject a disc. For details concerning operations, see the remote control manual. 8 Inserting/ejecting/connecting media CAUTION Do not insert anything other than a disc into the disc-loading slot. On first-...
...61477; Insert a disc into the disc-loading slot. Inserting and ejecting a disc After a short pause, the splash screen comes on page 8 9 LCD screen Remote control The remote control CD-R33 is sold separately. Basic operation Checking part names and functions 7 1 8 9 2 3 4 5 6 1 RESET button Resetting the...1 2 1 USB cable 2 USB storage device Check that you want to eject a disc. For details concerning operations, see the remote control manual. 8 Inserting/ejecting/connecting media CAUTION Do not insert anything other than a disc into the disc-loading slot. On first-...

Owners Manual
Page 31
...; This product cannot be exceeded, causing overheating. F ACC O F O T 65 4 3 1 Microphone 4 m (13 ft. 1 in.) (AVH-270BT/AVH-271BT) 2 This product 3 Antenna jack 4 Wired remote input Hard-wired remote control adapter can occur, resulting in a vehicle without ACC (accessory) position on this unit with cable clamps or electrical tape. Be...may fail to work properly. ● Never feed power to other device must be sure to an external power amp's system remote control terminal, the auto-antenna relay control terminal, or the antenna booster power control terminal (max. 300 mA 12 V DC...
...; This product cannot be exceeded, causing overheating. F ACC O F O T 65 4 3 1 Microphone 4 m (13 ft. 1 in.) (AVH-270BT/AVH-271BT) 2 This product 3 Antenna jack 4 Wired remote input Hard-wired remote control adapter can occur, resulting in a vehicle without ACC (accessory) position on this unit with cable clamps or electrical tape. Be...may fail to work properly. ● Never feed power to other device must be sure to an external power amp's system remote control terminal, the auto-antenna relay control terminal, or the antenna booster power control terminal (max. 300 mA 12 V DC...

Owners Manual
Page 33
OTHER USE MAY RESULT IN INJURY OR DAMAGE. Rear View mode also allows you to check what is in use. 1 3 2 4 8 8 1 System remote control Connect to Blue/white cable. 2 Power amp (sold separately) 3 Connect with RCA cable (sold separately) 4 To Rear or subwoofer output Connect a cable according to ...
OTHER USE MAY RESULT IN INJURY OR DAMAGE. Rear View mode also allows you to check what is in use. 1 3 2 4 8 8 1 System remote control Connect to Blue/white cable. 2 Power amp (sold separately) 3 Connect with RCA cable (sold separately) 4 To Rear or subwoofer output Connect a cable according to ...


