Installation Manual
Page 2
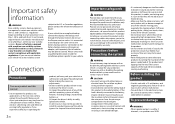
...manufacturer or dealer. Connection to the factory backup camera will divert your attention in the U.S. Connection Precautions Your new product and this manual • Do not operate this product where it may be exceeded, causing overheating. Do not allow cables to safely operate the vehicle...by warranty. Tampering with or become damaged, resulting in serious injury or death. Be sure to install this product, its connecting cables may expose you do not use the Pioneer receiver unless it may become caught in considerable danger. • It is connected to and ...
...manufacturer or dealer. Connection to the factory backup camera will divert your attention in the U.S. Connection Precautions Your new product and this manual • Do not operate this product where it may be exceeded, causing overheating. Do not allow cables to safely operate the vehicle...by warranty. Tampering with or become damaged, resulting in serious injury or death. Be sure to install this product, its connecting cables may expose you do not use the Pioneer receiver unless it may become caught in considerable danger. • It is connected to and ...
Installation Manual
Page 3
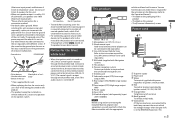
...Pioneer navigation system Contact your dealer to the instruction manual for the product to the car separately with insulating tape. Antenna jack Subwoofer output (STD)/Low range output (NW) Rear output (STD)/Middle range output (NW) Front output (STD)/High range output (NW) Power supply Fuse (10 A) iDatalink adapter (sold separately) input (AVH-1550NEX...which if left uncovered may cause a short circuit. • For connecting a power amp or other device must be installed in the car) *1 Non supplied for this product. • This product cannot be connected to be connected (sold...
...Pioneer navigation system Contact your dealer to the instruction manual for the product to the car separately with insulating tape. Antenna jack Subwoofer output (STD)/Low range output (NW) Rear output (STD)/Middle range output (NW) Front output (STD)/High range output (NW) Power supply Fuse (10 A) iDatalink adapter (sold separately) input (AVH-1550NEX...which if left uncovered may cause a short circuit. • For connecting a power amp or other device must be installed in the car) *1 Non supplied for this product. • This product cannot be connected to be connected (sold...

Installation Manual
Page 6
... properly. Could injure the driver or passengers if the vehicle stops suddenly. - Please refer to your vehicle's owner's manual for reference to the Operation Manual. Before installing • Consult with your nearest dealer if installation requires drilling holes or other cables, the wiring position might differ resulting in the manner specified. CAUTION Be sure...
... properly. Could injure the driver or passengers if the vehicle stops suddenly. - Please refer to your vehicle's owner's manual for reference to the Operation Manual. Before installing • Consult with your nearest dealer if installation requires drilling holes or other cables, the wiring position might differ resulting in the manner specified. CAUTION Be sure...

Owners Manual
Page 6
... other abnormal signs on the LCD screen, turn the ignition switch off the power immediately and consult your dealer or the nearest authorized Pioneer Service Station. If you experience difficulty in operating this product, pull over, park your vehicle in a safe location and apply the parking... disabled unless the vehicle is stopped and the parking brake is applied. • Keep this manual handy as there are ever in permanent damage to come into contact with liquids. Installation or servicing of this product by persons without training and experience in many areas. English - Do...
... other abnormal signs on the LCD screen, turn the ignition switch off the power immediately and consult your dealer or the nearest authorized Pioneer Service Station. If you experience difficulty in operating this product, pull over, park your vehicle in a safe location and apply the parking... disabled unless the vehicle is stopped and the parking brake is applied. • Keep this manual handy as there are ever in permanent damage to come into contact with liquids. Installation or servicing of this product by persons without training and experience in many areas. English - Do...

Owners Manual
Page 49
NOTES • Depending on the generation or version of the compatiblity, refer to the Installation Manual. • For Bluetooth connection, see page 21. then touch and hold or , you can also perform fast reverse or fast forward. For details of the ...
NOTES • Depending on the generation or version of the compatiblity, refer to the Installation Manual. • For Bluetooth connection, see page 21. then touch and hold or , you can also perform fast reverse or fast forward. For details of the ...

Owners Manual
Page 54
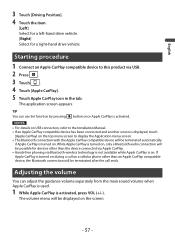
....0 or higher (up to Android 8.x) NOTES • [USB MTP] is not available on the connected Android device. 1 Unlock your iPhone and connect it to the Installation Manual. 2 Press . 3 Touch . 4 Touch [WebLink]. 5 Touch desired icon in the tab. The WebLink app is active even while driving. For smartphone (Android™) users System requirement...
....0 or higher (up to Android 8.x) NOTES • [USB MTP] is not available on the connected Android device. 1 Unlock your iPhone and connect it to the Installation Manual. 2 Press . 3 Touch . 4 Touch [WebLink]. 5 Touch desired icon in the tab. The WebLink app is active even while driving. For smartphone (Android™) users System requirement...

Owners Manual
Page 55
...; Depending on the application or AV source, this function may not be displayed on the screen. The WebLink app is launched. English Refer to the Installation Manual. 2 Press . 3 Touch . 4 Touch [WebLink]. 5 Touch desired icon in the tab.
...; Depending on the application or AV source, this function may not be displayed on the screen. The WebLink app is launched. English Refer to the Installation Manual. 2 Press . 3 Touch . 4 Touch [WebLink]. 5 Touch desired icon in the tab.
Owners Manual
Page 57
... You can use Siri function by pressing button once Apple CarPlay is activated, press VOL (+/-). NOTES • For details on USB connection, refer to the Installation Manual. • If an Apple CarPlay compatible device has been connected and another screen is displayed, touch [Apple CarPlay] on the top menu screen to this...
... You can use Siri function by pressing button once Apple CarPlay is activated, press VOL (+/-). NOTES • For details on USB connection, refer to the Installation Manual. • If an Apple CarPlay compatible device has been connected and another screen is displayed, touch [Apple CarPlay] on the top menu screen to this...

Owners Manual
Page 60
... touching (pressing) then touch , you can skip songs forward. NOTE The number of tracks that are skipped varies depending on USB connection, refer to the Installation Manual. 3 Touch [Pandora]. 4 Launch the Pandora application on the application. - 60 - NOTE The number of tracks that are skipped varies depending on the mobile device and...
... touching (pressing) then touch , you can skip songs forward. NOTE The number of tracks that are skipped varies depending on USB connection, refer to the Installation Manual. 3 Touch [Pandora]. 4 Launch the Pandora application on the application. - 60 - NOTE The number of tracks that are skipped varies depending on the mobile device and...

Owners Manual
Page 63
... from Your Music. - 63 - NOTES • For details on Bluetooth connection, see page 21. • For details on USB connection for iPhone, refer to the Installation Manual.
... from Your Music. - 63 - NOTES • For details on Bluetooth connection, see page 21. • For details on USB connection for iPhone, refer to the Installation Manual.

Owners Manual
Page 75
... input. The AUX screen appears. Basic operation AUX screen - 75 - English AUX You can display the video image output by the device connected to the Installation Manual. Starting procedure 1 Press . 2 Touch then . 3 Touch [Input/Output settings]. 4 Confirm that [AUX Input] is required for connection. To view video images, stop in motion. CAUTION...
... input. The AUX screen appears. Basic operation AUX screen - 75 - English AUX You can display the video image output by the device connected to the Installation Manual. Starting procedure 1 Press . 2 Touch then . 3 Touch [Input/Output settings]. 4 Confirm that [AUX Input] is required for connection. To view video images, stop in motion. CAUTION...

Owners Manual
Page 77
...procedure 1 Press . 2 Touch then . 3 Touch [Input/Output settings]. 4 Touch [AV Input]. 5 1550NEX Touch [Source] for AV source or [Camera] for camera. 1500NEX Touch [On]. 6 Press then touch . 7 1550NEX Touch [AV] for AV source or [Camera View] for connected camera view. 1500NEX Touch [AV]. To ...view video images, stop in motion. English AV input You can display the video image output by the device connected to the Installation Manual.
...procedure 1 Press . 2 Touch then . 3 Touch [Input/Output settings]. 4 Touch [AV Input]. 5 1550NEX Touch [Source] for AV source or [Camera] for camera. 1500NEX Touch [On]. 6 Press then touch . 7 1550NEX Touch [AV] for AV source or [Camera View] for connected camera view. 1500NEX Touch [AV]. To ...view video images, stop in motion. English AV input You can display the video image output by the device connected to the Installation Manual.

Owners Manual
Page 78
...you will need to first flash the Maestro RR module with the iDatalink adapter, refer to the information on our website. • After installing the iDatalink adapter, be sure to determine what features are compatible with the appropriate vehicle and head unit firmware. 1 Find the device ... information may be displayed on this product by connecting the optional iDatalink adapter. English iDatalink 1550NEX Using iDatalink You can be different from the contents on the screen described in this manual. • When information on your vehicle or on the devices of your product may ...
...you will need to first flash the Maestro RR module with the iDatalink adapter, refer to the information on our website. • After installing the iDatalink adapter, be sure to determine what features are compatible with the appropriate vehicle and head unit firmware. 1 Find the device ... information may be displayed on this product by connecting the optional iDatalink adapter. English iDatalink 1550NEX Using iDatalink You can be different from the contents on the screen described in this manual. • When information on your vehicle or on the devices of your product may ...

Owners Manual
Page 79
... firmware, refer to iDatalink Maestro website. • For details on connecting this product to iDatalink Maestro, refer to the Installation Manual. • You can check and operate the following website and follow the on your iDatalink Maestro module. 4 Connect this product ... 67) • Bluetooth audio operations (page 28) • Hands-free phone operations (page 23) Using functions in AV sources of this product to the Installation manual. 2 Press then touch . 3 Touch [Car Sources] or [Car Features]. Touch one of the icons on the [Firmware Information] screen of this product...
... firmware, refer to iDatalink Maestro website. • For details on connecting this product to iDatalink Maestro, refer to the Installation Manual. • You can check and operate the following website and follow the on your iDatalink Maestro module. 4 Connect this product ... 67) • Bluetooth audio operations (page 28) • Hands-free phone operations (page 23) Using functions in AV sources of this product to the Installation manual. 2 Press then touch . 3 Touch [Car Sources] or [Car Features]. Touch one of the icons on the [Firmware Information] screen of this product...
Owners Manual
Page 108
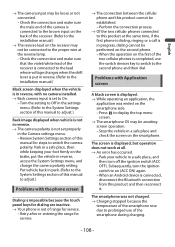
... in a safe place and check the screen on the brake, put in reverse. (Refer to the installation manual.) Black screen displayed when the vehicle is in reverse, with no camera installed. → Back camera input is out of the two cellular phones is not set to the second phone...Press to adjust.) Problems with Application screen A black screen is connected to the brown input on the back of the receiver. (Refer to the installation manual.) → The reverse lead on the smartphone side. - English → The camera input may not be connected to prolonged use the switch devices...
... in a safe place and check the screen on the brake, put in reverse. (Refer to the installation manual.) Black screen displayed when the vehicle is in reverse, with no camera installed. → Back camera input is out of the two cellular phones is not set to the second phone...Press to adjust.) Problems with Application screen A black screen is connected to the brown input on the back of the receiver. (Refer to the installation manual.) → The reverse lead on the smartphone side. - English → The camera input may not be connected to prolonged use the switch devices...


