Owner's Manual
Page 6
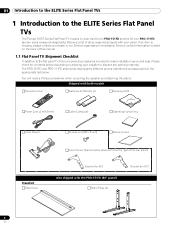
... the PRO-151FD (60" panel) Stand Pipes (2) Bracket (for contents before discarding or allowing your installer to the top right of this manual. 1.1 Flat Panel TV Shipment Checklist In addition to the flat panel TV, there are several accessories included to the ELITE Series Flat Panel TVs The Pioneer ELITE Series Flat Panel TV models include the 60-inch PRO-151FD and...
... the PRO-151FD (60" panel) Stand Pipes (2) Bracket (for contents before discarding or allowing your installer to the top right of this manual. 1.1 Flat Panel TV Shipment Checklist In addition to the flat panel TV, there are several accessories included to the ELITE Series Flat Panel TVs The Pioneer ELITE Series Flat Panel TV models include the 60-inch PRO-151FD and...
Owner's Manual
Page 7
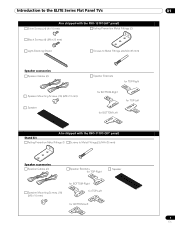
Introduction to the ELITE Series Flat Panel TVs 01 Also shipped with the PRO-151FD (60" panel) Silver Screws (4) (4×10 mm) Falling Prevention Metal Fittings (2) Black Screws (4) (M6×20 mm) Light-Blocking Shield Screws to Metal Fittings (4) (M4×... (16) (M5×10 mm) Speaker Speaker Brackets for TOP-Right for BOTTOM-Right for TOP-Left for BOTTOM-Left Also shipped with the PRO-111FD (50" panel) Stand kit Falling Prevention Metal Fittings (2) Screws to Metal Fittings(2) (M4×35 mm) Speaker accessories Speaker Cables (2) Speaker Brackets for TOP-Right Speaker...
Introduction to the ELITE Series Flat Panel TVs 01 Also shipped with the PRO-151FD (60" panel) Silver Screws (4) (4×10 mm) Falling Prevention Metal Fittings (2) Black Screws (4) (M6×20 mm) Light-Blocking Shield Screws to Metal Fittings (4) (M4×... (16) (M5×10 mm) Speaker Speaker Brackets for TOP-Right for BOTTOM-Right for TOP-Left for BOTTOM-Left Also shipped with the PRO-111FD (50" panel) Stand kit Falling Prevention Metal Fittings (2) Screws to Metal Fittings(2) (M4×35 mm) Speaker accessories Speaker Cables (2) Speaker Brackets for TOP-Right Speaker...
Owner's Manual
Page 14
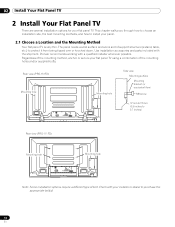
...inches) Rear view (PRO-111FD) W Mounting hole W T W W Mounting hole W T W Note: Some installation options require a different type of bolt. Pioneer recommends working with the shipment. Rear view (PRO-151FD) Mounting hole Mounting hole... The panel needs a solid surface and some sort of support structure (a stand, table, etc.) to purchase the appropriate bolt(s). 14 En Check with your panel. 2.1...Method Your flat panel TV is very thin. 02 Install Your Flat Panel TV 2 Install Your Flat Panel TV There are several installation options for your flat panel TV using a combination ...
...inches) Rear view (PRO-111FD) W Mounting hole W T W W Mounting hole W T W Note: Some installation options require a different type of bolt. Pioneer recommends working with the shipment. Rear view (PRO-151FD) Mounting hole Mounting hole... The panel needs a solid surface and some sort of support structure (a stand, table, etc.) to purchase the appropriate bolt(s). 14 En Check with your panel. 2.1...Method Your flat panel TV is very thin. 02 Install Your Flat Panel TV 2 Install Your Flat Panel TV There are several installation options for your flat panel TV using a combination ...
Owner's Manual
Page 16
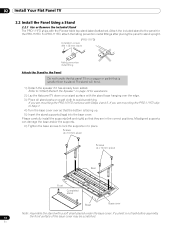
...) Installation screws (M4 × 35 mm: black) Falling prevention metal fitting Attach the Stand to the Panel Do not handle the flat panel TV on page 19 for the PRO-151FD. If you are mounting the PRO-151FD continue with the Pioneer table top stand (stand) attached. Refer to place. Screws (4 x 10 mm: silver) Screws (4 x 10 mm: silver) Rear...
...) Installation screws (M4 × 35 mm: black) Falling prevention metal fitting Attach the Stand to the Panel Do not handle the flat panel TV on page 19 for the PRO-151FD. If you are mounting the PRO-151FD continue with the Pioneer table top stand (stand) attached. Refer to place. Screws (4 x 10 mm: silver) Screws (4 x 10 mm: silver) Rear...
Owner's Manual
Page 17
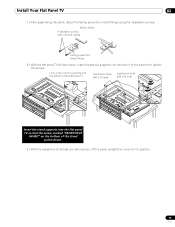
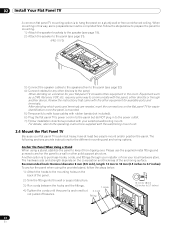
... bolts (M6 x 20 mm) Insert the stand supports into the bottom of the panel then tighten the screws. Install Your Flat Panel TV 02 7 ) After assembling the stand, attach the falling prevention metal fittings using the installation screws. (PRO-151FD) Installation screws (M4 x 35 mm: black...) Falling prevention metal fitting 8 ) With the flat panel TV still face down, insert the stand's supports into the flat panel TV...
... bolts (M6 x 20 mm) Insert the stand supports into the bottom of the panel then tighten the screws. Install Your Flat Panel TV 02 7 ) After assembling the stand, attach the falling prevention metal fittings using the installation screws. (PRO-151FD) Installation screws (M4 x 35 mm: black...) Falling prevention metal fitting 8 ) With the flat panel TV still face down, insert the stand's supports into the flat panel TV...
Owner's Manual
Page 19
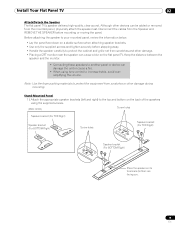
Stand-Mounted Panel 1 ) Attach the appropriate speaker brackets (left and right) to the top and bottom on the flat panel TV. Before attaching the speaker to another panel or device can damage the unit or cause a fire. • When using the supplied screws. (PRO-151FD) Screw holes Speaker bracket...8226; Use only the supplied screws and tighten securely before mounting or moving the panel. Install Your Flat Panel TV 02 Attach/Detach the Speaker The flat panel TV's speaker delivers high-quality, clear sound. Disconnect the cables from the Speaker and REMOVE THE SPEAKER before stepping ...
Stand-Mounted Panel 1 ) Attach the appropriate speaker brackets (left and right) to the top and bottom on the flat panel TV. Before attaching the speaker to another panel or device can damage the unit or cause a fire. • When using the supplied screws. (PRO-151FD) Screw holes Speaker bracket...8226; Use only the supplied screws and tighten securely before mounting or moving the panel. Install Your Flat Panel TV 02 Attach/Detach the Speaker The flat panel TV's speaker delivers high-quality, clear sound. Disconnect the cables from the Speaker and REMOVE THE SPEAKER before stepping ...
Owner's Manual
Page 23
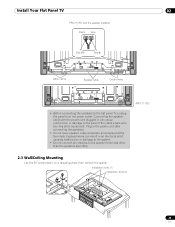
...in can result in an electrical short causing malfunction or damage to the system. • Do not connect any devices to the flat panel TV, unplug the panel from the power outlet. Exposed wires can cause malfunction or damage to the panel if the cable's bare wire touches other... than the speakers specified. (PRO-111FD) 2.3 Wall/Ceiling Mounting Lay the 50" panel down on a raised surface then remove the stand. Install Your Flat Panel TV 02 PRO-151FD with the power cord plugged in the power cord after connecting the speakers. •...
...in can result in an electrical short causing malfunction or damage to the system. • Do not connect any devices to the flat panel TV, unplug the panel from the power outlet. Exposed wires can cause malfunction or damage to the panel if the cable's bare wire touches other... than the speakers specified. (PRO-111FD) 2.3 Wall/Ceiling Mounting Lay the 50" panel down on a raised surface then remove the stand. Install Your Flat Panel TV 02 PRO-151FD with the power cord plugged in the power cord after connecting the speakers. •...
Owner's Manual
Page 24
... using the provided stand, follow the steps below to prepare the panel for mounting. 1 ) Attach the speaker brackets to the speaker (see page 19). 2 ) Attach the speaker to the panel (see page 21). (PRO-111FD) 3 ) Connect the speaker cables to the speakers then to the panel (see page ...inch), length 12 mm to 18 mm (0.5 inches to 0.7 inches) To anchor the panel when using a stand, stabilize the panel to keep it from a reinforced ceiling. When deciding on the flat panel TV for available ports and terminals. Another option is mounted. 5 ) Temporarily bundle loose cables with rubber bands ...
... using the provided stand, follow the steps below to prepare the panel for mounting. 1 ) Attach the speaker brackets to the speaker (see page 19). 2 ) Attach the speaker to the panel (see page 21). (PRO-111FD) 3 ) Connect the speaker cables to the speakers then to the panel (see page ...inch), length 12 mm to 18 mm (0.5 inches to 0.7 inches) To anchor the panel when using a stand, stabilize the panel to keep it from a reinforced ceiling. When deciding on the flat panel TV for available ports and terminals. Another option is mounted. 5 ) Temporarily bundle loose cables with rubber bands ...
Owner's Manual
Page 25
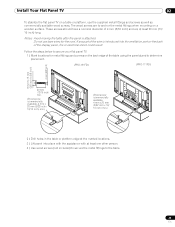
Do not use the supplied metal fittings and screws as well as commercially available wood screws. Follow the steps below to secure your flat panel TV. 1 ) Mark locations for the cord. These screws should have a nominal diameter of 4 mm (5/32 inch) and are to anchor the metal fittings when ... fittings to the table. 25 En Install Your Flat Panel TV 02 To stabilize the flat panel TV on a table or platform, use bare wires for metal fittings and screws on the back edge of the table using the panel stand to determine placement. (PRO-151FD) (PRO-111FD) 8 mm to 15 mm (3/8 inch to 5/8 ...
Do not use the supplied metal fittings and screws as well as commercially available wood screws. Follow the steps below to secure your flat panel TV. 1 ) Mark locations for the cord. These screws should have a nominal diameter of 4 mm (5/32 inch) and are to anchor the metal fittings when ... fittings to the table. 25 En Install Your Flat Panel TV 02 To stabilize the flat panel TV on a table or platform, use bare wires for metal fittings and screws on the back edge of the table using the panel stand to determine placement. (PRO-151FD) (PRO-111FD) 8 mm to 15 mm (3/8 inch to 5/8 ...
Owner's Manual
Page 145
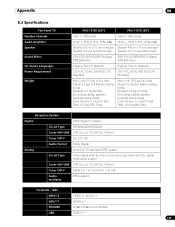
Appendix 08 8.3 Specifications Flat Panel TV Number of pixels Audio Amplifier Speaker Sound Effect On-Screen Languages Power Requirement Weight PRO-151FD (60") PRO-111FD (50") 1920 × 1080 pixels 1920 × 1080 pixels 18 W + 18 W (1 kHz, 10 %, 6 Ω) 18 W + 18 W (1 kHz, .../SRS/SRS TruBass/ SRS Definition SRS Definition English, French, Spanish English, French, Spanish 120 V AC, 60 Hz, 524 W (0.3 W Standby) 120 V AC, 60 Hz, 436 W (0.2 W Standby) Main unit: 51.0 kg (112.4 lbs) Stand: 6.1 kg (13.4 lbs) (including bolts) Speaker: 4.1 kg (9.0 lbs) (including cables, speaker ...
Appendix 08 8.3 Specifications Flat Panel TV Number of pixels Audio Amplifier Speaker Sound Effect On-Screen Languages Power Requirement Weight PRO-151FD (60") PRO-111FD (50") 1920 × 1080 pixels 1920 × 1080 pixels 18 W + 18 W (1 kHz, 10 %, 6 Ω) 18 W + 18 W (1 kHz, .../SRS/SRS TruBass/ SRS Definition SRS Definition English, French, Spanish English, French, Spanish 120 V AC, 60 Hz, 524 W (0.3 W Standby) 120 V AC, 60 Hz, 436 W (0.2 W Standby) Main unit: 51.0 kg (112.4 lbs) Stand: 6.1 kg (13.4 lbs) (including bolts) Speaker: 4.1 kg (9.0 lbs) (including cables, speaker ...


