Owner's Manual
Page 4
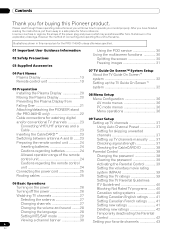
...differ from Falling Over 21 Attaching/detaching the PIONEER stand (for PRO-940HD only 22 08 Menu Setup Menu ...operating instructions so you for buying this manual are for the PRO-1140HD unless otherwise specified. 01 Important User Guidance... Information 02 Safety Precautions 03 Supplied Accessories Using the POD service 30 Using the multiscreen functions 30 Splitting the screen 30 Freezing images 31 04 Part Names Plasma Display 13 Remote control unit 19 07 TV Guide On Screen™ System Setup About the TV...
...differ from Falling Over 21 Attaching/detaching the PIONEER stand (for PRO-940HD only 22 08 Menu Setup Menu ...operating instructions so you for buying this manual are for the PRO-1140HD unless otherwise specified. 01 Important User Guidance... Information 02 Safety Precautions 03 Supplied Accessories Using the POD service 30 Using the multiscreen functions 30 Splitting the screen 30 Freezing images 31 04 Part Names Plasma Display 13 Remote control unit 19 07 TV Guide On Screen™ System Setup About the TV...
Owner's Manual
Page 10
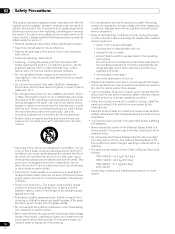
...unplug the power cord from qualified and authorized service personnel. • If any of the Plasma Display Panel to guard against pinching. • This panel contains glass elements. High voltage ... the product away from the wall outlet before operating the panel. • Keep this manual safe for a long period of the panel. The screen may be routed properly to prevent... such as stated on an unstable base can cause overheating and/or shorten the life of time. PRO-1140HD - 34.3 kg (75.7 lbs.) - Placing the product on the specification label. However, improper...
...unplug the power cord from qualified and authorized service personnel. • If any of the Plasma Display Panel to guard against pinching. • This panel contains glass elements. High voltage ... the product away from the wall outlet before operating the panel. • Keep this manual safe for a long period of the panel. The screen may be routed properly to prevent... such as stated on an unstable base can cause overheating and/or shorten the life of time. PRO-1140HD - 34.3 kg (75.7 lbs.) - Placing the product on the specification label. However, improper...
Owner's Manual
Page 11
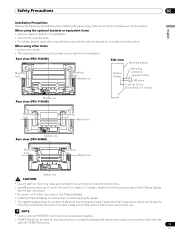
... only the supplied bolts. • For details, see the instruction manual that results from the mounting surface of standard mounting screw holes. Holes other than those shown above show the location of the Plasma Display. When using the optional brackets or equivalent items • Ask...• PIONEER shall not be liable for the installation: Rear view (PRO-1540HD) Side view Mounting surface Mounting hole Mounting hole Median line Plasma Display Mounting bracket (or equivalent item) M8 screw 12 mm to 18 mm (0.5 inches to 0.7 inches) Median line Rear view (PRO-1140HD) Mounting...
... only the supplied bolts. • For details, see the instruction manual that results from the mounting surface of standard mounting screw holes. Holes other than those shown above show the location of the Plasma Display. When using the optional brackets or equivalent items • Ask...• PIONEER shall not be liable for the installation: Rear view (PRO-1540HD) Side view Mounting surface Mounting hole Mounting hole Median line Plasma Display Mounting bracket (or equivalent item) M8 screw 12 mm to 18 mm (0.5 inches to 0.7 inches) Median line Rear view (PRO-1140HD) Mounting...

Owner's Manual
Page 20
Using the optional PIONEER stand (for PRO-1540HD and PRO-1140HD) • For details on installation, refer to the instruction manual supplied with the stand. Using the optional PIONEER speakers (for PRO-1540HD and PRO-1140HD) • For details on installation, refer to the instruction manual supplied with the speaker. 05 Preparation Preparation Installing the Plasma Display (PRO-1140HD) Over 50 cm (19 11/16...
Using the optional PIONEER stand (for PRO-1540HD and PRO-1140HD) • For details on installation, refer to the instruction manual supplied with the stand. Using the optional PIONEER speakers (for PRO-1540HD and PRO-1140HD) • For details on installation, refer to the instruction manual supplied with the speaker. 05 Preparation Preparation Installing the Plasma Display (PRO-1140HD) Over 50 cm (19 11/16...
Owner's Manual
Page 36
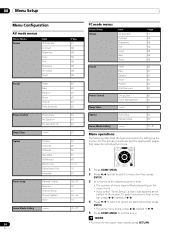
...exit the menu. 08 Menu Setup Menu Setup Menu Configuration AV mode menus Home Menu Picture Item AV Selection Contrast Brightness Color Tint Sharpness Pro Adjust Reset Sound Treble Bass Balance Reset FOCUS Front Surround Power Control Energy Save No Signal off No Operation off Sleep Timer Option Position Auto... 62 Reset 62 FOCUS 63 Front Surround 63 Power Control Energy Save 63 Power Management 64 Sleep Timer 57 Option Auto Setup 64 Manual Setup 65 Home Media Gallery 75 - 91 Menu operations The following describes the typical procedure for setting up the menus.
...exit the menu. 08 Menu Setup Menu Setup Menu Configuration AV mode menus Home Menu Picture Item AV Selection Contrast Brightness Color Tint Sharpness Pro Adjust Reset Sound Treble Bass Balance Reset FOCUS Front Surround Power Control Energy Save No Signal off No Operation off Sleep Timer Option Position Auto... 62 Reset 62 FOCUS 63 Front Surround 63 Power Control Energy Save 63 Power Management 64 Sleep Timer 57 Option Auto Setup 64 Manual Setup 65 Home Media Gallery 75 - 91 Menu operations The following describes the typical procedure for setting up the menus.

Owner's Manual
Page 59
... Press / to apply a fine adjustment. Selections Off Deactivates the PureCinema. Using Color Temp 1 Press HOME MENU. 2 Select "Picture". ( / then ENTER) 3 Select "Pro Adjust". ( / then ENTER) 4 Select "Color Detail". ( / then ENTER) 5 Select "Color Temp". ( / then ENTER) 6 Select the desired parameter. ( /...then recreates each still film frame for optimizing the picture quality. The manual adjustment screen appears. Adjustments and Settings 11 English Advanced picture adjustments The Plasma Display System provides various advanced functions for highdefinition picture quality. NOTE &#...
... Press / to apply a fine adjustment. Selections Off Deactivates the PureCinema. Using Color Temp 1 Press HOME MENU. 2 Select "Picture". ( / then ENTER) 3 Select "Pro Adjust". ( / then ENTER) 4 Select "Color Detail". ( / then ENTER) 5 Select "Color Temp". ( / then ENTER) 6 Select the desired parameter. ( /...then recreates each still film frame for optimizing the picture quality. The manual adjustment screen appears. Adjustments and Settings 11 English Advanced picture adjustments The Plasma Display System provides various advanced functions for highdefinition picture quality. NOTE &#...
Owner's Manual
Page 65
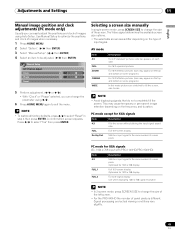
...frequency and duration. Signal processing and actual viewing conditions vary slightly. 65 En Press / to change the size of the screen. Selecting a screen size manually In single-screen mode, press SCREEN SIZE to select "Yes" then press ENTER. AV mode Item 4:3 FULL ZOOM CINEMA WIDE Description For 4:3 "standard... by Dot Matches input signal to the same number of screen pixels PC mode for XGA signals (Ex. 1024 × 768 input with PRO-1140HD/PRO-1540HD) Item 4:3 Description Matches input signal to the same number of screen pixels Optimized for 1024 × 768 display FULL1 Full 16:9 ...
...frequency and duration. Signal processing and actual viewing conditions vary slightly. 65 En Press / to change the size of the screen. Selecting a screen size manually In single-screen mode, press SCREEN SIZE to select "Yes" then press ENTER. AV mode Item 4:3 FULL ZOOM CINEMA WIDE Description For 4:3 "standard... by Dot Matches input signal to the same number of screen pixels PC mode for XGA signals (Ex. 1024 × 768 input with PRO-1140HD/PRO-1540HD) Item 4:3 Description Matches input signal to the same number of screen pixels Optimized for 1024 × 768 display FULL1 Full 16:9 ...


