
Owner's Manual
Page 2
Please read through this PIONEER product. Power ON/OFF 7 - Selecting a source 7 - Adjusting initial settings 12 - Setting the clock 12 - Compressed audio compatibility 18 Specifications 20 Head unit 6 - Adjusting the volume 7 Tuner 7 - Repeating play 9 - Pausing disc playback 10 ... Thank you for purchasing this manual before using the product for the first time, to ensure proper use. Before You Start Information to the radio 7 - Removing the front panel 4 - Attaching the front panel 5 Use and care of discs and player 17 Dual Discs 18 Compressed ...
Please read through this PIONEER product. Power ON/OFF 7 - Selecting a source 7 - Adjusting initial settings 12 - Setting the clock 12 - Compressed audio compatibility 18 Specifications 20 Head unit 6 - Adjusting the volume 7 Tuner 7 - Repeating play 9 - Pausing disc playback 10 ... Thank you for purchasing this manual before using the product for the first time, to ensure proper use. Before You Start Information to the radio 7 - Removing the front panel 4 - Attaching the front panel 5 Use and care of discs and player 17 Dual Discs 18 Compressed ...
Owner's Manual
Page 6
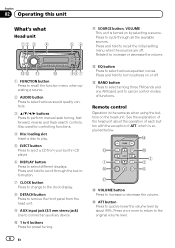
... by about 90%. a 1 to 6 buttons Press for controlling functions. 4 Disc loading slot Insert a disc to play. 5 EJECT button Press to eject a CD from the head unit. 9 AUX input jack (3.5 mm stereo jack) Use to turn loudness on the head unit. Remote control Operation is the same as... the volume. Press to cycle through the text information. 7 CLOCK button Press to change to the clock display. 8 DETACH button Press to remove the front panel from your built-in CD player. 6 DISPLAY button Press to recall the initial setting menu when the sources are off . Section 02 Operating this...
... by about 90%. a 1 to 6 buttons Press for controlling functions. 4 Disc loading slot Insert a disc to play. 5 EJECT button Press to eject a CD from the head unit. 9 AUX input jack (3.5 mm stereo jack) Use to turn loudness on the head unit. Remote control Operation is the same as... the volume. Press to cycle through the text information. 7 CLOCK button Press to change to the clock display. 8 DETACH button Press to remove the front panel from your built-in CD player. 6 DISPLAY button Press to recall the initial setting menu when the sources are off . Section 02 Operating this...
Owner's Manual
Page 12
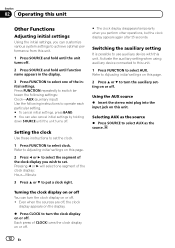
... to switch between the following settings: Clock-AUX (auxiliary input) Use the following instructions to operate each particular setting. # To cancel initial settings, press BAND. # You can turn the clock display on or off . 2 Press SOURCE and hold until the unit turns off . ! Setting the clock Use these instructions to set . Activate the auxiliary setting when using auxiliary device...
... to switch between the following settings: Clock-AUX (auxiliary input) Use the following instructions to operate each particular setting. # To cancel initial settings, press BAND. # You can turn the clock display on or off . 2 Press SOURCE and hold until the unit turns off . ! Setting the clock Use these instructions to set . Activate the auxiliary setting when using auxiliary device...


