User Manual
Page 2
.... - Connect the equipment into the lens as the European CE marking. FCC WARNING: To assure continued compliance, use only the provided grounded power supply cord and shielded interface cables when connecting this device. CAUTION RISK OF ELECTRIC SHOCK. Windows is designed and manufactured to a computer. 1. THINGS YOU SHOULD KNOW Note: This equipment has been tested to comply with the user's guide, may...
.... - Connect the equipment into the lens as the European CE marking. FCC WARNING: To assure continued compliance, use only the provided grounded power supply cord and shielded interface cables when connecting this device. CAUTION RISK OF ELECTRIC SHOCK. Windows is designed and manufactured to a computer. 1. THINGS YOU SHOULD KNOW Note: This equipment has been tested to comply with the user's guide, may...

User Manual
Page 3
... hazards. 20. Use a soft dry cloth to the unit. The projector may fall, which could result in section " Maintenance". Slots and openings of the cabinet are not sure of the type of the projector or in safe operating condition. 19. The projector should be walked on the bottom of power supplied to clean the air filter after every 100 lamp hours. As a safety...
... hazards. 20. Use a soft dry cloth to the unit. The projector may fall, which could result in section " Maintenance". Slots and openings of the cabinet are not sure of the type of the projector or in safe operating condition. 19. The projector should be walked on the bottom of power supplied to clean the air filter after every 100 lamp hours. As a safety...
User Manual
Page 4
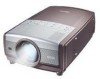
... high image quality, Philips recommends that this projector be maintained. Install the projector properly. Do not put the projector on either side to either side. The sound of the projector cabinet for allowing air circulation and cooling the projector. Do not cover the ventilation slot on the top, sides and rear of the fan may become necessary. Internal cleaning should only be cleaned (or the filter replaced...
... high image quality, Philips recommends that this projector be maintained. Install the projector properly. Do not put the projector on either side to either side. The sound of the projector cabinet for allowing air circulation and cooling the projector. Do not cover the ventilation slot on the top, sides and rear of the fan may become necessary. Internal cleaning should only be cleaned (or the filter replaced...
User Manual
Page 5
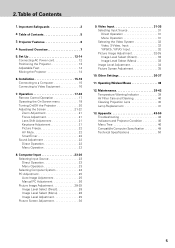
Operation 17-22 Remote Control Operation 17 Operating the On-Screen menu 18 Turning On/Off the Projector 20 Adjusting the Screen 21-22 Zoom Adjustment 21 Focus Adjustment 21 Lens Shift Adjustment 21 Keystone Adjustment 21 Picture Freeze 22 AV Mute 22 SmartTimer 22 Sound Adjustment 22 Direct Operation 22 Menu Operation 22 8. Projector Features 6 4. Other Settings 36-37 11. 2. Important Safeguards 2 2. Operating Wireless Mouse 38 12. Appendix 43-50 Troubleshooting 43 Indicators and Projector Condition 45 Menu Tree 46 Compatible Computer Specification...
Operation 17-22 Remote Control Operation 17 Operating the On-Screen menu 18 Turning On/Off the Projector 20 Adjusting the Screen 21-22 Zoom Adjustment 21 Focus Adjustment 21 Lens Shift Adjustment 21 Keystone Adjustment 21 Picture Freeze 22 AV Mute 22 SmartTimer 22 Sound Adjustment 22 Direct Operation 22 Menu Operation 22 8. Projector Features 6 4. Other Settings 36-37 11. 2. Important Safeguards 2 2. Operating Wireless Mouse 38 12. Appendix 43-50 Troubleshooting 43 Indicators and Projector Condition 45 Menu Tree 46 Compatible Computer Specification...
User Manual
Page 6
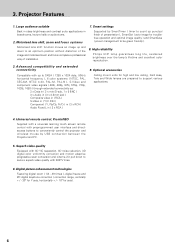
.... 2. Motorised lens shift function moves an image up to be green friendly ). 3. Advanced compatibility and extended connectivity Compatible with up and down to secure superb video quality with preprogrammed user interface and directaccess buttons to support various applications. 4. High reliability Philips UHP lamp guarantees long life, sustained brightness over the lamp's lifetime and excellent color reproduction. 3. Digital picture enhancement technologies Featuring digital zoom ( 1/4 - 49 times ), digital freeze and 2D digital keystone correction...
.... 2. Motorised lens shift function moves an image up to be green friendly ). 3. Advanced compatibility and extended connectivity Compatible with up and down to secure superb video quality with preprogrammed user interface and directaccess buttons to support various applications. 4. High reliability Philips UHP lamp guarantees long life, sustained brightness over the lamp's lifetime and excellent color reproduction. 3. Digital picture enhancement technologies Featuring digital zoom ( 1/4 - 49 times ), digital freeze and 2D digital keystone correction...
User Manual
Page 8
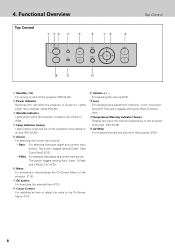
...) w Power Indicator Becomes dim red when the projector is ready to be turned on . Data For selecting computer signal as a current input source. The button toggles among Auto, Video, S-Video and Y,Pb/Cb, Pr/Cr.(P31) y Menu For activating or de-activating the On-Screen Menu of the projector.(P22) 8 For adjusting the volume.(P22) !0 Lens For activating lens adjustment functions : zoom, focus and lens shift.The button toggles among Data1, Data 2 and Data3.(P23) - 4. Lights bright red...
...) w Power Indicator Becomes dim red when the projector is ready to be turned on . Data For selecting computer signal as a current input source. The button toggles among Auto, Video, S-Video and Y,Pb/Cb, Pr/Cr.(P31) y Menu For activating or de-activating the On-Screen Menu of the projector.(P22) 8 For adjusting the volume.(P22) !0 Lens For activating lens adjustment functions : zoom, focus and lens shift.The button toggles among Data1, Data 2 and Data3.(P23) - 4. Lights bright red...

User Manual
Page 14
... service, consult a Philips Authorised LCD Projector Dealer. Projection angle can be adjusted up to approximately 10 degrees. 1 Lift the front of the projector and pull the Feet Lock Latches on both sides of the projector. 2 Release the Feet Lock Latches to lock the Adjustable Feet and rotate the feet to P21 and 36.) Moving the Projector Use the Carry Handle when moving the projector, attach the Lens...
... service, consult a Philips Authorised LCD Projector Dealer. Projection angle can be adjusted up to approximately 10 degrees. 1 Lift the front of the projector and pull the Feet Lock Latches on both sides of the projector. 2 Release the Feet Lock Latches to lock the Adjustable Feet and rotate the feet to P21 and 36.) Moving the Projector Use the Carry Handle when moving the projector, attach the Lens...
User Manual
Page 15
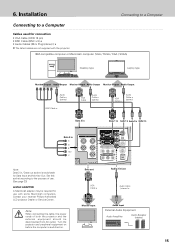
... Input Audio Input External Audio Equipment Audio Amplifier Audio Speaker (stereo) 15 6. Contact your nearest Philips Authorised LCD projector Dealer or Service Centre. Data out Audio 3 in / Data out socket is switched on. Turn the projector and peripheral equipment on before the computer is switchable for Data Input and Monitor Out. Set this socket according to a Computer Cables used for use . (See page 23) ◆ MAC ADAPTER A Macintosh adapter may be disconnected from AC outlet. Installation Connecting...
... Input Audio Input External Audio Equipment Audio Amplifier Audio Speaker (stereo) 15 6. Contact your nearest Philips Authorised LCD projector Dealer or Service Centre. Data out Audio 3 in / Data out socket is switched on. Turn the projector and peripheral equipment on before the computer is switchable for Data Input and Monitor Out. Set this socket according to a Computer Cables used for use . (See page 23) ◆ MAC ADAPTER A Macintosh adapter may be disconnected from AC outlet. Installation Connecting...
User Manual
Page 17
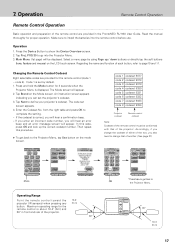
... look up / down buttons or directly tap the soft buttons (lens, feature and mouse) on the LCD touch screen. Read the manual thoroughly for 3 seconds when the Projector Menu is correct, you can set screen appears. 4. PXG 30 to the Projector Menu, tap Use button on the Mode screen. Changing the Remote Control Codeset Eight selectable codes are provided in front and rear of the projector. The code set the projector's codeset. 3. Enter the...
... look up / down buttons or directly tap the soft buttons (lens, feature and mouse) on the LCD touch screen. Read the manual thoroughly for 3 seconds when the Projector Menu is correct, you can set screen appears. 4. PXG 30 to the Projector Menu, tap Use button on the Mode screen. Changing the Remote Control Codeset Eight selectable codes are provided in front and rear of the projector. The code set the projector's codeset. 3. Enter the...
User Manual
Page 19
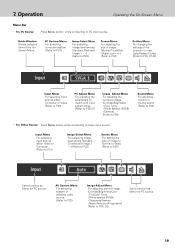
.../Digital zoom +/-] (Refer to P30) Setting Menu For changing the settings of selected video source. (Refer to P32) Image Adjust Menu For adjusting picture image. [Contrast/Brightness/Color /Tint/Color Temp. /White balance (R/G/B) /Sharpness/Gamma /Noise Reduction/Progressive] (Refer to P33) Screen Menu For setting the size of the OnScreen Menu. Guide Window Shows selected item of image to Normal or Wide. (Refer to P22) - For PC Source Press Menu button while connecting to Video input source. For Video Source Press Menu button while connecting to PC input source. Input...
.../Digital zoom +/-] (Refer to P30) Setting Menu For changing the settings of selected video source. (Refer to P32) Image Adjust Menu For adjusting picture image. [Contrast/Brightness/Color /Tint/Color Temp. /White balance (R/G/B) /Sharpness/Gamma /Noise Reduction/Progressive] (Refer to P33) Screen Menu For setting the size of the OnScreen Menu. Guide Window Shows selected item of image to Normal or Wide. (Refer to P22) - For PC Source Press Menu button while connecting to Video input source. For Video Source Press Menu button while connecting to PC input source. Input...

User Manual
Page 20
... the remote control. Input position and Lamp mode status Message disappears after 30 seconds. Note : When "On start to page 37.) 3 Press Standby/On button on the top control or on button on . 3 When the projector has been cooled down starts. The signal from a PC or video source comes up after 4 seconds. The message "Power off . To maintain the lamp-life, once you can be turned on the remote control. If the Temperature Warning Indicator continues to flash...
... the remote control. Input position and Lamp mode status Message disappears after 30 seconds. Note : When "On start to page 37.) 3 Press Standby/On button on the top control or on button on . 3 When the projector has been cooled down starts. The signal from a PC or video source comes up after 4 seconds. The message "Power off . To maintain the lamp-life, once you can be turned on the remote control. If the Temperature Warning Indicator continues to flash...
User Manual
Page 30
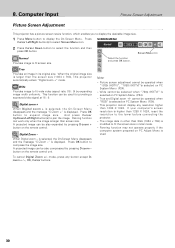
... lower before connecting the projector. - button on PC System Menu (P24). - 8. Digital zoom + When Digital zoom + is selected, the On-Screen Menu disappears and the message "D-Zoom +" is used for providing a squeezed video signal at 16 : 9. A projected image can be also expanded by pressing D-zoom + button on PC Adjust Menu is displayed. To cancel Digital Zoom +/- Panning function may not operate properly if the computer system prepared on the remote control. SCREEN MENU 2 Press Cursor Down button to fit screen size. And...
... lower before connecting the projector. - button on PC System Menu (P24). - 8. Digital zoom + When Digital zoom + is selected, the On-Screen Menu disappears and the message "D-Zoom +" is used for providing a squeezed video signal at 16 : 9. A projected image can be also expanded by pressing D-zoom + button on PC Adjust Menu is displayed. To cancel Digital Zoom +/- Panning function may not operate properly if the computer system prepared on the remote control. SCREEN MENU 2 Press Cursor Down button to fit screen size. And...
User Manual
Page 37
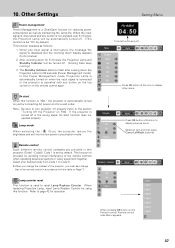
... interference of the remote controls when operating several projectors or video equipment together. 10. When the input signal is interrupted and any input signal is interrupted, the message"No signal"is automatically turned on the Remote control, Remote control code Menu appears. 37 Note ; If the projector is set into the low power consumption mode. This function is provided for 5 minutes). 2. When replacing Projection Lamp, reset Lamp Replace Counter by default.) This function operates as maintaining the Lamp-life. Press OK button at this...
... interference of the remote controls when operating several projectors or video equipment together. 10. When the input signal is interrupted and any input signal is interrupted, the message"No signal"is automatically turned on the Remote control, Remote control code Menu appears. 37 Note ; If the projector is set into the low power consumption mode. This function is provided for 5 minutes). 2. When replacing Projection Lamp, reset Lamp Replace Counter by default.) This function operates as maintaining the Lamp-life. Press OK button at this...
User Manual
Page 39
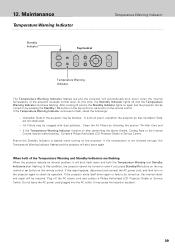
... and Standby Indicators start flashing. 12. Maintenance Temperature Warning Indicator Standby Indicator Top Control Temperature Warning Indicator Temperature Warning Indicator The Temperature Warning Indicator flashes red and the projector will shut itself down again or fails to flash, check the followings: - At this time, the Standby Indicator lights off period, the Standby Indicator lights on by following the section "Air-filter Care and - Contact a Philips Authorised LCD Projector Dealer or Service Centre. Plug off the AC power cord and contact a Philips Authorised LCD Projector...
... and Standby Indicators start flashing. 12. Maintenance Temperature Warning Indicator Standby Indicator Top Control Temperature Warning Indicator Temperature Warning Indicator The Temperature Warning Indicator flashes red and the projector will shut itself down again or fails to flash, check the followings: - At this time, the Standby Indicator lights off period, the Standby Indicator lights on by following the section "Air-filter Care and - Contact a Philips Authorised LCD Projector Dealer or Service Centre. Plug off the AC power cord and contact a Philips Authorised LCD Projector...
User Manual
Page 41
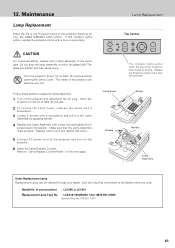
.... Model No. Cool the projector down, for at least 45 minutes before opening the Lamp Cover. Make sure that the Lamp Assembly is set properly. Lamp Cover Screws This indicator lights yellow when the life of this indicator lights yellow, replace the projection lamp with a new one promptly. Maintenance Lamp Replacement When the life of the Projection Lamp of the projection lamp draws to the dealer when you order. - Replace Lamp Cover and tighten the screw. 5 Connect AC power cord to "Lamp Replace Counter Reset" on the projector. 6 Reset the Lamp Replace Counter. Replace...
.... Model No. Cool the projector down, for at least 45 minutes before opening the Lamp Cover. Make sure that the Lamp Assembly is set properly. Lamp Cover Screws This indicator lights yellow when the life of this indicator lights yellow, replace the projection lamp with a new one promptly. Maintenance Lamp Replacement When the life of the Projection Lamp of the projection lamp draws to the dealer when you order. - Replace Lamp Cover and tighten the screw. 5 Connect AC power cord to "Lamp Replace Counter Reset" on the projector. 6 Reset the Lamp Replace Counter. Replace...
User Manual
Page 42
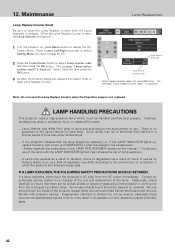
... an authorized service station for each lamp. Press Cursor Left/Right button(s) to select Setting Menu icon (refer to page 36, 37). 2 Press the Cursor Down button to reset Lamp Replace Counter. Lamp Replacement Total time of the projector except those who are not appropriately trained to display the On- No one should check the inside of lamp use Select Lamp counter reset and press OK button. When the Lamp Replace Counter is not replaced. is...
... an authorized service station for each lamp. Press Cursor Left/Right button(s) to select Setting Menu icon (refer to page 36, 37). 2 Press the Cursor Down button to reset Lamp Replace Counter. Lamp Replacement Total time of the projector except those who are not appropriately trained to display the On- No one should check the inside of lamp use Select Lamp counter reset and press OK button. When the Lamp Replace Counter is not replaced. is...
User Manual
Page 43
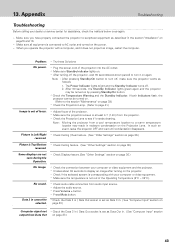
... power. - Make sure Standby Indicator lights on page15 and 16. - Picture is not out of focus. - Check Ceiling feature. (See "Other Settings" section on page 39.) - Press Mute button. - If both indicators flash, the projector cannot be turned on. (Refer to a warm temperature location may be selected. - Adjust focus of the projector into the AC outlet. - Note : Moving the projector from Data Out on the Projection Lens. Some displays are not seen during the Operation. - Data...
... power. - Make sure Standby Indicator lights on page15 and 16. - Picture is not out of focus. - Check Ceiling feature. (See "Other Settings" section on page 39.) - Press Mute button. - If both indicators flash, the projector cannot be turned on. (Refer to a warm temperature location may be selected. - Adjust focus of the projector into the AC outlet. - Note : Moving the projector from Data Out on the Projection Lens. Some displays are not seen during the Operation. - Data...
User Manual
Page 44
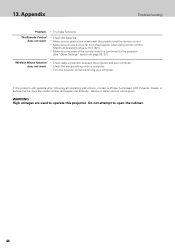
.... - Turn the projector on before turning on your computer. - Do not attempt to obtain service will be given. Check the mouse setting on a computer. Give the model number and explain the difficulty. WARNING : High voltages are not too far from the projector when using remote control. Appendix Troubleshooting Problem: The Remote Control does not work . - Try these Solutions - If the problem still persists after following all operating instructions, contact a Philips Authorised LCD Projector Dealer or Service...
.... - Turn the projector on before turning on your computer. - Do not attempt to obtain service will be given. Check the mouse setting on a computer. Give the model number and explain the difficulty. WARNING : High voltages are not too far from the projector when using remote control. Appendix Troubleshooting Problem: The Remote Control does not work . - Try these Solutions - If the problem still persists after following all operating instructions, contact a Philips Authorised LCD Projector Dealer or Service...
User Manual
Page 45
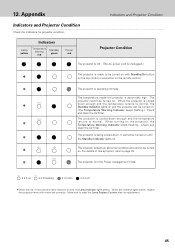
... Temperature Warning Indicator keeps flashing.) Check and clean the Air Filter. The projector is operating normally. When turning on . The projector is being cooled down enough and the temperature ✽ returns to normal, the Standby Indicator lights on and the projector can be turned on with Standby/On button on the top control or on button on • • • flashing • • • dim • • • off ✽ When the life of this indicator lights yellow, replace...
... Temperature Warning Indicator keeps flashing.) Check and clean the Air Filter. The projector is operating normally. When turning on . The projector is being cooled down enough and the temperature ✽ returns to normal, the Standby Indicator lights on and the projector can be turned on with Standby/On button on the top control or on button on • • • flashing • • • dim • • • off ✽ When the life of this indicator lights yellow, replace...
User Manual
Page 50
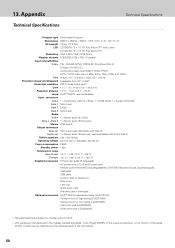
... ˚F) Supplied accessories Printed user guide (8 languages) AC power cord x 2 (US and Europe type) Remote control ProntoNEO (including batteries, CD-ROM, Instruction for use, Quick start guide) VGA cable USB cable Control cable for serial port Dust cover Lens cap Quick setup card Warranty card + envelopes Optional accessories UHP™ 250 W replacement lamp (LCA3121/00) Ceiling mount for high ceiling (LCA2215/00) Ceiling mount for low ceiling (LCA2216/00) Tele zoom lens (LCA3003/00) Wide zoom lens (LCA3004/00) - Appendix Technical Specifications Technical Specifications Projector type...
... ˚F) Supplied accessories Printed user guide (8 languages) AC power cord x 2 (US and Europe type) Remote control ProntoNEO (including batteries, CD-ROM, Instruction for use, Quick start guide) VGA cable USB cable Control cable for serial port Dust cover Lens cap Quick setup card Warranty card + envelopes Optional accessories UHP™ 250 W replacement lamp (LCA3121/00) Ceiling mount for high ceiling (LCA2215/00) Ceiling mount for low ceiling (LCA2216/00) Tele zoom lens (LCA3003/00) Wide zoom lens (LCA3004/00) - Appendix Technical Specifications Technical Specifications Projector type...


