User Manual
Page 2
... Adjusting the focus and size of the image 11 Adjusting the vertical angle of the projector 11 Keystone correction 11 Moving/transporting the projector 11 Preparation 11 Moving/transporting the projector 11 Inserting the batteries in the remote control 11 4. Introduction 4-5 Packaging contents 4 Optional accessories 5 Service accessories 5 2. Installation 12-17 General... to video equipment 15-17 CVBS 15 S-VHS 15 Scart connection 15 Component/HDTV (Pr,Y, Pb/ Cr,Y, Cb) 16 Scart connection (RGBS) 17 Philips Multimedia Projector 2 English User guide bSure1 / bSure 2 Index > 1.
... Adjusting the focus and size of the image 11 Adjusting the vertical angle of the projector 11 Keystone correction 11 Moving/transporting the projector 11 Preparation 11 Moving/transporting the projector 11 Inserting the batteries in the remote control 11 4. Introduction 4-5 Packaging contents 4 Optional accessories 5 Service accessories 5 2. Installation 12-17 General... to video equipment 15-17 CVBS 15 S-VHS 15 Scart connection 15 Component/HDTV (Pr,Y, Pb/ Cr,Y, Cb) 16 Scart connection (RGBS) 17 Philips Multimedia Projector 2 English User guide bSure1 / bSure 2 Index > 1.
User Manual
Page 3
... Display adjustments 24 Picture adjustments 24 General adjustments 25 Audio adjustments 25 General settings 25-27 Loading your own personal start-up screen Resetting the projector 27 26-27 6. Maintenance 28-30 Cleaning 28 Cleaning the cabinet 28 Cleaning the lens 28 Cleaning the dust filter 28 Lamp 29 Lamp replacement...
... Display adjustments 24 Picture adjustments 24 General adjustments 25 Audio adjustments 25 General settings 25-27 Loading your own personal start-up screen Resetting the projector 27 26-27 6. Maintenance 28-30 Cleaning 28 Cleaning the cabinet 28 Cleaning the lens 28 Cleaning the dust filter 28 Lamp 29 Lamp replacement...
User Manual
Page 4
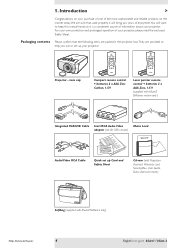
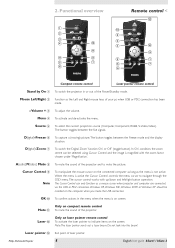
... remote control + batteries 2 x AAA Zinc Carbon, 1.5 V Laser pointer remote control + batteries 2 x AAA Zinc, 1.5 V (supplied with bSure2 Brilliance only) Philips Multimedia Projector 4 English User guide bSure1 / bSure 2 For your own protection and prolonged operation of your projector. Standby On LLEeFftT Mouse RRIiGgHhtT Volume Menu OK Mute AV Mute Source D-Freeze D-Zoom 6 LASER LLEeFftT Mouse RIGigHhTt...
... remote control + batteries 2 x AAA Zinc Carbon, 1.5 V Laser pointer remote control + batteries 2 x AAA Zinc, 1.5 V (supplied with bSure2 Brilliance only) Philips Multimedia Projector 4 English User guide bSure1 / bSure 2 For your own protection and prolonged operation of your projector. Standby On LLEeFftT Mouse RRIiGgHhtT Volume Menu OK Mute AV Mute Source D-Freeze D-Zoom 6 LASER LLEeFftT Mouse RIGigHhTt...
User Manual
Page 6
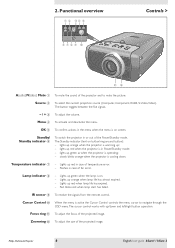
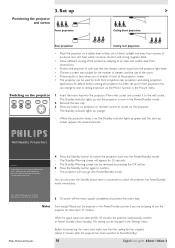
... menu when the menu is cooling down and left/right button operation. Temperature indicator 7 - Lights up orange when lamp life has almost expired. - Philips Multimedia Projector 6 English User guide bSure1 / bSure 2 The Standby indicator (text on . - Cursor Control 0 When the menu is in or out of the projected image. Standby/ Standby indicator 6 To...
... menu when the menu is cooling down and left/right button operation. Temperature indicator 7 - Lights up orange when lamp life has almost expired. - Philips Multimedia Projector 6 English User guide bSure1 / bSure 2 The Standby indicator (text on . - Cursor Control 0 When the menu is in or out of the projected image. Standby/ Standby indicator 6 To...
User Manual
Page 7
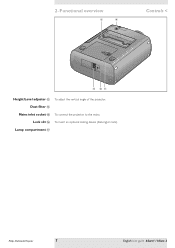
Lamp compartment & Philips Multimedia Projector 7 English User guide bSure1 / bSure 2 2. Dust filter $ Mains inlet socket % To connect the projector to the mains. Lock slit ^ To insert an optional locking device (Kensington lock). Functional overview # $ Controls < % ^& Height/Level adjuster # To adjust the vertical angle of the projector.
Lamp compartment & Philips Multimedia Projector 7 English User guide bSure1 / bSure 2 2. Dust filter $ Mains inlet socket % To connect the projector to the mains. Lock slit ^ To insert an optional locking device (Kensington lock). Functional overview # $ Controls < % ^& Height/Level adjuster # To adjust the vertical angle of the projector.
User Manual
Page 8
...on the connected computer as long as a mouse cursor when projector and computer are connected via the USB or PS/2 connectors. Philips Multimedia Projector 8 English User guide bSure1 / bSure 2 A(udio)/V(ideo) Mute 8 To mute the sound of the projector and to navigate through the OSD menu.The cursor control ...of laser pointer. The button toggles between the Freeze mode and the display situation. OK 0 To confirm actions in or out of the projector. Laser @ Only on laser pointer remote control To activate the laser pointer to indicate items on compact remote control Mute ! Menu 4 ...
...on the connected computer as long as a mouse cursor when projector and computer are connected via the USB or PS/2 connectors. Philips Multimedia Projector 8 English User guide bSure1 / bSure 2 A(udio)/V(ideo) Mute 8 To mute the sound of the projector and to navigate through the OSD menu.The cursor control ...of laser pointer. The button toggles between the Freeze mode and the display situation. OK 0 To confirm actions in or out of the projector. Laser @ Only on laser pointer remote control To activate the laser pointer to indicate items on compact remote control Mute ! Menu 4 ...
User Manual
Page 9
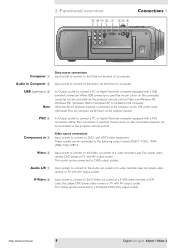
... Apple Macintosh computer equipped with a USB downlink connection. PS/2 4 In-/Output socket to connect a PC or Apple Macintosh computer equipped with a PS/2 connection. Philips Multimedia Projector 9 English User guide bSure1 / bSure 2 Functional overview 5 67 8 1 23 4 Connections < S-Video Computer Audio in Computer 2 Input socket to connect to the Data out terminal of a computer. This...
... Apple Macintosh computer equipped with a USB downlink connection. PS/2 4 In-/Output socket to connect a PC or Apple Macintosh computer equipped with a PS/2 connection. Philips Multimedia Projector 9 English User guide bSure1 / bSure 2 Functional overview 5 67 8 1 23 4 Connections < S-Video Computer Audio in Computer 2 Input socket to connect to the Data out terminal of a computer. This...
User Manual
Page 10
... wait 1 minute before switching on projector or remote control to the wall socket. - The Standby indicator lights up red, the projector is switched off the mains supply completely, disconnect the mains lead. PHILIPS Multimedia Projectors Warning If the projector is now in the Power/Standby ... vibration and strong magnetic fields. • Allow sufficient cooling of the product by key again to Power/Standby). Philips Multimedia Projector 10 English User guide bSure1 / bSure 2 The Standby Warning screen will now go into Power/Standby mode immediately. Press OK key to confirm. - When...
... wait 1 minute before switching on projector or remote control to the wall socket. - The Standby indicator lights up red, the projector is switched off the mains supply completely, disconnect the mains lead. PHILIPS Multimedia Projectors Warning If the projector is now in the Power/Standby ... vibration and strong magnetic fields. • Allow sufficient cooling of the product by key again to Power/Standby). Philips Multimedia Projector 10 English User guide bSure1 / bSure 2 The Standby Warning screen will now go into Power/Standby mode immediately. Press OK key to confirm. - When...
User Manual
Page 11
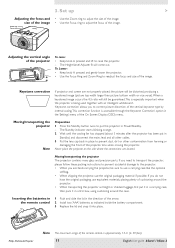
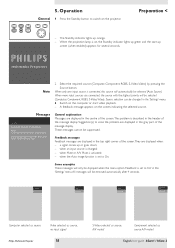
...prevent dust, dirt or other contamination from harming or damaging the front of the On Screen Display (OSD) menu. Philips Multimedia Projector Note The maximum range of the remote control is accessible through the 'Keystone Correction' option in Power/Standby. - Moving/transporting the... keystone type by internal scaling.This correction function is approximately 15 m (± 50 feet). 11 English User guide bSure1 / bSure 2 Keystone correction If projector and screen are located. Inserting the batteries in the remote control 1 Push and slide the lid in a firm box, using...
...prevent dust, dirt or other contamination from harming or damaging the front of the On Screen Display (OSD) menu. Philips Multimedia Projector Note The maximum range of the remote control is accessible through the 'Keystone Correction' option in Power/Standby. - Moving/transporting the... keystone type by internal scaling.This correction function is approximately 15 m (± 50 feet). 11 English User guide bSure1 / bSure 2 Keystone correction If projector and screen are located. Inserting the batteries in the remote control 1 Push and slide the lid in a firm box, using...
User Manual
Page 12
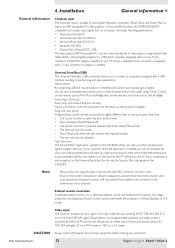
...configuration available, Apple Macintosh computer users could experience incomplete or erratic USB -functionality.These problems are not related to the projector.The image projected is simultaneously shown on the CD-ROM. Universal Serial Bus (USB) The Universal Serial Bus (USB)...presentation. Mouse control and 'drag and drop' is required. Video input The projector accepts the input signal of all computers that is needed. Philips Multimedia Projector 12 English User guide bSure1 / bSure 2 Installation General information < General information Computer input The computer input is ...
...configuration available, Apple Macintosh computer users could experience incomplete or erratic USB -functionality.These problems are not related to the projector.The image projected is simultaneously shown on the CD-ROM. Universal Serial Bus (USB) The Universal Serial Bus (USB)...presentation. Mouse control and 'drag and drop' is required. Video input The projector accepts the input signal of all computers that is needed. Philips Multimedia Projector 12 English User guide bSure1 / bSure 2 Installation General information < General information Computer input The computer input is ...
User Manual
Page 13
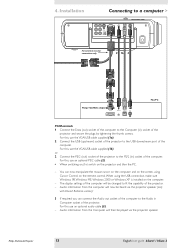
..., using the USB connection, make sure Windows 98, Windows ME, Windows 2000 or Windows XP is installed on the remote control. Philips Multimedia Projector 13 English User guide bSure1 / bSure 2 4. You can connect the Audio out socket of the computer to the Audio in Computer socket of the... projector. For this use the VGA/USB cable supplied (1a). 2 Connect the USB (upstream) socket of the projector to fit the capability of the computer. For ...
..., using the USB connection, make sure Windows 98, Windows ME, Windows 2000 or Windows XP is installed on the remote control. Philips Multimedia Projector 13 English User guide bSure1 / bSure 2 4. You can connect the Audio out socket of the computer to the Audio in Computer socket of the... projector. For this use the VGA/USB cable supplied (1a). 2 Connect the USB (upstream) socket of the projector to fit the capability of the computer. For ...
User Manual
Page 14
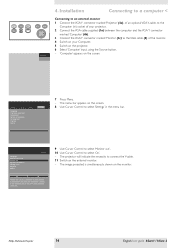
... indicate the necessity to the VGA cable (5) of an optional VGA Y-cable, to the Computer (in the menu bar. Philips Multimedia Projector 14 English User guide bSure1 / bSure 2 AV Mute Stand by Source Lamp Temp Menu OK Computer 4. Display Picture Language Kestone correction Monitor out System information... Installation Connecting to a computer < Connecting to...
... indicate the necessity to the VGA cable (5) of an optional VGA Y-cable, to the Computer (in the menu bar. Philips Multimedia Projector 14 English User guide bSure1 / bSure 2 AV Mute Stand by Source Lamp Temp Menu OK Computer 4. Display Picture Language Kestone correction Monitor out System information... Installation Connecting to a computer < Connecting to...
User Manual
Page 15
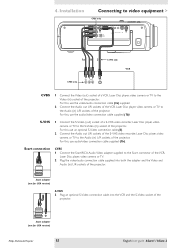
... out L/R sockets of the VCR, Laser Disc player, video camera or TV to the Audio (in ) L/R sockets of the projector. Scart adapter (not for USA version) Philips Multimedia Projector 15 English User guide bSure1 / bSure 2 4. For this , use audio/video connection cable supplied (1b). Scart connection CVBS 1 Connect the Scart/RCA Audio Video adapter...
... out L/R sockets of the VCR, Laser Disc player, video camera or TV to the Audio (in ) L/R sockets of the projector. Scart adapter (not for USA version) Philips Multimedia Projector 15 English User guide bSure1 / bSure 2 4. For this , use audio/video connection cable supplied (1b). Scart connection CVBS 1 Connect the Scart/RCA Audio Video adapter...
User Manual
Page 16
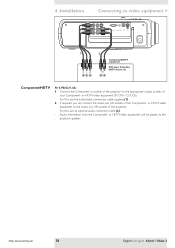
... R Computer Audio in Computer USB PS/2 1 Cr Y Cb Pr Y Pb R G B 2 Audio out R L Component/HDTV equipment DVD player, Settop Box, HDTV receiver, etc. Philips Multimedia Projector 16 English User guide bSure1 / bSure 2 Audio information from the Component- Component/HDTV Pr,Y, Pb/Cr,Y, Cb 1 Connect the Component in ) L/R sockets of your Component- Installation Connecting to...
... R Computer Audio in Computer USB PS/2 1 Cr Y Cb Pr Y Pb R G B 2 Audio out R L Component/HDTV equipment DVD player, Settop Box, HDTV receiver, etc. Philips Multimedia Projector 16 English User guide bSure1 / bSure 2 Audio information from the Component- Component/HDTV Pr,Y, Pb/Cr,Y, Cb 1 Connect the Component in ) L/R sockets of your Component- Installation Connecting to...

User Manual
Page 17
...Audio out L/R sockets of the adapter. or HDTV-video equipment will be played via the projector speaker. or HDTV-video equipment 2 Connect the Component in sockets of the projector to the Scart connector of the adapter. For this , use an optional audio connection ...Scart connection RGBS RGBS 1 Connect an optional Scart/RCA Component Video adapter (1) to the R, G and B outputs of your Component- Philips Multimedia Projector 17 English User guide bSure1 / bSure 2 or HDTV-video equipment to video equipment < S-Video Pr R YG Pb B Video Audio L Audio R Computer Audio in ) ...
...Audio out L/R sockets of the adapter. or HDTV-video equipment will be played via the projector speaker. or HDTV-video equipment 2 Connect the Component in sockets of the projector to the Scart connector of the adapter. For this , use an optional audio connection ...Scart connection RGBS RGBS 1 Connect an optional Scart/RCA Component Video adapter (1) to the R, G and B outputs of your Component- Philips Multimedia Projector 17 English User guide bSure1 / bSure 2 or HDTV-video equipment to video equipment < S-Video Pr R YG Pb B Video Audio L Audio R Computer Audio in ) ...
User Manual
Page 18
... A/V Muted Component video A/V Muted Computer selected as source Philips Multimedia Projector Video selected as source, no input signal 18 S-Video selected as source, A/V muted Component selected as source A/V muted English User guide bSure1 / bSure 2 Source selection can be displayed when the menu option ...Source). Some examples These messages will automatically be removed automatically after 4 seconds. All messages will switch off automatically. PHILIPS Multimedia Projectors Note 2 Select the required source (Computer, Component, RGBS, S-Video,Video) by Source Lamp Temp pj 5. ...
... A/V Muted Component video A/V Muted Computer selected as source Philips Multimedia Projector Video selected as source, no input signal 18 S-Video selected as source, A/V muted Component selected as source A/V muted English User guide bSure1 / bSure 2 Source selection can be displayed when the menu option ...Source). Some examples These messages will automatically be removed automatically after 4 seconds. All messages will switch off automatically. PHILIPS Multimedia Projectors Note 2 Select the required source (Computer, Component, RGBS, S-Video,Video) by Source Lamp Temp pj 5. ...
User Manual
Page 19
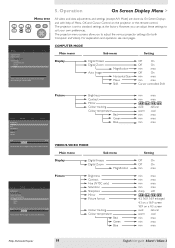
...format Colour tracking Colour temperature Red Green Blue Audio Settings min max Move pointer left or right to adjust the contrast level. The projector menu screens allow you can adjust these settings to adjust the position of Menu, OK and Cursor Control on a 4:3 screen ...vivid natural warm cool min max min max min max Philips Multimedia Projector 19 English User guide bSure1 / bSure 2 Picture Brightness Contrast Mirror Colour tracking Colour temperature Red Green Blue VIDEO/S-VIDEO MODE Main menu Sub menu Display...
...format Colour tracking Colour temperature Red Green Blue Audio Settings min max Move pointer left or right to adjust the contrast level. The projector menu screens allow you can adjust these settings to adjust the position of Menu, OK and Cursor Control on a 4:3 screen ...vivid natural warm cool min max min max min max Philips Multimedia Projector 19 English User guide bSure1 / bSure 2 Picture Brightness Contrast Mirror Colour tracking Colour temperature Red Green Blue VIDEO/S-VIDEO MODE Main menu Sub menu Display...
User Manual
Page 20
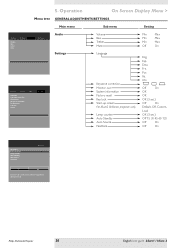
Deu. Philips Multimedia Projector 20 English User guide bSure1 / bSure 2 Esp. Ita. Off On OK OK OK (3 sec.) Off On Default, Off, Custom, Load OK (3 sec.) Off 15 30 45 60 120 Off On Off ... Auto Standby Auto Source Feedback Audio Settings Off On The Start-up screen can be shown or suppressed during start-up screen For bSure2 Brilliance projectors only Lamp counter Auto Standby Auto Source Feedback Min Max Min Max Min Max Off On Eng. Fra. Chi. Factory reset Key lock (more) Audio...
Deu. Philips Multimedia Projector 20 English User guide bSure1 / bSure 2 Esp. Ita. Off On OK OK OK (3 sec.) Off On Default, Off, Custom, Load OK (3 sec.) Off 15 30 45 60 120 Off On Off ... Auto Standby Auto Source Feedback Audio Settings Off On The Start-up screen can be shown or suppressed during start-up screen For bSure2 Brilliance projectors only Lamp counter Auto Standby Auto Source Feedback Min Max Min Max Min Max Off On Eng. Fra. Chi. Factory reset Key lock (more) Audio...
User Manual
Page 21
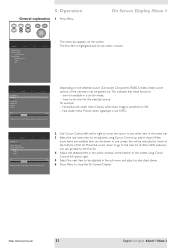
... adjusted using Cursor Control left and/or right. 5 Select the next item to close the On Screen 'Display'. Depending on the screen. Philips Multimedia Projector 21 English User guide bSure1 / bSure 2 When more ) Audio Settings min max Move pointer left and/or right to move the cursor to any other item in the...
... adjusted using Cursor Control left and/or right. 5 Select the next item to close the On Screen 'Display'. Depending on the screen. Philips Multimedia Projector 21 English User guide bSure1 / bSure 2 When more ) Audio Settings min max Move pointer left and/or right to move the cursor to any other item in the...
User Manual
Page 22
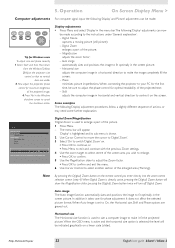
...is highlighted and its sub menu is used to On, the Horizontal size, Shift and Phase options are visible. 3 Now adjust the projectors phase control for Windows users To adjust size and phase correctly 1 Select 'Start' and then 'Shut down' from the Windows Taskbar. 2 Adjust... your PC for the first time, be made according to adjust the phase control for phase adjustment. Philips Multimedia Projector 22 English User guide bSure1 / bSure 2 Some examples The following 'Display' adjustments can be sure to the instructions under 'General explanation': - Shift adjusts the computer ...
...is highlighted and its sub menu is used to On, the Horizontal size, Shift and Phase options are visible. 3 Now adjust the projectors phase control for Windows users To adjust size and phase correctly 1 Select 'Start' and then 'Shut down' from the Windows Taskbar. 2 Adjust... your PC for the first time, be made according to adjust the phase control for phase adjustment. Philips Multimedia Projector 22 English User guide bSure1 / bSure 2 Some examples The following 'Display' adjustments can be sure to the instructions under 'General explanation': - Shift adjusts the computer ...
