User manual
Page 3
... 18 12 Glossary 50 Insert the remote control batteries 18 Find the correct viewing channel 19 Select menu display language 19 Turn on Progressive Scan 20 Change speaker settings 21 Use Philips EasyLink 22 Select a play source 24 5 Play 25 Play a disc 25 Play video 25 Play music 28 Play photo 29...
... 18 12 Glossary 50 Insert the remote control batteries 18 Find the correct viewing channel 19 Select menu display language 19 Turn on Progressive Scan 20 Change speaker settings 21 Use Philips EasyLink 22 Select a play source 24 5 Play 25 Play a disc 25 Play video 25 Play music 28 Play photo 29...
User manual
Page 5
... are disposing of overheating! Copyright notice This product incorporates copyright protection technology that is intended for a Class B digital device, pursuant to correct the interference by turning the equipment off and on, the user is prohibited. Use of this copyright protection technology must be authorised by Macrovision Corporation, and is protected by...
... are disposing of overheating! Copyright notice This product incorporates copyright protection technology that is intended for a Class B digital device, pursuant to correct the interference by turning the equipment off and on, the user is prohibited. Use of this copyright protection technology must be authorised by Macrovision Corporation, and is protected by...
User manual
Page 8
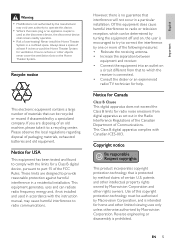
..., pauses or resumes disc play. b Disc compartment c (Open/Close) • Opens or closes the disc compar tment. Product overview Main unit a b cdefghijk a (Standby-On) • Turns on the Home Theater System or switches to play . • In radio mode, erases the current preset radio station.
..., pauses or resumes disc play. b Disc compartment c (Open/Close) • Opens or closes the disc compar tment. Product overview Main unit a b cdefghijk a (Standby-On) • Turns on the Home Theater System or switches to play . • In radio mode, erases the current preset radio station.

User manual
Page 9
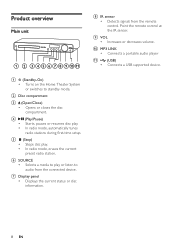
... and right for audio sync, then press VOL +/- English Your Home Theater System Remote control a b c d o e p f q g r h s t i j k u l v m w n a (Standby-On) • Turns on the Home Theater System or switches to standby mode. • Press and hold to tune the radio frequency. k Numeric buttons • Selects an item... to turn off the Home Theater System and all HDMI CEC compliant devices. In radio mode, press up and down to access the setting ...
... and right for audio sync, then press VOL +/- English Your Home Theater System Remote control a b c d o e p f q g r h s t i j k u l v m w n a (Standby-On) • Turns on the Home Theater System or switches to standby mode. • Press and hold to tune the radio frequency. k Numeric buttons • Selects an item... to turn off the Home Theater System and all HDMI CEC compliant devices. In radio mode, press up and down to access the setting ...
User manual
Page 10
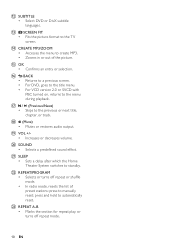
...entry or selection. p BACK • Returns to a previous screen. • For DVD, goes to the title menu. • For VCD version 2.0 or SVCD with PBC turned on, returns to the previous or next title, chapter, or track. t SOUND • Selects a predeÀned sound effect. r (Mute) • Mutes or restores audio... menu to create MP3. • Zooms in or out of preset stations: press to standby. w REPEAT A-B • Marks the section for repeat play, or turns off repeat or shufÁe mode. • In radio mode, resets the list of the picture. v REPEAT/PROGRAM • Selects or...
...entry or selection. p BACK • Returns to a previous screen. • For DVD, goes to the title menu. • For VCD version 2.0 or SVCD with PBC turned on, returns to the previous or next title, chapter, or track. t SOUND • Selects a predeÀned sound effect. r (Mute) • Mutes or restores audio... menu to create MP3. • Zooms in or out of preset stations: press to standby. w REPEAT A-B • Marks the section for repeat play, or turns off repeat or shufÁe mode. • In radio mode, resets the list of the picture. v REPEAT/PROGRAM • Selects or...
User manual
Page 12
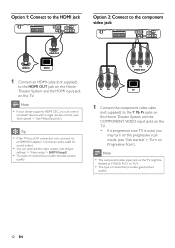
...the COMPONENT VIDEO input jacks on the TV. • If a progressive scan TV is used, you can optimize the video output. (see 'Get started ' > 'Use Philips EasyLink'). Tip • If the TV has a DVI connection only, connect via a HDMI/DVI adaptor. Option 1: Connect to the HDMI jack Option 2: Connect to the... > 'Video setup' > [HDMI Setup]). • This type of connection provides good picture quality. 12 EN Note • If your device supports HDMI CEC, you may turn on the TV might be labeled as Y Pb/Cb Pr/Cr or YUV. • This type of connection provides the best picture quality.
...the COMPONENT VIDEO input jacks on the TV. • If a progressive scan TV is used, you can optimize the video output. (see 'Get started ' > 'Use Philips EasyLink'). Tip • If the TV has a DVI connection only, connect via a HDMI/DVI adaptor. Option 1: Connect to the HDMI jack Option 2: Connect to the... > 'Video setup' > [HDMI Setup]). • This type of connection provides good picture quality. 12 EN Note • If your device supports HDMI CEC, you may turn on the TV might be labeled as Y Pb/Cb Pr/Cr or YUV. • This type of connection provides the best picture quality.
User manual
Page 19
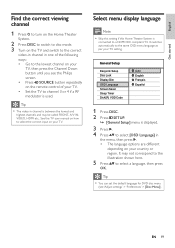
... press OK . It may be called FRONT, A/V IN, VIDEO, HDMI etc.. Tip • You can set the default language for DVD disc menu (see the Philips screen. • Press SOURCE button repeatedly on the remote control of your TV. • Set the TV to channel 3 or 4 if a RF modulator is between... is connected to a HDMI CEC compliant TV. EN 19 English Get started Find the correct viewing channel 1 Press to turn on the Home Theater System. 2 Press DISC to switch to disc mode. 3 Turn on the TV and switch to the correct video-in channel in one of the following ways: • Go...
... press OK . It may be called FRONT, A/V IN, VIDEO, HDMI etc.. Tip • You can set the default language for DVD disc menu (see the Philips screen. • Press SOURCE button repeatedly on the remote control of your TV. • Set the TV to channel 3 or 4 if a RF modulator is between... is connected to a HDMI CEC compliant TV. EN 19 English Get started Find the correct viewing channel 1 Press to turn on the Home Theater System. 2 Press DISC to switch to disc mode. 3 Turn on the TV and switch to the correct video-in channel in one of the following ways: • Go...

User manual
Page 20
... channel for this Home Theater System. 3 Press DISC. 4 Press SETUP. 5 Press to the component video jack'). Turn on Progressive Scan If the TV supports progressive scan output, you can now turn off the progressive scan feature on both this Home Theater System and the TV. 20 EN Note • During... play, when progressive scan mode is on for the auto recover. • If no picture displayed, turn on the progressive scan mode on the TV and ensure that the TV progressive scan mode is deactivated (see 'Connect video cables' > 'Option 2: Connect ...
... channel for this Home Theater System. 3 Press DISC. 4 Press SETUP. 5 Press to the component video jack'). Turn on Progressive Scan If the TV supports progressive scan output, you can now turn off the progressive scan feature on both this Home Theater System and the TV. 20 EN Note • During... play, when progressive scan mode is on for the auto recover. • If no picture displayed, turn on the progressive scan mode on the TV and ensure that the TV progressive scan mode is deactivated (see 'Connect video cables' > 'Option 2: Connect ...
User manual
Page 22
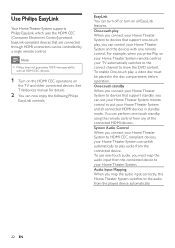
... audio input from the connected device to your Home Theater System can switch automatically to play , you can now enjoy the following Philips EasyLink controls. One-touch standby When you connect your Home Theater System to devices that support one-touch play audio from the connected...which uses the HDMI CEC (Consumer Electronics Control) protocol. Note • Philips does not guarantee 100% interoperability with one -touch audio, you connect your Home Theater System to show the DVD content. You can turn off or turn on the TV and other connected devices. See TVs/devices manual for ...
... audio input from the connected device to your Home Theater System can switch automatically to play , you can now enjoy the following Philips EasyLink controls. One-touch standby When you connect your Home Theater System to devices that support one-touch play audio from the connected...which uses the HDMI CEC (Consumer Electronics Control) protocol. Note • Philips does not guarantee 100% interoperability with one -touch audio, you connect your Home Theater System to show the DVD content. You can turn off or turn on the TV and other connected devices. See TVs/devices manual for ...
User manual
Page 23
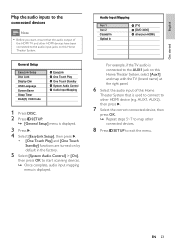
... DISC. 2 Press SETUP. » [General Setup] menu is displayed. 3 Press . 4 Select [EasyLink Setup], then press . • [One Touch Play] and [One Touch Standby] functions are turned on this Home Theater System that the audio output of this Home Theater System. EN 23 AUX1, AUX2), then press . 7 Select the correct connected device...
... DISC. 2 Press SETUP. » [General Setup] menu is displayed. 3 Press . 4 Select [EasyLink Setup], then press . • [One Touch Play] and [One Touch Standby] functions are turned on this Home Theater System that the audio output of this Home Theater System. EN 23 AUX1, AUX2), then press . 7 Select the correct connected device...
User manual
Page 25
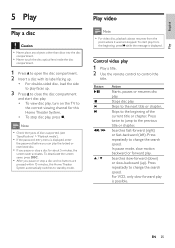
... its label facing up. • For double-sided disc, load the side to play faces up ). To start disc play. • To view disc play, turn on the TV to the correct viewing channel for about 5 minutes, the screen saver activates. Searches fast-forward (right) or fast-backward (left). Press repeatedly...
... its label facing up. • For double-sided disc, load the side to play faces up ). To start disc play. • To view disc play, turn on the TV to the correct viewing channel for about 5 minutes, the screen saver activates. Searches fast-forward (right) or fast-backward (left). Press repeatedly...
User manual
Page 26
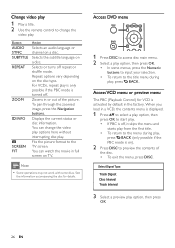
... the Numeric buttons to input your selection. • To return to the title menu during play, press BACK (only possible if the PBC mode is turned off. Fits the picture format to the menu during play, press BACK. Access DVD menu 1 Press DISC to access disc main menu. 2 Select a play option... AUDIO SYNC SUBTITLE REPEAT ZOOM INFO SCREEN FIT Action Selects an audio language or channel on a disc. Selects the subtitle language on a disc. Selects or turns off , it skips the menu and starts play option, then press OK 26 EN Repeat options vary depending on TV. Zooms in the factory.
... the Numeric buttons to input your selection. • To return to the title menu during play, press BACK (only possible if the PBC mode is turned off. Fits the picture format to the menu during play, press BACK. Access DVD menu 1 Press DISC to access disc main menu. 2 Select a play option... AUDIO SYNC SUBTITLE REPEAT ZOOM INFO SCREEN FIT Action Selects an audio language or channel on a disc. Selects the subtitle language on a disc. Selects or turns off , it skips the menu and starts play option, then press OK 26 EN Repeat options vary depending on TV. Zooms in the factory.
User manual
Page 28
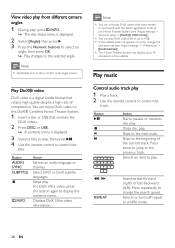
... the Numeric buttons to select an angle, then press OK. » Play changes to the selected angle. Select DVD or DivX subtitle languages. Selects or turns off repeat or shufÁe mode. 28 EN View video play from different camera angles 1 During play, press INFO. » The disc status menu is...
... the Numeric buttons to select an angle, then press OK. » Play changes to the selected angle. Select DVD or DivX subtitle languages. Selects or turns off repeat or shufÁe mode. 28 EN View video play from different camera angles 1 During play, press INFO. » The disc status menu is...
User manual
Page 32
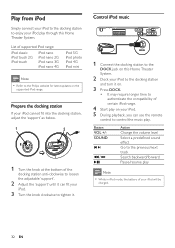
... control to control the music play. Prepare the docking station If your iPod cannot Àt into the docking station, adjust the 'support' as below. 1 2 1 Turn the knob at the bottom of the docking station anti-clockwise to loosen the adjustable 'support'. 2 Adjust the 'support' until it can Àt your iPod...iPod nano 3G iPod nano 4G iPod 5G iPod photo iPod 4G iPod mini Note • Refer to the Philips website for latest updates on your iPod to the docking station and turn it . Play from iPod Simply connect your iPod to the docking station to enjoy your iPod will be ...
... control to control the music play. Prepare the docking station If your iPod cannot Àt into the docking station, adjust the 'support' as below. 1 2 1 Turn the knob at the bottom of the docking station anti-clockwise to loosen the adjustable 'support'. 2 Adjust the 'support' until it can Àt your iPod...iPod nano 3G iPod nano 4G iPod 5G iPod photo iPod 4G iPod mini Note • Refer to the Philips website for latest updates on your iPod to the docking station and turn it . Play from iPod Simply connect your iPod to the docking station to enjoy your iPod will be ...
User manual
Page 38
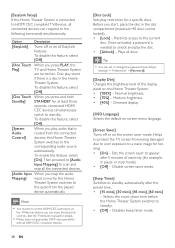
... this feature, select [Off]. [One Touch When you play audio that is needed to the following commands simultaneously: Option Description [EasyLink] Turns off or on the TV/devices before the Home Theater System switches to the current disc. Plays all connected devices can set or change the...Audio Input When you press and hold Standby] STANDBY for too long. • [On] - See the TV/devices manual for details. • Philips does not guarantee 100% interoperability with all HDMI CEC compliant devices. [Disc Lock] Sets play starts if there is connected to HDMI CEC compliant TV...
... this feature, select [Off]. [One Touch When you play audio that is needed to the following commands simultaneously: Option Description [EasyLink] Turns off or on the TV/devices before the Home Theater System switches to the current disc. Plays all connected devices can set or change the...Audio Input When you press and hold Standby] STANDBY for too long. • [On] - See the TV/devices manual for details. • Philips does not guarantee 100% interoperability with all HDMI CEC compliant devices. [Disc Lock] Sets play starts if there is connected to HDMI CEC compliant TV...

User manual
Page 42
...of the screen. Option [Auto] [480i], [576i], [480p], [576p], [720p], [1080i], [1080p] Description Detects and selects the best supported video resolution automatically. Turns on both sides of the screen is required. • [On] - [HDMI Setup] Selects the HDMI video setting when you can...by the TV. See the TV manual for disc play. Note • If the setting is more detailed description available (see 'Get started' > 'Turn on display captions. • [On] - Tip • There is not compatible with Closed Caption information included and the TV supports this Home Theater ...
...of the screen. Option [Auto] [480i], [576i], [480p], [576p], [720p], [1080i], [1080p] Description Detects and selects the best supported video resolution automatically. Turns on both sides of the screen is required. • [On] - [HDMI Setup] Selects the HDMI video setting when you can...by the TV. See the TV manual for disc play. Note • If the setting is more detailed description available (see 'Get started' > 'Turn on display captions. • [On] - Tip • There is not compatible with Closed Caption information included and the TV supports this Home Theater ...
User manual
Page 44
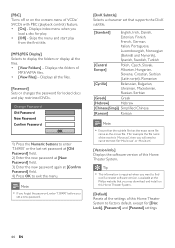
...Selects a character set password at [Old Password] Àeld. 2) Enter the new password at [New Password] Àeld. 3) Enter the new password again at the Philips website that the subtitle Àle has the exact same Àle name as the movie Àle. Displays the folders of this Home Theater... to display the folders or display all the Àles. [Password] Sets or changes the password for locked discs and play . • [Off] - [PBC] Turns off or on this Home Theater System. [Default] Resets all the settings of VCDs/ SVCDs with PBC (playback control) feature. • [On] -
...Selects a character set password at [Old Password] Àeld. 2) Enter the new password at [New Password] Àeld. 3) Enter the new password again at the Philips website that the subtitle Àle has the exact same Àle name as the movie Àle. Displays the folders of this Home Theater... to display the folders or display all the Àles. [Password] Sets or changes the password for locked discs and play . • [Off] - [PBC] Turns off or on this Home Theater System. [Default] Resets all the settings of VCDs/ SVCDs with PBC (playback control) feature. • [On] -

User manual
Page 45
... SETUP. 2 Select [Preferences] > [Version Info.], then press OK. 3 Write down the version number, then press SETUP to exit the menu. 4 Go to www.philips.com/support to check the latest software version available for new updates, compare the current software version of this Home Theater System, download it and... USB, then follow the instruction on the TV to conÀrm update operation. » Once software update is complete, this Home Theater System turns off to the edge in progress. 8 Disconnect the power cord for discs. Clean main unit screen Wipe the screen surface with a micro À...
... SETUP. 2 Select [Preferences] > [Version Info.], then press OK. 3 Write down the version number, then press SETUP to exit the menu. 4 Go to www.philips.com/support to check the latest software version available for new updates, compare the current software version of this Home Theater System, download it and... USB, then follow the instruction on the TV to conÀrm update operation. » Once software update is complete, this Home Theater System turns off to the edge in progress. 8 Disconnect the power cord for discs. Clean main unit screen Wipe the screen surface with a micro À...
User manual
Page 48
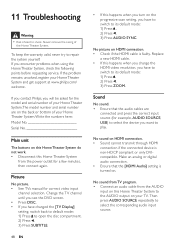
.... • Check if the HDMI cable is non-HDCP compliant or only DVIcompatible. If you have to switch to select the device you turn on your Home Theater System.The model number and serial number are connected and press the correct input source (for a few minutes, then ... change the HDMI video resolution, you encounter problems when using the Home Theater System, check the following points before requesting service. If you contact Philips, you have to switch to the AUDIO output on the progressive scan setting, you will be asked for correct video input channel selection. Replace...
.... • Check if the HDMI cable is non-HDCP compliant or only DVIcompatible. If you have to switch to select the device you turn on your Home Theater System.The model number and serial number are connected and press the correct input source (for a few minutes, then ... change the HDMI video resolution, you encounter problems when using the Home Theater System, check the following points before requesting service. If you contact Philips, you have to switch to the AUDIO output on the progressive scan setting, you will be asked for correct video input channel selection. Replace...


