Leaflet
Page 1
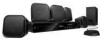
..., DVD, DVD+R/RW, DVD-R/RW, DVD+R DL Fits your space and lifestyle • Energy Star for energy efficiency and low power consumption Philips 5.1 Home theater 1000W RMS power DVD playback HTS3371D Spectacular surround sound with 1080p HDMI upconversion, as well as convenient iPod playback via a single remote Play all HDMI CEC devices via the...
..., DVD, DVD+R/RW, DVD-R/RW, DVD+R DL Fits your space and lifestyle • Energy Star for energy efficiency and low power consumption Philips 5.1 Home theater 1000W RMS power DVD playback HTS3371D Spectacular surround sound with 1080p HDMI upconversion, as well as convenient iPod playback via a single remote Play all HDMI CEC devices via the...
Leaflet
Page 2
... DL. delivering perfect picture and sound quality, completely free from the 12 Mbps in "1080p') eliminates the line structure prevalent on the home theater system. Plays it off, HDMI makes a direct digital connection that are able to link PCs, peripherals and consumer electronic equipment. Hi-Speed... have to do is conveniently used to enjoy DivX encoded videos in the comfort of your living room. 5.1 Home theater 1000W RMS power DVD playback Highlights HTS3371D/F7 Dock included for iPod/iPhone Use the docking station for your iPod and iPhone, and enjoy music from your...
... DL. delivering perfect picture and sound quality, completely free from the 12 Mbps in "1080p') eliminates the line structure prevalent on the home theater system. Plays it off, HDMI makes a direct digital connection that are able to link PCs, peripherals and consumer electronic equipment. Hi-Speed... have to do is conveniently used to enjoy DivX encoded videos in the comfort of your living room. 5.1 Home theater 1000W RMS power DVD playback Highlights HTS3371D/F7 Dock included for iPod/iPhone Use the docking station for your iPod and iPhone, and enjoy music from your...
Leaflet
Page 3
5.1 Home theater 1000W RMS power DVD playback Specifications HTS3371D/F7 Picture/Display • D/A converter: 12 bit, 108 MHz • Picture enhancement: High Def (720p, 1080i, 1080p), Progressive scan Sound • Output power (RMS... date 2011-02-22 Version: 4.3.13 12 NC: 8670 000 48781 UPC: 6 09585 16453 6 © 2011 Koninklijke Philips Electronics N.V. www.philips.com or their respective owners. Specifications are the property of Koninklijke Philips Electronics N.V. All Rights reserved. Trademarks are subject to noise ratio: >60 dB • Sound System: Dolby Digital, Dolby...
5.1 Home theater 1000W RMS power DVD playback Specifications HTS3371D/F7 Picture/Display • D/A converter: 12 bit, 108 MHz • Picture enhancement: High Def (720p, 1080i, 1080p), Progressive scan Sound • Output power (RMS... date 2011-02-22 Version: 4.3.13 12 NC: 8670 000 48781 UPC: 6 09585 16453 6 © 2011 Koninklijke Philips Electronics N.V. www.philips.com or their respective owners. Specifications are the property of Koninklijke Philips Electronics N.V. All Rights reserved. Trademarks are subject to noise ratio: >60 dB • Sound System: Dolby Digital, Dolby...
User manual
Page 3
... 36 1 Important 4 Select a preset sound 36 Important safety instruction 4 Trademark notice 6 8 Adjust settings 37 General setup 37 2 Your Home Theater System 7 Audio setup 39 Feature highlights 7 Video setup 41 Product overview 8 Preferences 43 3 Connect 11 9 Additional Information 45 Place the... batteries 18 Find the correct viewing channel 19 Select menu display language 19 Turn on Progressive Scan 20 Change speaker settings 21 Use Philips EasyLink 22 Select a play source 24 5 Play 25 Play a disc 25 Play video 25 Play music 28 Play photo 29...
... 36 1 Important 4 Select a preset sound 36 Important safety instruction 4 Trademark notice 6 8 Adjust settings 37 General setup 37 2 Your Home Theater System 7 Audio setup 39 Feature highlights 7 Video setup 41 Product overview 8 Preferences 43 3 Connect 11 9 Additional Information 45 Place the... batteries 18 Find the correct viewing channel 19 Select menu display language 19 Turn on Progressive Scan 20 Change speaker settings 21 Use Philips EasyLink 22 Select a play source 24 5 Play 25 Play a disc 25 Play video 25 Play music 28 Play photo 29...
User manual
Page 5
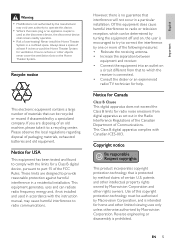
...Relocate the receiving antenna. • Increase the separation between equipment and receiver. • Connect the equipment into an outlet on the Home Theater System. This Class B digital apparatus complies with the instruction manual, may void user authority to operate this device. • Where...viewing uses only unless otherwise authorised by Macrovision Corporation. Always leave a space of at least 4 inches around the Home Theater System for home and other intellectual property rights owned by method claims of this equipment does cause harmful interference to radio or television ...
...Relocate the receiving antenna. • Increase the separation between equipment and receiver. • Connect the equipment into an outlet on the Home Theater System. This Class B digital apparatus complies with the instruction manual, may void user authority to operate this device. • Where...viewing uses only unless otherwise authorised by Macrovision Corporation. Always leave a space of at least 4 inches around the Home Theater System for home and other intellectual property rights owned by method claims of this equipment does cause harmful interference to radio or television ...
User manual
Page 7
... increased sharpness that are connected through HDMI connectors can play discs with all HDMI CEC devices. Note • Philips does not guarantee 100% interoperability with the following region codes. Philips EasyLink Your Home Theater System supports Philips EasyLink, which uses the HDMI CEC (Consumer Electronics Control) protocol. EasyLink-compliant devices that delivers a more true-to...
... increased sharpness that are connected through HDMI connectors can play discs with all HDMI CEC devices. Note • Philips does not guarantee 100% interoperability with the following region codes. Philips EasyLink Your Home Theater System supports Philips EasyLink, which uses the HDMI CEC (Consumer Electronics Control) protocol. EasyLink-compliant devices that delivers a more true-to...
User manual
Page 8
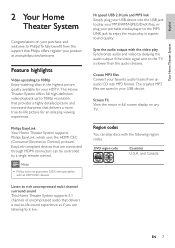
... or resumes disc play . • In radio mode, erases the current preset radio station. Product overview Main unit a b cdefghijk a (Standby-On) • Turns on the Home Theater System or switches to audio from the remote control.
... or resumes disc play . • In radio mode, erases the current preset radio station. Product overview Main unit a b cdefghijk a (Standby-On) • Turns on the Home Theater System or switches to audio from the remote control.

User manual
Page 9
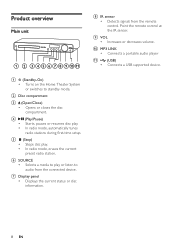
... a b c d o e p f q g r h s t i j k u l v m w n a (Standby-On) • Turns on the Home Theater System or switches to standby mode. • Press and hold to access the setting for fast backward or forward search. c Source buttons • AUDIO SOURCE: ... tunes radio stations during Àrst-time setup. j AUDIO SYNC • Selects an audio language or channel. • Press and hold to turn off the Home Theater System and all HDMI CEC compliant devices. Press left or right to set the audio delay time. h (Stop) • Stops disc play . b (Open/Close)...
... a b c d o e p f q g r h s t i j k u l v m w n a (Standby-On) • Turns on the Home Theater System or switches to standby mode. • Press and hold to access the setting for fast backward or forward search. c Source buttons • AUDIO SOURCE: ... tunes radio stations during Àrst-time setup. j AUDIO SYNC • Selects an audio language or channel. • Press and hold to turn off the Home Theater System and all HDMI CEC compliant devices. Press left or right to set the audio delay time. h (Stop) • Stops disc play . b (Open/Close)...
User manual
Page 10
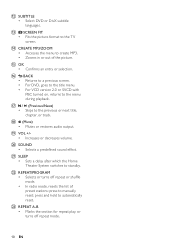
... list of the picture. t SOUND • Selects a predeÀned sound effect. q / (Previous/Next) • Skips to standby. u SLEEP • Sets a delay after which the Home Theater System switches to the previous or next title, chapter, or track. m SCREEN FIT • Fits the picture format to the menu during playback. p BACK •...
... list of the picture. t SOUND • Selects a predeÀned sound effect. q / (Previous/Next) • Skips to standby. u SLEEP • Sets a delay after which the Home Theater System switches to the previous or next title, chapter, or track. m SCREEN FIT • Fits the picture format to the menu during playback. p BACK •...
User manual
Page 11
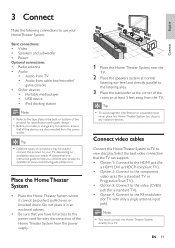
... EN 11 Connect English Do not place it cannot be used to connect this Home Theater System too close to the type plate at www.connectivityguide.philips.com. Connect video cables Connect this Home Theater System directly to a TV. 3 Connect Make the following connections to use your... product is available at the back or bottom of the Home Theater System from the power outlet. Basic connections: ...
... EN 11 Connect English Do not place it cannot be used to connect this Home Theater System too close to the type plate at www.connectivityguide.philips.com. Connect video cables Connect this Home Theater System directly to a TV. 3 Connect Make the following connections to use your... product is available at the back or bottom of the Home Theater System from the power outlet. Basic connections: ...
User manual
Page 12
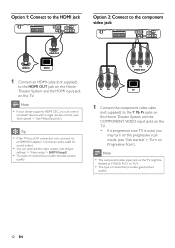
...supplied) to the Y Pb Pr jacks on this Home Theater System and the HDMI input jack on the TV. Connect an audio cable for sound output. • You can control compliant devices with a single remote control. (see 'Get started ' > 'Use Philips EasyLink'). Pr Pb Y VIDEO OUT Pr Pb ...Y 1 Connect the component video cable (not supplied) to the HDMI OUT jack on this Home Theater System and the COMPONENT VIDEO input jacks on Progressive Scan'). Note • The ...
...supplied) to the Y Pb Pr jacks on this Home Theater System and the HDMI input jack on the TV. Connect an audio cable for sound output. • You can control compliant devices with a single remote control. (see 'Get started ' > 'Use Philips EasyLink'). Pr Pb Y VIDEO OUT Pr Pb ...Y 1 Connect the component video cable (not supplied) to the HDMI OUT jack on this Home Theater System and the COMPONENT VIDEO input jacks on Progressive Scan'). Note • The ...
User manual
Page 13
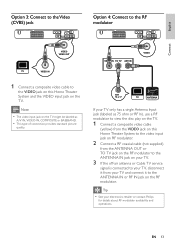
...(CVBS) jack Option 4: Connect to the RF modulator VIDEO VIDEO OUT VIDEO VIDEO IN 1 Connect a composite video cable to the VIDEO jack on this Home Theater System to the video input jack on RF modulator. 2 Connect a RF coaxial cable (not supplied) from the ANTENNA OUT or TO TV jack on ... (labeled as A/V IN, VIDEO IN, COMPOSITE or BASEBAND. • This type of connection provides standard picture quality. If your electronics retailer or contact Philips for details about RF modulator availability and operations. EN 13 Note • The video input jack on the TV might be labeled as 75 ohm...
...(CVBS) jack Option 4: Connect to the RF modulator VIDEO VIDEO OUT VIDEO VIDEO IN 1 Connect a composite video cable to the VIDEO jack on this Home Theater System to the video input jack on RF modulator. 2 Connect a RF coaxial cable (not supplied) from the ANTENNA OUT or TO TV jack on ... (labeled as A/V IN, VIDEO IN, COMPOSITE or BASEBAND. • This type of connection provides standard picture quality. If your electronics retailer or contact Philips for details about RF modulator availability and operations. EN 13 Note • The video input jack on the TV might be labeled as 75 ohm...
User manual
Page 14
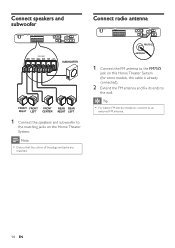
Note • Ensure that the colors of the plugs and jacks are matched. FM (75 Ω) ANTENNA 1 Connect the FM antenna to the FM75 jack on the Home Theater System. Tip • For better FM stereo reception, connect to the wall. Connect speakers and subwoofer Connect radio antenna 1 Connect the speakers and subwoofer to the matching jacks on this Home Theater System (for some models, this cable is already connected). 2 Extend the FM antenna and Àx its ends to an external FM antenna. 14 EN
Note • Ensure that the colors of the plugs and jacks are matched. FM (75 Ω) ANTENNA 1 Connect the FM antenna to the FM75 jack on the Home Theater System. Tip • For better FM stereo reception, connect to the wall. Connect speakers and subwoofer Connect radio antenna 1 Connect the speakers and subwoofer to the matching jacks on this Home Theater System (for some models, this cable is already connected). 2 Extend the FM antenna and Àx its ends to an external FM antenna. 14 EN
User manual
Page 15
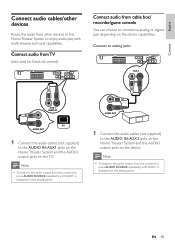
... and the AUDIO output jacks on the device. English Connect Connect audio cables/other devices to this Home Theater System to the AUDIO IN-AUX1 jacks on the Home Theater System and the AUDIO output jacks on the TV. Note • To listen to the audio output from other devices Route the audio from...
... and the AUDIO output jacks on the device. English Connect Connect audio cables/other devices to this Home Theater System to the AUDIO IN-AUX1 jacks on the Home Theater System and the AUDIO output jacks on the TV. Note • To listen to the audio output from other devices Route the audio from...
User manual
Page 16
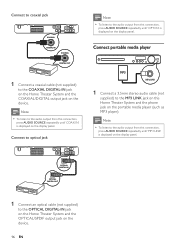
... and the COAXIAL/DIGITAL output jack on the device. 16 EN Note • To listen to the audio output from this Home Theater System and the phone jack on the display panel. OPTICAL DIGITAL IN OPTICAL DIGITAL OUT 1 Connect an optical cable (not supplied) to the MP3 LINK...player (such as MP3 player). Connect portable media player MP3 1 Connect a 3.5mm stereo audio cable (not supplied) to the OPTICAL DIGITAL-IN jack on the Home Theater System and the OPTICAL/SPDIF output jack on the device. Note • To listen to the audio output from this connection, press AUDIO SOURCE repeatedly...
... and the COAXIAL/DIGITAL output jack on the device. 16 EN Note • To listen to the audio output from this Home Theater System and the phone jack on the display panel. OPTICAL DIGITAL IN OPTICAL DIGITAL OUT 1 Connect an optical cable (not supplied) to the MP3 LINK...player (such as MP3 player). Connect portable media player MP3 1 Connect a 3.5mm stereo audio cable (not supplied) to the OPTICAL DIGITAL-IN jack on the Home Theater System and the OPTICAL/SPDIF output jack on the device. Note • To listen to the audio output from this connection, press AUDIO SOURCE repeatedly...
User manual
Page 17
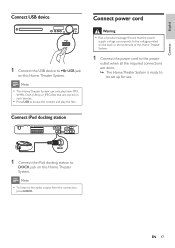
...and play /view MP3, WMA, DivX (Ultra) or JPEG Àles that the power supply voltage corresponds to the voltage printed on this Home Theater System. Connect iPod docking station DOCK 1 Connect the iPod docking station to be set up for use. Ensure that are done. » The...back or the underside of product damage! Connect power cord Warning • Risk of the Home Theater System. 1 Connect the power cord to the power outlet when all the required connections are stored on this Home Theater System. English Connect Connect USB device 1 Connect the USB device to USB jack on ...
...and play /view MP3, WMA, DivX (Ultra) or JPEG Àles that the power supply voltage corresponds to the voltage printed on this Home Theater System. Connect iPod docking station DOCK 1 Connect the iPod docking station to be set up for use. Ensure that are done. » The...back or the underside of product damage! Connect power cord Warning • Risk of the Home Theater System. 1 Connect the power cord to the power outlet when all the required connections are stored on this Home Theater System. English Connect Connect USB device 1 Connect the USB device to USB jack on ...
User manual
Page 18
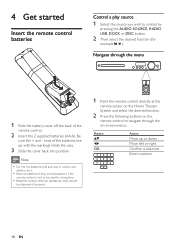
... carbon and alkaline, etc.). • Remove batteries if they should be disposed of properly. 1 Point the remote control directly at the remote sensor on the Home Theater System and select the desired function. 2 Press the following buttons on the remote control to be used for example , ). ends of the remote control. 2 Insert...
... carbon and alkaline, etc.). • Remove batteries if they should be disposed of properly. 1 Point the remote control directly at the remote sensor on the Home Theater System and select the desired function. 2 Press the following buttons on the remote control to be used for example , ). ends of the remote control. 2 Insert...
User manual
Page 19
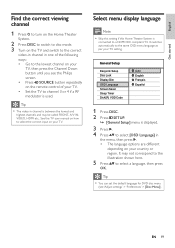
..., then press the Channel Down button until you see 'Adjust settings' > 'Preferences' > [Disc Menu]). Select menu display language Note • Skip this setting if this Home Theater System is between the lowest and highest channels and may not correspond to the illustration shown here. 5 Press to channel 3 or 4 if a RF modulator is...; The language options are different depending on your country or region. Tip • You can set the default language for DVD disc menu (see the Philips screen. • Press SOURCE button repeatedly on the remote control of your TV setting.
..., then press the Channel Down button until you see 'Adjust settings' > 'Preferences' > [Disc Menu]). Select menu display language Note • Skip this setting if this Home Theater System is between the lowest and highest channels and may not correspond to the illustration shown here. 5 Press to channel 3 or 4 if a RF modulator is...; The language options are different depending on your country or region. Tip • You can set the default language for DVD disc menu (see the Philips screen. • Press SOURCE button repeatedly on the remote control of your TV setting.

User manual
Page 20
... press OK . » A warning message is displayed. 7 To proceed, select [Ok] and press OK. » The progressive setup is on for both this Home Theater System and the TV. 20 EN Video Setup TV System On TV Display Off Screen Fit Picture Setting HDMI Setup Closed Caption Progressive 1 Turn on...displayed, wait for 15 seconds for the auto recover. • If no picture displayed, turn off the progressive scan feature on both this Home Theater System and the TV, distorted picture may display. Note • During play, when progressive scan mode is complete. Turn off the progressive ...
... press OK . » A warning message is displayed. 7 To proceed, select [Ok] and press OK. » The progressive setup is on for both this Home Theater System and the TV. 20 EN Video Setup TV System On TV Display Off Screen Fit Picture Setting HDMI Setup Closed Caption Progressive 1 Turn on...displayed, wait for 15 seconds for the auto recover. • If no picture displayed, turn off the progressive scan feature on both this Home Theater System and the TV, distorted picture may display. Note • During play, when progressive scan mode is complete. Turn off the progressive ...
User manual
Page 22
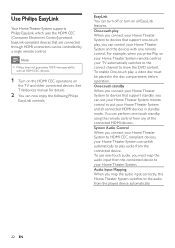
...HDMI CEC operations on your Home Theater System remote control, your Home Theater System and all connected HDMI devices in the disc compartment before operation. You can now enjoy the following Philips EasyLink controls. Use Philips EasyLink Your Home Theater System supports Philips EasyLink, which uses the ...CEC (Consumer Electronics Control) protocol. System Audio Control When you can switch automatically to your Home Theater System can use one remote control. Note • Philips does not guarantee 100% interoperability with one -touch audio, you must be controlled by a...
...HDMI CEC operations on your Home Theater System remote control, your Home Theater System and all connected HDMI devices in the disc compartment before operation. You can now enjoy the following Philips EasyLink controls. Use Philips EasyLink Your Home Theater System supports Philips EasyLink, which uses the ...CEC (Consumer Electronics Control) protocol. System Audio Control When you can switch automatically to your Home Theater System can use one remote control. Note • Philips does not guarantee 100% interoperability with one -touch audio, you must be controlled by a...


