Leaflet
Page 1
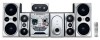
... enjoyment of your entertainment experience with the FWD798, featuring 5.1 Surround Sound for cinematic sound and MAX Sound for extra convenience Powerful performance also comes with total flexibility, thanks to a 3-disk changer. Philips DVD Mini Hi-Fi System FWD798 3 CHANGER Sized match with performance For pure... and powerful 5.1 Surround Sound Enliven your favorite music • Plays DVD, (S)VCD, MP3-CD, WMA-CD, CD(RW) & Picture CD...
... enjoyment of your entertainment experience with the FWD798, featuring 5.1 Surround Sound for cinematic sound and MAX Sound for extra convenience Powerful performance also comes with total flexibility, thanks to a 3-disk changer. Philips DVD Mini Hi-Fi System FWD798 3 CHANGER Sized match with performance For pure... and powerful 5.1 Surround Sound Enliven your favorite music • Plays DVD, (S)VCD, MP3-CD, WMA-CD, CD(RW) & Picture CD...
Leaflet
Page 2
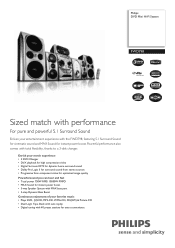
... to enjoy DivX encoded videos in the comfort of both fields are able to save large files like CD-R/RW, memory cards and DVD-video. Progressive Scan Progressive Scan doubles the vertical resolution of a button. Total 750W RMS/ 10000W PMPO MAX Sound MAX Sound technology ... and Home Theater Systems. Dolby Pro Logic II Surround Dolby Pro Logic II is created instantaneously, using the maximum resolution. DVD Mini Hi-Fi System FWD798/37 Specifications Product highlights Sound • Total Sound Power (RMS): 750 W • Sound System: Dolby Prologic II, DTS, Dolby Digital •...
... to enjoy DivX encoded videos in the comfort of both fields are able to save large files like CD-R/RW, memory cards and DVD-video. Progressive Scan Progressive Scan doubles the vertical resolution of a button. Total 750W RMS/ 10000W PMPO MAX Sound MAX Sound technology ... and Home Theater Systems. Dolby Pro Logic II Surround Dolby Pro Logic II is created instantaneously, using the maximum resolution. DVD Mini Hi-Fi System FWD798/37 Specifications Product highlights Sound • Total Sound Power (RMS): 750 W • Sound System: Dolby Prologic II, DTS, Dolby Digital •...
User manual
Page 10
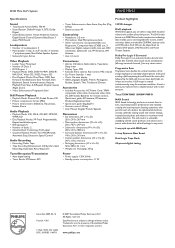
.... title number plus album is 32. Discs for playback according to 525 lines. Video CDs (VCDs) - Following formats can't be selected for playback Your DVD Mini Hi-Fi System will not play on this system.You cannot play on this system. AM loop antenna - To fully enjoy the progressive scan feature, you can...
.... title number plus album is 32. Discs for playback according to 525 lines. Video CDs (VCDs) - Following formats can't be selected for playback Your DVD Mini Hi-Fi System will not play on this system.You cannot play on this system. AM loop antenna - To fully enjoy the progressive scan feature, you can...
User manual
Page 11
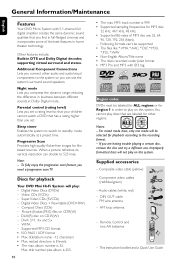
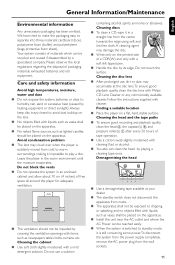
Always keep disc trays closed to dripping or splashing and no objects filled with Philips CD Lens Cleaner or any commercially available cleaner. Do not use , dirt or dust may accumulate at your dealer. ● The standby switch does not ... an enclosed cabinet and allow about 10 cm (4 inches) of free space all around the player for adequate ventilation. 10 cm (4 inches) 10 cm (4 inches) DVD Mini Hi-Fi System 10 cm (4 inches) ● The ventilation should be placed on a flat, hard, stable surface. Cleaning the disc lens ● After prolonged use a solution...
Always keep disc trays closed to dripping or splashing and no objects filled with Philips CD Lens Cleaner or any commercially available cleaner. Do not use , dirt or dust may accumulate at your dealer. ● The standby switch does not ... an enclosed cabinet and allow about 10 cm (4 inches) of free space all around the player for adequate ventilation. 10 cm (4 inches) 10 cm (4 inches) DVD Mini Hi-Fi System 10 cm (4 inches) ● The ventilation should be placed on a flat, hard, stable surface. Cleaning the disc lens ● After prolonged use a solution...
User manual
Page 12
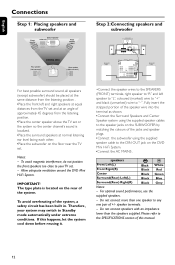
..."R" and left and right speakers at equal distances from the TV set and at an angle of +/- Notes: - Allow adequate ventilation around the DVD Mini Hi-Fi System. The type plate is localized. •Place the surround speakers at normal listening ear level facing each other. •Place the subwoofer on...the listening position. •Place the center speaker above the TV set or the system so the center channel's sound is located on the DVD Mini Hi-Fi System. •Connect the AC MAINS . To avoid magnetic interference, do not position the front speakers too close to your system may ...
..."R" and left and right speakers at equal distances from the TV set and at an angle of +/- Notes: - Allow adequate ventilation around the DVD Mini Hi-Fi System. The type plate is localized. •Place the surround speakers at normal listening ear level facing each other. •Place the subwoofer on...the listening position. •Place the center speaker above the TV set or the system so the center channel's sound is located on the DVD Mini Hi-Fi System. •Connect the AC MAINS . To avoid magnetic interference, do not position the front speakers too close to your system may ...
User manual
Page 15
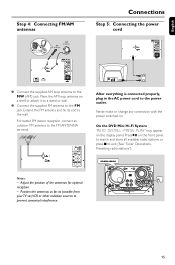
On the DVD Mini Hi-Fi System "AUTO INSTALL-PRESS PLAY" may appear on a shelf or attach it to a stand or wall. ● Connect the supplied FM antenna to the FM ...
On the DVD Mini Hi-Fi System "AUTO INSTALL-PRESS PLAY" may appear on a shelf or attach it to a stand or wall. ● Connect the supplied FM antenna to the FM ...
User manual
Page 22
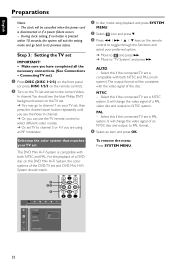
... and press 4. 3 Press 1 / ¡ / 5 / 4 keys on the remote control to its previous status. For the playback of the DVD,TV set and DVD Mini Hi-Fi System should see the blue Philips DVD background screen on the TV set. ➜ You may go back to toggle through the functions and select your TV set...press ¡. ➜ Move to channel 1 on the TV set and set is compatible with both NTSC and PAL. Select this DVD Mini Hi-Fi System, the color systems of a DVD disc on this if the connected TV set IMPORTANT! - Step 3: Setting the TV set is disconnected or if a power failure occurs....
... and press 4. 3 Press 1 / ¡ / 5 / 4 keys on the remote control to its previous status. For the playback of the DVD,TV set and DVD Mini Hi-Fi System should see the blue Philips DVD background screen on the TV set. ➜ You may go back to toggle through the functions and select your TV set...press ¡. ➜ Move to channel 1 on the TV set and set is compatible with both NTSC and PAL. Select this DVD Mini Hi-Fi System, the color systems of a DVD disc on this if the connected TV set IMPORTANT! - Step 3: Setting the TV set is disconnected or if a power failure occurs....
User manual
Page 23
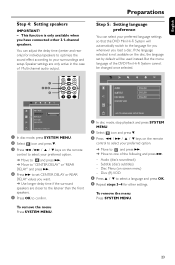
But the menu language of the DVD Mini Hi-Fi System cannot be used instead. To remove the menu Press SYSTEM MENU. PBC 1 In disc mode, press SYSTEM MENU. 2 Select icon and press 4. 3 Press 1 / ¡ / 5 / 4 ... "CENTER DELAY" or "REAR DELAY" and press ¡. 4 Press ¡ to set by default will automatically switch to your preferred language settings so that this DVD Mini Hi-Fi System will be changed once selected. If the language selected is only available when you load a disc. Audio (disc's soundtrack) - English Step 4: Setting speakers...
But the menu language of the DVD Mini Hi-Fi System cannot be used instead. To remove the menu Press SYSTEM MENU. PBC 1 In disc mode, press SYSTEM MENU. 2 Select icon and press 4. 3 Press 1 / ¡ / 5 / 4 ... "CENTER DELAY" or "REAR DELAY" and press ¡. 4 Press ¡ to set by default will automatically switch to your preferred language settings so that this DVD Mini Hi-Fi System will be changed once selected. If the language selected is only available when you load a disc. Audio (disc's soundtrack) - English Step 4: Setting speakers...
User manual
Page 33
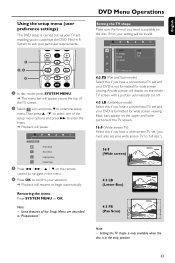
...; Playback will resume or begin automatically. English Using the setup menu (user preference settings) This DVD setup is carried out via your TV set, enabling you to customize the DVD Mini Hi-Fi System to suit your DVD is not formatted for wide screen viewing. Removing the menu Press SYSTEM MENU or OK. Setting... the TV shape is only available when the disc is in the menu. 4 Press OK to confirm your DVD is formatted for wide screen...
...; Playback will resume or begin automatically. English Using the setup menu (user preference settings) This DVD setup is carried out via your TV set, enabling you to customize the DVD Mini Hi-Fi System to suit your DVD is not formatted for wide screen viewing. Removing the menu Press SYSTEM MENU or OK. Setting... the TV shape is only available when the disc is in the menu. 4 Press OK to confirm your DVD is formatted for wide screen...


