Leaflet
Page 1
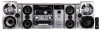
wOOx technology FWC798 3 CD Changer Mini HIFI System with wOOx Technology • 500 watts Total Power • 2 x 140 watts RMS Stereo + 2 x 110 watts RMS Power Boost • wOOx ... with Auto Replay • Digital out and Line out for perfect CD recording • Bedroom Clock with Wake-up and Sleep-timer • 31-key Remote Control
wOOx technology FWC798 3 CD Changer Mini HIFI System with wOOx Technology • 500 watts Total Power • 2 x 140 watts RMS Stereo + 2 x 110 watts RMS Power Boost • wOOx ... with Auto Replay • Digital out and Line out for perfect CD recording • Bedroom Clock with Wake-up and Sleep-timer • 31-key Remote Control

Leaflet
Page 2
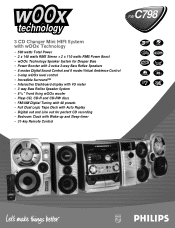
...197; TIMER ON/OFF VOLUME É í ë Ç à á REPEAT PROGRAM SHUFFLE WOOX WOOX ON/OFF DSC VAC LEVEL FWC798 Sound Enhancement 2 x 140 Watts RMS Stereo + 2 x 110 Watts RMS Power Boost The power boost generates 110 watts continuous RMS power output per ... The wOOx is a Trademark of Philips Electronics North America Corp. Direct Play Button Allows you the opportunity to skip back to the previous track or skip up to interrupt demo mode. Carton contains: 3CD Changer Mini System, MultiFunction Remote Control, Operating instructions, Warranty information ...
...197; TIMER ON/OFF VOLUME É í ë Ç à á REPEAT PROGRAM SHUFFLE WOOX WOOX ON/OFF DSC VAC LEVEL FWC798 Sound Enhancement 2 x 140 Watts RMS Stereo + 2 x 110 Watts RMS Power Boost The power boost generates 110 watts continuous RMS power output per ... The wOOx is a Trademark of Philips Electronics North America Corp. Direct Play Button Allows you the opportunity to skip back to the previous track or skip up to interrupt demo mode. Carton contains: 3CD Changer Mini System, MultiFunction Remote Control, Operating instructions, Warranty information ...
User manual
Page 8
... General Information Environmental Information 9 Acknowledgement 9 Supplied Accessories 9 Safety Information 9 Preparations Rear Connections 10-11 Optional Connections 12 Inserting batteries into the remote control 12 Controls Controls on the system and remote control 13-14 Basic Functions Plug and Play 15 Demonstration mode 15 Switching the system on 16 Switching the system to...
... General Information Environmental Information 9 Acknowledgement 9 Supplied Accessories 9 Safety Information 9 Preparations Rear Connections 10-11 Optional Connections 12 Inserting batteries into the remote control 12 Controls Controls on the system and remote control 13-14 Basic Functions Plug and Play 15 Demonstration mode 15 Switching the system on 16 Switching the system to...
User manual
Page 9
...must not be recycled and reused if disassembled by heating equipment or direct sunlight. Environmental Information All unnecessary packaging has been omitted. Supplied accessories - Remote control - Batteries (two AA size) for about one pair of the unit and 5 cm (2 inches) from a cold to a warm ... loop antenna - q Place the system in a location with 21 CFR 1040.10. Acknowledgement Energy Star As an ENERGY STARR Partner, Philips has determined that this occur, the CD player would not operate normally. Should this product meets the ENERGY STARR guidelines for energy efficiency....
...must not be recycled and reused if disassembled by heating equipment or direct sunlight. Environmental Information All unnecessary packaging has been omitted. Supplied accessories - Remote control - Batteries (two AA size) for about one pair of the unit and 5 cm (2 inches) from a cold to a warm ... loop antenna - q Place the system in a location with 21 CFR 1040.10. Acknowledgement Energy Star As an ENERGY STARR Partner, Philips has determined that this occur, the CD player would not operate normally. Should this product meets the ENERGY STARR guidelines for energy efficiency....

User manual
Page 12
... equipment to the digital input terminal of the equipment. Remove batteries if they should be generated and malfunction might occur. - Notes: - Inserting batteries into the Remote Control Insert two batteries (Type R06 or AA) into the remote control with the correct polarity as indicated by the + and -
... equipment to the digital input terminal of the equipment. Remove batteries if they should be generated and malfunction might occur. - Notes: - Inserting batteries into the Remote Control Insert two batteries (Type R06 or AA) into the remote control with the correct polarity as indicated by the + and -

User manual
Page 13
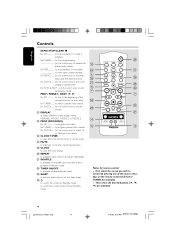
.... TAPE / (TAPE 1• 2) - English Controls (main system's illustration on page 3) Controls on the system only) to set the hour. for CLOCK ....... (on the system and remote control 1 ECO POWER - for TAPE to select the desired sound effect for TUNER ......... to select enhanced or normal wOOx sound effect. to select the desired...
.... TAPE / (TAPE 1• 2) - English Controls (main system's illustration on page 3) Controls on the system only) to set the hour. for CLOCK ....... (on the system and remote control 1 ECO POWER - for TAPE to select the desired sound effect for TUNER ......... to select enhanced or normal wOOx sound effect. to select the desired...
User manual
Page 14
...system only) to delete the preset radio station. for TAPE to exit clock setting or cancel timer. for TUNER ........ for example). - on the remote control (CD 123 or TUNER, for CLOCK ....... (on the system only) to stop programming. to program disc tracks. First, select the source you...to set the sleep timer. ºB - to select different screen display mode : NORMAL, MODE 1, MODE 2, or MODE 3. ™ PROG (PROGRAM) for remote control: - or 24-hour clock mode. £ CLOCK•TIMER - to switch the system to view the clock display. § REPEAT - to Eco ...
...system only) to delete the preset radio station. for TAPE to exit clock setting or cancel timer. for TUNER ........ for example). - on the remote control (CD 123 or TUNER, for CLOCK ....... (on the system only) to stop programming. to program disc tracks. First, select the source you...to set the sleep timer. ºB - to select different screen display mode : NORMAL, MODE 1, MODE 2, or MODE 3. ™ PROG (PROGRAM) for remote control: - or 24-hour clock mode. £ CLOCK•TIMER - to switch the system to view the clock display. § REPEAT - to Eco ...
User manual
Page 16
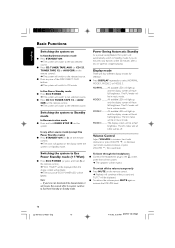
...Volume Control Adjust VOLUME to the last selected source. q Press CD, TUNER, TAPE, AUX (or CD 123, TUNER, TAPE 1/2 or AUX/CDR on the remote control). ➜ "ECO POWER" will be displayed, then the display screen will go blank. ➜ The low power ECO POWER LED will be lighted.... q Press any other source mode (except Eco Power Standby mode) q Press STANDBY ON (or B on the remote control). ➜ The clock will appear on the remote control. ➜ Playback will continue without sound and "MUTE" will be displayed. In Eco Power Standby mode q Press ECO POWER....
...Volume Control Adjust VOLUME to the last selected source. q Press CD, TUNER, TAPE, AUX (or CD 123, TUNER, TAPE 1/2 or AUX/CDR on the remote control). ➜ "ECO POWER" will be displayed, then the display screen will go blank. ➜ The low power ECO POWER LED will be lighted.... q Press any other source mode (except Eco Power Standby mode) q Press STANDBY ON (or B on the remote control). ➜ The clock will appear on the remote control. ➜ Playback will continue without sound and "MUTE" will be displayed. In Eco Power Standby mode q Press ECO POWER....
User manual
Page 17
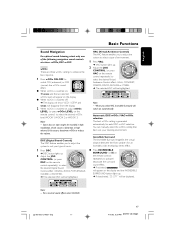
...suits your type of music. 1 Press DSC. ➜ DSC button lights up DSC 2 Adjust the JOG CONTROL (or press DSC on the remote control repeatedly) to select the desired Virtual Ambience Control effect : HALL, CONCERT, CINEMA, DISCO, ARCADE or CYBER. ➜ The selected VAC... will disappear from the display. 2 When wOOx is switched on, adjust wOOx LEVEL (or press wOOx LEVEL on the remote control) to select a type of the following navigation sound controls at high volume. Note: - ISNUCRRREODIUBNLDE ISNUCRRREODIUBNLDE VAC VAC VAC VAC (Virtual Ambience...
...suits your type of music. 1 Press DSC. ➜ DSC button lights up DSC 2 Adjust the JOG CONTROL (or press DSC on the remote control repeatedly) to select the desired Virtual Ambience Control effect : HALL, CONCERT, CINEMA, DISCO, ARCADE or CYBER. ➜ The selected VAC... will disappear from the display. 2 When wOOx is switched on, adjust wOOx LEVEL (or press wOOx LEVEL on the remote control) to select a type of the following navigation sound controls at high volume. Note: - ISNUCRRREODIUBNLDE ISNUCRRREODIUBNLDE VAC VAC VAC VAC (Virtual Ambience...

User manual
Page 20
..., press REPEAT until you press Ç. 2 To resume normal playback, press SHUFFLE again. ➜ SHUFF will appear on the remote control repeatedly to repeat all repeat modes. Shuffle All the available discs and their tracks or all the programmed tracks can be played ...In program shuffled playback ➜ "TRACK" or "PROGRAM" repeat modes are available for selection. ➜ RPT , SHUFF and PROG will appear on the remote control. ➜ "SHUFFLE" and SHUFF will disappear from the display. Repeat The current track, a disc, all available discs or all available discs. ➜...
..., press REPEAT until you press Ç. 2 To resume normal playback, press SHUFFLE again. ➜ SHUFF will appear on the remote control repeatedly to repeat all repeat modes. Shuffle All the available discs and their tracks or all the programmed tracks can be played ...In program shuffled playback ➜ "TRACK" or "PROGRAM" repeat modes are available for selection. ➜ RPT , SHUFF and PROG will appear on the remote control. ➜ "SHUFFLE" and SHUFF will disappear from the display. Repeat The current track, a disc, all available discs or all available discs. ➜...
User manual
Page 26
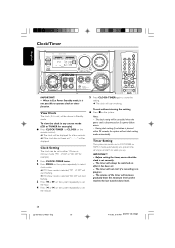
... in either 12-hour or 24-hour mode ("AM 12:00" or "00:00" for example) 1 Press CLOCK•TIMER twice. 2 Press PROG on the remote control). ➜ The clock will be cancelled when the power cord is selected, "00:00" will not start working. To view the clock in any...
... in either 12-hour or 24-hour mode ("AM 12:00" or "00:00" for example) 1 Press CLOCK•TIMER twice. 2 Press PROG on the remote control). ➜ The clock will be cancelled when the power cord is selected, "00:00" will not start working. To view the clock in any...
User manual
Page 27
... will show the remaining time followed by the set timer "XX:XX" and then the selected source. ➜ TIMER will remain on the remote control. ➜ The display will show "CANCEL" and TIMER will disappear from a specific track, make sure the music source has been prepared...setting mode automatically. Sleep Timer Setting The sleep timer enables the system to switch to Standby mode automatically at a preset time. 1 Press SLEEP on the remote control repeatedly to select a preset time. ➜ The selections are flashing. 2 Press CD, TUNER or TAPE to the desired radio station. "SLEEP...
... will show the remaining time followed by the set timer "XX:XX" and then the selected source. ➜ TIMER will remain on the remote control. ➜ The display will show "CANCEL" and TIMER will disappear from a specific track, make sure the music source has been prepared...setting mode automatically. Sleep Timer Setting The sleep timer enables the system to switch to Standby mode automatically at a preset time. 1 Press SLEEP on the remote control repeatedly to select a preset time. ➜ The selections are flashing. 2 Press CD, TUNER or TAPE to the desired radio station. "SLEEP...

User manual
Page 31
... on the timer. - Adjust the volume. - Disconnect the headphones. - Press and hold DEMO STOP Çon the system again. - Point the remote control in progress, stop recording. - Sound cannot be heard or is of the system's IR sensor. - If recording is not working. Check the speaker...- Press TIMER ON/OFF to select NORMAL or MODE 1 display mode. - Reset the clock/timer. - signs) aligned as indicated. - The remote control does not function properly. Replace the batteries. - Power has been interrupted or the power cord has been disconnected. Insert the batteries with their ...
... on the timer. - Adjust the volume. - Disconnect the headphones. - Press and hold DEMO STOP Çon the system again. - Point the remote control in progress, stop recording. - Sound cannot be heard or is of the system's IR sensor. - If recording is not working. Check the speaker...- Press TIMER ON/OFF to select NORMAL or MODE 1 display mode. - Reset the clock/timer. - signs) aligned as indicated. - The remote control does not function properly. Replace the batteries. - Power has been interrupted or the power cord has been disconnected. Insert the batteries with their ...


