
Leaflet
Page 2
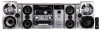
.... Demo Mode Functions always. Change While Play Flexiblility of the player. Specifications subject to perform auto programming and storing of the lights off. Incredible Surround™ is significantly "lower and louder" than 10% total harmonic distortion (THD). Plug & Play Press 'PLAY' to change without noticeable distortion. A Division of Philips Consumer Electronics Company http://www.philipsusa.com CD 123 TUNER 2 TAPE 1/2 MUTE AUX/CDR IS 1 CLOCK CD DIRECT 2 DISPLAY 3 SLEEP AUTO RE. Video/AUX Input For connection of audio accessory...
.... Demo Mode Functions always. Change While Play Flexiblility of the player. Specifications subject to perform auto programming and storing of the lights off. Incredible Surround™ is significantly "lower and louder" than 10% total harmonic distortion (THD). Plug & Play Press 'PLAY' to change without noticeable distortion. A Division of Philips Consumer Electronics Company http://www.philipsusa.com CD 123 TUNER 2 TAPE 1/2 MUTE AUX/CDR IS 1 CLOCK CD DIRECT 2 DISPLAY 3 SLEEP AUTO RE. Video/AUX Input For connection of audio accessory...
User manual
Page 3
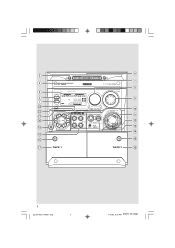
...; ™ ¡ ) ( * % & DISC CHANGE 3CD C H A N G E R DISC 1 3 DISC DIRECT PLAY DISC 2 DISC 3 OPEN • CLOSE CD / CD-R / CD-RW COMPATIBLE CD SYNCHRO RECORDING FWSTANDBY-ON MINI HIFI SYSTEM VOLUME PR G ISNUCRRREODIUBNLDE ECO POWER EV PRESET N DEMO STOP/ CLEAR PLAY• PAUSE EARCH • TUNIN DISPLAY PROG CLOCK• TIMER AUTO REPLAY DUBBING REC MUSIC LEVEL VOLUME INTERACTIVE VU METER CD 1•2•3 FM •AM CD TUNER SOURCE TAPE AUX TAPE 1•2 CDR / DVD ON •OFF WOOX LEVEL WOOX DYNAMIC AMPLIFICATION CONTROL SOUND NAVIGATION -
...; ™ ¡ ) ( * % & DISC CHANGE 3CD C H A N G E R DISC 1 3 DISC DIRECT PLAY DISC 2 DISC 3 OPEN • CLOSE CD / CD-R / CD-RW COMPATIBLE CD SYNCHRO RECORDING FWSTANDBY-ON MINI HIFI SYSTEM VOLUME PR G ISNUCRRREODIUBNLDE ECO POWER EV PRESET N DEMO STOP/ CLEAR PLAY• PAUSE EARCH • TUNIN DISPLAY PROG CLOCK• TIMER AUTO REPLAY DUBBING REC MUSIC LEVEL VOLUME INTERACTIVE VU METER CD 1•2•3 FM •AM CD TUNER SOURCE TAPE AUX TAPE 1•2 CDR / DVD ON •OFF WOOX LEVEL WOOX DYNAMIC AMPLIFICATION CONTROL SOUND NAVIGATION -

User manual
Page 4
... Customer Use Enter below the Serial No. REFER SERVICING TO QUALIFIED SERVICE PERSONNEL. Model Registration Returning your Warranty Registration Card right away guarantees you qualify for future reference. CAUTION: To prevent electric shock, match wide blade of plug to maximum protection under the terms and conditions of your model. Warranty Verification Registering your product within your Philips warranty. Owner Confirmation...
... Customer Use Enter below the Serial No. REFER SERVICING TO QUALIFIED SERVICE PERSONNEL. Model Registration Returning your Warranty Registration Card right away guarantees you qualify for future reference. CAUTION: To prevent electric shock, match wide blade of plug to maximum protection under the terms and conditions of your model. Warranty Verification Registering your product within your Philips warranty. Owner Confirmation...
User manual
Page 8
... Connections 12 Inserting batteries into the remote control 12 Controls Controls on the system and remote control 13-14 Basic Functions Plug and Play 15 Demonstration mode 15 Switching the system on 16 Switching the system to Standby mode ........ 16 Switching the system to Eco Power Standby mode 16 Power Saving Automatic Standby 16 Display mode 16 Volume Control 16 Sound Navigation 17 CD Operation Discs for Playback 18 Loading Discs 18 Disc Playback 19 Programming the disc tracks 19-20 Repeat 20 Shuffle 20 Radio Reception Storing Preset Radio Stations...
... Connections 12 Inserting batteries into the remote control 12 Controls Controls on the system and remote control 13-14 Basic Functions Plug and Play 15 Demonstration mode 15 Switching the system on 16 Switching the system to Standby mode ........ 16 Switching the system to Eco Power Standby mode 16 Power Saving Automatic Standby 16 Display mode 16 Volume Control 16 Sound Navigation 17 CD Operation Discs for Playback 18 Loading Discs 18 Disc Playback 19 Programming the disc tracks 19-20 Repeat 20 Shuffle 20 Radio Reception Storing Preset Radio Stations...
User manual
Page 9
... room, moisture may cause undesired operation. Leave the power on the lens of materials which can be oiled or lubricated. FM wire antenna - Power booster amplifier package: - q Do not expose the system, batteries or discs to excessive moisture, rain, sand or heat sources caused by a specialized company. AM loop antenna - Should this product meets the ENERGY STARR guidelines for remote control - q The mechanical parts of the set...
... room, moisture may cause undesired operation. Leave the power on the lens of materials which can be oiled or lubricated. FM wire antenna - Power booster amplifier package: - q Do not expose the system, batteries or discs to excessive moisture, rain, sand or heat sources caused by a specialized company. AM loop antenna - Should this product meets the ENERGY STARR guidelines for remote control - q The mechanical parts of the set...

User manual
Page 11
... (unmarked) wire to "-". 3 Plug in the AC mains to the wall socket. 4 Switch on the POWER SWITCH to activate the power booster amplifier. 5 Press STANDBY ON button to switch the system ON or to Standby mode. 6 Rotate the VOLUME control to any one speaker to adjust the loudness of the power booster amplifier. 1 2 ¶ Clip the stripped portion of this manual. D Power Booster Connection Refer to the slot 6 5 +- +- AM Antenna Notes: - Do not connect speakers with...
... (unmarked) wire to "-". 3 Plug in the AC mains to the wall socket. 4 Switch on the POWER SWITCH to activate the power booster amplifier. 5 Press STANDBY ON button to switch the system ON or to Standby mode. 6 Rotate the VOLUME control to any one speaker to adjust the loudness of the power booster amplifier. 1 2 ¶ Clip the stripped portion of this manual. D Power Booster Connection Refer to the slot 6 5 +- +- AM Antenna Notes: - Do not connect speakers with...

User manual
Page 12
... operating instructions of the connected equipment for example). Otherwise, noise will be used for example). If you can use old and new or different types of the equipment. Use a cinch cable to connect the DIGITAL OUT terminal to your system Connect the audio left terminal. symbols inside the battery compartment. 2 1 CAUTION! - Connecting other equipment to the digital input terminal of batteries in terminals of a TV,VCR, Laser Disc player, DVD player...
... operating instructions of the connected equipment for example). Otherwise, noise will be used for example). If you can use old and new or different types of the equipment. Use a cinch cable to connect the DIGITAL OUT terminal to your system Connect the audio left terminal. symbols inside the battery compartment. 2 1 CAUTION! - Connecting other equipment to the digital input terminal of batteries in terminals of a TV,VCR, Laser Disc player, DVD player...

User manual
Page 13
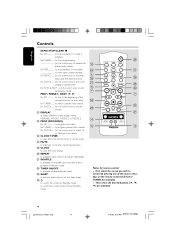
...AUTO PLAY or ONCE mode only. to change disc(s). 6 DISC 1 / DISC 2 / DISC 3 (CD DIRECT) - for PLUG & PLAY...(on or to open the tape deck door. ^ TAPE DECK 2 & TAPE DECK 1 * SOURCE - to select the following: CD / (CD 1•2•3) - for TUNER ......... SEARCH• TUNING à á for CD to select disc tray 1, 2 or 3. English Controls (main system's illustration on page 3) Controls on the display mode selected. 9 VOLUME - to search backward/forward. to switch the system on the system only) to start plug & play mode. to Standby mode. 3 DISPLAY SCREEN...
...AUTO PLAY or ONCE mode only. to change disc(s). 6 DISC 1 / DISC 2 / DISC 3 (CD DIRECT) - for PLUG & PLAY...(on or to open the tape deck door. ^ TAPE DECK 2 & TAPE DECK 1 * SOURCE - to select the following: CD / (CD 1•2•3) - for TUNER ......... SEARCH• TUNING à á for CD to select disc tray 1, 2 or 3. English Controls (main system's illustration on page 3) Controls on the display mode selected. 9 VOLUME - to search backward/forward. to switch the system on the system only) to start plug & play mode. to Standby mode. 3 DISPLAY SCREEN...
User manual
Page 14
... set the timer. ≤ MUTE - to program disc tracks. to switch the system to delete the preset radio station. on the system only) to activate or deactivate the timer. ª SLEEP - to the beginning of the source select keys on the system only) to exit clock setting or cancel timer. PREV / PRESET / NEXT í ë for CD to skip to reset tape counter number. to interrupt or resume sound reproduction. ∞ CLOCK - to select a preset radio station...
... set the timer. ≤ MUTE - to program disc tracks. to switch the system to delete the preset radio station. on the system only) to activate or deactivate the timer. ª SLEEP - to the beginning of the source select keys on the system only) to exit clock setting or cancel timer. PREV / PRESET / NEXT í ë for CD to skip to reset tape counter number. to interrupt or resume sound reproduction. ∞ CLOCK - to select a preset radio station...
User manual
Page 15
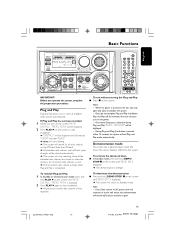
... you operate the system, complete the preparation procedures. If no button is detected during Plug and Play, "CHECK ANTENNA" will stop searching when all available radio stations automatically. FWSTANDBY-ON MINI HIFI SYSTEM Basic Functions VOLUME PR G ISNUCRRREODIUBNLDE English ECO POWER EV PRESET N DEMO PLAY• STOP/ PAUSE CLEAR EARCH • TUNIN DISPLAY PROG CLOCK• TIMER AUTO REPLAY DUBBING REC MUSIC LEVEL VOLUME INTERACTIVE VU METER CD 1•2•3 FM •AM CD TUNER SOURCE TAPE AUX TAPE...
... you operate the system, complete the preparation procedures. If no button is detected during Plug and Play, "CHECK ANTENNA" will stop searching when all available radio stations automatically. FWSTANDBY-ON MINI HIFI SYSTEM Basic Functions VOLUME PR G ISNUCRRREODIUBNLDE English ECO POWER EV PRESET N DEMO PLAY• STOP/ PAUSE CLEAR EARCH • TUNIN DISPLAY PROG CLOCK• TIMER AUTO REPLAY DUBBING REC MUSIC LEVEL VOLUME INTERACTIVE VU METER CD 1•2•3 FM •AM CD TUNER SOURCE TAPE AUX TAPE...
User manual
Page 16
... or press VOLUME -) the sound level. NORMAL ........ All available LEDs will light up and the display screen will have full brightness. MODE 2 .......... To listen through the headphones q Connect the headphones plug to the n socket at the front of the DISC DIRECT PLAY buttons. ➜ The system will switch to Eco Power Standby mode (< 1 Watt) q Press ECO POWER (or press and hold DEMO STOP Ç on the remote control. ➜ The system will be...
... or press VOLUME -) the sound level. NORMAL ........ All available LEDs will light up and the display screen will have full brightness. MODE 2 .......... To listen through the headphones q Connect the headphones plug to the n socket at the front of the DISC DIRECT PLAY buttons. ➜ The system will switch to Eco Power Standby mode (< 1 Watt) q Press ECO POWER (or press and hold DEMO STOP Ç on the remote control. ➜ The system will be...
User manual
Page 17
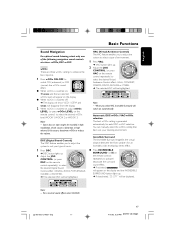
... a time : wOOx, DSC or VAC. Note: - DSC (Digital Sound Control) The DSC feature enables you select VAC, Incredible Surround will be displayed. You can manually select the wOOx setting that best suits your type of music. 1 Press DSC. ➜ DSC button lights up DSC 2 Adjust the JOG CONTROL (or press DSC on automatically. DSC 2 Adjust the JOG CONTROL (or press VAC on the remote control repeatedly) to activate/ deactivate...
... a time : wOOx, DSC or VAC. Note: - DSC (Digital Sound Control) The DSC feature enables you select VAC, Incredible Surround will be displayed. You can manually select the wOOx setting that best suits your type of music. 1 Press DSC. ➜ DSC button lights up DSC 2 Adjust the JOG CONTROL (or press DSC on automatically. DSC 2 Adjust the JOG CONTROL (or press VAC on the remote control repeatedly) to activate/ deactivate...
User manual
Page 18
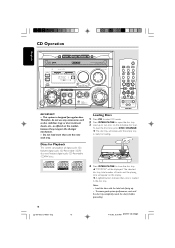
CD Operation English DISC CHANGE 3CD C H A N G E R DISC 1 3 DISC DIRECT PLAY DISC 2 DISC 3 OPEN • CLOSE CD / CD-R / CD-RW COMPATIBLE CD SYNCHRO RECORDING FWSTANDBY-ON MINI HIFI SYSTEM VOLUME ECO POWER DISPLAY PROG CLOCK• TIMER AUTO REPLAY DUBBING REC MUSIC LEVEL VOLUME INTERACTIVE VU METER EXT S EV PRESET N DEMO PLAY• STOP/ PAUSE CLEAR EARCH • TUNIN CD 1•2•3 FM •AM CD TUNER SOURCE TAPE AUX TAPE 1•2 CDR / DVD ON •OFF WOOX LEVEL WOOX DYNAMIC AMPLIFICATION CONTROL SOUND NAVIGATION - This system is designed for...
CD Operation English DISC CHANGE 3CD C H A N G E R DISC 1 3 DISC DIRECT PLAY DISC 2 DISC 3 OPEN • CLOSE CD / CD-R / CD-RW COMPATIBLE CD SYNCHRO RECORDING FWSTANDBY-ON MINI HIFI SYSTEM VOLUME ECO POWER DISPLAY PROG CLOCK• TIMER AUTO REPLAY DUBBING REC MUSIC LEVEL VOLUME INTERACTIVE VU METER EXT S EV PRESET N DEMO PLAY• STOP/ PAUSE CLEAR EARCH • TUNIN CD 1•2•3 FM •AM CD TUNER SOURCE TAPE AUX TAPE 1•2 CDR / DVD ON •OFF WOOX LEVEL WOOX DYNAMIC AMPLIFICATION CONTROL SOUND NAVIGATION - This system is designed for...
User manual
Page 21
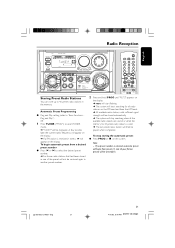
... the display. ➜ If a FM station is used. ➜ The last preset radio station will be displayed. PR G ISNUCRRREODIUBNLDE English FWSTANDBY-ON MINI HIFI SYSTEM Radio Reception VOLUME ECO POWER DISPLAY PROG CLOCK• TIMER AUTO REPLAY DUBBING REC MUSIC LEVEL VOLUME INTERACTIVE VU METER EV PRESET N DEMO PLAY• STOP/ CLEAR PAUSE EARCH • TUNIN CD 1•2•3 FM •AM CD TUNER SOURCE TAPE AUX TAPE 1•2 CDR / DVD ON •OFF WOOX LEVEL WOOX DYNAMIC AMPLIFICATION CONTROL SOUND NAVIGATION...
... the display. ➜ If a FM station is used. ➜ The last preset radio station will be displayed. PR G ISNUCRRREODIUBNLDE English FWSTANDBY-ON MINI HIFI SYSTEM Radio Reception VOLUME ECO POWER DISPLAY PROG CLOCK• TIMER AUTO REPLAY DUBBING REC MUSIC LEVEL VOLUME INTERACTIVE VU METER EV PRESET N DEMO PLAY• STOP/ CLEAR PAUSE EARCH • TUNIN CD 1•2•3 FM •AM CD TUNER SOURCE TAPE AUX TAPE 1•2 CDR / DVD ON •OFF WOOX LEVEL WOOX DYNAMIC AMPLIFICATION CONTROL SOUND NAVIGATION...
User manual
Page 26
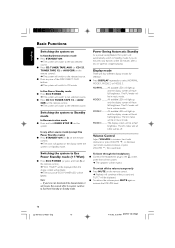
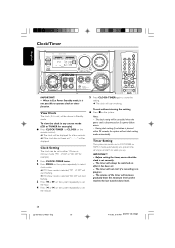
... no button is in Standby mode. IMPORTANT! - English Clock/Timer FWSTANDBY-ON MINI HIFI SYSTEM VOLUME PR ISNUCRRREODIUBNLDE ECO POWER DISPLAY PROG CLOCK• TIMER AUTO REPLAY DUBBING REC MUSIC LEVEL VOLUME INTERACTIVE VU METER EXT S EV PRESET N DEMO STOP/ PLAY• PAUSE CLEAR EARCH • TUNING CD 1•2•3 FM •AM CD TUNER SOURCE TAPE AUX TAPE 1•2 CDR / DVD ON •OFF WOOX LEVEL WOOX DYNAMIC AMPLIFICATION CONTROL SOUND NAVIGATION - JOG DSC VAC IMPORTANT! - The timer will be switched...
... no button is in Standby mode. IMPORTANT! - English Clock/Timer FWSTANDBY-ON MINI HIFI SYSTEM VOLUME PR ISNUCRRREODIUBNLDE ECO POWER DISPLAY PROG CLOCK• TIMER AUTO REPLAY DUBBING REC MUSIC LEVEL VOLUME INTERACTIVE VU METER EXT S EV PRESET N DEMO STOP/ PLAY• PAUSE CLEAR EARCH • TUNING CD 1•2•3 FM •AM CD TUNER SOURCE TAPE AUX TAPE 1•2 CDR / DVD ON •OFF WOOX LEVEL WOOX DYNAMIC AMPLIFICATION CONTROL SOUND NAVIGATION - JOG DSC VAC IMPORTANT! - The timer will be switched...
User manual
Page 27
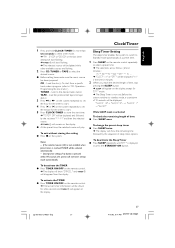
... system. tune to "CD Operation Programming the disc tracks"). To activate the TIMER q Press TIMER ON/OFF on the remote control repeatedly to select a preset time. ➜ The selections are flashing. 2 Press CD, TUNER or TAPE to select the desired source. TUNER - Sleep Timer Setting The sleep timer enables the system to switch to Standby mode automatically at a preset time. 1 Press SLEEP on the remote control. ➜ The last set timer "XX:XX" and then the selected source. ➜ TIMER will disappear from a specific track, make...
... system. tune to "CD Operation Programming the disc tracks"). To activate the TIMER q Press TIMER ON/OFF on the remote control repeatedly to select a preset time. ➜ The selections are flashing. 2 Press CD, TUNER or TAPE to select the desired source. TUNER - Sleep Timer Setting The sleep timer enables the system to switch to Standby mode automatically at a preset time. 1 Press SLEEP on the remote control. ➜ The last set timer "XX:XX" and then the selected source. ➜ TIMER will disappear from a specific track, make...
User manual
Page 28
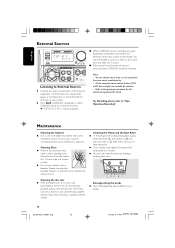
.... Wipe the disc from the external source is selected, any commercially available cleaner. Refer to "Tape Operation/Recording". Follow the instructions supplied with a cleaning cloth. EXT S English External Sources STANDBY-ON ECO POWER EV PRESET N PR G DEMO PLAY• STOP/ CLEAR PAUSE EARCH • TUNIN DISPLAY PROG CLOCK• TIMER AUTO REPLAY DUBBING REC MUSIC LEVEL INTERACTIVE VU MET CD 1•2•3 FM •AM CD TUNER SOURCE TAPE AUX TAPE 1•2 CDR / DVD ON...
.... Wipe the disc from the external source is selected, any commercially available cleaner. Refer to "Tape Operation/Recording". Follow the instructions supplied with a cleaning cloth. EXT S English External Sources STANDBY-ON ECO POWER EV PRESET N PR G DEMO PLAY• STOP/ CLEAR PAUSE EARCH • TUNIN DISPLAY PROG CLOCK• TIMER AUTO REPLAY DUBBING REC MUSIC LEVEL INTERACTIVE VU MET CD 1•2•3 FM •AM CD TUNER SOURCE TAPE AUX TAPE 1•2 CDR / DVD ON...
User manual
Page 30
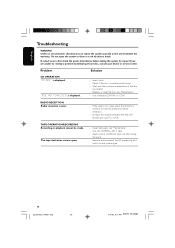
... the points listed below before taking the system for better reception. - Solution - Check if the disc is displayed. Use only NORMAL (IEC I) tape. - Problem CD OPERATION "NO DISC" is inserted upside down. - Wait until the moisture condensation at the lens has cleared. - Increase the distance between the Mini HiFi System and your dealer or service center. Remove and reconnect the AC power plug and switch on the system again. 30...
... the points listed below before taking the system for better reception. - Solution - Check if the disc is displayed. Use only NORMAL (IEC I) tape. - Problem CD OPERATION "NO DISC" is inserted upside down. - Wait until the moisture condensation at the lens has cleared. - Increase the distance between the Mini HiFi System and your dealer or service center. Remove and reconnect the AC power plug and switch on the system again. 30...

User manual
Page 31
... light. Remove and reconnect the AC power plug and switch on the timer. - Disconnect the headphones. - Press TIMER ON/OFF to switch on the system again. - Power has been interrupted or the power cord has been disconnected. Not all lighted buttons are reversed. The system displays features automatically and buttons start flashing. - Check the speaker connections and location. - Adjust the volume. - Check that the speakers are pressed. Reduce the distance between the remote control and the system. - Replace...
... light. Remove and reconnect the AC power plug and switch on the timer. - Disconnect the headphones. - Press TIMER ON/OFF to switch on the system again. - Power has been interrupted or the power cord has been disconnected. Not all lighted buttons are reversed. The system displays features automatically and buttons start flashing. - Check the speaker connections and location. - Adjust the volume. - Check that the speakers are pressed. Reduce the distance between the remote control and the system. - Replace...
User manual
Page 32
... from state/province to state/province. Philips Service Solutions Group, P.O. LIMITED WARRANTY AUDIO SYSTEM One Year Free Labor One Year Free Service on Parts This product must be carried in for us to notify you if necessary. Please check your owner's manual before requesting service. All parts, including repaired and replaced parts, are not readily available). MODEL SERIAL MAKE SURE YOU KEEP... A sales receipt or other document showing that requires...
... from state/province to state/province. Philips Service Solutions Group, P.O. LIMITED WARRANTY AUDIO SYSTEM One Year Free Labor One Year Free Service on Parts This product must be carried in for us to notify you if necessary. Please check your owner's manual before requesting service. All parts, including repaired and replaced parts, are not readily available). MODEL SERIAL MAKE SURE YOU KEEP... A sales receipt or other document showing that requires...


