Leaflet
Page 2
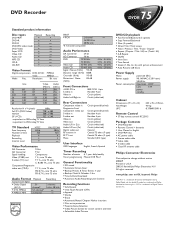
... type) User Interface OSD languages English, French, Spanish Timer Recording Number of Digital Theater Systems, Inc. All rights reserved www.philips.com or AOL keyword: Philips VCR Plus+ is a trademark of events 6; 1 year; Dolby Digital and the double-D symbol are trademarks of lines Playback...Contents • DVD Recorder • Remote Control + batteries • User Manual in English • DVD+RW disc • AC power cable • Stereo audio cable • Video cable • S-video cable • Coax RF antenna cable Philips Consumer Electronics Data subject to 250 ...
... type) User Interface OSD languages English, French, Spanish Timer Recording Number of Digital Theater Systems, Inc. All rights reserved www.philips.com or AOL keyword: Philips VCR Plus+ is a trademark of events 6; 1 year; Dolby Digital and the double-D symbol are trademarks of lines Playback...Contents • DVD Recorder • Remote Control + batteries • User Manual in English • DVD+RW disc • AC power cable • Stereo audio cable • Video cable • S-video cable • Coax RF antenna cable Philips Consumer Electronics Data subject to 250 ...

Quick start guide
Page 1
... owner's manual. Connect the power cords of this Quick-Use Guide to the MAINS (AC Power) jack on the rear of the Recorder. Your TV's remote may be near channel zero (0). You should remove the Demo Pin from the G-LINK jack on the rear of the DVD Recorder and to the... (or RF IN or 75 ohm input) jack, see the DVD Recorder's Initial Setup menu on the TV the first time you see the blue Philips DVD background picture or the Initial Setup Screen on the TV (when the DVD Recorder is on). • If your TV manual for connection instructions...
... owner's manual. Connect the power cords of this Quick-Use Guide to the MAINS (AC Power) jack on the rear of the Recorder. Your TV's remote may be near channel zero (0). You should remove the Demo Pin from the G-LINK jack on the rear of the DVD Recorder and to the... (or RF IN or 75 ohm input) jack, see the DVD Recorder's Initial Setup menu on the TV the first time you see the blue Philips DVD background picture or the Initial Setup Screen on the TV (when the DVD Recorder is on). • If your TV manual for connection instructions...

Quick start guide
Page 2
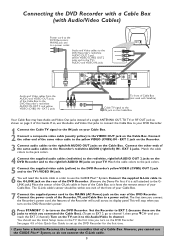
...colors. 5 You will need the G-Link cable in front of the Cable Box so it faces the remote sensor of your Cable Box. The first time you connect the DVD Recorder's power cord, the features... (CVBS) OUT 2 jack of the Recorder will stop when you turn on the DVD Recorder. Your TV's remote may be labelled RF OUT, TO TV, or ANTENNA OUT. The IN jack may be near channel zero ...(0). The G-Link cable's sensor should see the blue Philips DVD background picture or the Initial Setup Screen on the TV (when the DVD Recorder is still attached to...
...colors. 5 You will need the G-Link cable in front of the Cable Box so it faces the remote sensor of your Cable Box. The first time you connect the DVD Recorder's power cord, the features... (CVBS) OUT 2 jack of the Recorder will stop when you turn on the DVD Recorder. Your TV's remote may be labelled RF OUT, TO TV, or ANTENNA OUT. The IN jack may be near channel zero ...(0). The G-Link cable's sensor should see the blue Philips DVD background picture or the Initial Setup Screen on the TV (when the DVD Recorder is still attached to...
Quick start guide
Page 3
... jacks RIGHT AUDIO IN LEFT AUDIO IN VIDEO IN MAINS IN - EXT 2 jacks. See pages 4-5 of this Quick-Use Guide to set it faces the remote sensor of your Cable Box. 7 Connect the supplied power cord to the MAINS (AC Power) jack on the TV; Match the cable colors to the...
... jacks RIGHT AUDIO IN LEFT AUDIO IN VIDEO IN MAINS IN - EXT 2 jacks. See pages 4-5 of this Quick-Use Guide to set it faces the remote sensor of your Cable Box. 7 Connect the supplied power cord to the MAINS (AC Power) jack on the TV; Match the cable colors to the...
Quick start guide
Page 4
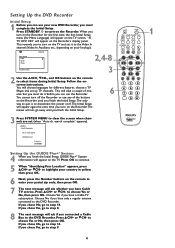
...-, and OK buttons on the Recorder. This will take a couple of the buttons on the Recorder until you must do it to turn on the remote to clear the screen when channels are set (when "Auto ch. Installation Auto Ch. to highlight your country in yellow, then press OK. 6 Next, press... message will ask whether you have only a regular antenna connected to the DVD Recorder. If you chose Yes, go away until you turn on the remote to enter your hookup). to continue. 5 When "Identifying Your Location" appears, press 8CH+ or 9CH- If you turn on your postal zip code, then press...
...-, and OK buttons on the Recorder. This will take a couple of the buttons on the Recorder until you must do it to turn on the remote to clear the screen when channels are set (when "Auto ch. Installation Auto Ch. to highlight your country in yellow, then press OK. 6 Next, press... message will ask whether you have only a regular antenna connected to the DVD Recorder. If you chose Yes, go away until you turn on the remote to enter your hookup). to continue. 5 When "Identifying Your Location" appears, press 8CH+ or 9CH- If you turn on your postal zip code, then press...
Quick start guide
Page 6
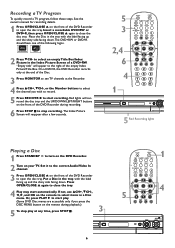
...k G 4 CLEAR MUTE 1 OPEN/CLOSE GUIDE UP DOWN 5 Red Recording lights RIGHT Playing a Disc 1 Press STANDBY y to turn on the DVD Recorder. 2 Turn on the remote to open the disc tray. Put a Disc in the Index Picture Screen of the following logos. 2 Press 9CH- to stop play . (Some DVD Disc menus...MENU button on the front of the empty Index Picture/Title Box. See the owner's manual for recording details. 1 Press OPEN/CLOSE A on the remote during recording. 6 Press STOP C to select an empty Title Box/Index Picture in the tray, with the label facing up and the shiny side...
...k G 4 CLEAR MUTE 1 OPEN/CLOSE GUIDE UP DOWN 5 Red Recording lights RIGHT Playing a Disc 1 Press STANDBY y to turn on the DVD Recorder. 2 Turn on the remote to open the disc tray. Put a Disc in the Index Picture Screen of the following logos. 2 Press 9CH- to stop play . (Some DVD Disc menus...MENU button on the front of the empty Index Picture/Title Box. See the owner's manual for recording details. 1 Press OPEN/CLOSE A on the remote during recording. 6 Press STOP C to select an empty Title Box/Index Picture in the tray, with the label facing up and the shiny side...
Quick start guide
Page 7
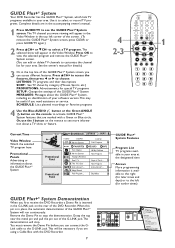
...(Y/C) PB L PB AUDIO PR R PR IN - SCHEDULE: Lists planned recordings or Favorite programs 4 Use the Blue AUDIO Y button or the Green ANGLE button on the remote to activate GUIDE Plus+® System features that are in the accompanying owner's manual. 1 Press GUIDE/TV to see more information about a TV show will... top line of the GUIDE Plus+® System screen, you need assistance or service. When this pin is inserted in the G-LINK jack on the remote to access the features, then press ; You must remove the Demo Pin before you are using a Cable Box with a Green or Blue circle. The...
...(Y/C) PB L PB AUDIO PR R PR IN - SCHEDULE: Lists planned recordings or Favorite programs 4 Use the Blue AUDIO Y button or the Green ANGLE button on the remote to activate GUIDE Plus+® System features that are in the accompanying owner's manual. 1 Press GUIDE/TV to see more information about a TV show will... top line of the GUIDE Plus+® System screen, you need assistance or service. When this pin is inserted in the G-LINK jack on the remote to access the features, then press ; You must remove the Demo Pin before you are using a Cable Box with a Green or Blue circle. The...
Quick start guide
Page 8
... 06/18/2003 K Timer Information Box Current time or time/date of a DVD+R or DVD+RW and provides access to play the Disc on the remote.The symbols in Hungary 3103 605 20832 3194/000 (WwnN N wnwWNnwNwn NnwWnwWnN) DVDR 80/17 Access the System Menu by pressing the SYSTEM MENU but...
... 06/18/2003 K Timer Information Box Current time or time/date of a DVD+R or DVD+RW and provides access to play the Disc on the remote.The symbols in Hungary 3103 605 20832 3194/000 (WwnN N wnwWNnwNwn NnwWnwWnN) DVDR 80/17 Access the System Menu by pressing the SYSTEM MENU but...
User manual
Page 3
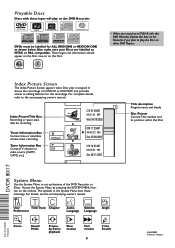
...Started Playable Discs 7 General Information 8 Hookups 9-17 Initial Setup 18-19 Basic Play and Recording Quick Disc Playback 20 Quick Recording 21 Controls Remote Control 22-23 Front Panel 24 Rear Panel 25 Advanced Installation TV Channel Programming 26 VCR Plus+® Channels 27 Clock Setting 28-29 ...54-58 DVD Recorder Features Menu 59 Picture Settings 60 Digital Output 61 Analog Output 62 Language Settings 63 Night Mode, Remote Control Used 64 Information You May Need Glossary 65 Helpful Hints 66-67 Diagnostic Test 68 Specifications 69 Limited Warranty 70 Information Index...
...Started Playable Discs 7 General Information 8 Hookups 9-17 Initial Setup 18-19 Basic Play and Recording Quick Disc Playback 20 Quick Recording 21 Controls Remote Control 22-23 Front Panel 24 Rear Panel 25 Advanced Installation TV Channel Programming 26 VCR Plus+® Channels 27 Clock Setting 28-29 ...54-58 DVD Recorder Features Menu 59 Picture Settings 60 Digital Output 61 Analog Output 62 Language Settings 63 Night Mode, Remote Control Used 64 Information You May Need Glossary 65 Helpful Hints 66-67 Diagnostic Test 68 Specifications 69 Limited Warranty 70 Information Index...
User manual
Page 6
...edit camcorder recordings, and quickly access your new DVD Recorder. Confidential unpublished works. Copyright 1992-1999 Dolby Laboratories. Copyright 2003 Philips Consumer Electronics. Read this manual carefully to understand the latest features, then enjoy your recordings in the Recorder until normal playback... q Repeat and Repeat A-B playback q Time Search q VCR Plus+ Programming Package Contents q DVD Recorder q Remote control with two AA batteries q AC power cord q One blank Philips DVD+RW q One RF coaxial cable (black with silver tip, with single prong in center of DVD, ...
...edit camcorder recordings, and quickly access your new DVD Recorder. Confidential unpublished works. Copyright 1992-1999 Dolby Laboratories. Copyright 2003 Philips Consumer Electronics. Read this manual carefully to understand the latest features, then enjoy your recordings in the Recorder until normal playback... q Repeat and Repeat A-B playback q Time Search q VCR Plus+ Programming Package Contents q DVD Recorder q Remote control with two AA batteries q AC power cord q One blank Philips DVD+RW q One RF coaxial cable (black with silver tip, with single prong in center of DVD, ...
User manual
Page 8
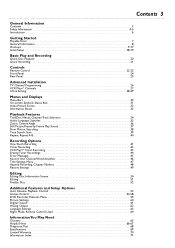
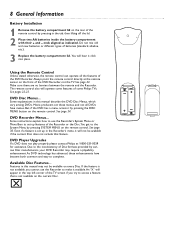
... set up in this manual may require a playability enhancement. DVD Player Upgrades If a DVD does not play properly, please contact Philips at the remote sensor on the front of the DVD Recorder. Due to complete. As DVD technology has advanced, these menus, and not all ... Available Disc Features... An "X" will operate some Philips TVs. See pages 22-23. _ DVD Disc Menus... Some explanations in the Recorder's menu, it will hear it click into place. _ + Using the Remote Control Unless stated otherwise, the remote control can operate all DVDs have become both common ...
... set up in this manual may require a playability enhancement. DVD Player Upgrades If a DVD does not play properly, please contact Philips at the remote sensor on the front of the DVD Recorder. Due to complete. As DVD technology has advanced, these menus, and not all ... Available Disc Features... An "X" will operate some Philips TVs. See pages 22-23. _ DVD Disc Menus... Some explanations in the Recorder's menu, it will hear it click into place. _ + Using the Remote Control Unless stated otherwise, the remote control can operate all DVDs have become both common ...
User manual
Page 9
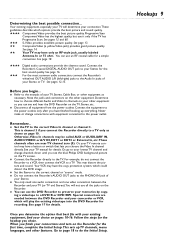
...and turn on page 10. Connect the Recorder's Coaxial DIGITAL AUDIO OUT jack to your other features. Before you can see the blue Philips DVD background picture on the TV screen. q Disconnect all the jacks on pages 10-16. See page 17 for the best sound quality.... 555 S-Video provides excellent picture quality. q Refer to your lowest TV channel and change connections with your existing equipment, find your TV remote control may have finished hooking up TV channels, menu languages, and other equipment so you begin... Or, your choice on the Recorder. This...
...and turn on page 10. Connect the Recorder's Coaxial DIGITAL AUDIO OUT jack to your other features. Before you can see the blue Philips DVD background picture on the TV screen. q Disconnect all the jacks on pages 10-16. See page 17 for the best sound quality.... 555 S-Video provides excellent picture quality. q Refer to your lowest TV channel and change connections with your existing equipment, find your TV remote control may have finished hooking up TV channels, menu languages, and other equipment so you begin... Or, your choice on the Recorder. This...
User manual
Page 10
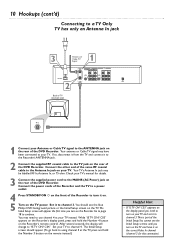
... TV ON? C03" appears on the Recorder's display panel, press and hold the Number 3 button on the remote instead.) Helpful Hint • If "IS TV ON? Your TV's Antenna In jack may have it to channel 3.... outlet. 4 Press STANDBY-ON y on the front of the Initial Setup.You cannot see the blue Philips DVD background picture or the Initial Setup screen on the TV. After several seconds, the display will appear...you need to use channel 4 at the TV, press and hold the Number 4 button on the Recorder's remote control. If so, disconnect it from the TV and connect it on. 5 Turn on the TV power...
... TV ON? C03" appears on the Recorder's display panel, press and hold the Number 3 button on the remote instead.) Helpful Hint • If "IS TV ON? Your TV's Antenna In jack may have it to channel 3.... outlet. 4 Press STANDBY-ON y on the front of the Initial Setup.You cannot see the blue Philips DVD background picture or the Initial Setup screen on the TV. After several seconds, the display will appear...you need to use channel 4 at the TV, press and hold the Number 4 button on the Recorder's remote control. If so, disconnect it from the TV and connect it on. 5 Turn on the TV power...
User manual
Page 11
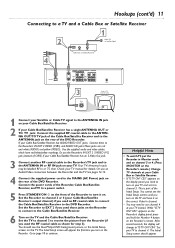
... shown for details. Helpful Hints • To watch TV, put the Recorder in Monitor mode and on channel 3 or 4. (Press MONITOR on the Recorder's remote.) Change TV channels at your TV instead. C04." Set your Cable Box/Satellite Receiver has AUDIO/VIDEO OUT jacks: Connect them to the Recorder's IN...the TV and the Cable Box/Satellite Receiver. Your TV's Antenna In jack may need to turn it to channel 3. You cannot see the blue Philips DVD background picture or the Initial Setup screen on the rear of the DVD Recorder. After several seconds, the display will appear the first time...
... shown for details. Helpful Hints • To watch TV, put the Recorder in Monitor mode and on channel 3 or 4. (Press MONITOR on the Recorder's remote.) Change TV channels at your TV instead. C04." Set your Cable Box/Satellite Receiver has AUDIO/VIDEO OUT jacks: Connect them to the Recorder's IN...the TV and the Cable Box/Satellite Receiver. Your TV's Antenna In jack may need to turn it to channel 3. You cannot see the blue Philips DVD background picture or the Initial Setup screen on the rear of the DVD Recorder. After several seconds, the display will appear the first time...
User manual
Page 12
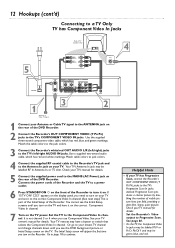
... L/R (left/right) jacks to the Component Video In channel. You cannot see the DVD background picture or Initial Setup screen on the Recorder. Your TV remote may be green, blue, and red. Go to page 18 to continue. 4 Helpful Hints • If your TV owner's manual for details. See page 60...
... L/R (left/right) jacks to the Component Video In channel. You cannot see the DVD background picture or Initial Setup screen on the Recorder. Your TV remote may be green, blue, and red. Go to page 18 to continue. 4 Helpful Hints • If your TV owner's manual for details. See page 60...
User manual
Page 13
... the TV to a power outlet. 6 Press STANDBY-ON y on the front of the Recorder to the Antenna In jack on the TV power. Your TV remote may have it on the Recorder. Go to page 18 to the MAINS (AC Power) jack on the TV screen. Check your TV's manual for...
... the TV to a power outlet. 6 Press STANDBY-ON y on the front of the Recorder to the Antenna In jack on the TV power. Your TV remote may have it on the Recorder. Go to page 18 to the MAINS (AC Power) jack on the TV screen. Check your TV's manual for...
User manual
Page 14
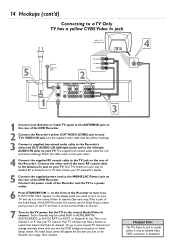
... and to the left/right AUDIO IN jacks on your TV manual. Your TV's Antenna In jack may have it on the Recorder. Your TV remote may be labelled RF In,Antenna In, or 75 ohm. Use the supplied video cable that selects the Video In channel.
... and to the left/right AUDIO IN jacks on your TV manual. Your TV's Antenna In jack may have it on the Recorder. Your TV remote may be labelled RF In,Antenna In, or 75 ohm. Use the supplied video cable that selects the Video In channel.
User manual
Page 15
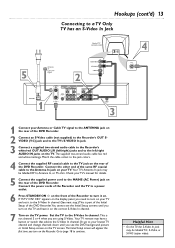
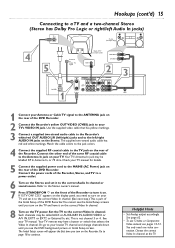
... channel. Your TV's Antenna In jack may have it to the correct Video In channel. (See next step.) This is not channel 3 or 4. Your TV remote may be called AUX or AUXILIARY IN,AUDIO/VIDEO or A/V IN, EXT1 or EXT2 or External In, etc. Helpful Hints • Set Analog output accordingly...
... channel. Your TV's Antenna In jack may have it to the correct Video In channel. (See next step.) This is not channel 3 or 4. Your TV remote may be called AUX or AUXILIARY IN,AUDIO/VIDEO or A/V IN, EXT1 or EXT2 or External In, etc. Helpful Hints • Set Analog output accordingly...
User manual
Page 16
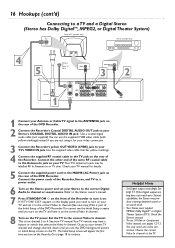
.... 6 Turn on the Stereo power and set it on the correct Video In channel. 8 Turn on the TV power. See your TV manual.Your TV remote may be labelled RF In,Antenna In, or 75 ohm. Choose the correct Video In channel at all. • Your Stereo must support MPEG2, Dolby...
.... 6 Turn on the Stereo power and set it on the correct Video In channel. 8 Turn on the TV power. See your TV manual.Your TV remote may be labelled RF In,Antenna In, or 75 ohm. Choose the correct Video In channel at all. • Your Stereo must support MPEG2, Dolby...
User manual
Page 21
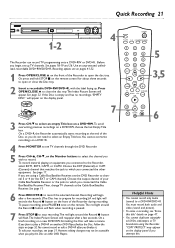
...close the disc tray.The Index Picture Screen will take a minute. If you are on pages 41-52. 1 Press OPEN/CLOSE A on the remote control for recording.) A red light will reappear after you plan to the Recorder, select EXT1, EXT2, CAM1, or CAM2. Choose the output channel...cannot duplicate copyrighted DVDs, videotapes, or TV broadcasts using a Cable Box/Satellite Receiver, set up . To pause recording, press PAUSE k once on the remote.The red light around the Record I button will flash.The Index Picture Screen will encircle the Record I button will flash when recording is empty and...
...close the disc tray.The Index Picture Screen will take a minute. If you are on pages 41-52. 1 Press OPEN/CLOSE A on the remote control for recording.) A red light will reappear after you plan to the Recorder, select EXT1, EXT2, CAM1, or CAM2. Choose the output channel...cannot duplicate copyrighted DVDs, videotapes, or TV broadcasts using a Cable Box/Satellite Receiver, set up . To pause recording, press PAUSE k once on the remote.The red light around the Record I button will flash.The Index Picture Screen will encircle the Record I button will flash when recording is empty and...


