
Leaflet
Page 2
... connecting DVD players or recorders to high-end TV sets. DVD Recorder/VCR DVDR600VR/37 Specifications Video Recording • Tape speeds: LP, SP • Recording enhancements...formats: MPEG2 • Audio compression: Dolby Digital Accessories • Included Accessories: Quick start guide, User Manual, Remote Control, Audio Cable, Coax RF antenna cable, CVBS video cable Connectivity • Connectivity Enhancements:...separate wires for the luminance and colour difference signals to the integrated solution. Philips DVD Recorders store audio in YPbPr format, no line structure. 6 hours ...
... connecting DVD players or recorders to high-end TV sets. DVD Recorder/VCR DVDR600VR/37 Specifications Video Recording • Tape speeds: LP, SP • Recording enhancements...formats: MPEG2 • Audio compression: Dolby Digital Accessories • Included Accessories: Quick start guide, User Manual, Remote Control, Audio Cable, Coax RF antenna cable, CVBS video cable Connectivity • Connectivity Enhancements:...separate wires for the luminance and colour difference signals to the integrated solution. Philips DVD Recorders store audio in YPbPr format, no line structure. 6 hours ...
User manual
Page 1
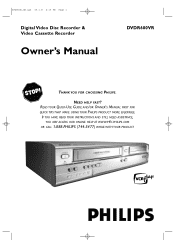
NEED HELP FAST? READ YOUR QUICK-USE GUIDE AND/OR OWNER'S MANUAL FIRST FOR QUICK TIPS THAT MAKE USING YOUR PHILIPS PRODUCT MORE ENJOYABLE. IF YOU HAVE READ YOUR INSTRUCTIONS AND STILL NEED ASSISTANCE, YOU MAY ACCESS OUR ONLINE HELP AT WWW.P4C.PHILIPS.COM OR CALL 1-888-PHILIPS (744-5477) WHILE WITH YOUR PRODUCT. ® E9480UD_EN.qx3 05.1.8 4:15 PM Page 1 Digital Video Disc Recorder & Video Cassette Recorder Owner's Manual DVDR600VR THANK YOU FOR CHOOSING PHILIPS.
NEED HELP FAST? READ YOUR QUICK-USE GUIDE AND/OR OWNER'S MANUAL FIRST FOR QUICK TIPS THAT MAKE USING YOUR PHILIPS PRODUCT MORE ENJOYABLE. IF YOU HAVE READ YOUR INSTRUCTIONS AND STILL NEED ASSISTANCE, YOU MAY ACCESS OUR ONLINE HELP AT WWW.P4C.PHILIPS.COM OR CALL 1-888-PHILIPS (744-5477) WHILE WITH YOUR PRODUCT. ® E9480UD_EN.qx3 05.1.8 4:15 PM Page 1 Digital Video Disc Recorder & Video Cassette Recorder Owner's Manual DVDR600VR THANK YOU FOR CHOOSING PHILIPS.
User manual
Page 6
... from Gemstar Development Corporation. Please observe the local regulations regarding the disposal of the Gemstar Development Corporation. Read this manual carefully to understand the latest features, then enjoy your DVD recordings in a cabinet, allow about one inch of ...space all around the Recorder for ventilation. Manufactured under license from Dolby Laboratories. Copyright 1992-1999 Dolby Laboratories. Copyright 2004 Philips Consumer Electronics. Confidential unpublished works. E9480UD_EN.qx3 05.1.8 4:15 PM Page 6 6 Introduction Welcome! "Dolby," "Pro Logic," and...
... from Gemstar Development Corporation. Please observe the local regulations regarding the disposal of the Gemstar Development Corporation. Read this manual carefully to understand the latest features, then enjoy your DVD recordings in a cabinet, allow about one inch of ...space all around the Recorder for ventilation. Manufactured under license from Dolby Laboratories. Copyright 1992-1999 Dolby Laboratories. Copyright 2004 Philips Consumer Electronics. Confidential unpublished works. E9480UD_EN.qx3 05.1.8 4:15 PM Page 6 6 Introduction Welcome! "Dolby," "Pro Logic," and...
User manual
Page 8
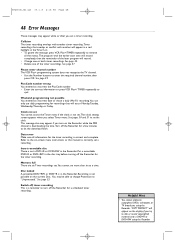
...not available, you try the feature again. (Some features are only available during play , then try to make it by pressing in this manual may require a free playability enhancement or upgrade. Or, try stopping or starting play , while others are no barriers between the remote and... set up features of the Recorder or the Disc.You get to complete. Make sure there are accessible only when play properly, please contact Philips for assistance. Available Disc Features... An "X" will not be available on every Disc. E9480UD_EN.qx3 05.1.8 4:15 PM Page 8 8 General...
...not available, you try the feature again. (Some features are only available during play , then try to make it by pressing in this manual may require a free playability enhancement or upgrade. Or, try stopping or starting play , while others are no barriers between the remote and... set up features of the Recorder or the Disc.You get to complete. Make sure there are accessible only when play properly, please contact Philips for assistance. Available Disc Features... An "X" will not be available on every Disc. E9480UD_EN.qx3 05.1.8 4:15 PM Page 8 8 General...
User manual
Page 9
... connect the Recorder to another VCR, then connect the VCR to your lowest TV channel and change connections with your existing equipment, find your TV manual for the best sound quality. Or, go to a TV.Your VCR may distort the picture and sound of a Disc or Videocassette playing on...Antenna In or 75 ohm. Your existing equipment, especially your TV, will determine your Stereo or TV. Before you begin... ● Refer to the manuals of this Recorder, you connect the Recorder directly to which may have connected your Antenna or Cable TV signal already.You can use the DVD...
... connect the Recorder to another VCR, then connect the VCR to your lowest TV channel and change connections with your existing equipment, find your TV manual for the best sound quality. Or, go to a TV.Your VCR may distort the picture and sound of a Disc or Videocassette playing on...Antenna In or 75 ohm. Your existing equipment, especially your TV, will determine your Stereo or TV. Before you begin... ● Refer to the manuals of this Recorder, you connect the Recorder directly to which may have connected your Antenna or Cable TV signal already.You can use the DVD...
User manual
Page 10
... end of the same RF coaxial cable to the Antenna In jack on the correct Video In channel (channel 3 for this connection). Check your TV's manual for several seconds until you may need to turn off the Recorder. Set it on your TV. Your TV's Antenna In jack may have it...
... end of the same RF coaxial cable to the Antenna In jack on the correct Video In channel (channel 3 for this connection). Check your TV's manual for several seconds until you may need to turn off the Recorder. Set it on your TV. Your TV's Antenna In jack may have it...
User manual
Page 11
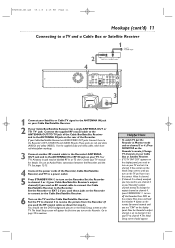
... until you turn on the Recorder's remote.) Change TV channels at your Cable Box or Satellite Receiver. • If "IS TV ON? Set your TV manual for several seconds until you see the DVD background picture or the Initial Setup screen on the Recorder. Check your TV to channel 4.The Initial...
... until you turn on the Recorder's remote.) Change TV channels at your Cable Box or Satellite Receiver. • If "IS TV ON? Set your TV manual for several seconds until you see the DVD background picture or the Initial Setup screen on the Recorder. Check your TV to channel 4.The Initial...
User manual
Page 12
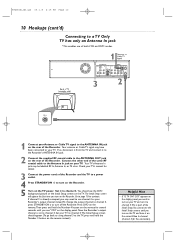
.... 5 Connect the power cords of the Recorder and the TV to a power outlet. 6 Press STANDBY-ON y to turn on the Recorder. Check your TV manual for details. C03" appears on the display panel, you need to turn on your TV has Progressive Scan, connect the Recorder's COMPONENT VIDEO OUT (Y PB.... E9480UD_EN.qx3 05.1.8 4:15 PM Page 12 12 Hookups (cont'd) Connecting to a TV Only TV has Component Video In Jacks 1 Connect your TV owner's manual for details. Use component video cable (not supplied), which has red and white markings. Use the supplied two-strand audio cable, which has red, blue...
.... 5 Connect the power cords of the Recorder and the TV to a power outlet. 6 Press STANDBY-ON y to turn on the Recorder. Check your TV manual for details. C03" appears on the display panel, you need to turn on your TV has Progressive Scan, connect the Recorder's COMPONENT VIDEO OUT (Y PB.... E9480UD_EN.qx3 05.1.8 4:15 PM Page 12 12 Hookups (cont'd) Connecting to a TV Only TV has Component Video In Jacks 1 Connect your TV owner's manual for details. Use component video cable (not supplied), which has red and white markings. Use the supplied two-strand audio cable, which has red, blue...
User manual
Page 13
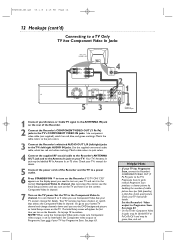
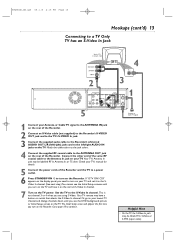
...-ON y to the Antenna In jack on your TV and set it on the correct S-Video In channel. 7 Turn on your TV. Check your TV's manual for details. 5 Connect the power cords of the same RF coaxial cable to turn on the TV power. C03" appears on the display panel, you...
...-ON y to the Antenna In jack on your TV and set it on the correct S-Video In channel. 7 Turn on your TV. Check your TV's manual for details. 5 Connect the power cords of the same RF coaxial cable to turn on the TV power. C03" appears on the display panel, you...
User manual
Page 14
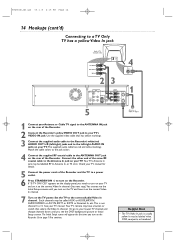
.... If "IS TV ON? Use the supplied video cable that selects the Video In channel. Connect the other end of the Recorder. Check your TV manual for details. 5 Connect the power cords of the Recorder. 2 Connect the Recorder's yellow VIDEO OUT jack to your TV's VIDEO IN jack. See your TV.... This is usually yellow. It may have it to turn on the TV power. C03" appears on the display panel, you turn on your TV manual. The supplied audio cable has red and white markings.
.... If "IS TV ON? Use the supplied video cable that selects the Video In channel. Connect the other end of the Recorder. Check your TV manual for details. 5 Connect the power cords of the Recorder. 2 Connect the Recorder's yellow VIDEO OUT jack to your TV's VIDEO IN jack. See your TV.... This is usually yellow. It may have it to turn on the TV power. C03" appears on the display panel, you turn on your TV manual. The supplied audio cable has red and white markings.

User manual
Page 15
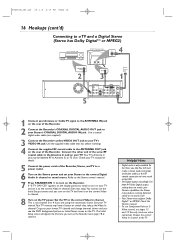
... cable to the ANTENNA OUT jack on the rear of the Recorder, Stereo, and TV to turn on the Stereo. Refer to the Stereo owner's manual. 7 Press STANDBY-ON y to a power outlet. 6 Turn on the Stereo and set it on the correct Video In channel. 8 Turn on the Recorder. Set the... that has yellow markings. 3 Connect the supplied audio cable to the Recorder's white/red AUDIO OUT L/R (left/right) jacks and to your TV manual. Check your TV manual for details. 5 Connect the power cords of the Recorder. Or, go to the left/right AUDIO IN jacks on the Recorder. Use the supplied...
... cable to the ANTENNA OUT jack on the rear of the Recorder, Stereo, and TV to turn on the Stereo. Refer to the Stereo owner's manual. 7 Press STANDBY-ON y to a power outlet. 6 Turn on the Stereo and set it on the correct Video In channel. 8 Turn on the Recorder. Set the... that has yellow markings. 3 Connect the supplied audio cable to the Recorder's white/red AUDIO OUT L/R (left/right) jacks and to your TV manual. Check your TV manual for details. 5 Connect the power cords of the Recorder. Or, go to the left/right AUDIO IN jacks on the Recorder. Use the supplied...
User manual
Page 16
...TV's Antenna In jack may have it on the correct Video In channel. 8 Turn on the TV power. If "IS TV ON? Check the Stereo's manual. • To use Component Video or SVideo instead, see the Initial Setup screens until you need one video connection. Set the TV to your Stereo...'s COAXIAL DIGITAL AUDIO IN jack. Check your TV manual for the Discs you turn on your Stereo to the correct Digital Audio In channel or sound source. This is only available for details. 5 Connect...
...TV's Antenna In jack may have it on the correct Video In channel. 8 Turn on the TV power. If "IS TV ON? Check the Stereo's manual. • To use Component Video or SVideo instead, see the Initial Setup screens until you need one video connection. Set the TV to your Stereo...'s COAXIAL DIGITAL AUDIO IN jack. Check your TV manual for the Discs you turn on your Stereo to the correct Digital Audio In channel or sound source. This is only available for details. 5 Connect...
User manual
Page 17
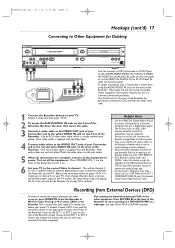
... marked with yellow. (One video cable is supplied with a Camcorder is supplied with the jacks on the front of the Recorder). See your VCR/Camcorder manual to your TV to the connection details on pages 10-16. This is a common connection possibility. Press RECORD I on the front of the Recorder to...
... marked with yellow. (One video cable is supplied with a Camcorder is supplied with the jacks on the front of the Recorder). See your VCR/Camcorder manual to your TV to the connection details on pages 10-16. This is a common connection possibility. Press RECORD I on the front of the Recorder to...
User manual
Page 18
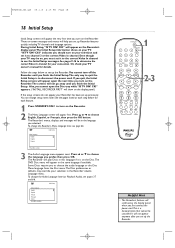
... will appear the very first time you turn on your TV. The Recorder's menus, displays, and messages will be cancelled. Or, check your TV owner's manual for your connection. Follow the steps below for each step below to set it is on the Recorder. 2 The Menu Language screen will not go...
... will appear the very first time you turn on your TV. The Recorder's menus, displays, and messages will be cancelled. Or, check your TV owner's manual for your connection. Follow the steps below for each step below to set it is on the Recorder. 2 The Menu Language screen will not go...
User manual
Page 30
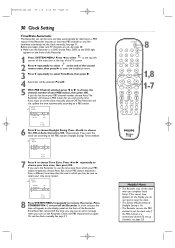
...Press s or B repeatedly to choose the channel number of the Recorder. But, if your PBS station broadcasts from which you and set the clock manually, choose Off.The Recorder will not update the time automatically according to turn on the front of your time zone, then press OK. B To... MENU repeatedly to choose Daylight Saving. Press STANDBY-ON y to a PBS station. Check the PBS channel and try again. Or, set the clock manually. E9480UD_EN.qx3 05.1.8 4:16 PM Page 30 30 Clock Setting Time/Date Automatic The Recorder can use the time zone from a different time zone than...
...Press s or B repeatedly to choose the channel number of the Recorder. But, if your PBS station broadcasts from which you and set the clock manually, choose Off.The Recorder will not update the time automatically according to turn on the front of your time zone, then press OK. B To... MENU repeatedly to choose Daylight Saving. Press STANDBY-ON y to a PBS station. Check the PBS channel and try again. Or, set the clock manually. E9480UD_EN.qx3 05.1.8 4:16 PM Page 30 30 Clock Setting Time/Date Automatic The Recorder can use the time zone from a different time zone than...
User manual
Page 31
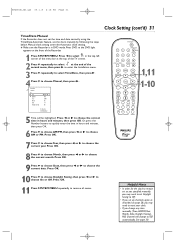
... Month, then press s or B to choose the current date. Press OK. 10 Press L to choose Daylight Saving, then press s or B to remove all menus. Manual clock setting overrides Automatic clock setting. ● Make sure the Recorder is in hours and minutes, then press OK. 6 Press L to choose AM/PM, then...Press OK. 11 Press SYSTEM MENU repeatedly to choose On or Off. E9480UD_EN.qx3 05.1.8 4:16 PM Page 31 Clock Setting (cont'd) 31 Time/Date Manual If the Recorder does not set the time and date correctly using the Time/Date Automatic feature, set Daylight Saving to Off. • If you...
... Month, then press s or B to choose the current date. Press OK. 10 Press L to choose Daylight Saving, then press s or B to remove all menus. Manual clock setting overrides Automatic clock setting. ● Make sure the Recorder is in hours and minutes, then press OK. 6 Press L to choose AM/PM, then...Press OK. 11 Press SYSTEM MENU repeatedly to choose On or Off. E9480UD_EN.qx3 05.1.8 4:16 PM Page 31 Clock Setting (cont'd) 31 Time/Date Manual If the Recorder does not set the time and date correctly using the Time/Date Automatic feature, set Daylight Saving to Off. • If you...
User manual
Page 32
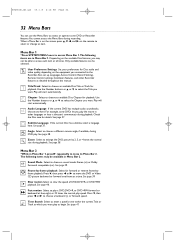
... within the current Title or Track at four, eight, or 32 times the normal play the movie in other Recorder features as detailed throughout this manual. Menu Bar 2 *While in Menu Bar 1, press B repeatedly to move the DVD or Video CD picture backward or forward one here. Only available features can...
... within the current Title or Track at four, eight, or 32 times the normal play the movie in other Recorder features as detailed throughout this manual. Menu Bar 2 *While in Menu Bar 1, press B repeatedly to move the DVD or Video CD picture backward or forward one here. Only available features can...
User manual
Page 48
... the PBS channel is downloading the time.Turn off the Recorder for the timer recording is a reminder to turn on -screen menu instructions or this manual to dub or record copyrighted material onto a DVD+R or DVD+RW using the Recorder. timer recording This is correct and complete. See page 47. See...
... the PBS channel is downloading the time.Turn off the Recorder for the timer recording is a reminder to turn on -screen menu instructions or this manual to dub or record copyrighted material onto a DVD+R or DVD+RW using the Recorder. timer recording This is correct and complete. See page 47. See...
User manual
Page 63
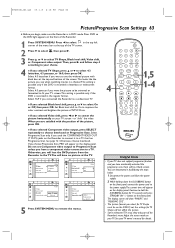
... is recorded in DVD mode. Otherwise, choose Interlaced. If you choose Progressive Scan, PRO will not affect the picture. • Some widescreen TVs may show "PHILIPS" and "READING CO2". • The picture format you select for 15 seconds and press STANDBY ON y button on the front of the TV screen. 2 Press... to connect it by following the steps below. 1 Disconnect the power cord from the Recorder to the TV.You will appear on your TV owner's manual for TV Shape will appear on the front panel, connect the power cord to the power supply.The current time will have no off Picture...
... is recorded in DVD mode. Otherwise, choose Interlaced. If you choose Progressive Scan, PRO will not affect the picture. • Some widescreen TVs may show "PHILIPS" and "READING CO2". • The picture format you select for 15 seconds and press STANDBY ON y button on the front of the TV screen. 2 Press... to connect it by following the steps below. 1 Disconnect the power cord from the Recorder to the TV.You will appear on your TV owner's manual for TV Shape will appear on the front panel, connect the power cord to the power supply.The current time will have no off Picture...
User manual
Page 78
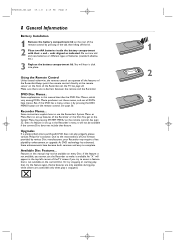
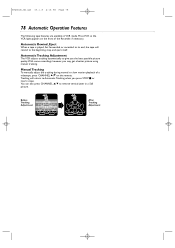
You can also press CHANNEL K/L to Automatic Tracking when you may get a better picture using manual tracking. Press VCR so the VCR light appears on the remote. Automatic Rewind, Eject When a tape is played, fast forwarded, or recorded to... however, you press STOP C or insert a tape. Automatic Tracking Adjustment The VCR adjusts tracking automatically to the beginning, stop, and eject itself. Manual Tracking To manually adjust the tracking during normal or slow motion playback of a videotape, press CHANNEL K/L on the front of the Recorder, if necessary. Before Tracking ...
You can also press CHANNEL K/L to Automatic Tracking when you may get a better picture using manual tracking. Press VCR so the VCR light appears on the remote. Automatic Rewind, Eject When a tape is played, fast forwarded, or recorded to... however, you press STOP C or insert a tape. Automatic Tracking Adjustment The VCR adjusts tracking automatically to the beginning, stop, and eject itself. Manual Tracking To manually adjust the tracking during normal or slow motion playback of a videotape, press CHANNEL K/L on the front of the Recorder, if necessary. Before Tracking ...

