
Leaflet
Page 2
... precisely to six hours of analog video recorder. or their respective owners. www.philips.com DVD+RW highest compatibility Compatibility in the same format, so it... All Rights reserved. Specifications are written at one time. DVD Recorder/VCR DVDR600VR/37 Specifications Video Recording • Tape speeds: LP, SP • Recording enhancements...MPEG2 • Audio compression: Dolby Digital Accessories • Included Accessories: Quick start guide, User Manual, Remote Control, Audio Cable, Coax RF antenna cable, CVBS video cable Connectivity • Connectivity Enhancements...
... precisely to six hours of analog video recorder. or their respective owners. www.philips.com DVD+RW highest compatibility Compatibility in the same format, so it... All Rights reserved. Specifications are written at one time. DVD Recorder/VCR DVDR600VR/37 Specifications Video Recording • Tape speeds: LP, SP • Recording enhancements...MPEG2 • Audio compression: Dolby Digital Accessories • Included Accessories: Quick start guide, User Manual, Remote Control, Audio Cable, Coax RF antenna cable, CVBS video cable Connectivity • Connectivity Enhancements...
User manual
Page 1
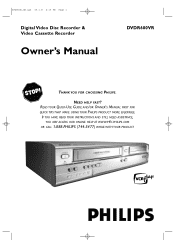
NEED HELP FAST? IF YOU HAVE READ YOUR INSTRUCTIONS AND STILL NEED ASSISTANCE, YOU MAY ACCESS OUR ONLINE HELP AT WWW.P4C.PHILIPS.COM OR CALL 1-888-PHILIPS (744-5477) WHILE WITH YOUR PRODUCT. ® E9480UD_EN.qx3 05.1.8 4:15 PM Page 1 Digital Video Disc Recorder & Video Cassette Recorder Owner's Manual DVDR600VR THANK YOU FOR CHOOSING PHILIPS. READ YOUR QUICK-USE GUIDE AND/OR OWNER'S MANUAL FIRST FOR QUICK TIPS THAT MAKE USING YOUR PHILIPS PRODUCT MORE ENJOYABLE.
NEED HELP FAST? IF YOU HAVE READ YOUR INSTRUCTIONS AND STILL NEED ASSISTANCE, YOU MAY ACCESS OUR ONLINE HELP AT WWW.P4C.PHILIPS.COM OR CALL 1-888-PHILIPS (744-5477) WHILE WITH YOUR PRODUCT. ® E9480UD_EN.qx3 05.1.8 4:15 PM Page 1 Digital Video Disc Recorder & Video Cassette Recorder Owner's Manual DVDR600VR THANK YOU FOR CHOOSING PHILIPS. READ YOUR QUICK-USE GUIDE AND/OR OWNER'S MANUAL FIRST FOR QUICK TIPS THAT MAKE USING YOUR PHILIPS PRODUCT MORE ENJOYABLE.
User manual
Page 6
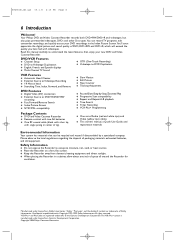
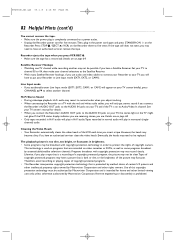
... Counter ● Tracking Adjustment ● Paused/Slow/Step-by a specialized company. Manufactured under license from Dolby Laboratories. Copyright 2004 Philips Consumer Electronics. Safety Information ● Do not expose the Recorder to understand the latest features, then enjoy your DVD recordings in... a cabinet, allow about one inch of Audio (red and white tips) and Video (yellow tips) cables ● This owner's manual, a Quick-Use Guide, and registration materials Environmental Information Your system has materials that can record TV programs, edit camcorder recordings,...
... Counter ● Tracking Adjustment ● Paused/Slow/Step-by a specialized company. Manufactured under license from Dolby Laboratories. Copyright 2004 Philips Consumer Electronics. Safety Information ● Do not expose the Recorder to understand the latest features, then enjoy your DVD recordings in... a cabinet, allow about one inch of Audio (red and white tips) and Video (yellow tips) cables ● This owner's manual, a Quick-Use Guide, and registration materials Environmental Information Your system has materials that can record TV programs, edit camcorder recordings,...
User manual
Page 12
.... 4 Connect the supplied RF coaxial cable to the Recorder's ANTENNA OUT jack and to the Antenna In jack on the TV. See your TV owner's manual for details. Or, go to your lowest TV channel and change channels down until you turn on the Recorder. NOTE:When using the Component Video... the rear of visible picture lines per field, providing a jitter-free, sharp, quiet picture. Go to page 18 to Progressive Scan only if your TV's manual for details. 5 Connect the power cords of the Recorder and the TV to a power outlet. 6 Press STANDBY-ON y to Interlaced. See page 63. See...
.... 4 Connect the supplied RF coaxial cable to the Recorder's ANTENNA OUT jack and to the Antenna In jack on the TV. See your TV owner's manual for details. Or, go to your lowest TV channel and change channels down until you turn on the Recorder. NOTE:When using the Component Video... the rear of visible picture lines per field, providing a jitter-free, sharp, quiet picture. Go to page 18 to Progressive Scan only if your TV's manual for details. 5 Connect the power cords of the Recorder and the TV to a power outlet. 6 Press STANDBY-ON y to Interlaced. See page 63. See...

User manual
Page 15
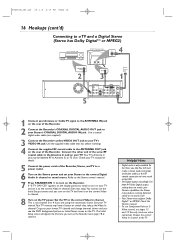
.... This is not channel 3 or 4 if you turn on the Recorder. Or, go to your TV manual. The audio cable has red and white markings. Your TV's Antenna In jack may be called AUX or .... 2 Connect the Recorder's yellow VIDEO OUT jack to your TV's VIDEO IN jack. Refer to the Stereo owner's manual. 7 Press STANDBY-ON y to the left/right AUDIO IN jacks on the Recorder. Connect the other end ... In,Antenna In, or 75 ohm. Helpful Hints • Set Analog output accordingly. Check your TV manual for details. 5 Connect the power cords of the same RF coaxial cable to the correct Audio In channel...
.... This is not channel 3 or 4 if you turn on the Recorder. Or, go to your TV manual. The audio cable has red and white markings. Your TV's Antenna In jack may be called AUX or .... 2 Connect the Recorder's yellow VIDEO OUT jack to your TV's VIDEO IN jack. Refer to the Stereo owner's manual. 7 Press STANDBY-ON y to the left/right AUDIO IN jacks on the Recorder. Connect the other end ... In,Antenna In, or 75 ohm. Helpful Hints • Set Analog output accordingly. Check your TV manual for details. 5 Connect the power cords of the same RF coaxial cable to the correct Audio In channel...
User manual
Page 16
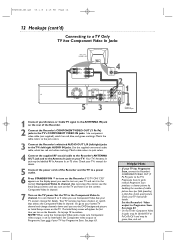
Refer to the Stereo owner's manual. 7 Press STANDBY-ON y to turn on the Recorder. The Initial Setup screen will appear the ... Recorder's COAXIAL DIGITAL AUDIO OUT jack to your Stereo's COAXIAL DIGITAL AUDIO IN jack. Check the Stereo's manual. • To use Component Video or SVideo instead, see the Initial Setup screens until you turn on the Recorder. See your ...to continue. Your TV's Antenna In jack may be labelled RF In,Antenna In, or 75 ohm. Check your TV manual for the Discs you need one video connection. Set the TV to the correct Video In channel. Use the supplied video...
Refer to the Stereo owner's manual. 7 Press STANDBY-ON y to turn on the Recorder. The Initial Setup screen will appear the ... Recorder's COAXIAL DIGITAL AUDIO OUT jack to your Stereo's COAXIAL DIGITAL AUDIO IN jack. Check the Stereo's manual. • To use Component Video or SVideo instead, see the Initial Setup screens until you turn on the Recorder. See your ...to continue. Your TV's Antenna In jack may be labelled RF In,Antenna In, or 75 ohm. Check your TV manual for the Discs you need one video connection. Set the TV to the correct Video In channel. Use the supplied video...
User manual
Page 18
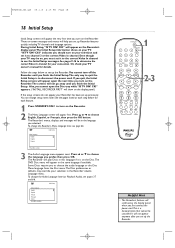
... language if it to disconnect the power cord. You can change the Recorder's Menu Language later, see the Initial Setup messages. These on your TV owner's manual for each feature. 1 Press STANDBY-ONy to continue STANDBY-ON 1 OPEN/CLOSE 1 2 3 EJECT TV/VIDEO 4 5 6 7 8 VCR Plus +/TIMER 0 9 MONITOR CHANNEL VCR DISC MENU CLEAR DVD...
... language if it to disconnect the power cord. You can change the Recorder's Menu Language later, see the Initial Setup messages. These on your TV owner's manual for each feature. 1 Press STANDBY-ONy to continue STANDBY-ON 1 OPEN/CLOSE 1 2 3 EJECT TV/VIDEO 4 5 6 7 8 VCR Plus +/TIMER 0 9 MONITOR CHANNEL VCR DISC MENU CLEAR DVD...
User manual
Page 63
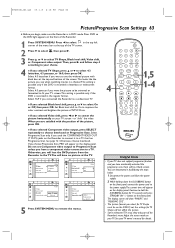
...TV Shape G Black level shift r Video shift Component video output s Interlaced Progressive Scan Press SELECT to toggle 5 Press SYSTEM MENU to fit your TV owner's manual for 15 seconds and press STANDBY ON y button on your choice. 4 ● If you selected TV Shape, press K or L to Progressive ... below. 1 Disconnect the power cord from the Recorder to the TV.You will not affect the picture. • Some widescreen TVs may show "PHILIPS" and "READING CO2". • The picture format you select for TV Shape must be on the display panel. Otherwise, choose Interlaced. Otherwise,...
...TV Shape G Black level shift r Video shift Component video output s Interlaced Progressive Scan Press SELECT to toggle 5 Press SYSTEM MENU to fit your TV owner's manual for 15 seconds and press STANDBY ON y button on your choice. 4 ● If you selected TV Shape, press K or L to Progressive ... below. 1 Disconnect the power cord from the Recorder to the TV.You will not affect the picture. • Some widescreen TVs may show "PHILIPS" and "READING CO2". • The picture format you select for TV Shape must be on the display panel. Otherwise, choose Interlaced. Otherwise,...
User manual
Page 81
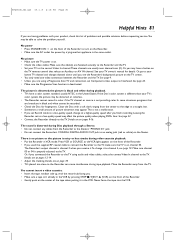
... black and white cannot be able to solve the problem yourself. Details are fastened securely to the Recorder and the TV. • Set your TV owner's manual for fingerprints. Move the Recorder away from the Recorder to the Stereo's "PHONO IN" jack. • Do not connect the Recorder's COAXIAL DIGITAL AUDIO OUT...
... black and white cannot be able to solve the problem yourself. Details are fastened securely to the Recorder and the TV. • Set your TV owner's manual for fingerprints. Move the Recorder away from the Recorder to the Stereo's "PHONO IN" jack. • Do not connect the Recorder's COAXIAL DIGITAL AUDIO OUT...
User manual
Page 82
... Unplug the Recorder power cord for five minutes.Then, plug in the power cord again and press STANDBY-ON y on your TV owner's manual for home and other rights owners. Likewise, if you insert a tape. Press STOP C / EJECT A (VCR) on video cassettes or DVDs, as well as.... Programs broadcast with copyright protection may become dirty. Cleaning the Video Heads • Your Recorder automatically cleans the video heads of copyright owners. Satellite Receiver Hookups • Watching one TV channel while recording another channel. If the tape still does not eject, you press VCR...
... Unplug the Recorder power cord for five minutes.Then, plug in the power cord again and press STANDBY-ON y on your TV owner's manual for home and other rights owners. Likewise, if you insert a tape. Press STOP C / EJECT A (VCR) on video cassettes or DVDs, as well as.... Programs broadcast with copyright protection may become dirty. Cleaning the Video Heads • Your Recorder automatically cleans the video heads of copyright owners. Satellite Receiver Hookups • Watching one TV channel while recording another channel. If the tape still does not eject, you press VCR...
User manual
Page 88
... video in channel (tv 9 video shift 63 visible chapter 54 warranty 87 widescreen tv 63 "x 8, 33 zoom 32, 38 8239 300 33912 1VMN20183A/E9480UD **** This owner's manual is made of 5 controls, remote 23-24 copying videotapes . . . . . .17, 72 counter 68 current chapter 54 daylight saving 30-31 d.dubbing button . . . . .26, 44, 73...
... video in channel (tv 9 video shift 63 visible chapter 54 warranty 87 widescreen tv 63 "x 8, 33 zoom 32, 38 8239 300 33912 1VMN20183A/E9480UD **** This owner's manual is made of 5 controls, remote 23-24 copying videotapes . . . . . .17, 72 counter 68 current chapter 54 daylight saving 30-31 d.dubbing button . . . . .26, 44, 73...
Quick start guide
Page 1
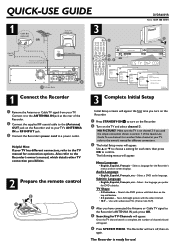
...to a power outlet. Make sure the TV is on channel 3 if you turn on the Recorder. 1 Press STANDBY-ON2 to the owner's manual for different connections. 3 The Initial Setup menu will appear the first time you used the simple connection shown in section 1 of this Quick...Antenna or Cable TV signal to the Recorder's owner's manual, which details other TV connection possibilities. 2 Prepare the remote control 3 1 2 Initial Setup screens will appear. Programming Auto ch. search complete 024 Channels found will appear. QUICK-USE GUIDE 1 3 DVDR600VR 12nc: 8239 300 33901 Antenna or Cable ...
...to a power outlet. Make sure the TV is on channel 3 if you turn on the Recorder. 1 Press STANDBY-ON2 to the owner's manual for different connections. 3 The Initial Setup menu will appear the first time you used the simple connection shown in section 1 of this Quick...Antenna or Cable TV signal to the Recorder's owner's manual, which details other TV connection possibilities. 2 Prepare the remote control 3 1 2 Initial Setup screens will appear. Programming Auto ch. search complete 024 Channels found will appear. QUICK-USE GUIDE 1 3 DVDR600VR 12nc: 8239 300 33901 Antenna or Cable ...
Quick start guide
Page 2
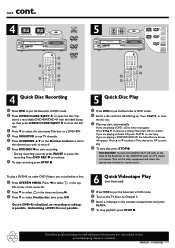
... recording, press STOP 9. 5 Quick Disc Play 1 Press DVD to put the Recorder in the menu and press B. 3 Press 4 to Channel 3. 3 Insert a videotape in the accompanying owner's manual. NO SOUND? Connect the AUDIO OUT L/R jacks at the back of the menu bar. 2 Press 4 to select in DVD mode. 2 Press OPEN/CLOSE/EJECTç...
... recording, press STOP 9. 5 Quick Disc Play 1 Press DVD to put the Recorder in the menu and press B. 3 Press 4 to Channel 3. 3 Insert a videotape in the accompanying owner's manual. NO SOUND? Connect the AUDIO OUT L/R jacks at the back of the menu bar. 2 Press 4 to select in DVD mode. 2 Press OPEN/CLOSE/EJECTç...

