
User manual
Page 8
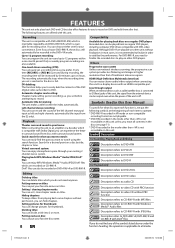
... for what you want to watch : You can easily find any of the symbols listed above under the function heading, the operation is connected to E1(Rear) jacks of the unit is not recordable on this unit unless you set a recording time as cable/satellite box, is applicable to 12 programs...
... for what you want to watch : You can easily find any of the symbols listed above under the function heading, the operation is connected to E1(Rear) jacks of the unit is not recordable on this unit unless you set a recording time as cable/satellite box, is applicable to 12 programs...
User manual
Page 9
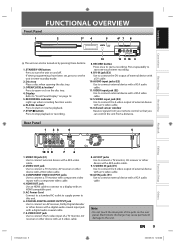
...) Use to connect a TV monitor with component video inputs with a RCA video cable. 12. VIDEO IN jack (E1) Use to connect external device with a RCA video cable. 2. AV IN jacks (E1) Use to connect external device with a RCA audio cable. Note • Do not touch the inner pins of ...PCM / BITSTREAM 10 9 8 7 6 1. AC Power Cord Connect to a standard AC outlet to supply power to start one-touch timer recording. 9. S-VIDEO IN jack (E1) Use to connect the S-video input of a TV monitor, AV receiver or other device with an S-video cable. 5 8. S-VIDEO OUT jack Use to connect the...
...) Use to connect a TV monitor with component video inputs with a RCA video cable. 12. VIDEO IN jack (E1) Use to connect external device with a RCA video cable. 2. AV IN jacks (E1) Use to connect external device with a RCA audio cable. Note • Do not touch the inner pins of ...PCM / BITSTREAM 10 9 8 7 6 1. AC Power Cord Connect to a standard AC outlet to supply power to start one-touch timer recording. 9. S-VIDEO IN jack (E1) Use to connect the S-video input of a TV monitor, AV receiver or other device with an S-video cable. 5 8. S-VIDEO OUT jack Use to connect the...

User manual
Page 14
... 6 Press [SETUP] to connect, then press [OK]. General Setting Playback Display Video Recording Clock DivX HDMI Reset All Progressive Scan TV Aspect Video InpVuidteo Input E1 (Rear) E2 (Front) 5 Use [K / L] to select the input jack type to exit. 14 EN E7E4AUD.indd 14 2007/05/16 14:56:13 "General Setting...
... 6 Press [SETUP] to connect, then press [OK]. General Setting Playback Display Video Recording Clock DivX HDMI Reset All Progressive Scan TV Aspect Video InpVuidteo Input E1 (Rear) E2 (Front) 5 Use [K / L] to select the input jack type to exit. 14 EN E7E4AUD.indd 14 2007/05/16 14:56:13 "General Setting...
User manual
Page 19
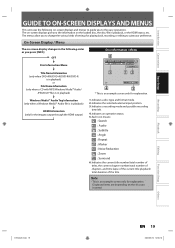
... for explanation. On-Screen Display / Menu The on the loaded disc, the disc/file in playback) Disc Information / Menu 6 1/ 5 1/ 5 0:01:00 / 1:23:45 DVD Video E1 (Rear) 5 12 SP(2Hr) 1:53 4 3 * This is an example screen only for the images output through the HDMI output) 1. Indicates the selected external input position...
... for explanation. On-Screen Display / Menu The on the loaded disc, the disc/file in playback) Disc Information / Menu 6 1/ 5 1/ 5 0:01:00 / 1:23:45 DVD Video E1 (Rear) 5 12 SP(2Hr) 1:53 4 3 * This is an example screen only for the images output through the HDMI output) 1. Indicates the selected external input position...
User manual
Page 26
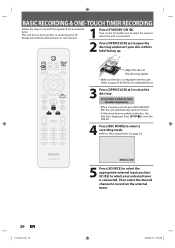
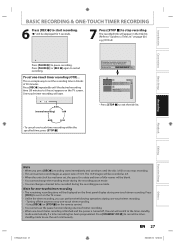
... & ONE-TOUCH TIMER RECORDING Follow the steps to "Recording Mode" on page 24. SP(2Hr) 0:58 5 Press [SOURCE] to select the appropriate external input position (E1/E2) to record on the TV and be sure to select the input to which your disc with this unit. (Refer to page 24 for...
... & ONE-TOUCH TIMER RECORDING Follow the steps to "Recording Mode" on page 24. SP(2Hr) 0:58 5 Press [SOURCE] to select the appropriate external input position (E1/E2) to record on the TV and be sure to select the input to which your disc with this unit. (Refer to page 24 for...
User manual
Page 27
... RECORDING & ONE-TOUCH TIMER RECORDING 6 Press [REC I] to 6 hours) appears on the TV screen. Writing to Disc 90% 1 SP(2Hr) NOV/21/07 11:00AM E1 SP NOV/21/07 0:20:44 2 EMPTY TITLE 1:41:17 SP(2Hr) • Press [STOP C] to be displayed on the front panel display during the...
... RECORDING & ONE-TOUCH TIMER RECORDING 6 Press [REC I] to 6 hours) appears on the TV screen. Writing to Disc 90% 1 SP(2Hr) NOV/21/07 11:00AM E1 SP NOV/21/07 0:20:44 2 EMPTY TITLE 1:41:17 SP(2Hr) • Press [STOP C] to be displayed on the front panel display during the...

User manual
Page 28
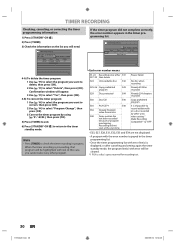
... SP 2 : 00 1/1 JAN/01 Daily MON-SAT MON-FRI SAT FRI When pressing [L] at step 1. Timer Programming Date Date JAN/02 E1/E2 E1 MON JAN/01 11:00AM Start End E1/E2 NewSPtraorgt ram End - - : - - - - : - - TIMER RECORDING You can program the unit to record up to 12 programs ...• Use [s / B] to move the cursor to select "New Program", then press [OK]. Before recording, make sure • Connect the external tuner to either E1 or E2 and set the clock yet: "Clock Setting" menu will appear instead of pages and current page (2 pages maximum) 1 Press [TIMER]. 2 Use [K /...
... SP 2 : 00 1/1 JAN/01 Daily MON-SAT MON-FRI SAT FRI When pressing [L] at step 1. Timer Programming Date Date JAN/02 E1/E2 E1 MON JAN/01 11:00AM Start End E1/E2 NewSPtraorgt ram End - - : - - - - : - - TIMER RECORDING You can program the unit to record up to 12 programs ...• Use [s / B] to move the cursor to select "New Program", then press [OK]. Before recording, make sure • Connect the external tuner to either E1 or E2 and set the clock yet: "Clock Setting" menu will appear instead of pages and current page (2 pages maximum) 1 Press [TIMER]. 2 Use [K /...

User manual
Page 29
...00AM Mode SP SP 1 : 00 1/1 Refer to "Recording Mode" on the disc and determines the appropriate recording mode to select a recording mode. Date JAN/02 E1/E2 E1 Start 12 : 00AM Mode SP End 1 : 00AM SP 1 : 00 1/1 Your program setting is too limited. 7 Press [OK] when all items are ... overlapped" appears, and the overlapped program will appear. Mode SP SP 2 : 00 1/1 5 Use [K / L] to select the appropriate external input position (E1/E2) to enter the start and end time, then press [B]. When "Auto" is selected as a recording mode, the unit calculates how much time is only...
...00AM Mode SP SP 1 : 00 1/1 Refer to "Recording Mode" on the disc and determines the appropriate recording mode to select a recording mode. Date JAN/02 E1/E2 E1 Start 12 : 00AM Mode SP End 1 : 00AM SP 1 : 00 1/1 Your program setting is too limited. 7 Press [OK] when all items are ... overlapped" appears, and the overlapped program will appear. Mode SP SP 2 : 00 1/1 5 Use [K / L] to select the appropriate external input position (E1/E2) to enter the start and end time, then press [B]. When "Auto" is selected as a recording mode, the unit calculates how much time is only...
User manual
Page 30
...at the start time. Timer Programming TUE JAN/02 11:00AM Date Start End E41 JAN/02 12:00AM 1:00AM New Program E1/E2 E1 1/1 Each error number means: E1-22 Recording error other program. Power failed No disc when recording Already 49 titles recorded Already 254 chapters recorded Copy prohibited program... the timer standby mode, the program line(s) with red. Timer Programming JAN/ 2/07 12:00 AM E1 SP SP (1:00) MON JAN/01 11:00AM Date JAN/02 Start End 12:00AM 1:00AM New Program E1/E2 E1 1/1 4-A) To delete the timer program: 1 Use [K / L] to select the program you cannot select...
...at the start time. Timer Programming TUE JAN/02 11:00AM Date Start End E41 JAN/02 12:00AM 1:00AM New Program E1/E2 E1 1/1 Each error number means: E1-22 Recording error other program. Power failed No disc when recording Already 49 titles recorded Already 254 chapters recorded Copy prohibited program... the timer standby mode, the program line(s) with red. Timer Programming JAN/ 2/07 12:00 AM E1 SP SP (1:00) MON JAN/01 11:00AM Date JAN/02 Start End 12:00AM 1:00AM New Program E1/E2 E1 1/1 4-A) To delete the timer program: 1 Use [K / L] to select the program you cannot select...
User manual
Page 32
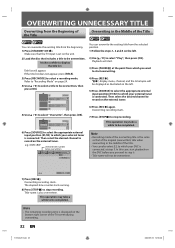
... title list. This operation may take a while to be overwritten, then press [OK]. 1 SP (2Hr) NOV/21/07 11:00AM E1 SP NOV/21/07 0:20:44 2 NOV/22/07 11:35AM E1 EP NOV/22/07 0:10:33 3 5) Use [K / L] to which your external tuner is connected, at the point from which... be completed. Note • The remaining recording time is the same as illustrated on the left . 5) Press [SOURCE] to select the appropriate external input position (E1/E2) to select "Play", then press [OK]. If the title list does not appear, press [TITLE]. 3) Press [REC MODE] to stop recording. F I SP(2Hr) 2:00...
... title list. This operation may take a while to be overwritten, then press [OK]. 1 SP (2Hr) NOV/21/07 11:00AM E1 SP NOV/21/07 0:20:44 2 NOV/22/07 11:35AM E1 EP NOV/22/07 0:10:33 3 5) Use [K / L] to which your external tuner is connected, at the point from which... be completed. Note • The remaining recording time is the same as illustrated on the left . 5) Press [SOURCE] to select the appropriate external input position (E1/E2) to select "Play", then press [OK]. If the title list does not appear, press [TITLE]. 3) Press [REC MODE] to stop recording. F I SP(2Hr) 2:00...
User manual
Page 34
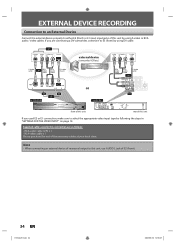
... • When connecting an external device of monaural output to this unit by using S-video or RCA audio / video cables. Supplied cables used E2 or E1 connection, make sure to select the appropriate video input type by following the steps in this connection are as follows: • RCA audio cable (L/R) x 1 &#... to E3 (front) by using DV cable. EXTERNAL DEVICE RECORDING Connection to an External Device Connect the external device properly to either E2 (front) or E1 (rear) input jacks of this unit, use AUDIO L jack of E2 (Front). 34 EN E7E4AUD.indd 34 2007/05/16 14:56:27 If ...
... • When connecting an external device of monaural output to this unit by using S-video or RCA audio / video cables. Supplied cables used E2 or E1 connection, make sure to select the appropriate video input type by following the steps in this connection are as follows: • RCA audio cable (L/R) x 1 &#... to E3 (front) by using DV cable. EXTERNAL DEVICE RECORDING Connection to an External Device Connect the external device properly to either E2 (front) or E1 (rear) input jacks of this unit, use AUDIO L jack of E2 (Front). 34 EN E7E4AUD.indd 34 2007/05/16 14:56:27 If ...

User manual
Page 35
It takes a while to load the disc. 4 Select the input of the unit which the unit is connected. (E2, E3 or E1) • To use the input jacks on the unit to "Recording Mode" on the rear of this unit; Playback Editing Function Setup Others ... Press [OPEN/CLOSE A] to select a recording mode. Select "E2 or E3 (Front)" position by using [SOURCE]. 5 Press [REC MODE] to close the disc tray. Select "E1 (Rear)" position by using [SOURCE]. • To use the input jacks on page 24. Introduction Connections Basic Setup Recording EXTERNAL DEVICE RECORDING Recording from an...
It takes a while to load the disc. 4 Select the input of the unit which the unit is connected. (E2, E3 or E1) • To use the input jacks on the unit to "Recording Mode" on the rear of this unit; Playback Editing Function Setup Others ... Press [OPEN/CLOSE A] to select a recording mode. Select "E2 or E3 (Front)" position by using [SOURCE]. 5 Press [REC MODE] to close the disc tray. Select "E1 (Rear)" position by using [SOURCE]. • To use the input jacks on page 24. Introduction Connections Basic Setup Recording EXTERNAL DEVICE RECORDING Recording from an...
User manual
Page 46
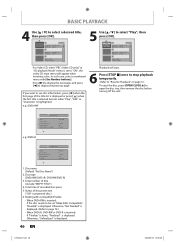
..." is highlighted. Total time of title (include "EMPTY TITLE") 4. Play Edit Overwrite 1 SP (2Hr) NOV/21/07 11:00AM E1 SP NOV/21/07 0:20:44 2 NOV/22/07 11:35AM E1 EP NOV/22/07 0:10:33 3 EMPTY TITLE 1:37:52 SP(2Hr) • For Video CD, when "PBC (Video CD... press [OK]. BASIC PLAYBACK 4 Use [K / L] to select a desired title, then press [OK]. 1 SP (2Hr) NOV/21/07 11:00AM E1 SP NOV/21/07 0:20:44 2 NOV/22/07 11:35AM E1 EP NOV/22/07 0:10:33 3 EMPTY TITLE 1:37:52 SP(2Hr) 5 Use [K / L] to page 72.) • When DVD+R, DVD...
..." is highlighted. Total time of title (include "EMPTY TITLE") 4. Play Edit Overwrite 1 SP (2Hr) NOV/21/07 11:00AM E1 SP NOV/21/07 0:20:44 2 NOV/22/07 11:35AM E1 EP NOV/22/07 0:10:33 3 EMPTY TITLE 1:37:52 SP(2Hr) • For Video CD, when "PBC (Video CD... press [OK]. BASIC PLAYBACK 4 Use [K / L] to select a desired title, then press [OK]. 1 SP (2Hr) NOV/21/07 11:00AM E1 SP NOV/21/07 0:20:44 2 NOV/22/07 11:35AM E1 EP NOV/22/07 0:10:33 3 EMPTY TITLE 1:37:52 SP(2Hr) 5 Use [K / L] to page 72.) • When DVD+R, DVD...
User manual
Page 60
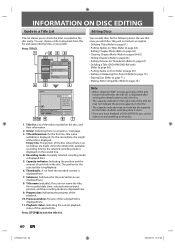
... portion for the selected menu are made. Press [TITLE]. 1 234 1 SP (2Hr) Play Edit Overwrite NOV/21/07 11:00AM E1 SP NOV/21/07 0:20:44 2 NOV/22/07 11:35AM E1 EP NOV/22/07 0:10:33 3 EMPTY TITLE 1:37:52 SP(2Hr) 6 2 5 Edit 2 Title Delete Edit Title Name Chapter... Mark Hide Chapter Index Picture Title Dividing NOV/22/07 11:35AM E1 EP 0:00:59 11 10 9 87 You can choose a title to play back from the recorded content is displayed here. 5. INFORMATION ON DISC EDITING Guide...
... portion for the selected menu are made. Press [TITLE]. 1 234 1 SP (2Hr) Play Edit Overwrite NOV/21/07 11:00AM E1 SP NOV/21/07 0:20:44 2 NOV/22/07 11:35AM E1 EP NOV/22/07 0:10:33 3 EMPTY TITLE 1:37:52 SP(2Hr) 6 2 5 Edit 2 Title Delete Edit Title Name Chapter... Mark Hide Chapter Index Picture Title Dividing NOV/22/07 11:35AM E1 EP 0:00:59 11 10 9 87 You can choose a title to play back from the recorded content is displayed here. 5. INFORMATION ON DISC EDITING Guide...
User manual
Page 61
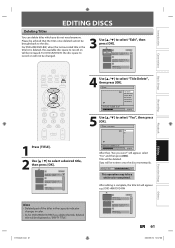
...OK]. e.g.) DVD+RW/DVD-RW 1 SP (2Hr) EMPTY TITLE 0:21:14 SP(2Hr) 2 NOV/22/07 11:35AM E1 EP NOV/22/07 0:10:33 3 EMPTY TITLE 1:37:52 SP(2Hr) Others EN 61 2007/05/16 14:57:00 ... Delete Edit Title Name Chapter Mark Hide Chapter Index Picture Title Dividing NOV/21/07 11:00AM E1 SP 0:00:59 5 Use [K / L] to be written onto the disc momentarily. Play Edit Overwrite 1 SP (...2Hr) NOV/21/07 11:00AM E1 SP NOV/21/07 0:20:44 2 NOV/22/07 11:35AM E1 EP NOV/22/07 0:10:33 3 EMPTY TITLE 1:37:52 SP(2Hr) 4 Use [K / ...
...OK]. e.g.) DVD+RW/DVD-RW 1 SP (2Hr) EMPTY TITLE 0:21:14 SP(2Hr) 2 NOV/22/07 11:35AM E1 EP NOV/22/07 0:10:33 3 EMPTY TITLE 1:37:52 SP(2Hr) Others EN 61 2007/05/16 14:57:00 ... Delete Edit Title Name Chapter Mark Hide Chapter Index Picture Title Dividing NOV/21/07 11:00AM E1 SP 0:00:59 5 Use [K / L] to be written onto the disc momentarily. Play Edit Overwrite 1 SP (...2Hr) NOV/21/07 11:00AM E1 SP NOV/21/07 0:20:44 2 NOV/22/07 11:35AM E1 EP NOV/22/07 0:10:33 3 EMPTY TITLE 1:37:52 SP(2Hr) 4 Use [K / ...

User manual
Page 62
... select "Yes", then press [OK]. Edit - Edit 1 Title Delete Edit Title Name Chapter Mark Hide Chapter Index Picture Title Dividing NOV/21/07 11:00AM E1 SP 0:00:59 3 To enter a title name, follow the steps of "Guide to Edit Title Name" on the titles and change to select "Edit Title...
... select "Yes", then press [OK]. Edit - Edit 1 Title Delete Edit Title Name Chapter Mark Hide Chapter Index Picture Title Dividing NOV/21/07 11:00AM E1 SP 0:00:59 3 To enter a title name, follow the steps of "Guide to Edit Title Name" on the titles and change to select "Edit Title...
User manual
Page 63
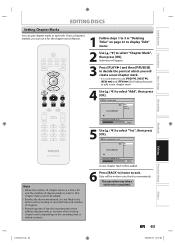
... Function Setup Others E7E4AUD.indd 63 2007/05/16 14:57:02 Edit - Chapter Mark 1 Add Delete Delete All Chapter 2/ 2 NOV/21/07 11:00AM E1 SP 0:00:59 Note • When the number of chapter marks in a title is 99 and the number of the disc may take a while to... a chapter is not likely to be added. 6 Press [BACK ] twice to select "Add", then press [OK]. Add 1 Yes No Chapter 2/ 2 F NOV/21/07 11:00AM E1 SP 0:00:59 A new chapter mark will appear. 3 Press [PLAY B] and then [PAUSE F] to recorded time and number of chapters. • Remaining time of chapter...
... Function Setup Others E7E4AUD.indd 63 2007/05/16 14:57:02 Edit - Chapter Mark 1 Add Delete Delete All Chapter 2/ 2 NOV/21/07 11:00AM E1 SP 0:00:59 Note • When the number of chapter marks in a title is 99 and the number of the disc may take a while to... a chapter is not likely to be added. 6 Press [BACK ] twice to select "Add", then press [OK]. Add 1 Yes No Chapter 2/ 2 F NOV/21/07 11:00AM E1 SP 0:00:59 A new chapter mark will appear. 3 Press [PLAY B] and then [PAUSE F] to recorded time and number of chapters. • Remaining time of chapter...

User manual
Page 64
Edit - Chapter Mark - Delete 1 Yes No Chapter 2/ 2 F NOV/21/07 11:00AM E1 SP 0:00:59 The selected chapter mark will be completed. Note • Remaining time of the disc may take a while to be written onto the ...
Edit - Chapter Mark - Delete 1 Yes No Chapter 2/ 2 F NOV/21/07 11:00AM E1 SP 0:00:59 The selected chapter mark will be completed. Note • Remaining time of the disc may take a while to be written onto the ...

User manual
Page 65
... 0:00:59 All chapter marks will be written onto the disc momentarily. Delete All 1 Yes No Chapter 2/ 2 F NOV/21/07 11:00AM E1 SP 0:00:59 5 Use [K / L] to select "Chapter Mark", then press [OK]. Introduction Connections Basic Setup Recording EDITING DISCS Clearing Chapter Marks (cont'd) To delete all ...
... 0:00:59 All chapter marks will be written onto the disc momentarily. Delete All 1 Yes No Chapter 2/ 2 F NOV/21/07 11:00AM E1 SP 0:00:59 5 Use [K / L] to select "Chapter Mark", then press [OK]. Introduction Connections Basic Setup Recording EDITING DISCS Clearing Chapter Marks (cont'd) To delete all ...
User manual
Page 66
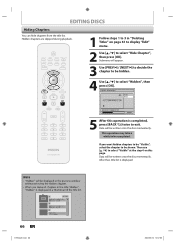
Hide Chapter 1 Chapter 2/ 2 Visible Visible Hidden NOV/21/07 11:00AM E1 SP 0:00:59 5 After this page. Then use [K / L] to select "Visible" at the step 4 on page 61 to display "Edit" menu. 2 Use [K / L] to select "Hidden", ... to be hidden. 4 Use [K / L] to select "Hide Chapter", then press [OK]. Hidden 1 SP (2Hr) NOV/21/07 11:00AM E1 SP NOV/21/07 0:20:44 2 NOV/22/07 11:35AM E1 EP NOV/22/07 0:10:33 3 EMPTY TITLE 1:37:52 SP(2Hr) 66 EN E7E4AUD.indd 66 2007/05/16...
Hide Chapter 1 Chapter 2/ 2 Visible Visible Hidden NOV/21/07 11:00AM E1 SP 0:00:59 5 After this page. Then use [K / L] to select "Visible" at the step 4 on page 61 to display "Edit" menu. 2 Use [K / L] to select "Hidden", ... to be hidden. 4 Use [K / L] to select "Hide Chapter", then press [OK]. Hidden 1 SP (2Hr) NOV/21/07 11:00AM E1 SP NOV/21/07 0:20:44 2 NOV/22/07 11:35AM E1 EP NOV/22/07 0:10:33 3 EMPTY TITLE 1:37:52 SP(2Hr) 66 EN E7E4AUD.indd 66 2007/05/16...