
Leaflet
Page 1
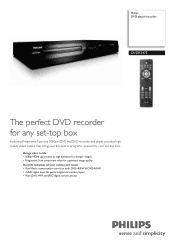
Philips DVD player/recorder DVDR3475 The perfect DVD recorder for perfect digital camcorder copies • Plays DivX, MP3 and JPEG digital camera photos Brings video to life • 1080p HDMI upconverts to high definition for sharper images • Progressive Scan component video for optimized image quality Records and plays ... records on both DVD+R/RW & DVD-R/RW • i.LINK digital input for any set-top box Featuring Progressive Scan and 1080p HDMI, this DVD recorder and player provides high quality video output that brings out the best in programs received by your set-top box.
Philips DVD player/recorder DVDR3475 The perfect DVD recorder for perfect digital camcorder copies • Plays DivX, MP3 and JPEG digital camera photos Brings video to life • 1080p HDMI upconverts to high definition for sharper images • Progressive Scan component video for optimized image quality Records and plays ... records on both DVD+R/RW & DVD-R/RW • i.LINK digital input for any set-top box Featuring Progressive Scan and 1080p HDMI, this DVD recorder and player provides high quality video output that brings out the best in programs received by your set-top box.
Leaflet
Page 2
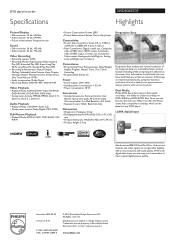
... sharper picture. Now you can buy any DVD player. the ability to change without notice. Dual Media Philips DVD Recorders support 'dual media' recording - DVD player/recorder Specifications DVDR3475/37 Highlights Picture/Display • D/A converter: 10 bit, 54 MHz • A/D converter: 10 ..., CVBS in, i.LINK DV in (IEEE1394, 4-pin), S-video in • Rear Connections: Digital coaxial out, Composite video (CVBS) input, HDMI output, Composite video (CVBS) output, S-Video out, Component Video output, Analog audio Left/Right in, Analog audio Left/Right out, S-Video in...
... sharper picture. Now you can buy any DVD player. the ability to change without notice. Dual Media Philips DVD Recorders support 'dual media' recording - DVD player/recorder Specifications DVDR3475/37 Highlights Picture/Display • D/A converter: 10 bit, 54 MHz • A/D converter: 10 ..., CVBS in, i.LINK DV in (IEEE1394, 4-pin), S-video in • Rear Connections: Digital coaxial out, Composite video (CVBS) input, HDMI output, Composite video (CVBS) output, S-Video out, Component Video output, Analog audio Left/Right in, Analog audio Left/Right out, S-Video in...
User manual
Page 5
...or under license from direct sunlight and keep it is working . Sound will need to out. Manufactured under conditions of high humidity. HDMI, the HDMI logo and HighDefinition Multimedia Interface are trademarks of the unit. EN 5 Editing Function Setup Others E7E4AUD.indd 5 2007/05/16 14:56... performance of cellular phone). Avoid places with stereo sound on pages 87-91 before you are compatible with actual recordable DVD discs. philips.com/welcome Cleaning the cabinet • Wipe the front panel and other exterior surfaces of the unit with AM radio or a digital...
...or under license from direct sunlight and keep it is working . Sound will need to out. Manufactured under conditions of high humidity. HDMI, the HDMI logo and HighDefinition Multimedia Interface are trademarks of the unit. EN 5 Editing Function Setup Others E7E4AUD.indd 5 2007/05/16 14:56... performance of cellular phone). Avoid places with stereo sound on pages 87-91 before you are compatible with actual recordable DVD discs. philips.com/welcome Cleaning the cabinet • Wipe the front panel and other exterior surfaces of the unit with AM radio or a digital...
User manual
Page 6
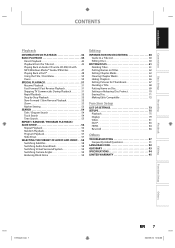
... Panel Display 12 Connections CONNECTION TO AN EXTERNAL TUNER 13 SETTINGS FOR THE VIDEO INPUT 14 CONNECTION TO A TV 15 CONNECTION TO A TV WITH AN HDMI COMPATIBLE PORT 16 CONNECTION TO AN AUDIO SYSTEM 18 Basic Setup GUIDE TO ON-SCREEN DISPLAYS AND MENUS . . . . 19 On-Screen Display / Menu 19 Main...
... Panel Display 12 Connections CONNECTION TO AN EXTERNAL TUNER 13 SETTINGS FOR THE VIDEO INPUT 14 CONNECTION TO A TV 15 CONNECTION TO A TV WITH AN HDMI COMPATIBLE PORT 16 CONNECTION TO AN AUDIO SYSTEM 18 Basic Setup GUIDE TO ON-SCREEN DISPLAYS AND MENUS . . . . 19 On-Screen Display / Menu 19 Main...
User manual
Page 7
... Protect 70 Erasing Disc 71 Making Edits Compatible 72 Function Setup LIST OF SETTINGS 73 SETUPS 75 Playback 75 Display 79 Video 81 DivX 83 HDMI 84 Reset All 86 Others TROUBLESHOOTING 87 Frequently Asked Questions 91 LANGUAGE CODE 92 GLOSSARY 93 SPECIFICATIONS 94 LIMITED WARRANTY 95 Recording Playback Editing Function...
... Protect 70 Erasing Disc 71 Making Edits Compatible 72 Function Setup LIST OF SETTINGS 73 SETUPS 75 Playback 75 Display 79 Video 81 DivX 83 HDMI 84 Reset All 86 Others TROUBLESHOOTING 87 Frequently Asked Questions 91 LANGUAGE CODE 92 GLOSSARY 93 SPECIFICATIONS 94 LIMITED WARRANTY 95 Recording Playback Editing Function...
User manual
Page 8
... DVD+RW/DVD-RW, which is rewritable repeatedly and DVD+R/DVD-R, which are offered with this unit to a display device with an HDMI-compatible port. Recording This unit is compatible with Dolby Digital, you can enjoy clearer audio/video output when connecting this unit. Every time... . Symbols Used in the mode other DVD players. You can easily find any of the DVC (digital video camcorder) to DVD. HDMI (High-Definition Multimedia Interface) You can experience the theater surround sound from playing back some chapters without permission, you can enjoy stereophonic space...
... DVD+RW/DVD-RW, which is rewritable repeatedly and DVD+R/DVD-R, which are offered with this unit to a display device with an HDMI-compatible port. Recording This unit is compatible with Dolby Digital, you can enjoy clearer audio/video output when connecting this unit. Every time... . Symbols Used in the mode other DVD players. You can easily find any of the DVC (digital video camcorder) to DVD. HDMI (High-Definition Multimedia Interface) You can experience the theater surround sound from playing back some chapters without permission, you can enjoy stereophonic space...
User manual
Page 9
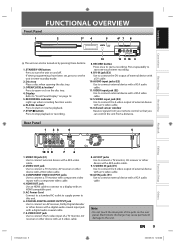
... recording. Rear Panel 1 23 4 VIDEO VIDEO IN OUT Y L PB/CB L R AV IN IN R PR/CR OUT S-VIDEO AV OUT COMPONENT VIDEO OUTPUT S-VIDEO HDMI OUT COAXIAL DIGITAL AUDIO OUTPUT PCM / BITSTREAM 10 9 8 7 6 1. STANDBY-ON button Press to open or close the disc tray. 4. OPEN/CLOSE A button* Press ... these buttons. 1. S-VIDEO input jack (E2) Use to a display with a RCA audio cable. 9. Infrared sensor window Receive signals from a distance. HDMI OUT jack Use an HDMI cable to connect to connect the S-video output of a TV monitor, AV receiver or other device with an...
... recording. Rear Panel 1 23 4 VIDEO VIDEO IN OUT Y L PB/CB L R AV IN IN R PR/CR OUT S-VIDEO AV OUT COMPONENT VIDEO OUTPUT S-VIDEO HDMI OUT COAXIAL DIGITAL AUDIO OUTPUT PCM / BITSTREAM 10 9 8 7 6 1. STANDBY-ON button Press to open or close the disc tray. 4. OPEN/CLOSE A button* Press ... these buttons. 1. S-VIDEO input jack (E2) Use to a display with a RCA audio cable. 9. Infrared sensor window Receive signals from a distance. HDMI OUT jack Use an HDMI cable to connect to connect the S-video output of a TV monitor, AV receiver or other device with an...
User manual
Page 11
...-ON y button Press to turn the unit on display. • Press to enter values for the settings in the main menu. • Press to the Philips brand TV products, you can adjust the TV volume with these buttons. 30. REW E button • During playback, press to fast reverse playback. • ... to slow forward playback. 26. DISC MENU button Press to skip 30 seconds. 15. SKIP button During playback, press to display the disc menu. 6. HDMI button Press to the previously displayed menu screen. 10. BACK button Press to return to set the unit in pause, press repeatedly to display the...
...-ON y button Press to turn the unit on display. • Press to enter values for the settings in the main menu. • Press to the Philips brand TV products, you can adjust the TV volume with these buttons. 30. REW E button • During playback, press to fast reverse playback. • ... to slow forward playback. 26. DISC MENU button Press to skip 30 seconds. 15. SKIP button During playback, press to display the disc menu. 6. HDMI button Press to the previously displayed menu screen. 10. BACK button Press to return to set the unit in pause, press repeatedly to display the...

User manual
Page 12
... • Recording time / remaining time • Clock • Selected external input position • Remaining time for one-touch timer recording • Selected HDMI OUTPUT mode Display Message Appears when the disc tray is selected. 2007/05/16 14:56:11 Appears when... Appears when the PBC function is being written on the disc tray. Refer to page 43.) E7E4AUD.indd 12 Appears when HDMI output mode (480p) is closing. Appears when HDMI output mode (1080i) is selected. Appears when data is activated. (Video CD playback only. FUNCTIONAL OVERVIEW Front Panel Display ...
... • Recording time / remaining time • Clock • Selected external input position • Remaining time for one-touch timer recording • Selected HDMI OUTPUT mode Display Message Appears when the disc tray is selected. 2007/05/16 14:56:11 Appears when... Appears when the PBC function is being written on the disc tray. Refer to page 43.) E7E4AUD.indd 12 Appears when HDMI output mode (480p) is closing. Appears when HDMI output mode (1080i) is selected. Appears when data is activated. (Video CD playback only. FUNCTIONAL OVERVIEW Front Panel Display ...
User manual
Page 13
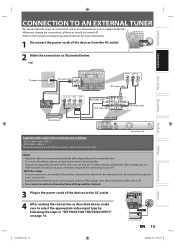
... tuner S-video cable VIDEO VIDEO IN OUT Y L PB/CB L R AV IN IN R PR/CR OUT S-VIDEO AV OUT COMPONENT VIDEO OUTPUT S-VIDEO HDMI OUT COAXIAL DIGITAL AUDIO OUTPUT PCM / BITSTREAM Supplied cables used in this unit EN 13 Editing Function Setup Others E7E4AUD.indd 13 2007/05/16... off . • You cannot record one channel while watching another channel. 3 Plug in "SETTINGS FOR THE VIDEO INPUT" IN VIDEO IN Y VIDEO HDMI OUT OUT on CVBS output even when the power of your TV disconnect 2 Make the connection as illustrated below. e.g.) TV signal RF coaxial cable ANT...
... tuner S-video cable VIDEO VIDEO IN OUT Y L PB/CB L R AV IN IN R PR/CR OUT S-VIDEO AV OUT COMPONENT VIDEO OUTPUT S-VIDEO HDMI OUT COAXIAL DIGITAL AUDIO OUTPUT PCM / BITSTREAM Supplied cables used in this unit EN 13 Editing Function Setup Others E7E4AUD.indd 13 2007/05/16... off . • You cannot record one channel while watching another channel. 3 Plug in "SETTINGS FOR THE VIDEO INPUT" IN VIDEO IN Y VIDEO HDMI OUT OUT on CVBS output even when the power of your TV disconnect 2 Make the connection as illustrated below. e.g.) TV signal RF coaxial cable ANT...

User manual
Page 14
...OK]. If you want to use [K / L] to use VIDEO IN jack, select "Video In". General Setting Playback Display Video Recording Clock DivX HDMI Reset All Progressive Scan TV Aspect E1V(Rideeaor)InpVuidteo Input E1Vi(dReeoarIn) E2S-(VFirdoenot)In 6 Press [SETUP] to connect, then press [OK]. General... Setting Playback Display Video Recording Clock DivX HDMI Reset All Progressive Scan TV Aspect Video InpVuidteo Input E1 (Rear) E2 (Front) 5 Use [K / L] to select the input jack type to...
...OK]. If you want to use [K / L] to use VIDEO IN jack, select "Video In". General Setting Playback Display Video Recording Clock DivX HDMI Reset All Progressive Scan TV Aspect E1V(Rideeaor)InpVuidteo Input E1Vi(dReeoarIn) E2S-(VFirdoenot)In 6 Press [SETUP] to connect, then press [OK]. General... Setting Playback Display Video Recording Clock DivX HDMI Reset All Progressive Scan TV Aspect Video InpVuidteo Input E1 (Rear) E2 (Front) 5 Use [K / L] to select the input jack type to...
User manual
Page 15
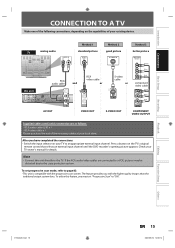
... RCA audio cable and RCA video cable or S-video cable or this unit VIDEO VIDEO IN OUT Y L PB/CB L R IN R AV IN S-VIDEO AV OUT HDMI OUT COAXIAL DIGITAL AUDIO OUTPUT PCM / BITSTREAM AV OUT VIDEO OUT L R AV OUT VIDEO OUT L R AV OUT VIDEO OUT OUT S-VIDEO S-VIDEO OUT better picture...
... RCA audio cable and RCA video cable or S-video cable or this unit VIDEO VIDEO IN OUT Y L PB/CB L R IN R AV IN S-VIDEO AV OUT HDMI OUT COAXIAL DIGITAL AUDIO OUTPUT PCM / BITSTREAM AV OUT VIDEO OUT L R AV OUT VIDEO OUT L R AV OUT VIDEO OUT OUT S-VIDEO S-VIDEO OUT better picture...
User manual
Page 16
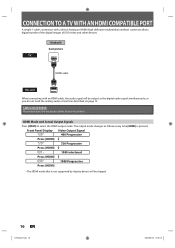
...EN E7E4AUD.indd 16 2007/05/16 14:56:15 Please purchase the necessary cables at your local store. HDMI Mode and Actual Output Signals Press [HDMI] to select the HDMI output mode. The output mode changes as the digital audio signal simultaneously, so you do not need the ...analog audio connection described on page 15. Method 4 best picture TV HDMI IN HDMI cable this unit HDMI OUT When connecting with a device having an HDMI (high-definition multimedia interface) connector allows digital transfer of the digital images of DVD-video and other devices....
...EN E7E4AUD.indd 16 2007/05/16 14:56:15 Please purchase the necessary cables at your local store. HDMI Mode and Actual Output Signals Press [HDMI] to select the HDMI output mode. The output mode changes as the digital audio signal simultaneously, so you do not need the ...analog audio connection described on page 15. Method 4 best picture TV HDMI IN HDMI cable this unit HDMI OUT When connecting with a device having an HDMI (high-definition multimedia interface) connector allows digital transfer of the digital images of DVD-video and other devices....
User manual
Page 17
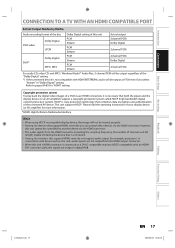
... output as this unit, audio signals are output in "Dolby Digital" setting. Introduction Connections Basic Setup CONNECTION TO A TV WITH AN HDMI COMPATIBLE PORT Actual Output Modes by Media Audio recording format of the disc Dolby Digital setting of this unit Actual output DVD-video Dolby...™ Audio files, 2 channel PCM will be output regardless of the "Dolby Digital" setting. *1 If the connected device is not compatible with an HDMI- however, this unit cannot be viewed properly. • Among the devices that both the player and the display device (or an AV amplifier) support...
... output as this unit, audio signals are output in "Dolby Digital" setting. Introduction Connections Basic Setup CONNECTION TO A TV WITH AN HDMI COMPATIBLE PORT Actual Output Modes by Media Audio recording format of the disc Dolby Digital setting of this unit Actual output DVD-video Dolby...™ Audio files, 2 channel PCM will be output regardless of the "Dolby Digital" setting. *1 If the connected device is not compatible with an HDMI- however, this unit cannot be viewed properly. • Among the devices that both the player and the display device (or an AV amplifier) support...
User manual
Page 18
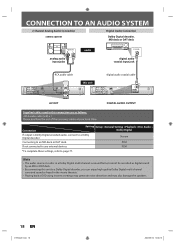
...audio COAXIAL digital audio coaxial input jack RCA audio cable VIDEO VIDEO IN OUT Y L PB/CB L R IN R AV IN S-VIDEO AV OUT HDMI OUT COAXIAL DIGITAL AUDIO OUTPUT PCM / BITSTREAM VIDEO OUT L AV OUT R AV OUT digital audio coaxial cable this connection are as heard in this ...unit VIDEO VIDEO IN OUT Y L PB/CB L R AV IN IN R PR/CR OUT S-VIDEO AV OUT COMPONENT VIDEO OUTPUT S-VIDEO HDMI OUT COAXIAL DIGITAL AUDIO OUTPUT PCM / BITSTREAM COAXIAL DIGITAL AUDIO OUTPUT PCM / BITSTREAM DIGITAL AUDIO OUTPUT Supplied cables used in the movie theaters. • ...
...audio COAXIAL digital audio coaxial input jack RCA audio cable VIDEO VIDEO IN OUT Y L PB/CB L R IN R AV IN S-VIDEO AV OUT HDMI OUT COAXIAL DIGITAL AUDIO OUTPUT PCM / BITSTREAM VIDEO OUT L AV OUT R AV OUT digital audio coaxial cable this connection are as heard in this ...unit VIDEO VIDEO IN OUT Y L PB/CB L R AV IN IN R PR/CR OUT S-VIDEO AV OUT COMPONENT VIDEO OUTPUT S-VIDEO HDMI OUT COAXIAL DIGITAL AUDIO OUTPUT PCM / BITSTREAM COAXIAL DIGITAL AUDIO OUTPUT PCM / BITSTREAM DIGITAL AUDIO OUTPUT Supplied cables used in the movie theaters. • ...
User manual
Page 19
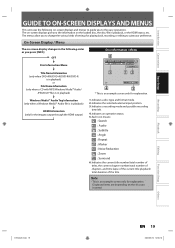
...and menus to guide you to suite your preference. On-Screen Display / Menu The on-screen display changes in playback, or the HDMI status, etc. Indicates the selected external input position. 3. Indicates the current title number/total number of titles, the current chapter number... of chapters, and time lapse of the current title playback/ total duration of settings for explanation. Note • This is in playback) HDMI Information (only for explanation. Indicates an operation status. 5. Windows Media™ Audio Tag Information (only when a Windows Media™ Audio file...
...and menus to guide you to suite your preference. On-Screen Display / Menu The on-screen display changes in playback, or the HDMI status, etc. Indicates the selected external input position. 3. Indicates the current title number/total number of titles, the current chapter number... of chapters, and time lapse of the current title playback/ total duration of settings for explanation. Note • This is in playback) HDMI Information (only for explanation. Indicates an operation status. 5. Windows Media™ Audio Tag Information (only when a Windows Media™ Audio file...

User manual
Page 20
... 1 2 Video Info. : Audio Info. : 480p Bitstream YCbCr 3 4 * This is an example screen only for explanation. Indicates the resolution of the HDMI output image. 2. Indicates artist/title information (only when available) • First, artist name will be displayed. • If you press [INFO] one ...more time, title name will be displayed. 20 EN E7E4AUD.indd 20 2007/05/16 14:56:16 Displays title/file name. Indicates the HDMI video format. 3. GUIDE TO ON-SCREEN DISPLAYS AND MENUS Title/File Name Information Title Name Information Title Name My Title 1 File Name Information ...
... 1 2 Video Info. : Audio Info. : 480p Bitstream YCbCr 3 4 * This is an example screen only for explanation. Indicates the resolution of the HDMI output image. 2. Indicates artist/title information (only when available) • First, artist name will be displayed. • If you press [INFO] one ...more time, title name will be displayed. 20 EN E7E4AUD.indd 20 2007/05/16 14:56:16 Displays title/file name. Indicates the HDMI video format. 3. GUIDE TO ON-SCREEN DISPLAYS AND MENUS Title/File Name Information Title Name Information Title Name My Title 1 File Name Information ...
User manual
Page 21
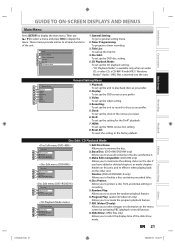
... MP3 / Windows Media™ Audio / JPEG files is inserted into the unit. 1 General Setting 2 Playback 3 Display 4 Video Recording 5 Clock 26 DivX HDMI 37 Reset All 48 General Setting Menu 1. Video: To set up the video setting. 4. Recording: To set up the unit to play back discs as...select images or information on the other unit. Clock: To set up the unit to record to discs as you prefer. 5. HDMI: To set up the HDMI connection setting. 8. Disc Protect : Allows you to activate the random playback feature. 6. EN 21 Editing Function Setup Others E7E4AUD....
... MP3 / Windows Media™ Audio / JPEG files is inserted into the unit. 1 General Setting 2 Playback 3 Display 4 Video Recording 5 Clock 26 DivX HDMI 37 Reset All 48 General Setting Menu 1. Video: To set up the video setting. 4. Recording: To set up the unit to play back discs as...select images or information on the other unit. Clock: To set up the unit to record to discs as you prefer. 5. HDMI: To set up the HDMI connection setting. 8. Disc Protect : Allows you to activate the random playback feature. 6. EN 21 Editing Function Setup Others E7E4AUD....

User manual
Page 23
General Setting Playback Display Video Clock Setting Recording Clock JAN / 01 / 2007 ( MON ) DivX 12 : 00 AM HDMI Reset All Your setting will be used. • You can also be activated. E7E4AUD.indd 23 EN 23 2007/05/16 14:56:18 General ...Setting Playback Display Video Clock Setting Recording Clock JAN / 01 / 2007 ( MON ) DivX 12 : 00 AM HDMI Reset All 4 Use [{ / B] to select an item to set the built-in calendar from the year 2007 up to select "General Setting", then press [OK...
General Setting Playback Display Video Clock Setting Recording Clock JAN / 01 / 2007 ( MON ) DivX 12 : 00 AM HDMI Reset All Your setting will be used. • You can also be activated. E7E4AUD.indd 23 EN 23 2007/05/16 14:56:18 General ...Setting Playback Display Video Clock Setting Recording Clock JAN / 01 / 2007 ( MON ) DivX 12 : 00 AM HDMI Reset All 4 Use [{ / B] to select an item to set the built-in calendar from the year 2007 up to select "General Setting", then press [OK...

User manual
Page 25
...created depending on the remaining time of the disc. 5) Press [SETUP] to exit. General Setting Playback Display Video Recording Clock DivX HDMI Reset All Auto Chapter Auto ChaptAeur to Finalize Make Recording Compatible OFF 5 minutes 10 minutes 15 minutes 30 minutes 60 minutes 5) Press...8226; A blank chapter may be replaced when you make an additional recording on this unit. General Setting Playback Display Video Recording Clock DivX HDMI Reset All Auto Chapter Make RecordAinugtoCFoimnaplaiztieble Make Recording Compatible ON OFF ON: OFF: Title list will appear. 3) Use [K / L] to ...
...created depending on the remaining time of the disc. 5) Press [SETUP] to exit. General Setting Playback Display Video Recording Clock DivX HDMI Reset All Auto Chapter Auto ChaptAeur to Finalize Make Recording Compatible OFF 5 minutes 10 minutes 15 minutes 30 minutes 60 minutes 5) Press...8226; A blank chapter may be replaced when you make an additional recording on this unit. General Setting Playback Display Video Recording Clock DivX HDMI Reset All Auto Chapter Make RecordAinugtoCFoimnaplaiztieble Make Recording Compatible ON OFF ON: OFF: Title list will appear. 3) Use [K / L] to ...