
Leaflet
Page 3
... N.V. or their respective owners. Trademarks are subject to change without notice. www.philips.com All Rights reserved. DVD player/recorder Specifications DVDR3400/37 Picture/Display • D/A converter: 10 bit, 54 MHz • A/D converter:...power consumption: < 3 W • Power consumption: 27 W (Typical) W Accessories • Included Accessories: Remote Control, User Manual, Quick start guide, RF antenna cable, Warranty Leaflet, 2 x AAA Batteries, Audio/Video cable • Remote Control 12NC: 242254900926 Dimensions • Set dimensions (W x H x D): 435 x 43 x 322 mm &#...
... N.V. or their respective owners. Trademarks are subject to change without notice. www.philips.com All Rights reserved. DVD player/recorder Specifications DVDR3400/37 Picture/Display • D/A converter: 10 bit, 54 MHz • A/D converter:...power consumption: < 3 W • Power consumption: 27 W (Typical) W Accessories • Included Accessories: Remote Control, User Manual, Quick start guide, RF antenna cable, Warranty Leaflet, 2 x AAA Batteries, Audio/Video cable • Remote Control 12NC: 242254900926 Dimensions • Set dimensions (W x H x D): 435 x 43 x 322 mm &#...
User manual
Page 6
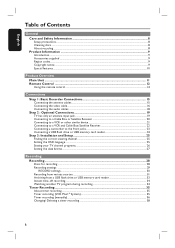
... 8 Setup precautions...8 Cleaning discs ...8 About recycling...8 Product Information ...9 Introduction ...9 Accessories supplied ...9 Region codes...9 Copyright notice...9 Special features ...10 Product Overview Main Unit ...11 Remote Control ...12 Using the remote control ...14 Connections Step 1: Basic Recorder Connections 15 Connecting the antenna cables ...15 Connecting the video cable...16 Connecting the audio cables ...18...
... 8 Setup precautions...8 Cleaning discs ...8 About recycling...8 Product Information ...9 Introduction ...9 Accessories supplied ...9 Region codes...9 Copyright notice...9 Special features ...10 Product Overview Main Unit ...11 Remote Control ...12 Using the remote control ...14 Connections Step 1: Basic Recorder Connections 15 Connecting the antenna cables ...15 Connecting the video cable...16 Connecting the audio cables ...18...

User manual
Page 9
It contains important information and notes regarding operations of copyrights and constitute a criminal offence. Product Information Accessories supplied - Remote control and batteries - RF coaxial cable - Quick Start Guide Region codes DVD films are usually not released at the same time ... manual before they can be played back on DVD players and DVD-ROM drives. Before you start using your country. English Introduction Your Philips recorder allows you to record TV programs or duplicate camcorder recordings to be played in all DVD players are given in the guarantee booklet....
It contains important information and notes regarding operations of copyrights and constitute a criminal offence. Product Information Accessories supplied - Remote control and batteries - RF coaxial cable - Quick Start Guide Region codes DVD films are usually not released at the same time ... manual before they can be played back on DVD players and DVD-ROM drives. Before you start using your country. English Introduction Your Philips recorder allows you to record TV programs or duplicate camcorder recordings to be played in all DVD players are given in the guarantee booklet....

User manual
Page 11
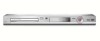
... Main Unit a b c d ef gh English i jk a STANDBY-ON - b Disc tray c OPEN/CLOSE ç - Stops playback/recording. k USB - Turns on the remote control to select 'CAM2' in order to standby mode. e .(PREV) / > (NEXT) - Press repeatedly to view the input source. Jacks behind the flap Flip down the.... Go to make a forward/ reverse search. É(PLAY) - Press SOURCE on the remote control to select 'CAM1' in order to view the contents of the recorder. Press SOURCE on the remote control to select 'DV' in order to set up a One Touch Recording at the right...
... Main Unit a b c d ef gh English i jk a STANDBY-ON - b Disc tray c OPEN/CLOSE ç - Stops playback/recording. k USB - Turns on the remote control to select 'CAM2' in order to standby mode. e .(PREV) / > (NEXT) - Press repeatedly to view the input source. Jacks behind the flap Flip down the.... Go to make a forward/ reverse search. É(PLAY) - Press SOURCE on the remote control to select 'CAM1' in order to view the contents of the recorder. Press SOURCE on the remote control to select 'DV' in order to set up a One Touch Recording at the right...

User manual
Page 12
...+® menu. 12 Turns on the TV screen. Enters/exits the setup menu. Skips to standby mode. k STOP - While in the selection playlist/ copylist. - English Remote Control SOURCE REPEAT USB SELECT TOOLS CLEAR OPEN/CLOSE ç ZOOM DISC MENU PLAY/PAUSE REC MODE TIMER EDIT a b c d e f g h i j k l m n o a 2 - Selects a chapter/track number to the...
...+® menu. 12 Turns on the TV screen. Enters/exits the setup menu. Skips to standby mode. k STOP - While in the selection playlist/ copylist. - English Remote Control SOURCE REPEAT USB SELECT TOOLS CLEAR OPEN/CLOSE ç ZOOM DISC MENU PLAY/PAUSE REC MODE TIMER EDIT a b c d e f g h i j k l m n o a 2 - Selects a chapter/track number to the...

User manual
Page 13
Remote Control (continued) English p USB - x REC - y TV VOL +/ - e; Selects a track/chapter/file in DVD mode. Press to the previous menu of a DVD±R/±RW. - u OK - Plays a disc. - t DISC MENU - Press to set (Philips TV only.) wj SUBTITLE - v BACK2 - Enters/exits the timer recording menu. s ... to access the DVD disc menu or Index Picture screen of a video CD (VCD.) w PLAY/PAUSE u - Mutes the volume of the TV set (Philips TV only.) z TV MUTE H - Toggles between recording modes : HQ, SP, SPP, LP, EP, or SLP. Enters/exits the video editing menu....
Remote Control (continued) English p USB - x REC - y TV VOL +/ - e; Selects a track/chapter/file in DVD mode. Press to the previous menu of a DVD±R/±RW. - u OK - Plays a disc. - t DISC MENU - Press to set (Philips TV only.) wj SUBTITLE - v BACK2 - Enters/exits the timer recording menu. s ... to access the DVD disc menu or Index Picture screen of a video CD (VCD.) w PLAY/PAUSE u - Mutes the volume of the TV set (Philips TV only.) z TV MUTE H - Toggles between recording modes : HQ, SP, SPP, LP, EP, or SLP. Enters/exits the video editing menu....

User manual
Page 14
B Insert two batteries of properly. D Aim the remote control directly at the remote sensor (IR) on the remote control. Do not mix batteries (old and new or carbon and alkaline, etc..) - B A Open the battery compartment. C Close the cover. SOURCE ...function (for a long time. - Batteries contain chemical substances, so they are exhausted or if the remote control is not to control by pressing the SOURCE button on the front panel. English Remote Control (continued) Using the remote control C A CAUTION! - Remove batteries if they should be used for example à, á...
B Insert two batteries of properly. D Aim the remote control directly at the remote sensor (IR) on the remote control. Do not mix batteries (old and new or carbon and alkaline, etc..) - B A Open the battery compartment. C Close the cover. SOURCE ...function (for a long time. - Batteries contain chemical substances, so they are exhausted or if the remote control is not to control by pressing the SOURCE button on the front panel. English Remote Control (continued) Using the remote control C A CAUTION! - Remove batteries if they should be used for example à, á...

User manual
Page 23
... input channel. Option 2: Using the VIDEO In or S-VIDEO In jacks Use this connection if you start operating, press SOURCE on the remote control repeatedly to copy camcorder recordings. TIPS: Refer to connect the CAM 2 jack if the connected video device has the S-Video output ...have a Digital Video or Digital 8 camcorder. Option 1: Using the DV IN jack Use this connection if you start operating, press SOURCE on the remote control repeatedly to the Video output jack on the camcorder. English Step 2: Optional Connections (continued) DV OUT L AR B OR Connecting a camcorder ...
... input channel. Option 2: Using the VIDEO In or S-VIDEO In jacks Use this connection if you start operating, press SOURCE on the remote control repeatedly to copy camcorder recordings. TIPS: Refer to connect the CAM 2 jack if the connected video device has the S-Video output ...have a Digital Video or Digital 8 camcorder. Option 1: Using the DV IN jack Use this connection if you start operating, press SOURCE on the remote control repeatedly to the Video output jack on the camcorder. English Step 2: Optional Connections (continued) DV OUT L AR B OR Connecting a camcorder ...

User manual
Page 24
... to the respective connected device's user manual for other USB devices except to view the files stored in the above illustration.) B Press USB on the remote control to a USB flash drive / USB memory card reader. - The USB port only supports the playback of a USB flash drive / USB memory card reader through...
... to the respective connected device's user manual for other USB devices except to view the files stored in the above illustration.) B Press USB on the remote control to a USB flash drive / USB memory card reader. - The USB port only supports the playback of a USB flash drive / USB memory card reader through...

User manual
Page 25
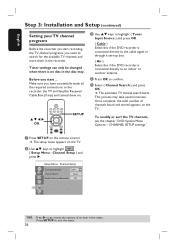
... keys to confirm. D Use ST keys to highlight the desired language and press OK to highlight { Setup Menu - TIPS: Press X to Channel 1 on your TV's remote control. This will optimise the performance of an item in channel. You may press ° button repeatedly on your TV...'s remote control until you start... Or, set it on the recorder to access its options. General } and press X RECMODE TIMER EDIT VCR Plus+ to Channel 3 or 4 ...
... keys to confirm. D Use ST keys to highlight the desired language and press OK to highlight { Setup Menu - TIPS: Press X to Channel 1 on your TV's remote control. This will optimise the performance of an item in channel. You may press ° button repeatedly on your TV...'s remote control until you start... Or, set it on the recorder to access its options. General } and press X RECMODE TIMER EDIT VCR Plus+ to Channel 3 or 4 ...
User manual
Page 26
... of channels found and stored appears on the TV. Make sure you need to search for the available TV channels and store them on the remote control. This process may take several minutes. Once complete, the total number of an item in the disc tray. Setup Menu - Tuner settings can start...
... of channels found and stored appears on the TV. Make sure you need to search for the available TV channels and store them on the remote control. This process may take several minutes. Once complete, the total number of an item in the disc tray. Setup Menu - Tuner settings can start...

User manual
Page 27
... { Manual } press OK to confirm. If the recorder has not set the time and date correctly, you can also use the numeric keypad 0-9 on the remote control to select { Setup Menu -
... { Manual } press OK to confirm. If the recorder has not set the time and date correctly, you can also use the numeric keypad 0-9 on the remote control to select { Setup Menu -

User manual
Page 29
... OPEN/CLOSE ç ZOOM DISC MENU SETUP Setup Menu - Recording settings The default recording settings allow you playback the DVD±R on the remote control. OK PLAY CH REC MODE TIMER EDIT VCR Plus+ TIPS: Ensure that there is enough space on this recorder. When the recorder receives... a copy guard signal, recording will be recorded on the DVD±R/±RW before recording. Any changes made using the remote control will remain unchanged for the next recording. See "Playing your recordings on the TV. The setup menu appears on other DVD players(...
... OPEN/CLOSE ç ZOOM DISC MENU SETUP Setup Menu - Recording settings The default recording settings allow you playback the DVD±R on the remote control. OK PLAY CH REC MODE TIMER EDIT VCR Plus+ TIPS: Ensure that there is enough space on this recorder. When the recorder receives... a copy guard signal, recording will be recorded on the DVD±R/±RW before recording. Any changes made using the remote control will remain unchanged for the next recording. See "Playing your recordings on the TV. The setup menu appears on other DVD players(...

User manual
Page 30
... automatically be inserted within the title during recording at a specific interval. Input source from the device connected to the CAM2 and AUDIO L/R jacks on the remote control. Input source from the device connected to the EXT3 Y Pb Pr in the recording quickly. { On } - This enables you can press the SOURCE button...
... automatically be inserted within the title during recording at a specific interval. Input source from the device connected to the CAM2 and AUDIO L/R jacks on the remote control. Input source from the device connected to the EXT3 Y Pb Pr in the recording quickly. { On } - This enables you can press the SOURCE button...
User manual
Page 31
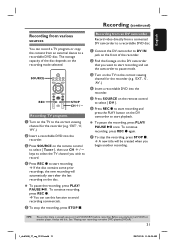
... last recording on the disc. E To stop the recording, press STOP x. A Connect the DV camcorder to select { DV }. E Press SOURCE on the remote control to DV IN jack on the front of the disc depends on the TV to record. To continue recording, press REC z again. G To stop...±R/±RW before recording. To continue recording, press REC z. B Find the footage on the DV camcorder that there is enough space on the remote control to select { Tuner }, then use this function to start recording. TIPS: Ensure that you begin another player, finalize the disc. The storage ...
... last recording on the disc. E To stop the recording, press STOP x. A Connect the DV camcorder to select { DV }. E Press SOURCE on the remote control to DV IN jack on the front of the disc depends on the TV to record. To continue recording, press REC z again. G To stop...±R/±RW before recording. To continue recording, press REC z. B Find the footage on the DV camcorder that there is enough space on the remote control to select { Tuner }, then use this function to start recording. TIPS: Ensure that you begin another player, finalize the disc. The storage ...

User manual
Page 33
.... Helpful Hints: - The USB port does not support the connection of other DVD players(DVD±R only)". 33 It is enough space on the remote control. TIPS: Ensure that there is not possible to record content from the copy list, press CLEAR. Before you playback the DVD±R on other...3 Song1.mp3 4 NATURE-1.JPG 5 BUTTER-1.JPG 6 P1022500.JPG 7 Music.mp3 8 MERLIO-1.JPG Copy List 1 Picture2.jpg 2 Music.mp3 REC PLAY CH OK A Turn on the remote control to view the files stored in the menu and press OK to proceed. The USB drive content menu appears. Audio Type Mode Audio Search...
.... Helpful Hints: - The USB port does not support the connection of other DVD players(DVD±R only)". 33 It is enough space on the remote control. TIPS: Ensure that there is not possible to record content from the copy list, press CLEAR. Before you playback the DVD±R on other...3 Song1.mp3 4 NATURE-1.JPG 5 BUTTER-1.JPG 6 P1022500.JPG 7 Music.mp3 8 MERLIO-1.JPG Copy List 1 Picture2.jpg 2 Music.mp3 REC PLAY CH OK A Turn on the remote control to view the files stored in the menu and press OK to proceed. The USB drive content menu appears. Audio Type Mode Audio Search...

User manual
Page 34
... input channel if you want to watch another player, finalize the disc. Before you to make a recording with a preset length easily without using the TV's remote control to change the TV channels. English Recording (continued) Instant time-off to standby mode automatically. Helpful hint: - TIPS: 34 Ensure that there is in...
... input channel if you want to watch another player, finalize the disc. Before you to make a recording with a preset length easily without using the TV's remote control to change the TV channels. English Recording (continued) Instant time-off to standby mode automatically. Helpful hint: - TIPS: 34 Ensure that there is in...

User manual
Page 35
...system. - Using manual timer schedule. To cancel the PlusCode programming, use it, enter the PlusCode programming number associated with your recordings on the remote control. The recorder will tune to record. (e.g. : 5-312-4 or 5,312 4, key in the programming number. To use ST keys ... TV listings magazine. English Timer Recording About timer recording Use the timer recording to program PLAY/PAUSE a timer recording - A Turn on the remote control. VCR Plus+ System Enter the PlusCode programming number for the recorder (e.g. 'EXT', '0', 'AV'.) B Press VCR Plus+ on other ...
...system. - Using manual timer schedule. To cancel the PlusCode programming, use it, enter the PlusCode programming number associated with your recordings on the remote control. The recorder will tune to record. (e.g. : 5-312-4 or 5,312 4, key in the programming number. To use ST keys ... TV listings magazine. English Timer Recording About timer recording Use the timer recording to program PLAY/PAUSE a timer recording - A Turn on the remote control. VCR Plus+ System Enter the PlusCode programming number for the recorder (e.g. 'EXT', '0', 'AV'.) B Press VCR Plus+ on other ...

User manual
Page 36
... Ch003 SP Once 01 / 01 / 06 10 : 30 PM 11 : 00 PM CANCELOK If the channel number of recording. Timer recording (manually) A Turn on the remote control. The VCR Plus+® program information will light up on the DVD±R/±RW before the recording begins. The timer editor menu appears...
... Ch003 SP Once 01 / 01 / 06 10 : 30 PM 11 : 00 PM CANCELOK If the channel number of recording. Timer recording (manually) A Turn on the remote control. The VCR Plus+® program information will light up on the DVD±R/±RW before the recording begins. The timer editor menu appears...

User manual
Page 38
....30am 4 CH005 SP 02/09/06 12.30pm 02.15pm 5 6 C Use ST keys to select a timer program which you playback the DVD±R on the remote control. G Once complete, select OK in the menu and press OK. TIPS: 38 Ensure that there is enough space on other DVD players". See "Playing... correct viewing channel for the recorder (e.g. 'EXT', '0', 'AV'.) B Press TIMER on another player, finalize the disc. D To delete the timer entry, press CLEAR on the remote control. H Press TIMER to exit the menu. The timer schedule appears.
....30am 4 CH005 SP 02/09/06 12.30pm 02.15pm 5 6 C Use ST keys to select a timer program which you playback the DVD±R on the remote control. G Once complete, select OK in the menu and press OK. TIPS: 38 Ensure that there is enough space on other DVD players". See "Playing... correct viewing channel for the recorder (e.g. 'EXT', '0', 'AV'.) B Press TIMER on another player, finalize the disc. D To delete the timer entry, press CLEAR on the remote control. H Press TIMER to exit the menu. The timer schedule appears.


