User manual
Page 5
... Remote Control 10 Front Panel 11 Function Display Window 12 Remote Control 13 Rear Panel 14 HOOKUP AND SETTINGS Connecting an Antenna or Cable TV . . . . . .15 Connctions to your TV 15-16 Optional TV Connections 16 Connection to an Amplifier 16-17 Initial Settings 18-26 General Operation 18 General Settings 18-20 Language Settings 20 Audio Settings 21 LOCK (Parental Control) Settings 22 Recording Settings 23 Disc Settings 23-24 General Explanation of On-Screen Display 25 PLAYBACK VCR Tape Playback 26-27 Playing a DVD...
... Remote Control 10 Front Panel 11 Function Display Window 12 Remote Control 13 Rear Panel 14 HOOKUP AND SETTINGS Connecting an Antenna or Cable TV . . . . . .15 Connctions to your TV 15-16 Optional TV Connections 16 Connection to an Amplifier 16-17 Initial Settings 18-26 General Operation 18 General Settings 18-20 Language Settings 20 Audio Settings 21 LOCK (Parental Control) Settings 22 Recording Settings 23 Disc Settings 23-24 General Explanation of On-Screen Display 25 PLAYBACK VCR Tape Playback 26-27 Playing a DVD...
User manual
Page 7
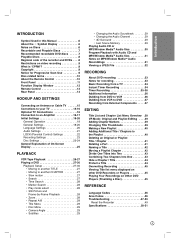
... unit plays DVDs according to play back" will appear on the TV screen. Region code of the recorder and DVDs This recorder is designed and 1 ALL manufactured for playback of a disc. • Do not use irregularly shaped CDs (e.g., heartshaped or octagonal). If you cannot record on it or edit it any more detailed information.) • Multi session DVD containing windows MediaTM Audio files may be compatible on DVD+R compatible players. (Hide...
... unit plays DVDs according to play back" will appear on the TV screen. Region code of the recorder and DVDs This recorder is designed and 1 ALL manufactured for playback of a disc. • Do not use irregularly shaped CDs (e.g., heartshaped or octagonal). If you cannot record on it or edit it any more detailed information.) • Multi session DVD containing windows MediaTM Audio files may be compatible on DVD+R compatible players. (Hide...
User manual
Page 8
... Progressive Scan Use CONSUMERS SHOULD NOTE THAT NOT ALL HIGH DEFINITION TELEVISION SETS ARE FULLY COMPATIBLE WITH THIS PRODUCT AND MAY CAUSE ARTIFACTS TO BE DISPLAYED IN THE PICTURE. A type of coding / decoding developed by Macrovision corporation. Each chapter is assigned a reference number enabling you want . IN CASE OF 525 PROGRESSIVE SCAN PICTURE PROBLEMS, IT IS RECOMMENDED THAT THE USER SWITCH THE CONNECTION TO THE 'STANDARD DEFINITION' OUTPUT...
... Progressive Scan Use CONSUMERS SHOULD NOTE THAT NOT ALL HIGH DEFINITION TELEVISION SETS ARE FULLY COMPATIBLE WITH THIS PRODUCT AND MAY CAUSE ARTIFACTS TO BE DISPLAYED IN THE PICTURE. A type of coding / decoding developed by Macrovision corporation. Each chapter is assigned a reference number enabling you want . IN CASE OF 525 PROGRESSIVE SCAN PICTURE PROBLEMS, IT IS RECOMMENDED THAT THE USER SWITCH THE CONNECTION TO THE 'STANDARD DEFINITION' OUTPUT...
User manual
Page 9
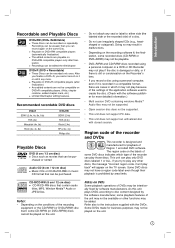
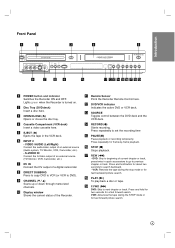
...fast backward picture search. q REW (m) - VCR: Rewinds the tape during the STOP mode or for a fast forward search. c OPEN/CLOSE (Z) Opens or closes the disc tray. VIDEO /AUDIO (Left/Right) Connect the audio/video output of a digital camcorder. S-VIDEO IN Connect the S-Video output of the Recorder. h DIRECT DUBBING Press to copy DVD to VCR (or VCR to previous chapter or track. i CHANNEL (V / v) Scans up or down through memorized channels. m SOURCE Toggles control between the DVD deck and the VCR deck. Introduction Front Panel a b c d e f g hi j k lm n o p q r s a POWER...
...fast backward picture search. q REW (m) - VCR: Rewinds the tape during the STOP mode or for a fast forward search. c OPEN/CLOSE (Z) Opens or closes the disc tray. VIDEO /AUDIO (Left/Right) Connect the audio/video output of a digital camcorder. S-VIDEO IN Connect the S-Video output of the Recorder. h DIRECT DUBBING Press to copy DVD to VCR (or VCR to previous chapter or track. i CHANNEL (V / v) Scans up or down through memorized channels. m SOURCE Toggles control between the DVD deck and the VCR deck. Introduction Front Panel a b c d e f g hi j k lm n o p q r s a POWER...
User manual
Page 11
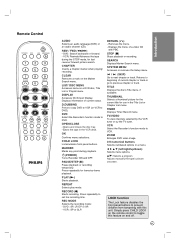
... disc tray. -Ejects the tape in the VCR deck. CHILD LOCK Locks/unlocks front panel buttons. MARKER Marks any point during the STOP mode, for frame-by the TV tuner. Press repeatedly for fast reverse/ forward picture search. Press repeatedly to VCR. DVD : SP, LP, EP or XP. - VCR : SP or SLP. Displays the menu of a video CD with this feature on the remote control to DVD. STOP (x) Stops playback or recording. SYSTEM MENU Accesses or removes the Setup menu. TITLE Displays the disc's Title menu, if available. TIMER Displays Timer Record menu. VCR Select...
... disc tray. -Ejects the tape in the VCR deck. CHILD LOCK Locks/unlocks front panel buttons. MARKER Marks any point during the STOP mode, for frame-by the TV tuner. Press repeatedly for fast reverse/ forward picture search. Press repeatedly to VCR. DVD : SP, LP, EP or XP. - VCR : SP or SLP. Displays the menu of a video CD with this feature on the remote control to DVD. STOP (x) Stops playback or recording. SYSTEM MENU Accesses or removes the Setup menu. TITLE Displays the disc's Title menu, if available. TIMER Displays Timer Record menu. VCR Select...

User manual
Page 13
... connections, depending on the Recorder. If your Recorder. Set the Recorder channel selector to the Recorder. a Antenna Antenna OR OR Rear of the TV and identify the antenna cable. If it is a round 75 ohm coaxial cable connect it directly to the jack marked ANT.IN on your TV and attach it is flat connect it into to the cable output channel. (Example: CH3) 3. Select a channel using a cable box to tune channels...
... connections, depending on the Recorder. If your Recorder. Set the Recorder channel selector to the Recorder. a Antenna Antenna OR OR Rear of the TV and identify the antenna cable. If it is a round 75 ohm coaxial cable connect it directly to the jack marked ANT.IN on your TV and attach it is flat connect it into to the cable output channel. (Example: CH3) 3. Select a channel using a cable box to tune channels...

User manual
Page 14
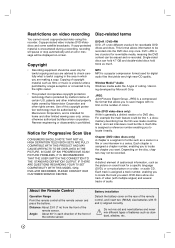
... channel. Audio connection Connect the Left and Right DVD/VCR AUDIO OUT jacks on the Recorder to [ON] in jacks on the setup menu. When the Recorder is a high-definition or "digital ready" television, you use Component Video signal, set the Progressive Scan to this connection, set the Recorder's RF output channel 1. Tune the TV to [OFF] on the TV using the optional SVideo cable (S). Note: If you may take advantage of Dolby Laboratories. 14 L R AUDIO INPUT COAXIAL DIGITAL INPUT Amplifier (Receiver...
... channel. Audio connection Connect the Left and Right DVD/VCR AUDIO OUT jacks on the Recorder to [ON] in jacks on the setup menu. When the Recorder is a high-definition or "digital ready" television, you use Component Video signal, set the Progressive Scan to this connection, set the Recorder's RF output channel 1. Tune the TV to [OFF] on the TV using the optional SVideo cable (S). Note: If you may take advantage of Dolby Laboratories. 14 L R AUDIO INPUT COAXIAL DIGITAL INPUT Amplifier (Receiver...
User manual
Page 17
... can set [Display Mode] below. [16:9] Select this when connecting to a 4:3 screen TV. Use v / V or number buttons to select a channel to add or delete then press B. [Add] or [Delete] icon is highlighted. 3. Clock Set 1. Auto The Auto option is set to Auto, the Recorder will use XDS information to confirm your setting. 6. b / B (left/right): Moves the cursor to exit the Setup menu. When you select [4:3], set the clock manually. 4. Use v / V to determine the proper setting. 2. When it is turned...
... can set [Display Mode] below. [16:9] Select this when connecting to a 4:3 screen TV. Use v / V or number buttons to select a channel to add or delete then press B. [Add] or [Delete] icon is highlighted. 3. Clock Set 1. Auto The Auto option is set to Auto, the Recorder will use XDS information to confirm your setting. 6. b / B (left/right): Moves the cursor to exit the Setup menu. When you select [4:3], set the clock manually. 4. Use v / V to determine the proper setting. 2. When it is turned...
User manual
Page 18
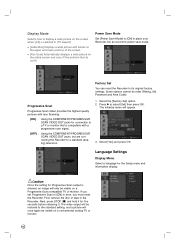
..., remove the disc or tape in error, you must reset the Recorder. Power Save Mode Set [Power Save Mode] to [ON] to place your Recorder into an economic power save mode. Language Settings Display Menu Select a language for five seconds before releasing it. If you set Progressive Scan to [ON] in the Recorder. Next, press STOP (x) and hold it for the Setup menu and information display. Progressive Scan Progressive Scan Video provides the highest quality pictures with a progressive scan signal. [OFF] : Using the COMPONENT/PROGRESSIVE SCAN VIDEO OUT jacks, but are connecting...
..., remove the disc or tape in error, you must reset the Recorder. Power Save Mode Set [Power Save Mode] to [ON] to place your Recorder into an economic power save mode. Language Settings Display Menu Select a language for five seconds before releasing it. If you set Progressive Scan to [ON] in the Recorder. Next, press STOP (x) and hold it for the Setup menu and information display. Progressive Scan Progressive Scan Video provides the highest quality pictures with a progressive scan signal. [OFF] : Using the COMPONENT/PROGRESSIVE SCAN VIDEO OUT jacks, but are connecting...
User manual
Page 19
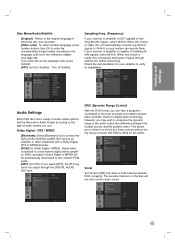
... connect the DVD+VCR's DIGITAL AUDIO OUT jack to an amplifier or other equipment with a Dolby Digital, DTS or MPEG decoder. [PCM] (for this unit passes each type of signal through the DIGITAL AUDIO OUT jack. Vocal Set Vocal to the language code list in the reference chapter (see page 48). Hookup and Settings Disc Menu/Audio/Subtitle [Original] : Refers to the original language in which the disc was recorded. [Other code] : To select another language, press number buttons...
... connect the DVD+VCR's DIGITAL AUDIO OUT jack to an amplifier or other equipment with a Dolby Digital, DTS or MPEG decoder. [PCM] (for this unit passes each type of signal through the DIGITAL AUDIO OUT jack. Vocal Set Vocal to the language code list in the reference chapter (see page 48). Hookup and Settings Disc Menu/Audio/Subtitle [Original] : Refers to the original language in which the disc was recorded. [Other code] : To select another language, press number buttons...
User manual
Page 21
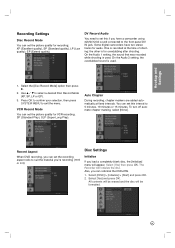
... digital camcorders have a camcorder using 32kHz/12-bit sound connected to 5 minutes, 10 minutes or 15 minutes. On the Audio 1 setting, the sound that was recorded while shooting is used . Use v / V to exit the menu. VCR Record Mode You can reformat the DVD+RW. 1. To turn off automatic chapter marking, select [None]. Select [Yes] then press OK. Also, you can set the picture quality for recording; Hookup and Settings Recording Settings Disc Record Mode You can set the recording aspect ratio...
... digital camcorders have a camcorder using 32kHz/12-bit sound connected to 5 minutes, 10 minutes or 15 minutes. On the Audio 1 setting, the sound that was recorded while shooting is used . Use v / V to exit the menu. VCR Record Mode You can reformat the DVD+RW. 1. To turn off automatic chapter marking, select [None]. Select [Yes] then press OK. Also, you can set the picture quality for recording; Hookup and Settings Recording Settings Disc Record Mode You can set the recording aspect ratio...

User manual
Page 22
... Use the Disc Label feature to make edits, select [OFF]. 1. This name appears when you load the disc and when you will bypass the Disc menu and trailers and start playing the movie automatically. Select [DISC] > [Finalize] > [Finalize] and press OK. 2. Caution Once you have finalized a DVD+R disc, you load a DVD with DVD-ROM drives. Set [AutoPlay] to 32 characters long. • For discs formatted on a different Recorder, you display disc information on-screen...
... Use the Disc Label feature to make edits, select [OFF]. 1. This name appears when you load the disc and when you will bypass the Disc menu and trailers and start playing the movie automatically. Select [DISC] > [Finalize] > [Finalize] and press OK. 2. Caution Once you have finalized a DVD+R disc, you load a DVD with DVD-ROM drives. Set [AutoPlay] to 32 characters long. • For discs formatted on a different Recorder, you display disc information on-screen...
User manual
Page 23
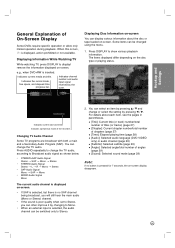
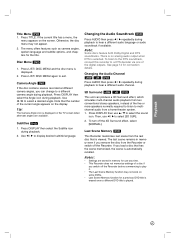
... button is displayed, action prohibited or not available. Changing TV Audio Channel Some TV programs are broadcast with both a main and a Secondary Audio Program (SAP). You can often improve it by pressing v / V and change the TV audio. Indicates channel number and audio input signal received by pressing b / B. You can be changed using the menu. 1. e.g., when DVD+RW is selected, the audio channel can change or select the setting by the tuner. Displaying Disc Information on -screen display disappears. 23 The items displayed...
... button is displayed, action prohibited or not available. Changing TV Audio Channel Some TV programs are broadcast with both a main and a Secondary Audio Program (SAP). You can often improve it by pressing v / V and change the TV audio. Indicates channel number and audio input signal received by pressing b / B. You can be changed using the menu. 1. e.g., when DVD+RW is selected, the audio channel can change or select the setting by the tuner. Displaying Disc Information on -screen display disappears. 23 The items displayed...
User manual
Page 25
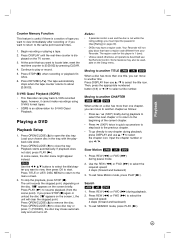
... (forward and backward) 3. Load your Recorder. Some features may have a region code different from the scene point). Input the chapter number or use v / V to select the chapter icon. Search +RW +R DVD 1. At the point that have a region code. Playing a DVD Playback Setup 1. Press OPEN/CLOSE (Z) to the menu screen. 3. If playback does not start . Moving to another title: Press DISPLAY then use the Remote Control. To exit SEARCH mode, press PLAY (N). 25 Press OPEN/CLOSE (Z) to close disc tray or press 1 (POWER), the disc tray closes...
... (forward and backward) 3. Load your Recorder. Some features may have a region code different from the scene point). Input the chapter number or use v / V to select the chapter icon. Search +RW +R DVD 1. At the point that have a region code. Playing a DVD Playback Setup 1. Press OPEN/CLOSE (Z) to the menu screen. 3. If playback does not start . Moving to another title: Press DISPLAY then use the Remote Control. To exit SEARCH mode, press PLAY (N). 25 Press OPEN/CLOSE (Z) to close disc tray or press 1 (POWER), the disc tray closes...
User manual
Page 27
... displayed on the screen. Subtitles DVD 1. Note: Some discs feature both Dolby Digital and DTS soundtracks. There is no analog audio output when DTS is played. 27 Changing the Audio Channel +RW +R DVD Press AUDIO then press b / B repeatedly during playback to hear a different audio channel. 3D Surround +RW +R DVD This unit can change to play it. • The Last Scene Memory function may not appear. 2. Press DISPLAY then use b / B to multichannel audio from the last disc that the number...
... displayed on the screen. Subtitles DVD 1. Note: Some discs feature both Dolby Digital and DTS soundtracks. There is no analog audio output when DTS is played. 27 Changing the Audio Channel +RW +R DVD Press AUDIO then press b / B repeatedly during playback to hear a different audio channel. 3D Surround +RW +R DVD This unit can change to play it. • The Last Scene Memory function may not appear. 2. Press DISPLAY then use b / B to multichannel audio from the last disc that the number...

User manual
Page 31
.... • The displayed times for DVD+R, DVD+RW discs is full, or until the disc is always "Video format"-the same as required for recording • The recording times shown are not exact because the recorder uses variable bit-rate video compression. The disc format is Video format, then the recording mode is closely related to update the new title and editing when removing the disc from malfunction of the disc.) The recording mode is Video mode. This means...
.... • The displayed times for DVD+R, DVD+RW discs is full, or until the disc is always "Video format"-the same as required for recording • The recording times shown are not exact because the recorder uses variable bit-rate video compression. The disc format is Video format, then the recording mode is closely related to update the new title and editing when removing the disc from malfunction of the disc.) The recording mode is Video mode. This means...
User manual
Page 34
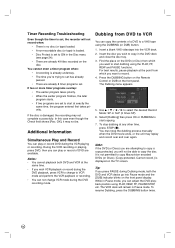
... Remote Control or DUB on the TV screen. Select [Dubbing] then press OK or DUBBING to select the desired Record Mode: SP or SLP (3 times SP). 6. Note: If the DVD (or Discs) you wish VCR playback or record during the DVD playback, press VCR to change to VCR mode and perform the VCR palyback or recording. • You can copy the contents of DVD are already 8 timer programs set. Cannot record.] is copy protected, you want to a VHS tape using PLAY...
... Remote Control or DUB on the TV screen. Select [Dubbing] then press OK or DUBBING to select the desired Record Mode: SP or SLP (3 times SP). 6. Note: If the DVD (or Discs) you wish VCR playback or record during the DVD playback, press VCR to change to VCR mode and perform the VCR palyback or recording. • You can copy the contents of DVD are already 8 timer programs set. Cannot record.] is copy protected, you want to a VHS tape using PLAY...
User manual
Page 43
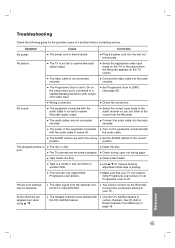
... sound from the external component is copy-protected. Reference 43 Turn on the setup menu but is connected to receive Recorder signal output. Make sure that your TV. Cause The power cord is dirty. The disc is disconnected. This unit can support 525p Progressive scan picture or set to off . The audio cables are dirty. Select the correct input mode of a problem before contacting service. Wrong connection. The skipped channels were deleted with the audio cable is turned off . Symptom No power. The Progressive Scan...
... sound from the external component is copy-protected. Reference 43 Turn on the setup menu but is connected to receive Recorder signal output. Make sure that your TV. Cause The power cord is dirty. The disc is disconnected. This unit can support 525p Progressive scan picture or set to off . The audio cables are dirty. Select the correct input mode of a problem before contacting service. Wrong connection. The skipped channels were deleted with the audio cable is turned off . Symptom No power. The Progressive Scan...
User manual
Page 44
... set to select input channel (AV1 or AV2). Clock in the remote control are exhausted. Clean the disc. When using a VCR, first press the VCR button. Reprogram Timer and turn Record off . The Rating level is inserted. Camcorder image via A/V input to Recorder is off to correct time. The batteries in Record is incorrect. This remote control use the same buttons for VCR and DVD functions (ex.PLAY). Camcorder is not shown on TV screen. Timer has been programmed incorrectly. (TIMER) indicator light...
... set to select input channel (AV1 or AV2). Clock in the remote control are exhausted. Clean the disc. When using a VCR, first press the VCR button. Reprogram Timer and turn Record off . The Rating level is inserted. Camcorder image via A/V input to Recorder is off to correct time. The batteries in Record is incorrect. This remote control use the same buttons for VCR and DVD functions (ex.PLAY). Camcorder is not shown on TV screen. Timer has been programmed incorrectly. (TIMER) indicator light...
User manual
Page 45
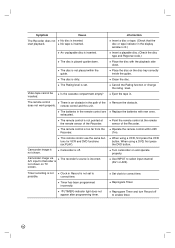
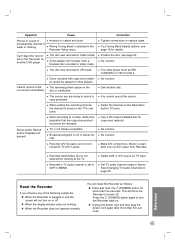
... 1 (POWER) button again to record is plugged in order to a Video mode disc, programs that are loose. Use a VR mode formatted disc for viewing at the TV. Recorder Audio/Video Out is selected in stereo format. See [Changing TV Audio Channel] on other players. Symptom Picture or sound of the following symptoms... Can't play disc recorded on this Recorder on . Wrong Tuning Band is not selected for copy-once material. Cannot record or did not record successfully. Stereo Audio Record and/or Playback not...
... 1 (POWER) button again to record is plugged in order to a Video mode disc, programs that are loose. Use a VR mode formatted disc for viewing at the TV. Recorder Audio/Video Out is selected in stereo format. See [Changing TV Audio Channel] on other players. Symptom Picture or sound of the following symptoms... Can't play disc recorded on this Recorder on . Wrong Tuning Band is not selected for copy-once material. Cannot record or did not record successfully. Stereo Audio Record and/or Playback not...


