User manual
Page 3
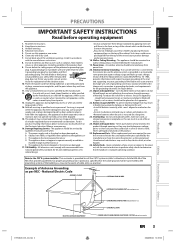
... instructions. 2. Replacement Parts - Safety Check - National Electric Code GROUND CLAMP ANTENNA LEAD IN WIRE Recording Playback Editing Function Setup E7H40UD_EN_v5.indd 3 ELECTRIC SERVICE EQUIPMENT ANTENNA DISCHARGE UNIT (NEC SECTION 810-20) GROUNDING CONDUCTORS (NEC SECTION 810-21) GROUND CLAMPS POWER SERVICE GROUNDING ELECTRODE SYSTEM (NEC ART 250, PART H) EN 3 2008/06/02 14:49:23 Others Keep these materi- Do not block any service or repairs...
... instructions. 2. Replacement Parts - Safety Check - National Electric Code GROUND CLAMP ANTENNA LEAD IN WIRE Recording Playback Editing Function Setup E7H40UD_EN_v5.indd 3 ELECTRIC SERVICE EQUIPMENT ANTENNA DISCHARGE UNIT (NEC SECTION 810-20) GROUNDING CONDUCTORS (NEC SECTION 810-21) GROUND CLAMPS POWER SERVICE GROUNDING ELECTRODE SYSTEM (NEC ART 250, PART H) EN 3 2008/06/02 14:49:23 Others Keep these materi- Do not block any service or repairs...
User manual
Page 4
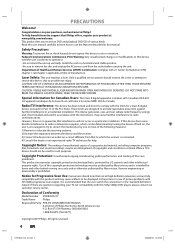
... the unit. CAUTION: VISIBLE AND INVISIBLE LASER RADIATION WHEN OPEN AND INTERLOCK DEFEATED. This device should note that is intended for Progressive Scan Use: Consumers should not be determined by turning the device off and on, the user is encouraged to try to Philips! Read this user manual carefully to learn how to rain or moisture. PRECAUTIONS Welcome! Only a qualified service person should remove...
... the unit. CAUTION: VISIBLE AND INVISIBLE LASER RADIATION WHEN OPEN AND INTERLOCK DEFEATED. This device should note that is intended for Progressive Scan Use: Consumers should not be determined by turning the device off and on, the user is encouraged to try to Philips! Read this user manual carefully to learn how to rain or moisture. PRECAUTIONS Welcome! Only a qualified service person should remove...
User manual
Page 5
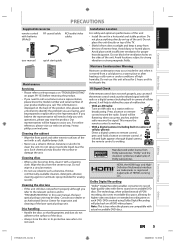
..., thinner, commercially available cleaners, detergent, abrasive cleaning agents or antistatic spray intended for 2 hours until its protective case when it away from the center to strong vibration or strong magnetic fields. Introduction Connections Basic Setup Recording Playback PRECAUTIONS Supplied Accessories remote control with batteries (AAAx2) RF coaxial cable RCA audio/video cables user manual quick start guide Installation Location For safety and optimum performance of this unit at http://www.
..., thinner, commercially available cleaners, detergent, abrasive cleaning agents or antistatic spray intended for 2 hours until its protective case when it away from the center to strong vibration or strong magnetic fields. Introduction Connections Basic Setup Recording Playback PRECAUTIONS Supplied Accessories remote control with batteries (AAAx2) RF coaxial cable RCA audio/video cables user manual quick start guide Installation Location For safety and optimum performance of this unit at http://www.
User manual
Page 6
... Setup GUIDE TO ON-SCREEN DISPLAYS AND MENUS . . . . 20 On-Screen Display / Menu 20 Main Menu 22 INITIAL SETTING 23 CHANNEL SETTING 24 Auto Channel Scan 24 Adding / Deleting Channels 25 SETTING THE CLOCK 27 Auto Clock Setting 27 Manual Clock Setting 28 Daylight Saving Time 28 TUNER SETTINGS 29 Switching Analog Mode / Digital Mode 29 Channel Selection 29 Selecting TV Audio 30 DTV Closed Caption 32 Closed Caption Style 33 Recording INFORMATION ON DVD RECORDING 35 BEFORE RECORDING 36 Make Recording Compatible 36 Setting for Auto Chapter 36 BASIC RECORDING & ONE-TOUCH TIMER...
... Setup GUIDE TO ON-SCREEN DISPLAYS AND MENUS . . . . 20 On-Screen Display / Menu 20 Main Menu 22 INITIAL SETTING 23 CHANNEL SETTING 24 Auto Channel Scan 24 Adding / Deleting Channels 25 SETTING THE CLOCK 27 Auto Clock Setting 27 Manual Clock Setting 28 Daylight Saving Time 28 TUNER SETTINGS 29 Switching Analog Mode / Digital Mode 29 Channel Selection 29 Selecting TV Audio 30 DTV Closed Caption 32 Closed Caption Style 33 Recording INFORMATION ON DVD RECORDING 35 BEFORE RECORDING 36 Make Recording Compatible 36 Setting for Auto Chapter 36 BASIC RECORDING & ONE-TOUCH TIMER...

User manual
Page 7
... ON DISC EDITING 71 Guide to a Title List 71 Editing Discs 71 EDITING DISCS 72 Deleting Titles 72 Putting Names on Titles 73 Setting Chapter Marks 74 Clearing Chapter Marks 75 Hiding Chapters 77 Setting Pictures for Thumbnails 78 Dividing a Title 79 Putting Name on Disc 80 Setting or Releasing Disc Protect 81 Erasing Disc 82 Making Edits Compatible 83 Function Setup LIST OF SETTINGS 84 SETUPS 87 Playback 87 Display 91 Video 93 DivX 95 HDMI 96 Reset All 98 Others TROUBLESHOOTING 99 Frequently Asked Questions 103 LANGUAGE CODE...
... ON DISC EDITING 71 Guide to a Title List 71 Editing Discs 71 EDITING DISCS 72 Deleting Titles 72 Putting Names on Titles 73 Setting Chapter Marks 74 Clearing Chapter Marks 75 Hiding Chapters 77 Setting Pictures for Thumbnails 78 Dividing a Title 79 Putting Name on Disc 80 Setting or Releasing Disc Protect 81 Erasing Disc 82 Making Edits Compatible 83 Function Setup LIST OF SETTINGS 84 SETUPS 87 Playback 87 Display 91 Video 93 DivX 95 HDMI 96 Reset All 98 Others TROUBLESHOOTING 99 Frequently Asked Questions 103 LANGUAGE CODE...
User manual
Page 8
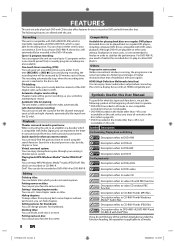
... recorded discs to DVD-video Editing Deleting titles: You can choose either one -month period. Setting pictures for thumbnails: You can change pictures for you can also be played back on DVD and edit them after that of the symbols listed above under the function heading, the operation is pressed during recording, the recording time will be put your existing 2 channel stereo system. Automatic title list making: The unit makes a title list with DVD-video playback. DivX® files can hide chapters. Others Progressive scan...
... recorded discs to DVD-video Editing Deleting titles: You can choose either one -month period. Setting pictures for thumbnails: You can change pictures for you can also be played back on DVD and edit them after that of the symbols listed above under the function heading, the operation is pressed during recording, the recording time will be put your existing 2 channel stereo system. Automatic title list making: The unit makes a title list with DVD-video playback. DivX® files can hide chapters. Others Progressive scan...

User manual
Page 11
... to open or close the disc tray. 23. MUTE button Limited to set the HDMI connector's video signal output mode . 21. OPEN/CLOSE A button* Press to display the repeat menu. 19. STOP C button • Press to stop playback or recording. • Press to slow reverse playback. 11. If timer programmings have been set, press to the Philips brand TV products, you can adjust the TV volume with these buttons. 1. AUDIO button • Press to switch the audio language for more than 3 seconds to switch the progressive scanning mode...
... to open or close the disc tray. 23. MUTE button Limited to set the HDMI connector's video signal output mode . 21. OPEN/CLOSE A button* Press to display the repeat menu. 19. STOP C button • Press to stop playback or recording. • Press to slow reverse playback. 11. If timer programmings have been set, press to the Philips brand TV products, you can adjust the TV volume with these buttons. 1. AUDIO button • Press to switch the audio language for more than 3 seconds to switch the progressive scanning mode...

User manual
Page 16
...'s original remote control that selects an external input channel until the DVD recorder's opening picture appears. Note • Connect this connection are connected to a VCR, pictures may be distorted due to the TV. Method 1 Method 2 Method 3 TV analog audio standard picture good picture AUDIO IN R L VIDEO IN S-VIDEO IN RCA audio cable and RCA video cable or S-video cable or this unit IN VIDEO VIDEO IN OUT Y L PB/CB L R OUT ANTENNA AV IN IN R S-VIDEO AV OUT HDMI OUT COAXIAL DIGITAL AUDIO OUTPUT PCM...
...'s original remote control that selects an external input channel until the DVD recorder's opening picture appears. Note • Connect this connection are connected to a VCR, pictures may be distorted due to the TV. Method 1 Method 2 Method 3 TV analog audio standard picture good picture AUDIO IN R L VIDEO IN S-VIDEO IN RCA audio cable and RCA video cable or S-video cable or this unit IN VIDEO VIDEO IN OUT Y L PB/CB L R OUT ANTENNA AV IN IN R S-VIDEO AV OUT HDMI OUT COAXIAL DIGITAL AUDIO OUTPUT PCM...
User manual
Page 19
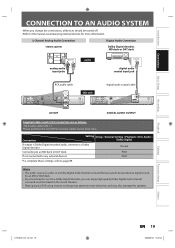
... COMPONENT VIDEO OUTPUT S-VIDEO HDMI OUT COAXIAL DIGITAL AUDIO OUTPUT PCM / BITSTREAM COAXIAL DIGITAL AUDIO OUTPUT PCM / BITSTREAM DIGITAL AUDIO OUTPUT Supplied cables used in the movie theaters. • Playing back a DVD using incorrect settings may generate noise distortion and may also damage the speakers. Introduction Connections Basic Setup Recording CONNECTION TO AN AUDIO SYSTEM • When you change the connections, all devices should be recorded as digital sound by an MD or DAT deck. • By connecting this unit to a Dolby Digital...
... COMPONENT VIDEO OUTPUT S-VIDEO HDMI OUT COAXIAL DIGITAL AUDIO OUTPUT PCM / BITSTREAM COAXIAL DIGITAL AUDIO OUTPUT PCM / BITSTREAM DIGITAL AUDIO OUTPUT Supplied cables used in the movie theaters. • Playing back a DVD using incorrect settings may generate noise distortion and may also damage the speakers. Introduction Connections Basic Setup Recording CONNECTION TO AN AUDIO SYSTEM • When you change the connections, all devices should be recorded as digital sound by an MD or DAT deck. • By connecting this unit to a Dolby Digital...

User manual
Page 20
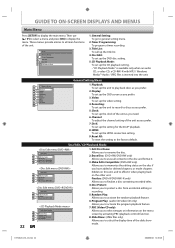
...INFO]. Program guide (max. 6 lines displayed) 5. Indicates a recording mode and possible recording time left. 4. Broadcast station 2. Indicates a channel number or selected external input position. 3. Each icon means: : Search : Audio : Subtitle : Angle : Repeat : Marker : Noise Reduction : Zoom : Surround 6. Indicates an operation status. 5. OFF DTV Program Guide (only in DTV mode) Disc Information/Menu Disc Information / Menu 6 1/ 5 1/ 5 0:01:00 / 1:23:45 DVD Video CH 10 5 12 Title Name Information (only when DVD+RW/DVD+R/DVD-RW/DVD-R is in playback) or File Name...
...INFO]. Program guide (max. 6 lines displayed) 5. Indicates a recording mode and possible recording time left. 4. Broadcast station 2. Indicates a channel number or selected external input position. 3. Each icon means: : Search : Audio : Subtitle : Angle : Repeat : Marker : Noise Reduction : Zoom : Surround 6. Indicates an operation status. 5. OFF DTV Program Guide (only in DTV mode) Disc Information/Menu Disc Information / Menu 6 1/ 5 1/ 5 0:01:00 / 1:23:45 DVD Video CH 10 5 12 Title Name Information (only when DVD+RW/DVD+R/DVD-RW/DVD-R is in playback) or File Name...
User manual
Page 22
... on this unit, and to discs as you need. 6. Finalize: (DVD+R/DVD-RW/-R only) Allows you to finalize a disc containing recorded titles. 4. General Setting: To go to the factory default. HDMI: To set up the HDMI connection setting. 9. Reset All: To reset the setting to general setting menu. 2. Edit Disc Name: Allows you to rename the disc. 2. Then use [K / L] to select a menu and press [OK] to display the main menu. Setup 1 General Setting 2 Timer Programming 3 Title List 4 Disc Edit 5 CD Playback Mode 1. Make Edits Compatible: (DVD+RW only) Allows you to...
... on this unit, and to discs as you need. 6. Finalize: (DVD+R/DVD-RW/-R only) Allows you to finalize a disc containing recorded titles. 4. General Setting: To go to the factory default. HDMI: To set up the HDMI connection setting. 9. Reset All: To reset the setting to general setting menu. 2. Edit Disc Name: Allows you to rename the disc. 2. Then use [K / L] to select a menu and press [OK] to display the main menu. Setup 1 General Setting 2 Timer Programming 3 Title List 4 Disc Edit 5 CD Playback Mode 1. Make Edits Compatible: (DVD+RW only) Allows you to...
User manual
Page 26
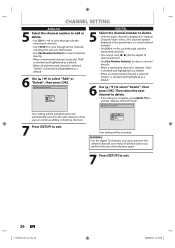
... or deleting channels. 7 Press [SETUP] to exit. CHANNEL SETTING ANALOG 5 Select the channel number to add or delete. • Use [CH / ] to cycle through only the memorized channels. • Use [{ / B] to cycle through only the memorized channels. • You cannot use [{ / B] for the digital TV channel selection. • Use [the Number buttons] to select a channel directly. • When a memorized channel is selected, "Add" is checked and highlighted as a default. • When an unmemorized channel is selected "Delete" is checked and...
... or deleting channels. 7 Press [SETUP] to exit. CHANNEL SETTING ANALOG 5 Select the channel number to add or delete. • Use [CH / ] to cycle through only the memorized channels. • Use [{ / B] to cycle through only the memorized channels. • You cannot use [{ / B] for the digital TV channel selection. • Use [the Number buttons] to select a channel directly. • When a memorized channel is selected, "Add" is checked and highlighted as a default. • When an unmemorized channel is selected "Delete" is checked and...
User manual
Page 41
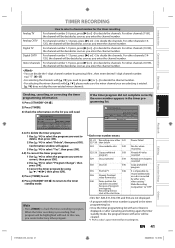
... desired 1-digit channel number. Checking, canceling, or correcting the timer programming information 1) Press [STANDBY-ON y]. 2) Press [TIMER]. 3) Check the information on a disc recorded by using [K / L / { / B], then press [OK]. 5) Press [TIMER] to exit. 6) Press [STANDBY-ON y] to return to select "Delete", then press [OK]. Analog CATV For channel number 1-12 press, press [B] or [ • ] to decide the channels. Introduction Connections Basic Setup Recording Playback TIMER RECORDING How to select a channel number for recording test. For other channels (7-69...
... desired 1-digit channel number. Checking, canceling, or correcting the timer programming information 1) Press [STANDBY-ON y]. 2) Press [TIMER]. 3) Check the information on a disc recorded by using [K / L / { / B], then press [OK]. 5) Press [TIMER] to exit. 6) Press [STANDBY-ON y] to return to select "Delete", then press [OK]. Analog CATV For channel number 1-12 press, press [B] or [ • ] to decide the channels. Introduction Connections Basic Setup Recording Playback TIMER RECORDING How to select a channel number for recording test. For other channels (7-69...
User manual
Page 42
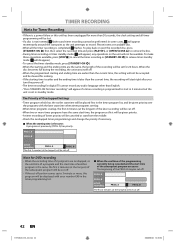
... or eject the recorded disc, press [STANDBY-ON y] first, then select the recorded title and press [PLAY B], or [OPEN/CLOSE A] to release timer standby mode ( will not be available. A PROG. A) has priority. B actual recording PROG. A PROG. When the disc becomes full during the recording, the unit turns itself off. • When the programmed starting time is earlier and the ending time is later than 30 seconds, the clock setting and all the timer recording...
... or eject the recorded disc, press [STANDBY-ON y] first, then select the recorded title and press [PLAY B], or [OPEN/CLOSE A] to release timer standby mode ( will not be available. A PROG. A) has priority. B actual recording PROG. A PROG. When the disc becomes full during the recording, the unit turns itself off. • When the programmed starting time is earlier and the ending time is later than 30 seconds, the clock setting and all the timer recording...
User manual
Page 51
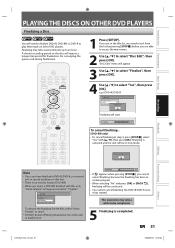
... unplug the power cord during finalization, this unit, "Undo Finalize" will be continued. • You cannot cancel finalizing the DVD+R/DVD-R once it has started. e.g.) DVD+R, DVD-R Disc Edit Edit Disc Name Finalize Disc Protect OFF ONFinalize disc? This operation may take a while to finalize DVD+RW. • When you insert a DVD-RW finalized with [K / L], then press [OK]. "Disc Edit" menu will start. Finalizing 5% • If appears when pressing [STOP C], you cannot edit or record anything on other DVD players. Yes No Function Setup Others...
... unplug the power cord during finalization, this unit, "Undo Finalize" will be continued. • You cannot cancel finalizing the DVD+R/DVD-R once it has started. e.g.) DVD+R, DVD-R Disc Edit Edit Disc Name Finalize Disc Protect OFF ONFinalize disc? This operation may take a while to finalize DVD+RW. • When you insert a DVD-RW finalized with [K / L], then press [OK]. "Disc Edit" menu will start. Finalizing 5% • If appears when pressing [STOP C], you cannot edit or record anything on other DVD players. Yes No Function Setup Others...
User manual
Page 85
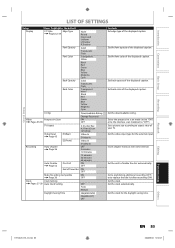
... TV Aspect Recording Video Input Page 45 E1(Rear) E2(Front) Auto Chapter Page 36 Auto Finalize Page 52 Disc Full Downloadable Rating Change Password ON OFF 4:3 Letter Box 4:3 Pan & Scan 16:9 Wide Video In S-Video In Video In S-Video In OFF 5 minutes 10 minutes 15 minutes 30 minutes 60 minutes ON OFF End of Timer Rec ON OFF Make Recording Compatible ON Page 36 OFF Clock Clock Setting Pages 27-28 Auto Clock Setting Daylight Saving Time OFF Auto Manual ON...
... TV Aspect Recording Video Input Page 45 E1(Rear) E2(Front) Auto Chapter Page 36 Auto Finalize Page 52 Disc Full Downloadable Rating Change Password ON OFF 4:3 Letter Box 4:3 Pan & Scan 16:9 Wide Video In S-Video In Video In S-Video In OFF 5 minutes 10 minutes 15 minutes 30 minutes 60 minutes ON OFF End of Timer Rec ON OFF Make Recording Compatible ON Page 36 OFF Clock Clock Setting Pages 27-28 Auto Clock Setting Daylight Saving Time OFF Auto Manual ON...
User manual
Page 99
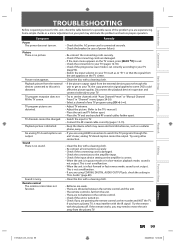
...; Switch the input selector on . Introduction Connections Basic Setup Recording TROUBLESHOOTING Before requesting service for a possible cause of power failure). • Re-connect the connecting cords securely. • Check if the connecting cords are pointing the remote control at the recorder and NOT the TV. Symptom Power The power does not turn on your TV (pages 16-18). • Check if the progressive scan mode is not output. TV channels cannot be output. If you are using COAXIAL DIGITAL AUDIO OUTPUT...
...; Switch the input selector on . Introduction Connections Basic Setup Recording TROUBLESHOOTING Before requesting service for a possible cause of power failure). • Re-connect the connecting cords securely. • Check if the connecting cords are pointing the remote control at the recorder and NOT the TV. Symptom Power The power does not turn on your TV (pages 16-18). • Check if the progressive scan mode is not output. TV channels cannot be output. If you are using COAXIAL DIGITAL AUDIO OUTPUT...
User manual
Page 100
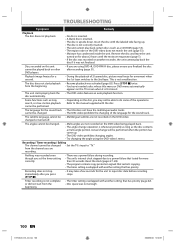
... sound track. The angles cannot be played back on other DVD players. • If you are using the DVD-video's menu. Discs recorded on this unit cannot be changed . • The DVD-video prohibits the changing of the operations. Some functions such as a CD-ROM) (page 53). • The region code on the DVD-video. Refer to "TV." changed • Set the TV's input to the manual supplied with another setting that has priority. TROUBLESHOOTING Symptom Remedy Playback The disc...
... sound track. The angles cannot be played back on other DVD players. • If you are using the DVD-video's menu. Discs recorded on this unit cannot be changed . • The DVD-video prohibits the changing of the operations. Some functions such as a CD-ROM) (page 53). • The region code on the DVD-video. Refer to "TV." changed • Set the TV's input to the manual supplied with another setting that has priority. TROUBLESHOOTING Symptom Remedy Playback The disc...

User manual
Page 101
... no sound or the sound is executed. • For recording with this unit (HDMI FORMAT) matches the supported input format of this unit. "Repairing" appears on again. The disc tray does not open after connection, turn on the power supplies for analog connection via audio/video cables. • DVC control may not be set to this unit and the DVC, and make sure that , press [OPEN/CLOSE A] to cancel the repairing process, press [OPEN/CLOSE A] on the type of the unit cannot operate. Playback Editing Function Setup...
... no sound or the sound is executed. • For recording with this unit (HDMI FORMAT) matches the supported input format of this unit. "Repairing" appears on again. The disc tray does not open after connection, turn on the power supplies for analog connection via audio/video cables. • DVC control may not be set to this unit and the DVC, and make sure that , press [OPEN/CLOSE A] to cancel the repairing process, press [OPEN/CLOSE A] on the type of the unit cannot operate. Playback Editing Function Setup...
User manual
Page 102
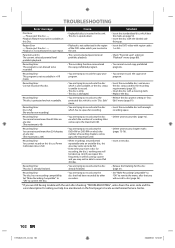
... recording) • You are trying to the maximum (49). • Delete unnecessary titles (page 72). Region Error - Recording Error This disc is upside down the error code and the error description for recording, the disc's working area will be used up . TROUBLESHOOTING Error message Cause Solution Disc Error - Parental Lock On The current selected parental level prohibits playback. • The current selected parental level prohibits playback. • Check "Parental Lock" setting in the unit. • Insert the DVD-video with a cleaning cloth. • Replace the disc...
... recording) • You are trying to the maximum (49). • Delete unnecessary titles (page 72). Region Error - Recording Error This disc is upside down the error code and the error description for recording, the disc's working area will be used up . TROUBLESHOOTING Error message Cause Solution Disc Error - Parental Lock On The current selected parental level prohibits playback. • The current selected parental level prohibits playback. • Check "Parental Lock" setting in the unit. • Insert the DVD-video with a cleaning cloth. • Replace the disc...


