User manual
Page 1
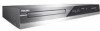
Introduction Connections Basic Setup Register your product and get support at www.philips.com/welcome STOP ARRÊT DVDR3505/37 ALTO EN DIGITAL VIDEO DISC RECORDER WITH DIGITAL TUNER Recording Playback Editing Function Setup Others E7H40UD_EN_v5.indd 1 2008/06/02 14:49:20
Introduction Connections Basic Setup Register your product and get support at www.philips.com/welcome STOP ARRÊT DVDR3505/37 ALTO EN DIGITAL VIDEO DISC RECORDER WITH DIGITAL TUNER Recording Playback Editing Function Setup Others E7H40UD_EN_v5.indd 1 2008/06/02 14:49:20
User manual
Page 4
... prohibited. Declaration of Conformity Model Number: DVDR3505/37 Trade Name: Philips Responsible Party: PHILIPS CONSUMER ELECTRONICS A Division of Discs are questions regarding your TV set compatibility ...manual. To fully benefit from that Philips offers, register your purchase, and welcome to possible eye injury. This product lets you record on a circuit different from the support...3) Connect the device into an outlet on DVD and playback DVD/CD of copy-protected material, including computer programs, files, broadcasts and sound recordings, may cause artifacts to which can radiate ...
... prohibited. Declaration of Conformity Model Number: DVDR3505/37 Trade Name: Philips Responsible Party: PHILIPS CONSUMER ELECTRONICS A Division of Discs are questions regarding your TV set compatibility ...manual. To fully benefit from that Philips offers, register your purchase, and welcome to possible eye injury. This product lets you record on a circuit different from the support...3) Connect the device into an outlet on DVD and playback DVD/CD of copy-protected material, including computer programs, files, broadcasts and sound recordings, may cause artifacts to which can radiate ...
User manual
Page 6
...TV Audio 30 DTV Closed Caption 32 Closed Caption Style 33 Recording INFORMATION ON DVD RECORDING 35 BEFORE RECORDING 36 Make Recording Compatible 36 Setting for Auto Chapter 36 BASIC RECORDING & ONE-TOUCH TIMER RECORDING 37 TIMER RECORDING 39 Hints for Timer Recording 42 OVERWRITING UNNECESSARY TITLE 43 Overwriting from the Beginning of ... 44 SETTINGS FOR AN EXTERNAL DEVICE 45 Connection to an External Device 45 Recording from an External Device 46 DV DUBBING 47 Guide to DV and On-Screen Display 47 DVC to DVD Dubbing 48 SETTING A DISC TO PROTECT 50 PLAYING THE DISCS IN OTHER...
...TV Audio 30 DTV Closed Caption 32 Closed Caption Style 33 Recording INFORMATION ON DVD RECORDING 35 BEFORE RECORDING 36 Make Recording Compatible 36 Setting for Auto Chapter 36 BASIC RECORDING & ONE-TOUCH TIMER RECORDING 37 TIMER RECORDING 39 Hints for Timer Recording 42 OVERWRITING UNNECESSARY TITLE 43 Overwriting from the Beginning of ... 44 SETTINGS FOR AN EXTERNAL DEVICE 45 Connection to an External Device 45 Recording from an External Device 46 DV DUBBING 47 Guide to DV and On-Screen Display 47 DVC to DVD Dubbing 48 SETTING A DISC TO PROTECT 50 PLAYING THE DISCS IN OTHER...
User manual
Page 22
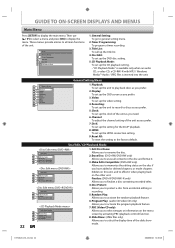
...DivX: To set up the setting for the DivX® playback. 8. Reset All: To reset the setting to general setting menu. 2. Finalize: (DVD+R/DVD-RW/-R only) Allows you to effect it . 3. Disc Protect : Allows you to activate the random playback feature. 6. Slide Show: (JPEG files... JPEG files is inserted into the unit. 1 General Setting 2 Playback 3 Display 4 Video Recording 5 Clock 26 Channel DivX 37 HDMI 48 Reset All 59 General Setting Menu 1. Recording: To set up the unit to record to activate the program playback feature. 7. HDMI: To set up the title list. 4. ...
...DivX: To set up the setting for the DivX® playback. 8. Reset All: To reset the setting to general setting menu. 2. Finalize: (DVD+R/DVD-RW/-R only) Allows you to effect it . 3. Disc Protect : Allows you to activate the random playback feature. 6. Slide Show: (JPEG files... JPEG files is inserted into the unit. 1 General Setting 2 Playback 3 Display 4 Video Recording 5 Clock 26 Channel DivX 37 HDMI 48 Reset All 59 General Setting Menu 1. Recording: To set up the unit to record to activate the program playback feature. 7. HDMI: To set up the title list. 4. ...
User manual
Page 24
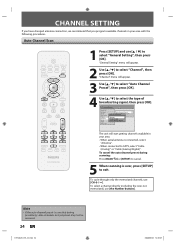
... channel preset during presetting, some channels not yet preset may not be received. 24 EN E7H40UD_EN_v5.indd 24 2008/06/02 14:49:37 General Setting Playback Display Video Recording Clock Channel DivX HDMI Reset All Auto Channel Preset Manual Channel Preset Auto ChannTeVl PAruedsieot Select Antenna Cable (Analog) Cable (Analog / Digital...
... channel preset during presetting, some channels not yet preset may not be received. 24 EN E7H40UD_EN_v5.indd 24 2008/06/02 14:49:37 General Setting Playback Display Video Recording Clock Channel DivX HDMI Reset All Auto Channel Preset Manual Channel Preset Auto ChannTeVl PAruedsieot Select Antenna Cable (Analog) Cable (Analog / Digital...
User manual
Page 37
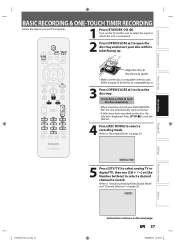
... the list of compatible discs.) 3 Press [OPEN/CLOSE A] to record. It may take a while to load the disc completely. • When inserting a brand-new DVD+RW/DVDRW, the unit automatically starts to format. • If titles have been recorded on the disc, the title list is connected. 2 Press [OPEN... [STOP C] to exit the title list. 4 Press [REC MODE] to "Switching Analog Mode/Digital Mode" and "Channel Selection" on page 29. Recording Playback Editing E7H40UD_EN_v5.indd 37 Function Setup SP(2Hr) 0:58 5 Press [DTV/TV] to select analog TV or digital TV, then use [CH / ] or [the Number ...
... the list of compatible discs.) 3 Press [OPEN/CLOSE A] to record. It may take a while to load the disc completely. • When inserting a brand-new DVD+RW/DVDRW, the unit automatically starts to format. • If titles have been recorded on the disc, the title list is connected. 2 Press [OPEN... [STOP C] to exit the title list. 4 Press [REC MODE] to "Switching Analog Mode/Digital Mode" and "Channel Selection" on page 29. Recording Playback Editing E7H40UD_EN_v5.indd 37 Function Setup SP(2Hr) 0:58 5 Press [DTV/TV] to select analog TV or digital TV, then use [CH / ] or [the Number ...
User manual
Page 43
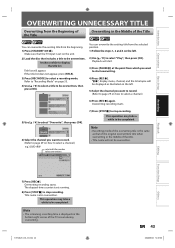
... press [OK]. Refer to "Recording Mode" on the left .... beginning. 1) Press [STANDBY-ON y]. Recording Playback Editing Function Setup F I SP...Play", then press [OK]. Overwriting recording starts. Playback will be overwritten, ...TITLE 1:37:52 SP(2Hr) 5) Use [K / L] to select a recording mode....also overwritten. Note • Recording mode of the title. &#...that includes a title to stop recording. Play Edit Overwrite 1 SP (2Hr)...you want to record. (Refer to...recording. Overwriting recording starts. 7) Press [STOP C] to be completed. Note • The remaining recording...
... press [OK]. Refer to "Recording Mode" on the left .... beginning. 1) Press [STANDBY-ON y]. Recording Playback Editing Function Setup F I SP...Play", then press [OK]. Overwriting recording starts. Playback will be overwritten, ...TITLE 1:37:52 SP(2Hr) 5) Use [K / L] to select a recording mode....also overwritten. Note • Recording mode of the title. &#...that includes a title to stop recording. Play Edit Overwrite 1 SP (2Hr)...you want to record. (Refer to...recording. Overwriting recording starts. 7) Press [STOP C] to be completed. Note • The remaining recording...

User manual
Page 57
...see disc information, press [{ ] when the first page of recorded disc space 5. e.g.) DVD+RW Playback will appear when inserting a disc. Disc type (DVD+RW/DVD+R/ DVD-RW/DVD-R) 3. Introduction Connections Basic Setup Recording Playback BASIC PLAYBACK 4 Use [K / L] to select a ...desired title, then press [OK]. 1 SP (2Hr) NOV/21/07 11:00AM CH12 SP NOV/21/07 0:20:44 2 NOV/22/07 11:35AM CH13 EP NOV/22/07 0:10:33 3 EMPTY TITLE 1:37...
...see disc information, press [{ ] when the first page of recorded disc space 5. e.g.) DVD+RW Playback will appear when inserting a disc. Disc type (DVD+RW/DVD+R/ DVD-RW/DVD-R) 3. Introduction Connections Basic Setup Recording Playback BASIC PLAYBACK 4 Use [K / L] to select a ...desired title, then press [OK]. 1 SP (2Hr) NOV/21/07 11:00AM CH12 SP NOV/21/07 0:20:44 2 NOV/22/07 11:35AM CH13 EP NOV/22/07 0:10:33 3 EMPTY TITLE 1:37...

User manual
Page 71
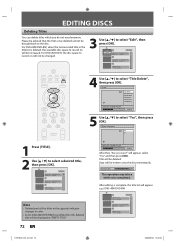
...Be sure that disc. 1. Arrow: Indicating there is displayed here. 7. Press [STOP C] to play back from the recorded content is a previous / next page. 3. Empty title: The portion of the selected title. Press [TITLE]. 1...44 2 NOV/22/07 11:35AM CH13 EP NOV/22/07 0:10:33 3 EMPTY TITLE 1:37:52 SP(2Hr) 6 2 5 Edit 2 Title Delete Edit Title Name Chapter Mark Hide Chapter Index...may not indicate the capacity for the titles of which recording time is short. • Once you have finalized a DVD+R/ DVD-R, you cannot edit or record anything on that once you edit titles, they will...
...Be sure that disc. 1. Arrow: Indicating there is displayed here. 7. Press [STOP C] to play back from the recorded content is a previous / next page. 3. Empty title: The portion of the selected title. Press [TITLE]. 1...44 2 NOV/22/07 11:35AM CH13 EP NOV/22/07 0:10:33 3 EMPTY TITLE 1:37:52 SP(2Hr) 6 2 5 Edit 2 Title Delete Edit Title Name Chapter Mark Hide Chapter Index...may not indicate the capacity for the titles of which recording time is short. • Once you have finalized a DVD+R/ DVD-R, you cannot edit or record anything on that once you edit titles, they will...
User manual
Page 72
...07 0:10:33 3 EMPTY TITLE 1:37:52 SP(2Hr) 4 Use [K / L] to select "Yes", then press [OK]. Writing to Disc 90% This operation may take a while to select "Edit", then press [OK]. For DVD+R/DVD-R, the disc space to the disc. For DVD+RW/DVD-RW, when the last recorded title in color. • As ...for DVD+RW/DVD-RW if you delete the title, deleted title will not be changed. 3 Use [K / L] to...
...07 0:10:33 3 EMPTY TITLE 1:37:52 SP(2Hr) 4 Use [K / L] to select "Yes", then press [OK]. Writing to Disc 90% This operation may take a while to select "Edit", then press [OK]. For DVD+R/DVD-R, the disc space to the disc. For DVD+RW/DVD-RW, when the last recorded title in color. • As ...for DVD+RW/DVD-RW if you delete the title, deleted title will not be changed. 3 Use [K / L] to...

User manual
Page 74
... will be completed. 74 EN E7H40UD_EN_v5.indd 74 2008/06/02 14:50:37 Data will appear. 3 Press [PLAY B] and then [PAUSE F] to decide...[REW E] and [FFW D] for the chapter search feature. 1 Follow steps 1 to 3 in "Deleting Titles" on the recording time or edited contents. 5 Use [K / L] to select "Yes", then press [OK]. Once a chapter is marked, you will be able ...to add according to recorded time and number of chapters. • Remaining time of chapter marks in a disc is 99 and the number of...
... will be completed. 74 EN E7H40UD_EN_v5.indd 74 2008/06/02 14:50:37 Data will appear. 3 Press [PLAY B] and then [PAUSE F] to decide...[REW E] and [FFW D] for the chapter search feature. 1 Follow steps 1 to 3 in "Deleting Titles" on the recording time or edited contents. 5 Use [K / L] to select "Yes", then press [OK]. Once a chapter is marked, you will be able ...to add according to recorded time and number of chapters. • Remaining time of chapter marks in a disc is 99 and the number of...

User manual
Page 77
Hide Chapter 1 Chapter 2/ 2 Visible Visible Hidden NOV/21/07 11:00AM CH12 SP 0:00:59 5 After this page. Recording Playback Editing Function Setup Note • "Hidden" will appear. 3 Use [PREV ] / [NEXT ] to decide the chapter to be shown. Edit - If you make all chapters .../21/07 11:00AM CH12 SP NOV/21/07 0:20:44 2 NOV/22/07 11:35AM CH13 EP NOV/22/07 0:10:33 3 EMPTY TITLE 1:37:52 SP(2Hr) E7H40UD_EN_v5.indd 77 EN 77 2008/06/02 14:50:40 Others Introduction Connections Basic Setup EDITING DISCS Hiding Chapters You can...
Hide Chapter 1 Chapter 2/ 2 Visible Visible Hidden NOV/21/07 11:00AM CH12 SP 0:00:59 5 After this page. Recording Playback Editing Function Setup Note • "Hidden" will appear. 3 Use [PREV ] / [NEXT ] to decide the chapter to be shown. Edit - If you make all chapters .../21/07 11:00AM CH12 SP NOV/21/07 0:20:44 2 NOV/22/07 11:35AM CH13 EP NOV/22/07 0:10:33 3 EMPTY TITLE 1:37:52 SP(2Hr) E7H40UD_EN_v5.indd 77 EN 77 2008/06/02 14:50:40 Others Introduction Connections Basic Setup EDITING DISCS Hiding Chapters You can...

User manual
Page 108
PHILIPS CONSUMER ELECTRONICS A DDiivviision of PhhiilliippssEElelecctrtroonnicicssNNoorrtthhAAmmeerricicaaCCoorrpp PP.O.O..BBooxx667711553399MMaarireietttat,aG, GAA3300000066000022966 Meet Philips at the Internet http://www.philips.com/welcome DVHDTRS36560050/37 CLASS 1 LASER PRODUCT 3139 245 25683 E7H40UD_EN_v5.indd 108 Printed in China JpnCN-0740/37-3 1VMN23463A * E7H40UD 2008/06/02 14:51:00
PHILIPS CONSUMER ELECTRONICS A DDiivviision of PhhiilliippssEElelecctrtroonnicicssNNoorrtthhAAmmeerricicaaCCoorrpp PP.O.O..BBooxx667711553399MMaarireietttat,aG, GAA3300000066000022966 Meet Philips at the Internet http://www.philips.com/welcome DVHDTRS36560050/37 CLASS 1 LASER PRODUCT 3139 245 25683 E7H40UD_EN_v5.indd 108 Printed in China JpnCN-0740/37-3 1VMN23463A * E7H40UD 2008/06/02 14:51:00


