
Leaflet
Page 2
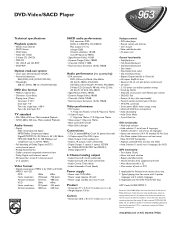
output: 2V rms voltage (OdB) Channel unbalance: DVD-Video/SACD Player 963SA DVD Technical specifications Playback system • SACD multi-channel • SACD Stereo • DVD-Video • Video CD (VCD) • S-Video CD (SVCD) • MP3-CD • CD (CD-R and CD-RW)1 • DVD+RW SACD audio performance D/A converter: DSD SACD: fs 2.8224Mhz, DC-100kHz Max.
output: 2V rms voltage (OdB) Channel unbalance: DVD-Video/SACD Player 963SA DVD Technical specifications Playback system • SACD multi-channel • SACD Stereo • DVD-Video • Video CD (VCD) • S-Video CD (SVCD) • MP3-CD • CD (CD-R and CD-RW)1 • DVD+RW SACD audio performance D/A converter: DSD SACD: fs 2.8224Mhz, DC-100kHz Max.
User manual
Page 3
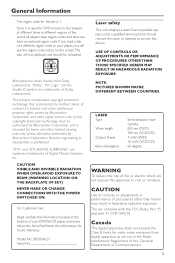
... player, you load a disc of this appliance to your DVD/SACD player and enter below the Serial No.Retain this information for this device. CAUTION VISIBLE AND INVISIBLE RADIATION WHEN OPEN, AVOID EXPOSURE TO BEAM (WARNING LOCATION: ON THE BACKPLATE OF SET) NEVER MAKE OR CHANGE CONNECTIONS WITH THE POWER SWITCHED ON. Due to service this set is intended for radio noise emissions from Dolby Laboratories. LASER Type...
... player, you load a disc of this appliance to your DVD/SACD player and enter below the Serial No.Retain this information for this device. CAUTION VISIBLE AND INVISIBLE RADIATION WHEN OPEN, AVOID EXPOSURE TO BEAM (WARNING LOCATION: ON THE BACKPLATE OF SET) NEVER MAKE OR CHANGE CONNECTIONS WITH THE POWER SWITCHED ON. Due to service this set is intended for radio noise emissions from Dolby Laboratories. LASER Type...

User manual
Page 5
...21 Playing a DVD-Video 21 Playing a disc 21 Smart Resume 21 Playing a Video CD 22 Playing a disc 22 Playing a Super Audio CD 22 Playing a disc 22 Sound Mode - Introduction Environmental Information 6 Supplied accessories 6 Safety Information 6 Symbols Used in this Manual 6 Reality reproduced: Super Audio CD 7 The next standard: hybrid disc 7 SACD: reality in sound...and vision 7 Functional Overview Front Panel 8 Rear Panel 9 Remote Control 10 Preparation Basic Connections 11 Connecting to a TV 11 Connecting to an Audio System 12 Connecting to a Multi-channel Audio/(Video...
...21 Playing a DVD-Video 21 Playing a disc 21 Smart Resume 21 Playing a Video CD 22 Playing a disc 22 Playing a Super Audio CD 22 Playing a disc 22 Sound Mode - Introduction Environmental Information 6 Supplied accessories 6 Safety Information 6 Symbols Used in this Manual 6 Reality reproduced: Super Audio CD 7 The next standard: hybrid disc 7 SACD: reality in sound...and vision 7 Functional Overview Front Panel 8 Rear Panel 9 Remote Control 10 Preparation Basic Connections 11 Connecting to a TV 11 Connecting to an Audio System 12 Connecting to a Multi-channel Audio/(Video...
User manual
Page 6
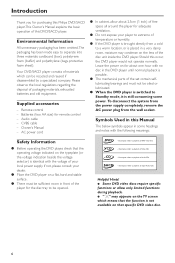
... on for about 2.5cm (1 inch) of free space all around the player for adequate ventilation. To disconnect the system from the power supply completely, remove the AC power plug from a cold to be oiled or lubricated. Description refers to playback of DVD-video discs VCD - Batteries (two AA size) for remote control - Owner's Manual - Description refers to playback of Audio CDs SACD - Description refers to extreme...
... on for about 2.5cm (1 inch) of free space all around the player for adequate ventilation. To disconnect the system from the power supply completely, remove the AC power plug from a cold to be oiled or lubricated. Description refers to playback of DVD-video discs VCD - Batteries (two AA size) for remote control - Owner's Manual - Description refers to playback of Audio CDs SACD - Description refers to extreme...
User manual
Page 7
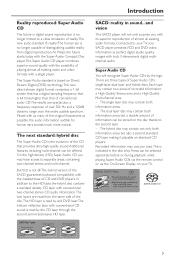
... compatibility with the installed base of your TV. 1 CD Layer that is not all existing audio and video formats with the possibility of information can be stored on any of CD and DVD players. Each type may contain not only both information areas. - Additional features, including multi-channel, can be offered. At Philips the future starts today with the Super Audio Compact Disc player...
... compatibility with the installed base of your TV. 1 CD Layer that is not all existing audio and video formats with the possibility of information can be stored on any of CD and DVD players. Each type may contain not only both information areas. - Additional features, including multi-channel, can be offered. At Philips the future starts today with the Super Audio Compact Disc player...
User manual
Page 10
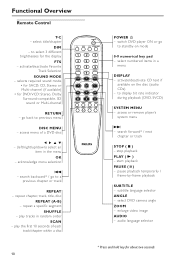
... Track Selection SOUND MODE - Functional Overview Remote Control T-C - selects required sound mode • for SACD: CD, Stereo or Multi-channel (if available) • for DVD/VCD: Stereo, Dolby Surround-compatible, 3D sound or Multi-channel RETURN - access menu of each track/chapter within a disc POWER 2 T-C DIM FTS SOUND MODE 1 4 7 RETURN DISC MENU 2 3 5 6 8 9 DISPLAY 0 SYSTEM MENU É OK É Éë É É Éë STOP PLAY PAUSE Ç É Å SUBTITLE ANGLE ZOOM AUDIO REPEAT REPEAT SHUFFLE SCAN A-B POWER B - to...
... Track Selection SOUND MODE - Functional Overview Remote Control T-C - selects required sound mode • for SACD: CD, Stereo or Multi-channel (if available) • for DVD/VCD: Stereo, Dolby Surround-compatible, 3D sound or Multi-channel RETURN - access menu of each track/chapter within a disc POWER 2 T-C DIM FTS SOUND MODE 1 4 7 RETURN DISC MENU 2 3 5 6 8 9 DISPLAY 0 SYSTEM MENU É OK É Éë É É Éë STOP PLAY PAUSE Ç É Å SUBTITLE ANGLE ZOOM AUDIO REPEAT REPEAT SHUFFLE SCAN A-B POWER B - to...

User manual
Page 11
.... Progressive / Interlace SELECTOR This switch will change connections with the power switched on the player. If your amplifier or receiver. Progressive Interlace Warning! - Preparation Basic Connections q Please refer to the instruction books of your TV, VCR, Stereo System or other devices as necessary to make or change the type of your existing equipment. q Make one of the following connections, depending on the capabilities of signal output from the Component Video Output on . - Connect the DVD player's DIGITAL AUDIO...
.... Progressive / Interlace SELECTOR This switch will change connections with the power switched on the player. If your amplifier or receiver. Progressive Interlace Warning! - Preparation Basic Connections q Please refer to the instruction books of your TV, VCR, Stereo System or other devices as necessary to make or change the type of your existing equipment. q Make one of the following connections, depending on the capabilities of signal output from the Component Video Output on . - Connect the DVD player's DIGITAL AUDIO...
User manual
Page 12
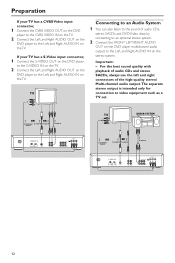
... best sound quality with playback of audio CDs and stereo SACDs, always use the left and right connectors of audio CDs, stereo SACDs and DVD Video discs by connecting to an optional stereo system. 2 Connect the FRONT LEFT/RIGHT AUDIO OUT on the DVD player multichannel audio output to the Left and Right AUDIO IN on the TV. Important: - Preparation If your TV has a S-Video input connector, 1 Connect the S-VIDEO...
... best sound quality with playback of audio CDs and stereo SACDs, always use the left and right connectors of audio CDs, stereo SACDs and DVD Video discs by connecting to an optional stereo system. 2 Connect the FRONT LEFT/RIGHT AUDIO OUT on the DVD player multichannel audio output to the Left and Right AUDIO IN on the TV. Important: - Preparation If your TV has a S-Video input connector, 1 Connect the S-VIDEO...
User manual
Page 13
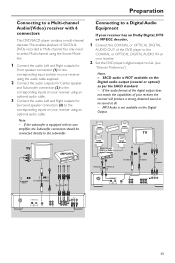
... OPTICAL S-VIDEO 1 L 2 R CVBS AUDIO OUT VIDEO OUT Pr/Cr Pb/Cb Y Progressive Interlace FRONT CENTER SURROUND L L R R FRONT SUB WF SURROUND 13 If the audio format of the digital output does not match the capabilities of SACDs & DVDs recorded in Multi-channel.You only need to select Multi-channel using the Sound Mode key. 1 Connect the audio Left and Right outputs for Front speaker connection (1) to the corresponding input sockets on your receiver using the audio cable supplied. 2 Connect the audio outputs for Center...
... OPTICAL S-VIDEO 1 L 2 R CVBS AUDIO OUT VIDEO OUT Pr/Cr Pb/Cb Y Progressive Interlace FRONT CENTER SURROUND L L R R FRONT SUB WF SURROUND 13 If the audio format of the digital output does not match the capabilities of SACDs & DVDs recorded in Multi-channel.You only need to select Multi-channel using the Sound Mode key. 1 Connect the audio Left and Right outputs for Front speaker connection (1) to the corresponding input sockets on your receiver using the audio cable supplied. 2 Connect the audio outputs for Center...
User manual
Page 14
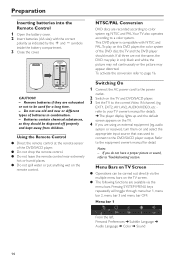
... receiver), turn them on the TV screen. Menu Bars on TV Screen q Operations can be carried out directly via the menu bars. This DVD player is compatible with the correct polarity as indicated by the + and - Remove batteries if they should match. Using the Remote Control q Direct the remote control at the remote sensor of batteries in only black and white, the picture may roll continuously or the picture may appear distorted. Switching On 1 Connect the AC power cord...
... receiver), turn them on the TV screen. Menu Bars on TV Screen q Operations can be carried out directly via the menu bars. This DVD player is compatible with the correct polarity as indicated by the + and - Remove batteries if they should match. Using the Remote Control q Direct the remote control at the remote sensor of batteries in only black and white, the picture may roll continuously or the picture may appear distorted. Switching On 1 Connect the AC power cord...
User manual
Page 16
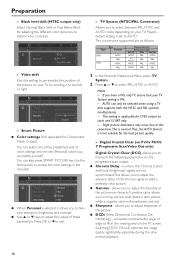
... to access the color settings in the menubar. ¶ When Personal is PAL. - Video shift Use this conversion.This is normal.Thus, the AUTO format is where the Chroma (color) and luma (brightness) signals are as follows: Disc Type Format DVD VCD NTSC PAL NTSC PAL Output format Selected mode NTSC PAL AUTO NTSC PAL NTSC Not Supported PAL PAL NTSC PAL NTSC NTSC PAL PAL - Notes: - If you to fine-tune the following parameters on the front panel) to adjust...
... to access the color settings in the menubar. ¶ When Personal is PAL. - Video shift Use this conversion.This is normal.Thus, the AUTO format is where the Chroma (color) and luma (brightness) signals are as follows: Disc Type Format DVD VCD NTSC PAL NTSC PAL Output format Selected mode NTSC PAL AUTO NTSC PAL NTSC Not Supported PAL PAL NTSC PAL NTSC NTSC PAL PAL - Notes: - If you to fine-tune the following parameters on the front panel) to adjust...
User manual
Page 21
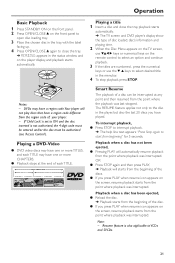
... front panel to open disc loading tray. 3 Place the chosen disc in the tray, with the label facing up. 4 Press OPEN/CLOSE / again to close the tray, playback starts automatically. ➜ The TV screen and DVD player's display show the type of disc loaded, disc's information and playing time. 2 When the Disc Menu appears on the TV screen, use 431 2 keys or numerical keys on the remote control to select an option and continue playback. 3 If the titles are numbered , press...
... front panel to open disc loading tray. 3 Place the chosen disc in the tray, with the label facing up. 4 Press OPEN/CLOSE / again to close the tray, playback starts automatically. ➜ The TV screen and DVD player's display show the type of disc loaded, disc's information and playing time. 2 When the Disc Menu appears on the TV screen, use 431 2 keys or numerical keys on the remote control to select an option and continue playback. 3 If the titles are numbered , press...
User manual
Page 22
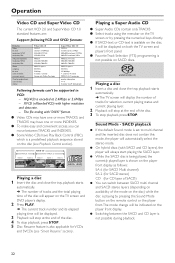
Operation Video CD and Super Video CD The current VCD 2.0 and Super Video CD 1.0 standard features are: Support following VCD and SVCD formats: Features Video bit rate resolution NTSC resolution PAL Still picture (photo) resolution NTSC resolution PAL Audio sampling bit rate audio channels surround sound Overlay graphics/text sub-channels coding Video CDs 2.0 MPEG-1 constant 1,150 Kbps 352x240, 29.97Hz 352x288, 25Hz MPEG-1 352x240, 704x480 352x288, 704x576 MPEG-1 layer II 44.1KHz...
Operation Video CD and Super Video CD The current VCD 2.0 and Super Video CD 1.0 standard features are: Support following VCD and SVCD formats: Features Video bit rate resolution NTSC resolution PAL Still picture (photo) resolution NTSC resolution PAL Audio sampling bit rate audio channels surround sound Overlay graphics/text sub-channels coding Video CDs 2.0 MPEG-1 constant 1,150 Kbps 352x240, 29.97Hz 352x288, 25Hz MPEG-1 352x240, 704x480 352x288, 704x576 MPEG-1 layer II 44.1KHz...

User manual
Page 23
... disc menu will stop at the end of the disc. 3 To stop the playback. 2 Press Sound Mode button on the remote control or the player front to toggle between SACD multi channel, SACD stereo and CD layers (depending on availability of the mode on the disc). ➜ The mode change will be display on both the TV screen and player's front display. Subtitle Language 1 Select Z (SUBTITLE) in the menu bar or press the AUDIO button on the remote control directly. 2 Press SUBTITLE or 3/4 repeatedly...
... disc menu will stop at the end of the disc. 3 To stop the playback. 2 Press Sound Mode button on the remote control or the player front to toggle between SACD multi channel, SACD stereo and CD layers (depending on availability of the mode on the disc). ➜ The mode change will be display on both the TV screen and player's front display. Subtitle Language 1 Select Z (SUBTITLE) in the menu bar or press the AUDIO button on the remote control directly. 2 Press SUBTITLE or 3/4 repeatedly...
User manual
Page 28
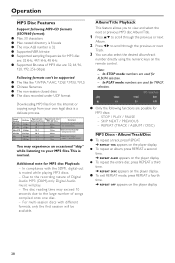
..., 256 (kbps) Following formats can also select the desired album/track number directly using the numeric keys on the remote control. REPEAT (TRACK / ALBUM / DISC) MP3 Discs - not recommended. 15 : 1 10 : 1 15 hrs 10 hrs Balanced sound quality - The disc reading time may experience an occasional "skip" while listening to the recording nature of Digital Audio MP3 (DAM),only Digital Audio music will be supported q The files like CD* CD* Bit...
..., 256 (kbps) Following formats can also select the desired album/track number directly using the numeric keys on the remote control. REPEAT (TRACK / ALBUM / DISC) MP3 Discs - not recommended. 15 : 1 10 : 1 15 hrs 10 hrs Balanced sound quality - The disc reading time may experience an occasional "skip" while listening to the recording nature of Digital Audio MP3 (DAM),only Digital Audio music will be supported q The files like CD* CD* Bit...

User manual
Page 30
... remote control to select a rating from 1 to your 4-digit code. If necessary, enter the code a second time. 3 Move to Parental Control using the 3/4 keys. 4 Move to value adjustment (1-8) using the 2 key. 5 Then use the 3/4 keys or the numerical keys on the disc. Changing the 4-digit code 1 When disc playback is stopped, select ACCESS CONTROL in the Personal Preferences menu using the 3/4 keys. 2 Enter the current 4 digit code. 3 Move to CHANGE CODE using the 4 and press the 2 key. 4 Enter the new 4-digit code...
... remote control to select a rating from 1 to your 4-digit code. If necessary, enter the code a second time. 3 Move to Parental Control using the 3/4 keys. 4 Move to value adjustment (1-8) using the 2 key. 5 Then use the 3/4 keys or the numerical keys on the disc. Changing the 4-digit code 1 When disc playback is stopped, select ACCESS CONTROL in the Personal Preferences menu using the 3/4 keys. 2 Enter the current 4 digit code. 3 Move to CHANGE CODE using the 4 and press the 2 key. 4 Enter the new 4-digit code...

User manual
Page 31
...) Number of lines 625 525 Playback Multistandard (PAL/NTSC) VIDEO PERFORMANCE YUV output Y: 1Vpp into 75 ohm Pr/Cr Pb/Cb: 0.7Vpp into 75 ohm S-Video output Y: 1Vpp into 75 ohm C: 0.3Vpp into 75 ohm Video output 1 Vpp into 75 ohm Black Level Shift On/Off Video Shift Left/Right AUDIO FORMAT DSD Multichannel and Stereo MPEG/ Compressed Digital Dolby Digital 16, 20, 24 bits DTS/PCM...
...) Number of lines 625 525 Playback Multistandard (PAL/NTSC) VIDEO PERFORMANCE YUV output Y: 1Vpp into 75 ohm Pr/Cr Pb/Cb: 0.7Vpp into 75 ohm S-Video output Y: 1Vpp into 75 ohm C: 0.3Vpp into 75 ohm Video output 1 Vpp into 75 ohm Black Level Shift On/Off Video Shift Left/Right AUDIO FORMAT DSD Multichannel and Stereo MPEG/ Compressed Digital Dolby Digital 16, 20, 24 bits DTS/PCM...
User manual
Page 32
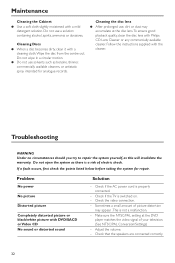
... open the system as this will invalidate the warranty. Make sure the NTSC/PAL setting at the disc lens.To ensure good playback quality, clean the disc lens with Philips CD Lens Cleaner or any commercially available cleaner. Problem No power No picture Distorted picture Completely distorted picture or black/white picture with a cleaning cloth. Do not use , dirt or dust may appear .This is not a malfunction. - Adjust the volume...
... open the system as this will invalidate the warranty. Make sure the NTSC/PAL setting at the disc lens.To ensure good playback quality, clean the disc lens with Philips CD Lens Cleaner or any commercially available cleaner. Problem No power No picture Distorted picture Completely distorted picture or black/white picture with a cleaning cloth. Do not use , dirt or dust may appear .This is not a malfunction. - Adjust the volume...
User manual
Page 33
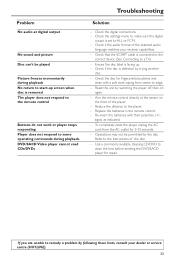
... the settings menu to make sure the digital output is set to the instructions of the player. - Aim the remote control directly at digital output No sound and picture Disc can't be permitted by trying another disc. - Re-insert the batteries with a soft cloth wiping from the AC outlet for repair. Operations may not be played Picture freezes momentarily during playback. Refer to ALL or PCM. - Use a commonly available cleaning CD/DVD to remedy a problem by switching the player...
... the settings menu to make sure the digital output is set to the instructions of the player. - Aim the remote control directly at digital output No sound and picture Disc can't be permitted by trying another disc. - Re-insert the batteries with a soft cloth wiping from the AC outlet for repair. Operations may not be played Picture freezes momentarily during playback. Refer to ALL or PCM. - Use a commonly available cleaning CD/DVD to remedy a problem by switching the player...
User manual
Page 34
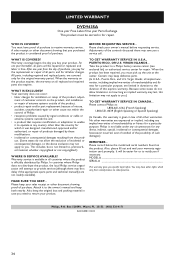
... mail your owner's manual before requesting service. Box 520890, Miami, FL 33152 (402) 536-4171 EL6555E001/ 03-03 34 Your warranty does not cover: • labor charges for repair. Philips, P.O. WHO IS COVERED? WHAT IS EXCLUDED? Please contact Philips at the center. It will be carried in duration to operate in lieu of the product, adjust- MODEL SERIAL This warranty gives you a service call. Centers...
... mail your owner's manual before requesting service. Box 520890, Miami, FL 33152 (402) 536-4171 EL6555E001/ 03-03 34 Your warranty does not cover: • labor charges for repair. Philips, P.O. WHO IS COVERED? WHAT IS EXCLUDED? Please contact Philips at the center. It will be carried in duration to operate in lieu of the product, adjust- MODEL SERIAL This warranty gives you a service call. Centers...


