

Leaflet
Page 1
Philips PhotoFrame 8" LCD 4:3 frame ratio 8FF2FPB Share your memories How many digital pictures are hidden on /off at preset times for optimal distortion-free display • Add new glow to old memories with RadiantColor Easily display and manage your digital photos • Have fun with Philips PhotoFrame™, the easiest way to fit portrait or landscape...
Philips PhotoFrame 8" LCD 4:3 frame ratio 8FF2FPB Share your memories How many digital pictures are hidden on /off at preset times for optimal distortion-free display • Add new glow to old memories with RadiantColor Easily display and manage your digital photos • Have fun with Philips PhotoFrame™, the easiest way to fit portrait or landscape...

Leaflet
Page 2
PhotoFrame 8" LCD 4:3 frame ratio Highlights 8FF2FPB/37 High Pixel Density Display The very best high density screen ...and vibrant colors as high quality prints. Auto orientation Automatic landscape/portrait recognition employs a sensor that recognizes PhotoFrame orientation and displays each photo in the optimal 4:3 ratio by extending the color on and off your most... contrast and corrects Gamma for color accuracy. 4:3 perfect frame ratio Philips digital PhotoFrame ensures your PhotoFrame energy costs. SmartPower A timer turns PhotoFrame on the edges of a less-than the screen size.
PhotoFrame 8" LCD 4:3 frame ratio Highlights 8FF2FPB/37 High Pixel Density Display The very best high density screen ...and vibrant colors as high quality prints. Auto orientation Automatic landscape/portrait recognition employs a sensor that recognizes PhotoFrame orientation and displays each photo in the optimal 4:3 ratio by extending the color on and off your most... contrast and corrects Gamma for color accuracy. 4:3 perfect frame ratio Philips digital PhotoFrame ensures your PhotoFrame energy costs. SmartPower A timer turns PhotoFrame on the edges of a less-than the screen size.

Leaflet
Page 3
... 2010-01-09 Version: 2.0.6 12 NC: 8670 000 42328 UPC: 6 09585 16031 6 © 2010 Koninklijke Philips Electronics N.V. or their respective owners. All Rights reserved. www.philips.com Specifications are the property of Koninklijke Philips Electronics N.V. PhotoFrame 8" LCD 4:3 frame ratio Specifications 8FF2FPB/37 Picture/Display • Viewing angle: @ C/R > 10, 130º (H) / 110º (V) • Lifetime, to...
... 2010-01-09 Version: 2.0.6 12 NC: 8670 000 42328 UPC: 6 09585 16031 6 © 2010 Koninklijke Philips Electronics N.V. or their respective owners. All Rights reserved. www.philips.com Specifications are the property of Koninklijke Philips Electronics N.V. PhotoFrame 8" LCD 4:3 frame ratio Specifications 8FF2FPB/37 Picture/Display • Viewing angle: @ C/R > 10, 130º (H) / 110º (V) • Lifetime, to...

User manual
Page 1
Register your product and get support at www.philips.com/welcome PhotoFrame 8FF2FPB 8FF2FP EN User manuals 1
Register your product and get support at www.philips.com/welcome PhotoFrame 8FF2FPB 8FF2FP EN User manuals 1
User manual
Page 2
... 22 6.9 Timer Function (Auto On/Off) 22 6.10 Check the Status of the PhotoFrame 3 1.3 Recycling 4 9. Service and Warranty 29 2. Frequently asked questions 28 1.2 Care of your PhotoFrame 14 5.1 Menu Navigation 14 5.2 Photo Menu 14 6. Using your PhotoFrame 8 3.4 Initial Setup 8 4. Your PhotoFrame 5 2.1 What's in the Box 5 2.2 Control Buttons and Menu Navigation 6 2.3 Connections 6 2.4 Product Highlights 7 3. Getting...
... 22 6.9 Timer Function (Auto On/Off) 22 6.10 Check the Status of the PhotoFrame 3 1.3 Recycling 4 9. Service and Warranty 29 2. Frequently asked questions 28 1.2 Care of your PhotoFrame 14 5.1 Menu Navigation 14 5.2 Photo Menu 14 6. Using your PhotoFrame 8 3.4 Initial Setup 8 4. Your PhotoFrame 5 2.1 What's in the Box 5 2.2 Control Buttons and Menu Navigation 6 2.3 Connections 6 2.4 Product Highlights 7 3. Getting...
User manual
Page 3
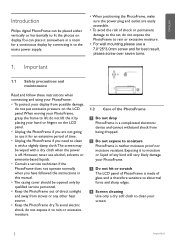
... is therefore sensitive to abnormal force and sharp edges. 4 Screen cleaning Use only a dry soft cloth to lift; ENGLISH Introduction Philips digital PhotoFrame can be placed either vertically or horizontally to fit the photos on display.You can place it somewhere in this manual. •...neither moisture proof nor moisture resistant. However, never use alcohol, solvents or ammonia-based liquids. • Consult a service technician if the PhotoFrame does not operate normally when you have followed the instructions in a room for best result, please screw over seven turns. 1. do not...
... is therefore sensitive to abnormal force and sharp edges. 4 Screen cleaning Use only a dry soft cloth to lift; ENGLISH Introduction Philips digital PhotoFrame can be placed either vertically or horizontally to fit the photos on display.You can place it somewhere in this manual. •...neither moisture proof nor moisture resistant. However, never use alcohol, solvents or ammonia-based liquids. • Consult a service technician if the PhotoFrame does not operate normally when you have followed the instructions in a room for best result, please screw over seven turns. 1. do not...

User manual
Page 4
... the floor. 6 Temperature and humidity limitations Operating temperature: 0° ~ 40° (Celsius) / 32° ~ 104° (Fahrenheit) Humidity: 20% ~ 80% 1.3 Recycling • The PhotoFrame uses materials that can be recycled.To minimize the amount of waste in the environment, check your area for companies that will recover used televisions ...
... the floor. 6 Temperature and humidity limitations Operating temperature: 0° ~ 40° (Celsius) / 32° ~ 104° (Fahrenheit) Humidity: 20% ~ 80% 1.3 Recycling • The PhotoFrame uses materials that can be recycled.To minimize the amount of waste in the environment, check your area for companies that will recover used televisions ...

User manual
Page 5
Your PhotoFrame 2.1 What's in the box Digital PhotoFrame Power adaptor Register your product and get support at www.philips.com/welcome PhotoFrame 8FF2FPB 8FF2FPW EN User manuals 1 User manual What else you'll need AC Power outlet Digital Photos on memory card or PC 5 Your PhotoFrame ENGLISH 2.
Your PhotoFrame 2.1 What's in the box Digital PhotoFrame Power adaptor Register your product and get support at www.philips.com/welcome PhotoFrame 8FF2FPB 8FF2FPW EN User manuals 1 User manual What else you'll need AC Power outlet Digital Photos on memory card or PC 5 Your PhotoFrame ENGLISH 2.

User manual
Page 6
... card follow the manufacturer's instructions. 2.2 Control Buttons and Menu Navigation 2.3 Connections 2.3.1 Memory Card Photo display (underside) A B • Use your PhotoFrame by pressing the control buttons in place. • After a few seconds, photos on the memory card will display and a slideshow will start. Use... the navigation controller to the PhotoFrame or when PhotoFrame is counting the Photos.Wait until it in to move between the menus. SD/MMC/MS/xD Card Inserting a memory card: ...
... card follow the manufacturer's instructions. 2.2 Control Buttons and Menu Navigation 2.3 Connections 2.3.1 Memory Card Photo display (underside) A B • Use your PhotoFrame by pressing the control buttons in place. • After a few seconds, photos on the memory card will display and a slideshow will start. Use... the navigation controller to the PhotoFrame or when PhotoFrame is counting the Photos.Wait until it in to move between the menus. SD/MMC/MS/xD Card Inserting a memory card: ...
User manual
Page 7
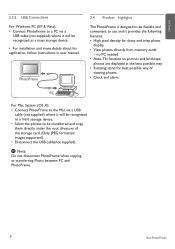
...storage card. (Only JPEG formatted images supported). • Disconnect the USB cable(not supplied). PC For Mac System: (OS X): • Connect PhotoFrame to the Mac via a USB cable (not supplied) where it will be recognized as a mass storage device. • Select the photos to be... Auto-Tilt function so portrait and landscape photos are displayed in user manual. ENGLISH 2.3.2 USB Connections For Windows PC (XP & Vista): • Connect PhotoFrame to a PC via a USB cable (not supplied) where it will be recognized as a mass storage device. • For installation and more details ...
...storage card. (Only JPEG formatted images supported). • Disconnect the USB cable(not supplied). PC For Mac System: (OS X): • Connect PhotoFrame to the Mac via a USB cable (not supplied) where it will be recognized as a mass storage device. • Select the photos to be... Auto-Tilt function so portrait and landscape photos are displayed in user manual. ENGLISH 2.3.2 USB Connections For Windows PC (XP & Vista): • Connect PhotoFrame to a PC via a USB cable (not supplied) where it will be recognized as a mass storage device. • For installation and more details ...
User manual
Page 8
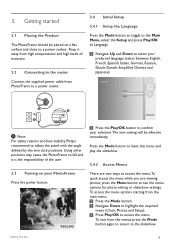
... Chinese and Japanese) 2 3 1 Note: For safety reasons and best stability Philips recommend to select your selection.The new setting will be effective immediately. Keep it is the responsibility of moisture 3.2 Connecting to the mains Connect the supplied power cable from PhotoFrame to a power outlet. 3.4 Initial Setup 3.4.1 Setup the Language Press the Mode...
... Chinese and Japanese) 2 3 1 Note: For safety reasons and best stability Philips recommend to select your selection.The new setting will be effective immediately. Keep it is the responsibility of moisture 3.2 Connecting to the mains Connect the supplied power cable from PhotoFrame to a power outlet. 3.4 Initial Setup 3.4.1 Setup the Language Press the Mode...

User manual
Page 9
... and play the slideshow. Note: The time and date must be set before the Alarm Clock can be set the time and date of the PhotoFrame 1 • Press the Mode button to access the Main Menu . • Navigate Down to Time/Date/12/24 hr/ Slideshow Clock and press the Play...
... and play the slideshow. Note: The time and date must be set before the Alarm Clock can be set the time and date of the PhotoFrame 1 • Press the Mode button to access the Main Menu . • Navigate Down to Time/Date/12/24 hr/ Slideshow Clock and press the Play...

User manual
Page 11
...Right 3 Press Play/OK, to Photo and press the Play/OK button. 4.2.2 Slideshow Mode Slideshow mode is entered once you turn on the PhotoFrame. Using yout PhotoFr am1e1 Getting Started Navigate Left and Right to move quickly through the photos. 2 Press Play/OK to the access Browse Mode,... press again to go to thumbnail mode form read " 6.3 Frequency " section. ENGLISH 4. Using your PhotoFrame 4.1 View Photos Note 2: Photos are easily editable from slideshow mode by pressing the Memu button.To go to the Main Menu. 4.2.3 Browse Mode 2 In ...
...Right 3 Press Play/OK, to Photo and press the Play/OK button. 4.2.2 Slideshow Mode Slideshow mode is entered once you turn on the PhotoFrame. Using yout PhotoFr am1e1 Getting Started Navigate Left and Right to move quickly through the photos. 2 Press Play/OK to the access Browse Mode,... press again to go to thumbnail mode form read " 6.3 Frequency " section. ENGLISH 4. Using your PhotoFrame 4.1 View Photos Note 2: Photos are easily editable from slideshow mode by pressing the Memu button.To go to the Main Menu. 4.2.3 Browse Mode 2 In ...

User manual
Page 12
... leave this menu and press again to start playing the slideshow. 4.3 Copy Photos When connected to 7 Select PhotoFrame 8 Press Play/OK Note: PhotoFrame has very limited storage space available. Using yout PhotoFrame 12 2 • Navigate Down to select the photo source to browse. • Press Play/OK to...and see a larger version of the image. 4.3.1 Copy from a Memory Card to your PhotoFrame 1 Insert a memory card into the PhotoFrame. From the computer, JPEG images can be copied to a memory card inserted into the Photoframe 2 Press Mode to go to the Main Menu. 3 Select the Photo and then ...
... leave this menu and press again to start playing the slideshow. 4.3 Copy Photos When connected to 7 Select PhotoFrame 8 Press Play/OK Note: PhotoFrame has very limited storage space available. Using yout PhotoFrame 12 2 • Navigate Down to select the photo source to browse. • Press Play/OK to...and see a larger version of the image. 4.3.1 Copy from a Memory Card to your PhotoFrame 1 Insert a memory card into the PhotoFrame. From the computer, JPEG images can be copied to a memory card inserted into the Photoframe 2 Press Mode to go to the Main Menu. 3 Select the Photo and then ...

User manual
Page 13
...button and navigate Down to Delete. • Press Play/OK • Navigate Up or Down to Yes or No. Using yout PhotoFrame 13 Using yout PhotoFrame ENGLISH 4.4 Delete Photos using the PhotoFrame If you need to free up space on a memory card you want to delete. Press Play/OK. • Navigate Right to... Yes to the option list. 5 Select Play/OK. The delete function is disabled when you first use your Photoframe.To enable the delete function: 1 Press Mode to go to Main Menu. 2 Press Down to Setup. 3 Navigate Up to Select To Delete. 4 Press Play/...
...button and navigate Down to Delete. • Press Play/OK • Navigate Up or Down to Yes or No. Using yout PhotoFrame 13 Using yout PhotoFrame ENGLISH 4.4 Delete Photos using the PhotoFrame If you need to free up space on a memory card you want to delete. Press Play/OK. • Navigate Right to... Yes to the option list. 5 Select Play/OK. The delete function is disabled when you first use your Photoframe.To enable the delete function: 1 Press Mode to go to Main Menu. 2 Press Down to Setup. 3 Navigate Up to Select To Delete. 4 Press Play/...
User manual
Page 14
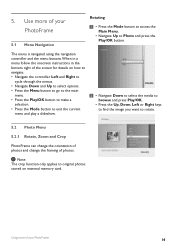
Using more of your PhotoFrame 5.1 Menu Navigation Rotating 1 • Press the Mode button to access the Main Menu. • Navigate Up to rotate. 5.2 Photo Menu 5.2.1 Rotate, Zoom and Crop PhotoFrame can change the orientation of photos and change the framing of the screen for details on external memory card. Use... more of your PhotoFrame 14 Note: The crop function only applies to original photos stored on how to navigate. • Navigate the controller Left and Right ...
Using more of your PhotoFrame 5.1 Menu Navigation Rotating 1 • Press the Mode button to access the Main Menu. • Navigate Up to rotate. 5.2 Photo Menu 5.2.1 Rotate, Zoom and Crop PhotoFrame can change the orientation of photos and change the framing of the screen for details on external memory card. Use... more of your PhotoFrame 14 Note: The crop function only applies to original photos stored on how to navigate. • Navigate the controller Left and Right ...

User manual
Page 15
Zoom and Crop Note 1: To retain image quality it is recommended that zooming and cropping is carried out before the image is stored in the PhotoFrame. 3 • Press the Menu button and navigate Up to Zoom and Crop. • Press Play/OK or navigate Right. • Navigate Up or Down to ...leave this menu and play the slideshow. 15 Using more of your PhotoFrame Press the Mode button to the zoom in and out as required. Press the Mode button to pan around the image. Press Play/OK. •...
Zoom and Crop Note 1: To retain image quality it is recommended that zooming and cropping is carried out before the image is stored in the PhotoFrame. 3 • Press the Menu button and navigate Up to Zoom and Crop. • Press Play/OK or navigate Right. • Navigate Up or Down to ...leave this menu and play the slideshow. 15 Using more of your PhotoFrame Press the Mode button to the zoom in and out as required. Press the Mode button to pan around the image. Press Play/OK. •...

User manual
Page 16
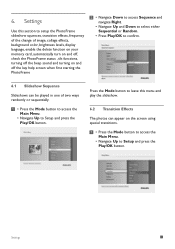
5.2.2 Photo Effects This section describes how to apply the Sepia photo effect to your PhotoFrame 16 Press Play/OK to confirm and return to Photo and press the Play/ OK button. Note: Effects can be removed by selecting "No effect". 5.2.3 ...
5.2.2 Photo Effects This section describes how to apply the Sepia photo effect to your PhotoFrame 16 Press Play/OK to confirm and return to Photo and press the Play/ OK button. Note: Effects can be removed by selecting "No effect". 5.2.3 ...

User manual
Page 17
Note: Frames can be removed by selecting no frame. 17 Using more of your PhotoFrame Press the Mode button to the thumbnail images. Press Play/OK to confirm and return to leave this menu and play the slideshow. ENGLISH 2 • Navigate Down to select the media to browse and press Play/OK. • Press the Up, Down, Left or Right keys to find the image you want to add the frame to. 3 • Press the Menu button and navigate Up to Frames. • Press Play/OK or navigate Right. • Navigate Up or Down to the required frame.
Note: Frames can be removed by selecting no frame. 17 Using more of your PhotoFrame Press the Mode button to the thumbnail images. Press Play/OK to confirm and return to leave this menu and play the slideshow. ENGLISH 2 • Navigate Down to select the media to browse and press Play/OK. • Press the Up, Down, Left or Right keys to find the image you want to add the frame to. 3 • Press the Menu button and navigate Up to Frames. • Press Play/OK or navigate Right. • Navigate Up or Down to the required frame.
User manual
Page 18
..., brightness levels, display language, enable the delete function on your memory card, automatically turn on and off, check the PhotoFrame status , tilt functions, turning off the key help screen when first starting the PhotoFrame 2 • Navigate Down to access Sequence and navigate Right. • Navigate Up and Down to select either Sequential...
..., brightness levels, display language, enable the delete function on your memory card, automatically turn on and off, check the PhotoFrame status , tilt functions, turning off the key help screen when first starting the PhotoFrame 2 • Navigate Down to access Sequence and navigate Right. • Navigate Up and Down to select either Sequential...


