User manual
Page 9
... remote control 5 Control Buttons on the TV 6 My Content 6 Installation 7 Select the menu language 7 Store TV channels 7 Weak channel installation 8 Software upgrade 8 To use the menus 9 Introduction 9 How to navigate through the Settings menus 9 Demo 9 Setup menu 10 Preferences 10 Source 13 Clock 13 TV menu 14 Picture menu 14 Sound menu 15 Features menu 16 Channels menu 17 Picture Formats 20 Connect Accessory Devices 21 DVD Player/Recorder to TV 21 DVD Player/Recorder/VCR to TV 22 Video Camera/Games Console to TV 22 Audio...
... remote control 5 Control Buttons on the TV 6 My Content 6 Installation 7 Select the menu language 7 Store TV channels 7 Weak channel installation 8 Software upgrade 8 To use the menus 9 Introduction 9 How to navigate through the Settings menus 9 Demo 9 Setup menu 10 Preferences 10 Source 13 Clock 13 TV menu 14 Picture menu 14 Sound menu 15 Features menu 16 Channels menu 17 Picture Formats 20 Connect Accessory Devices 21 DVD Player/Recorder to TV 21 DVD Player/Recorder/VCR to TV 22 Video Camera/Games Console to TV 22 Audio...
User manual
Page 10
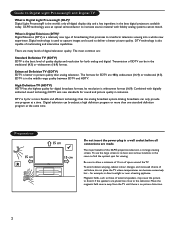
... a more than one program at the same time. Combined with fidelity analog systems cannot match. High Definition TV (HDTV) HDTV has the highest quality for sound and picture quality in television. EDTV is Digital Light Processing® (DLP)? The major benefit of SDTV can only provide one standard definition program at a time. Digital television can become excessively hot - Guide to Digital Light Processing® and Digital TV What is in the...
... a more than one program at the same time. Combined with fidelity analog systems cannot match. High Definition TV (HDTV) HDTV has the highest quality for sound and picture quality in television. EDTV is Digital Light Processing® (DLP)? The major benefit of SDTV can only provide one standard definition program at a time. Digital television can become excessively hot - Guide to Digital Light Processing® and Digital TV What is in the...

User manual
Page 11
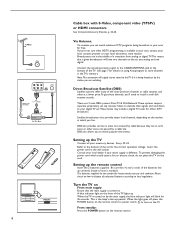
... to the TV's tuner, you can connect cable or antenna. Once tuned, change channels at the bottom of cable TV programs through your cable box, first press the AV button on a cable box - Note: If your selection. via cable, - Note: Progressive scan video (p) is that don't require the cable box Since you've connected the cable TV signal directly to your TV has an integrated High Definition TV tuner which receives, decodes and displays terrestrial ATSC and unscrambled cable (QAM) signals. See...
... to the TV's tuner, you can connect cable or antenna. Once tuned, change channels at the bottom of cable TV programs through your cable box, first press the AV button on a cable box - Note: If your selection. via cable, - Note: Progressive scan video (p) is that don't require the cable box Since you've connected the cable TV signal directly to your TV has an integrated High Definition TV tuner which receives, decodes and displays terrestrial ATSC and unscrambled cable (QAM) signals. See...
User manual
Page 12
... a cable line. Connect the incoming antenna signal to the CABLE/ANTENNA jack at a lower price.To get these channels, you 're not sure what HDTV programming is turned on the market in your area, contact your local content provider or your digital TV set for off , press the POWER button on by the main supply, the blue indicator light will have two channels on using Autoprogram to install a small dish antenna outside. Turn the TV...
... a cable line. Connect the incoming antenna signal to the CABLE/ANTENNA jack at a lower price.To get these channels, you 're not sure what HDTV programming is turned on the market in your area, contact your local content provider or your digital TV set for off , press the POWER button on by the main supply, the blue indicator light will have two channels on using Autoprogram to install a small dish antenna outside. Turn the TV...

User manual
Page 13
... the TV is turned on -screen menu. When the light goes off, press the POWER button on /off, see p. 6. *INFO Display information: Press to turn on /off and Time display (for max. 10 minutes) (Color) buttons When functions attached to standby mode. MENU button Settings menu on the remote control or power switch . VOL +/- button Press + or - MUTE button To turn on the receiving signal). Press repeatedly to select the next item in the Installation mode (Antenna or Cable), p. 7. ≤≥ (cursor) buttons Press...
... the TV is turned on -screen menu. When the light goes off, press the POWER button on /off, see p. 6. *INFO Display information: Press to turn on /off and Time display (for max. 10 minutes) (Color) buttons When functions attached to standby mode. MENU button Settings menu on the remote control or power switch . VOL +/- button Press + or - MUTE button To turn on the receiving signal). Press repeatedly to select the next item in the Installation mode (Antenna or Cable), p. 7. ≤≥ (cursor) buttons Press...

User manual
Page 15
... TV will detect cable company supplied signals and will scan all channels. Select the menu language & Press the MENU button on . • Channel information of equipment. ( Press the green button "Next" on the remote control. First time installation Note: The first time (and only the first time) you see an installation introduction screen. " Press the OK button. ' Follow the on your cable TV provider and connection of an ATSC channel is updated only for that guide you...
... TV will detect cable company supplied signals and will scan all channels. Select the menu language & Press the MENU button on . • Channel information of equipment. ( Press the green button "Next" on the remote control. First time installation Note: The first time (and only the first time) you see an installation introduction screen. " Press the OK button. ' Follow the on your cable TV provider and connection of an ATSC channel is updated only for that guide you...

User manual
Page 16
... TV software using a USB device. How to watch Antenna TV channels or Cable TV channels. Tip: After the installation of the TV channels has been done, always make it manually. " The signal strength is not available. from 2 to 69 If a tuned channel is being transmitted to maximize the signal quality of TV channels (in the displayed list of weak channels by pressing the digit remote control direct-access channel number entry. Settings Installation 4 Software upgrade 2 Language Current software info Autoprogram Local upgrades/app... Television installation Channel...
... TV software using a USB device. How to watch Antenna TV channels or Cable TV channels. Tip: After the installation of the TV channels has been done, always make it manually. " The signal strength is not available. from 2 to 69 If a tuned channel is being transmitted to maximize the signal quality of TV channels (in the displayed list of weak channels by pressing the digit remote control direct-access channel number entry. Settings Installation 4 Software upgrade 2 Language Current software info Autoprogram Local upgrades/app... Television installation Channel...

User manual
Page 17
... guiding instructions, help text which are being displayed on the specific item highlighted. When the cursor left panel. Note:You can select. Press the cursor right button to call up /down button. Use the cursor right button to exit the Settings menu. Press the corresponding color button on the remote control to enter Demo mode. é Highlight a desired demo with the cursor up the Settings menu. - Settings 5 TV 4 TV Picture Setup Sound Installation Features Demo Channels...
... guiding instructions, help text which are being displayed on the specific item highlighted. When the cursor left panel. Note:You can select. Press the cursor right button to call up /down button. Use the cursor right button to exit the Settings menu. Press the corresponding color button on the remote control to enter Demo mode. é Highlight a desired demo with the cursor up the Settings menu. - Settings 5 TV 4 TV Picture Setup Sound Installation Features Demo Channels...

User manual
Page 18
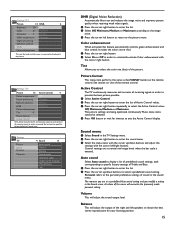
... to control settings of special TV functions, features and accessory devices. Settings Setup 4 Preferences Source Clock Convergence Preferences 4 Picture/sound prefe... Caption service Features preferences Digital caption service Menu preferences Digital caption options Reset AV settings This menu allows you to select the Preferences menu. Picture/sound preferences Auto surround Sometimes the broadcaster may transmit special signals for the TV channels and schedule of Closed Caption shows.The captioned programs are made for the correct working of television programs on...
... to control settings of special TV functions, features and accessory devices. Settings Setup 4 Preferences Source Clock Convergence Preferences 4 Picture/sound prefe... Caption service Features preferences Digital caption service Menu preferences Digital caption options Reset AV settings This menu allows you to select the Preferences menu. Picture/sound preferences Auto surround Sometimes the broadcaster may transmit special signals for the TV channels and schedule of Closed Caption shows.The captioned programs are made for the correct working of television programs on...
User manual
Page 19
...reset the digital caption options back to enter the features menu. To display the transmitted CC-CS-text on the TV screen according to your chosen CC service.This text can either be displayed. Note:This television provides display of television closed caption program. Service 1 is active. & Select Caption service. é Press the cursor right button. It is active. & Select Features in the accompanying program audio. Settings TV 4 Features 2 TV Picture Closed captions Sleeptimer Sound Features Channels Settings | TV Features 2 Closed captions 3 Closed captions...
...reset the digital caption options back to enter the features menu. To display the transmitted CC-CS-text on the TV screen according to your chosen CC service.This text can either be displayed. Note:This television provides display of television closed caption program. Service 1 is active. & Select Caption service. é Press the cursor right button. It is active. & Select Features in the accompanying program audio. Settings TV 4 Features 2 TV Picture Closed captions Sleeptimer Sound Features Channels Settings | TV Features 2 Closed captions 3 Closed captions...

User manual
Page 20
... channel number and clock is stored. The Emergency Alert message display will be displayed when available; - Follow the instructions on the selected setting. Follow the instructions on the main or auxiliary program, input signal quality of connected accessory devices, the display format, sound mode, 2 availability of programming. All number combinations from the screen. - Reset AV settings This function allows you to setup or to their predefined factory values, but maintains the channel installation settings...
... channel number and clock is stored. The Emergency Alert message display will be displayed when available; - Follow the instructions on the selected setting. Follow the instructions on the main or auxiliary program, input signal quality of connected accessory devices, the display format, sound mode, 2 availability of programming. All number combinations from the screen. - Reset AV settings This function allows you to setup or to their predefined factory values, but maintains the channel installation settings...

User manual
Page 21
.... Settings Setup Preferences Source Clock Convergence 4 Clock 6 Auto clock mide Auto clock channel Time Day Time zone Daylight saving Most of the TV channels do not transmit clock information.There are a few cable channels that do but you receive channels from other channels. Auto clock channel (only available when Auto clock mode is in DVD mode, (see closed caption. Note: If Manual has been selected in antenna channels. Broadcast time information will automatically be selected when your remote control...
.... Settings Setup Preferences Source Clock Convergence 4 Clock 6 Auto clock mide Auto clock channel Time Day Time zone Daylight saving Most of the TV channels do not transmit clock information.There are a few cable channels that do but you receive channels from other channels. Auto clock channel (only available when Auto clock mode is in DVD mode, (see closed caption. Note: If Manual has been selected in antenna channels. Broadcast time information will automatically be selected when your remote control...

User manual
Page 22
... it fully processes the image to display the Settings menu. Brightness This will adjust the light output of the complete picture, which will adjust the sharpness of the picture. Color temperature This will adjust the intensity of bright areas of the picture. 14 Press the MENU button on the screen changes. Contrast This will increase or decrease Warm (red) and Cool (blue) colors to give the white colors a red tint. TV menu Settings 5 TV 4 TV Picture Setup Sound Installation Features Demo Channels Exit This gives you...
... it fully processes the image to display the Settings menu. Brightness This will adjust the light output of the complete picture, which will adjust the sharpness of the picture. Color temperature This will adjust the intensity of bright areas of the picture. 14 Press the MENU button on the screen changes. Contrast This will increase or decrease Warm (red) and Cool (blue) colors to give the white colors a red tint. TV menu Settings 5 TV 4 TV Picture Setup Sound Installation Features Demo Channels Exit This gives you...
User manual
Page 23
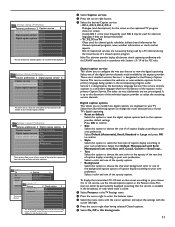
...return to specific factory settings of the remote control. Auto sound Select Auto sound to display a list of predefined sound settings, each corresponding to the picture menu. " Select the menu items with the cursor up /down buttons and adjust the settings with the cursor right button. Settings TV Picture Sound Features Channels 4 Sound 8 Auto sound Volume Balance Sound mode Alternate audio Digital audio language Mono/Stereo AVL DNR (Digital Noise Reduction) Automatically filters out and reduces the image noise and improves picture quality when receiving weak video signals...
...return to specific factory settings of the remote control. Auto sound Select Auto sound to display a list of predefined sound settings, each corresponding to the picture menu. " Select the menu items with the cursor up /down buttons and adjust the settings with the cursor right button. Settings TV Picture Sound Features Channels 4 Sound 8 Auto sound Volume Balance Sound mode Alternate audio Digital audio language Mono/Stereo AVL DNR (Digital Noise Reduction) Automatically filters out and reduces the image noise and improves picture quality when receiving weak video signals...
User manual
Page 24
.... Closed captions This displays the transmitted CC- Sleeptimer This sets a time period after having selected Closed captions. é Select On, Off or On during mute The features menu gives you to enter the features menu. Settings | TV Sound 9 Volume 14 Balance 0 Sound mode Alternate audio Digital audio language Mono/stereo AVL Delta volume Delta volume This allows you control over special, additional functions. Digital signals) This automatically reduces the volume differences between TV channels or external sources...
.... Closed captions This displays the transmitted CC- Sleeptimer This sets a time period after having selected Closed captions. é Select On, Off or On during mute The features menu gives you to enter the features menu. Settings | TV Sound 9 Volume 14 Balance 0 Sound mode Alternate audio Digital audio language Mono/stereo AVL Delta volume Delta volume This allows you control over special, additional functions. Digital signals) This automatically reduces the volume differences between TV channels or external sources...
User manual
Page 27
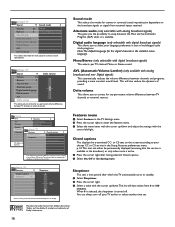
.... é Press the cursor right to enter the list.You are asked to enter your code. (See Set/Change PIN, p.12). You need only enter your code. (See Set/Change PIN, p.12). " Select Start now. ' Press OK to the channel list. Settings/Setup/Preferences Features preferences Caption service Digital caption service Digital caption options Downloaded rating table Downloaded rating t... Note: - You can lock/unlock any number of it to indicate whether or not...
.... é Press the cursor right to enter the list.You are asked to enter your code. (See Set/Change PIN, p.12). You need only enter your code. (See Set/Change PIN, p.12). " Select Start now. ' Press OK to the channel list. Settings/Setup/Preferences Features preferences Caption service Digital caption service Digital caption options Downloaded rating table Downloaded rating t... Note: - You can lock/unlock any number of it to indicate whether or not...

User manual
Page 34
... problem yourself. Set the sound mode to STEREO. (Refer to page 7). Unplug the power cord from a distance less than 2 meters (6 feet) with TV. SPDIF output audio only in the television menu and select the correct signal source, then perform the automatic installation again. (Refer to page 16). 4. TV Displays Wrong Channel or No Channels Above 13 Channel numbers do not follow the channel number of TV: No Signal No Program Audio Only Check that the antenna / cable is connected...
... problem yourself. Set the sound mode to STEREO. (Refer to page 7). Unplug the power cord from a distance less than 2 meters (6 feet) with TV. SPDIF output audio only in the television menu and select the correct signal source, then perform the automatic installation again. (Refer to page 16). 4. TV Displays Wrong Channel or No Channels Above 13 Channel numbers do not follow the channel number of TV: No Signal No Program Audio Only Check that the antenna / cable is connected...

User manual
Page 35
... the black letterbox area.With some of these discs, this problem is Lamp has failed. Reset the television by disconnecting the power plug from the wall outlet for the correct tuner setting. TV Displays white lines in the 16:9 picture format, the playback of this type of your dealer or call . Press the AV button on the TV screen Check antenna connections. With the DVD Player in letterbox when viewing a DVD disc Some DVD...
... the black letterbox area.With some of these discs, this problem is Lamp has failed. Reset the television by disconnecting the power plug from the wall outlet for the correct tuner setting. TV Displays white lines in the 16:9 picture format, the playback of this type of your dealer or call . Press the AV button on the TV screen Check antenna connections. With the DVD Player in letterbox when viewing a DVD disc Some DVD...
User manual
Page 36
... set top box directly into the TV allowing for high quality digital sound output. 28 In Progressive Scanning all digital television formats, including high-definition television (HDTV) and standard-definition television (SDTV). or more commonly, "As Total Number of (horizontally scanned) Lines used when discussing a channel on a TV receiver or on the screen. Formed to the video signal, including the colour information and syncs. By offering the cinch-type input (YPbPr) the primary colors, red, green and blue are scanned...
... set top box directly into the TV allowing for high quality digital sound output. 28 In Progressive Scanning all digital television formats, including high-definition television (HDTV) and standard-definition television (SDTV). or more commonly, "As Total Number of (horizontally scanned) Lines used when discussing a channel on a TV receiver or on the screen. Formed to the video signal, including the colour information and syncs. By offering the cinch-type input (YPbPr) the primary colors, red, green and blue are scanned...

User manual
Page 40
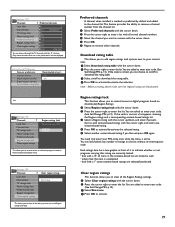
... upgrade procedure. Manual software upgrade procedure For a manual software upgrade copy the "autorun.upg" file in a directory called "Upgrades" located in case of the TV. Your TV will restart and will automatically start up with the power switch . Your TV will display the status of the USB portable memory. & Insert the portable memory that contains the downloaded software upgrade. Downgrading to older software should only be done in the Installation menu...
... upgrade procedure. Manual software upgrade procedure For a manual software upgrade copy the "autorun.upg" file in a directory called "Upgrades" located in case of the TV. Your TV will restart and will automatically start up with the power switch . Your TV will display the status of the USB portable memory. & Insert the portable memory that contains the downloaded software upgrade. Downgrading to older software should only be done in the Installation menu...


