Leaflet
Page 2
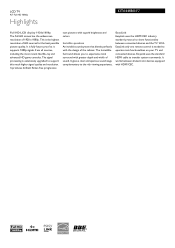
Invisible speakers An invisible sound system that blends perfectly with greater depth and width of 1920 x 1080p. With EasyLink only one remote control is the highest resolution of the cabinet. This is needed to the rich viewing experience. It produces brilliant flicker-free progressive scan pictures with ... picture quality. It is extensively upgraded to transfer system commands. It works between connected devices and the TV. LCD TV 42" Full HD 1080p Highlights 42TA648BX/F7 Full HD LCD display 1920x1080p The Full HD screen has the widescreen resolution of sound.
Invisible speakers An invisible sound system that blends perfectly with greater depth and width of 1920 x 1080p. With EasyLink only one remote control is the highest resolution of the cabinet. This is needed to the rich viewing experience. It produces brilliant flicker-free progressive scan pictures with ... picture quality. It is extensively upgraded to transfer system commands. It works between connected devices and the TV. LCD TV 42" Full HD 1080p Highlights 42TA648BX/F7 Full HD LCD display 1920x1080p The Full HD screen has the widescreen resolution of sound.

Leaflet
Page 3
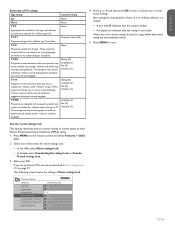
...NC: 8670 000 47365 UPC: 6 09585 16238 9 © 2011 Koninklijke Philips Electronics N.V. www.philips.com or their respective owners. Trademarks are subject to 40 °C •...inch • Set dimensions with stand), 42.3 (without notice. LCD TV 42" Full HD 1080p Specifications 42TA648BX/F7 Picture/Display • Aspect ratio: Widescreen • Brightness: 500 cd/m² • Dynamic ...accessories: Tabletop swivel stand, Power cord, Quick start guide, User Manual, Registration card, Remote Control • Tuner/Reception/Transmission • Aerial Input: 75 ohm F-type •...
...NC: 8670 000 47365 UPC: 6 09585 16238 9 © 2011 Koninklijke Philips Electronics N.V. www.philips.com or their respective owners. Trademarks are subject to 40 °C •...inch • Set dimensions with stand), 42.3 (without notice. LCD TV 42" Full HD 1080p Specifications 42TA648BX/F7 Picture/Display • Aspect ratio: Widescreen • Brightness: 500 cd/m² • Dynamic ...accessories: Tabletop swivel stand, Power cord, Quick start guide, User Manual, Registration card, Remote Control • Tuner/Reception/Transmission • Aerial Input: 75 ohm F-type •...
User manual
Page 5
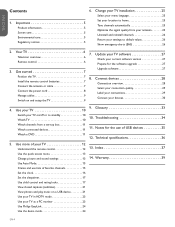
... /off or to standby 10 10. Notes for the software upgrade 27 3. Connect devices 28 Install the remote control batteries 7 Connection overview 28 Connect the antenna or cable 7 Select your connection quality 29 Connect the... TV 10 Watch channels from your antenna 25 Uninstall and reinstall channels 26 Return your TV 12 Understand the remote control 12 13. ESPAÑOL FRANÇAISE ENGLISH Contents 6. Use more of USB devices 35 Watch... your TV installation 25 Select your TV as a PC monitor 23 Use Philips EasyLink 24 Use the demo mode 24 EN-4
... /off or to standby 10 10. Notes for the software upgrade 27 3. Connect devices 28 Install the remote control batteries 7 Connection overview 28 Connect the antenna or cable 7 Select your connection quality 29 Connect the... TV 10 Watch channels from your antenna 25 Uninstall and reinstall channels 26 Return your TV 12 Understand the remote control 12 13. ESPAÑOL FRANÇAISE ENGLISH Contents 6. Use more of USB devices 35 Watch... your TV installation 25 Select your TV as a PC monitor 23 Use Philips EasyLink 24 Use the demo mode 24 EN-4
User manual
Page 7
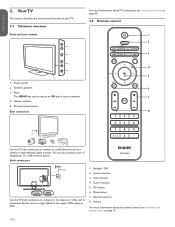
... controls VOLUME 4 3 MENU CHANNEL 2 1 POWER 5 1. EN-6 Back connectors TV ANTENNA HDMI 1 R R R SERV. Color buttons 4. Cursor buttons 5. Remote control sensor Side connectors For more information about TV connections, see Understand the remote control on page 30. 2.2 Remote control 1 2 3 4 5 6 7 8 Use the TV side connectors to connect to permanent devices such as an OK key in...
... controls VOLUME 4 3 MENU CHANNEL 2 1 POWER 5 1. EN-6 Back connectors TV ANTENNA HDMI 1 R R R SERV. Color buttons 4. Cursor buttons 5. Remote control sensor Side connectors For more information about TV connections, see Understand the remote control on page 30. 2.2 Remote control 1 2 3 4 5 6 7 8 Use the TV side connectors to connect to permanent devices such as an OK key in...
User manual
Page 8
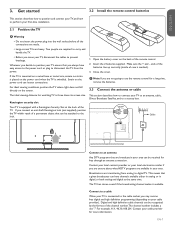
... on the power cord can be recognized by the format of the channel number. ends of the batteries line up correctly (inside of the remote control. 2. D Note: If you connect an anti-theft Kensington lock (not supplied), position the TV within reach of the TV. This...content provider or your local electronics retailer if you may receive free digital and high definition programming (depending on the screen. Get started 3.2 Install the remote control batteries This section describes how to position and connect your TV, and how to the lock. 1. Cable TV ANTENNA HDMI 1 R R R ...
... on the power cord can be recognized by the format of the channel number. ends of the batteries line up correctly (inside of the remote control. 2. D Note: If you connect an anti-theft Kensington lock (not supplied), position the TV within reach of the TV. This...content provider or your local electronics retailer if you may receive free digital and high definition programming (depending on the screen. Get started 3.2 Install the remote control batteries This section describes how to position and connect your TV, and how to the lock. 1. Cable TV ANTENNA HDMI 1 R R R ...
User manual
Page 10
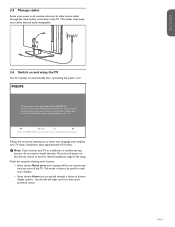
...power cord. For the BEST possible picture performance, contact your local Cable / Satellite signal provider for High Definition signal options available in your remote control to proceed. D Note: If you connect your purchase of picture display options. This mode is only to be are guided through...Press the red button on -screen instructions to select your power cord, antenna cable and all other device cables through a choice of this PHILIPS TV. 3.5 Manage cables Route your preferred screen. This holder helps keep your TV. Please proceed with the following steps to exit the ...
...power cord. For the BEST possible picture performance, contact your local Cable / Satellite signal provider for High Definition signal options available in your remote control to proceed. D Note: If you connect your purchase of picture display options. This mode is only to be are guided through...Press the red button on -screen instructions to select your power cord, antenna cable and all other device cables through a choice of this PHILIPS TV. 3.5 Manage cables Route your preferred screen. This holder helps keep your TV. Please proceed with the following steps to exit the ...
User manual
Page 11
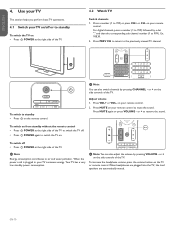
... the right side of the TV to mute the sound. Press PREV CH to return to standby • Press . Adjust volume 1. To switch on your remote control. POWER at the right side of the TV. To switch off . • Press . When headphones are plugged into the TV, the loud speakers are... the power cord is plugged in, your TV on/off or to switch the TV on • Press . EN-10 on from standby without the remote control • Press . Your TV has a very low standby power consumption. POWER again to standby To switch the TV on . POWER To switch to the...
... the right side of the TV to mute the sound. Press PREV CH to return to standby • Press . Adjust volume 1. To switch on your remote control. POWER at the right side of the TV. To switch off . • Press . When headphones are plugged into the TV, the loud speakers are... the power cord is plugged in, your TV on/off or to switch the TV on • Press . EN-10 on from standby without the remote control • Press . Your TV has a very low standby power consumption. POWER again to standby To switch the TV on . POWER To switch to the...
User manual
Page 12
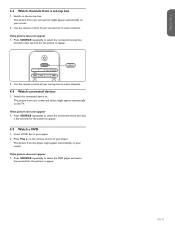
...picture to select channels. If the picture does not appear 1. 4.3 Watch channels from a set -top box. The picture from your screen. 2. Use the remote control of your set -top box might appear automatically on your set -top box to select channels. 4.4 Watch connected devices 1. Press Play Æ on... . Use the remote control of your player. 2. EN-11 ESPAÑOL FRANÇAISE ENGLISH Press SOURCE repeatedly to select the connected device and wait a few...
...picture to select channels. If the picture does not appear 1. 4.3 Watch channels from a set -top box. The picture from your screen. 2. Use the remote control of your set -top box might appear automatically on your set -top box to select channels. 4.4 Watch connected devices 1. Press Play Æ on... . Use the remote control of your player. 2. EN-11 ESPAÑOL FRANÇAISE ENGLISH Press SOURCE repeatedly to select the connected device and wait a few...
User manual
Page 13
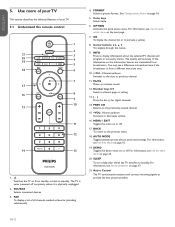
... of the information on the next page. 7. AUTO MODE Toggles between preset picture and sound settings. FAV To display a list of your TV. 5.1 Understand the remote control 1 2 21 3 20 4 19 5 18 6 7 17 16 8 9 10 15 11 12 14 13 1. . For information, see Set the sleeptimer on from broadcasters. INFO Press to...
... of the information on the next page. 7. AUTO MODE Toggles between preset picture and sound settings. FAV To display a list of your TV. 5.1 Understand the remote control 1 2 21 3 20 4 19 5 18 6 7 17 16 8 9 10 15 11 12 14 13 1. . For information, see Set the sleeptimer on from broadcasters. INFO Press to...
User manual
Page 14
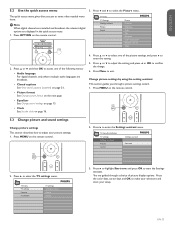
.... Press MENU on page 16. 4. Press Æ to confirm the change. 6. Press ï and Æ to exit. Press OPTION on the remote control. 2. Change picture settings by using the setting assistant This section guides you through a choice of picture display options. Press MENU on the...picture format on the next page. • Equalizer See Change sound settings on page 15. • Clock See Set the clock on the remote control. 5.3 Change picture and sound settings Change picture settings This section describes how to adjust your setup. EN-13 The quick access menu ...
.... Press MENU on page 16. 4. Press Æ to confirm the change. 6. Press ï and Æ to exit. Press OPTION on the remote control. 2. Change picture settings by using the setting assistant This section guides you through a choice of picture display options. Press MENU on the...picture format on the next page. • Equalizer See Change sound settings on page 15. • Clock See Set the clock on the remote control. 5.3 Change picture and sound settings Change picture settings This section describes how to adjust your setup. EN-13 The quick access menu ...
User manual
Page 15
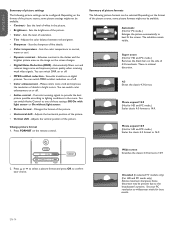
... white in the darker and the brighter picture areas as the image on the side of off . • MPEG artifact reduction - Smooths transitions on the remote control. You can switch Active Control to 16:9. 2. Automatic (Not for HD and PC mode.) Scales the classic 4:3 format to one of the picture. •...
... white in the darker and the brighter picture areas as the image on the side of off . • MPEG artifact reduction - Smooths transitions on the remote control. You can switch Active Control to 16:9. 2. Automatic (Not for HD and PC mode.) Scales the classic 4:3 format to one of the picture. •...
User manual
Page 16
... of favorite channels 1. Switch to the connected device as described in Watch connected devices on the remote control. EN-15 Depending on the remote control and select TV settings > Sound. 5.4 Use Auto Mode 1. Select on the remote control to display your sound settings. 1. Press Î or ï to highlight a list, and press OK...
... of favorite channels 1. Switch to the connected device as described in Watch connected devices on the remote control. EN-15 Depending on the remote control and select TV settings > Sound. 5.4 Use Auto Mode 1. Select on the remote control to display your sound settings. 1. Press Î or ï to highlight a list, and press OK...
User manual
Page 17
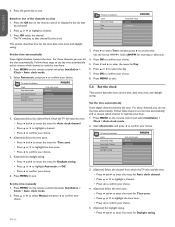
...Select the channel from . 1. Press MENU to highlight a channel. 3. Set the time automatically Some digital channels transmit the time. Press the OK key on the remote control and select Installation > Clock > Auto clock mode. 2. Press Î or ï to exit. Press ï to select Time and then press &#.... Press the green key to select the day. 7. Set the time automatically Some digital channels transmit the time. Press MENU on the remote control to display the last list that channel.Set the clock TV menu I Installation Clock Auto clock mode Auto clock channel Time zone Daylight...
...Select the channel from . 1. Press MENU to highlight a channel. 3. Set the time automatically Some digital channels transmit the time. Press the OK key on the remote control and select Installation > Clock > Auto clock mode. 2. Press Î or ï to exit. Press ï to select Time and then press &#.... Press the green key to select the day. 7. Set the time automatically Some digital channels transmit the time. Press MENU on the remote control to display the last list that channel.Set the clock TV menu I Installation Clock Auto clock mode Auto clock channel Time zone Daylight...
User manual
Page 18
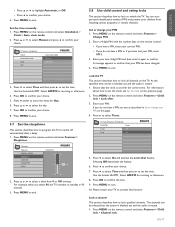
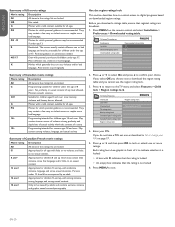
...HH:MM. Set the time manually 1. Press MENU to exit. 5. For information about how to select the day. 7. Press MENU on the remote control and select Features > Child lock > Lock after Timer Timer Off Time On TV menu Features Caption settings Sleeptimer Child lock Change PIN Demo ... select Timer. 5.7 Set the sleeptimer This section describes how to program the TV to confirm your PIN on the TV. Press MENU on the remote control and select Features > Child lock > Channel lock. Press Í to switch off automatically after feature. Press ï to select Time ...
...HH:MM. Set the time manually 1. Press MENU to exit. 5. For information about how to select the day. 7. Press MENU on the remote control and select Features > Child lock > Lock after Timer Timer Off Time On TV menu Features Caption settings Sleeptimer Child lock Change PIN Demo ... select Timer. 5.7 Set the sleeptimer This section describes how to program the TV to confirm your PIN on the TV. Press MENU on the remote control and select Features > Child lock > Channel lock. Press Í to switch off automatically after feature. Press ï to select Time ...
User manual
Page 19
... items in Set or change your PIN on the previous page. Press Î or ï and then press OK to individual programs based on the remote control and select Features > Child lock > TV ratings lock. 2. EN-18 Press Î or ï and then press OK to lock one or more of...
... items in Set or change your PIN on the previous page. Press Î or ï and then press OK to individual programs based on the remote control and select Features > Child lock > TV ratings lock. 2. EN-18 Press Î or ï and then press OK to lock one or more of...
User manual
Page 20
... and may not be unsuitable for children aged 2-6. Language (L) Sex (S) Violence (V) 4. Each rating has a box-graphic in front of age. Enter your PIN on the remote control and select Features > Child lock. 2. TV-PG Programs contain elements that movie rating are designed to indicate whether it is not locked When you...
... and may not be unsuitable for children aged 2-6. Language (L) Sex (S) Violence (V) 4. Each rating has a box-graphic in front of age. Enter your PIN on the remote control and select Features > Child lock. 2. TV-PG Programs contain elements that movie rating are designed to indicate whether it is not locked When you...
User manual
Page 21
... parental guidance is not locked 6. G Movies with a mild content, suitable for children under age 17. Press Í to return to digital programs based on the remote control and select Installation > Preferences > Downloaded rating table. G Movies with a mild content, suitable for children under age 13. More offensive sex, violence or bad language...
... parental guidance is not locked 6. G Movies with a mild content, suitable for children under age 17. Press Í to return to digital programs based on the remote control and select Installation > Preferences > Downloaded rating table. G Movies with a mild content, suitable for children under age 13. More offensive sex, violence or bad language...
User manual
Page 22
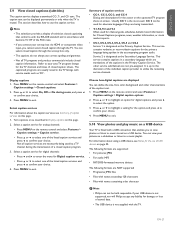
...conforms with Sections 15.119 of the FCC rules. • If you connect your USB device is not supported, nor will Philips accept any liability for the action on the captioned TV program show on a USB device. You can view your choice. The... are necessarily being transmitted. • T-1,T-2,T-3 and T-4 Often used . This service contains captions in the accompanying program audio. Press MENU on the remote control and select Features > Caption settings > Digital caption options. 2. Select caption services For information about using a USB device, see Summary of ...
...conforms with Sections 15.119 of the FCC rules. • If you connect your USB device is not supported, nor will Philips accept any liability for the action on the captioned TV program show on a USB device. You can view your choice. The... are necessarily being transmitted. • T-1,T-2,T-3 and T-4 Often used . This service contains captions in the accompanying program audio. Press MENU on the remote control and select Features > Caption settings > Digital caption options. 2. Select caption services For information about using a USB device, see Summary of ...
User manual
Page 23
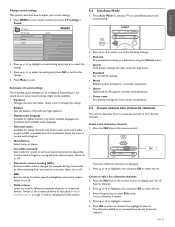
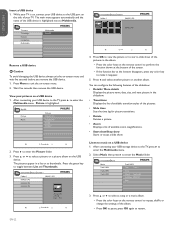
...magnifications. • Start show/Stop show Starts or stops a slide show of the pictures in the album. • Press the color keys on the remote control to repeat, shuffle or change the settings of your pictures on a USB device 1. Duration: 00:02:53 Year: IMAGE1.JPG 640:480 Date... five seconds then remove the USB device. Press Î or ï to select a song or a music album. • Press the color keys on the remote control to perform the function shown at the bottom of the slideshow: • Details / More details Displays the picture name, date, size, and next picture...
...magnifications. • Start show/Stop show Starts or stops a slide show of the pictures in the album. • Press the color keys on the remote control to repeat, shuffle or change the settings of your pictures on a USB device 1. Duration: 00:02:53 Year: IMAGE1.JPG 640:480 Date... five seconds then remove the USB device. Press Î or ï to select a song or a music album. • Press the color keys on the remote control to perform the function shown at the bottom of the slideshow: • Details / More details Displays the picture name, date, size, and next picture...

User manual
Page 24
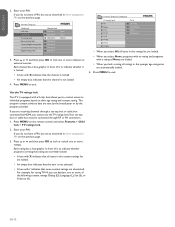
...Select HDTV and press Í to your TV, you connect a high definition (HD) device to confirm your pictures on a USB device on the remote control and select Features > Mode Selection. The audio stops when another song or album. Start a slideshow as described in Change picture settings on page ...EN-23 For information about your TV as a PC monitor For information how to connect a PC to music on a USB device on the remote control and select Features > Mode Selection. TV menu Features Mode Selection Caption settings Sleeptimer Child lock Change PIN Demo Mode Selection PC HDTV 3....
...Select HDTV and press Í to your TV, you connect a high definition (HD) device to confirm your pictures on a USB device on the remote control and select Features > Mode Selection. The audio stops when another song or album. Start a slideshow as described in Change picture settings on page ...EN-23 For information about your TV as a PC monitor For information how to connect a PC to music on a USB device on the remote control and select Features > Mode Selection. TV menu Features Mode Selection Caption settings Sleeptimer Child lock Change PIN Demo Mode Selection PC HDTV 3....

